
Stop settling for tough, gray roast beef that requires a gallon of water to swallow. Most home cooks fail because they blast the meat with high heat, which causes the muscle fibers to tighten and squeeze out every drop of moisture. You’ve likely experienced that disappointing “gray ring” where the outside is overcooked and the middle is barely edible.
The secret to a perfect Garlic Herb Roasted Beef is the reverse sear method. This technique ensures an edge-to-edge pink center and a buttery texture that melts in your mouth. By flipping the traditional roasting process on its head, you control the internal temperature with precision while building a savory, aromatic crust.
I’ve found that the real magic happens during the rest. If you cut into that roast the second it leaves the pan, you’ll lose the very juices that make it tender. The secret is patience; letting the meat sit allows those juices to move back into the fibers, ensuring every slice is as succulent as the first.
The Science of Tenderness and Heat
Beef round cuts, like the top round or eye of round, are notoriously lean. Because they come from the hard-working leg muscles of the cow, they contain a lot of connective tissue and very little fat. If you subject these fibers to intense heat immediately, they seize up like a rubber band, resulting in a chewy, dry dinner.
Roasting at a low temperature of 250°F changes the game entirely. This gentle heat allows the natural enzymes in the beef to break down tough proteins before the meat reaches its final temperature. It’s almost like a controlled aging process that happens right in your oven.
Furthermore, slow roasting prevents the exterior from reaching high temperatures too quickly. This means you won’t have a thick layer of dry, well-done meat surrounding a tiny circle of pink. Instead, you get a uniform, tender texture from the very edge to the absolute center.
Why Room Temperature Starts Matter
You should never take a roast straight from the fridge to the oven. A cold core acts as an insulator, meaning the outside will be long finished before the middle even begins to warm up. This imbalance is the primary cause of uneven cooking and dry edges.
Take your three-pound roast out of the refrigerator at least one hour before you plan to season it. This “tempering” period allows the internal temperature to rise slightly, ensuring the heat penetrates the meat evenly. It’s a simple step that makes a massive difference in the final result.
The Role of the Wire Rack
Airflow is your best friend when roasting Garlic Herb Roasted Beef. If you place the meat directly on a flat baking sheet, the bottom will sit in its own moisture and steam. This results in a soggy, gray underside that lacks flavor and texture.
By using a wire rack set over a baking sheet, you create a convection environment. The hot air can circulate 360 degrees around the beef, drying out the surface for a better crust and ensuring the bottom cooks at the same rate as the top. It’s the easiest way to guarantee a professional-looking roast.
Essential Components for the Herb Crust
The crust isn’t just about flavor; it’s about creating a sensory experience. I always recommend using Kosher salt because its large, flat grains cling to the meat better than fine table salt. It also draws out just enough moisture to create a tacky surface that helps the herbs stick.
Fresh thyme is non-negotiable here. While dried herbs have their place, they can often taste dusty or muted. Fresh thyme contains volatile oils that wake up when they hit the heat, filling your kitchen with an earthy, lemony aroma that complements the beef perfectly.
Don’t be afraid of the red pepper flakes. They aren’t there to make the dish spicy; rather, they provide a beautiful visual pop and a subtle warmth that cuts through the richness of the meat. When mixed with minced garlic and olive oil, they form a paste that roasts into a stunning mahogany shell.
Selecting the Right Cut of Beef
Top round and eye of round are the stars of this recipe because they are affordable and lean. Top round is generally a bit more tender and has a more pronounced “beefy” flavor. Eye of round is very circular and uniform, which makes for beautiful, consistent slices.
When you’re at the butcher counter, look for a roast with a thin “fat cap” on one side if possible. Even a little bit of fat will render down and baste the meat as it cooks. However, since these are lean cuts, the garlic-herb rub is essential for adding the moisture and fat that the meat naturally lacks.
The Aromatics: Garlic and Red Pepper
Garlic is the backbone of this flavor profile, but you have to handle it with care. You want to mince the garlic very finely so it integrates into the oil paste. If the pieces are too large, they might fall off or, worse, turn bitter during the final searing phase.
The combination of garlic and red pepper creates a classic savory profile. As the beef roasts slowly, the garlic softens and loses its sharp bite, turning sweet and mellow. This creates a complex base that makes the simple horseradish sauce taste even more sophisticated.
Step-by-Step: Achieving the Perfect Roast
Success starts with a dry surface. Use paper towels to pat the beef until there isn’t a hint of moisture left. If the meat is wet, the oil won’t stick, and the beef will steam instead of roasting. Once it’s dry, massage that garlic-herb paste into every nook and cranny.
Phase 1: The Low-Temperature Roast
Slide your seasoned roast into the 250°F oven and let the gentle heat do the work. You aren’t looking for a specific color at this stage; the meat might actually look a bit pale when it comes out. That’s perfectly fine because we are focusing entirely on the internal temperature.
Use a meat thermometer to check the center. You are looking for 125°F for a perfect medium-rare. At this point, the meat will feel firm but still have a slight give. The aroma of toasted garlic and warm thyme should be starting to fill the room.
Phase 2: The High-Heat Sear
Now we trigger the Maillard reaction. Get a cast-iron skillet screaming hot with a little high-smoke-point oil. Carefully place the roast in the pan. You should hear a loud, aggressive sizzle immediately. If you don’t, the pan isn’t hot enough.
Sear the meat for only a minute or two per side. You only want to develop that deep, dark crust. Don’t leave it in too long, or you’ll start cooking the inside again and ruin that perfect pink center you worked so hard to achieve.
Phase 3: The Critical 20-Minute Rest
This is where most people fail. You must move the beef to a cutting board, tent it loosely with foil, and walk away for 20 minutes. Think of the meat like a sponge; when it’s hot, the fibers are tight and the juice is squeezed out. As it cools slightly, the fibers relax and soak that juice back in.
During this time, the internal temperature will actually rise by about 5 to 10 degrees. This “carry-over cooking” is what brings the beef to its final, perfect doneness. If you skip this, all that delicious juice will end up on your cutting board instead of in your mouth.
Troubleshooting Common Roasting Errors
If your meat turns out tough, you likely either skipped the resting period or sliced it with the grain. Slicing with the grain leaves long muscle fibers intact, making it very hard to chew. Always look for the direction of the fibers and cut across them.
If your garlic tastes bitter, it probably burnt during the searing phase. To prevent this, make sure your garlic is minced very fine so it sticks to the meat rather than sitting on top. You can also lightly scrape off any large chunks of garlic before the meat hits the hot skillet.
A lack of crust usually means the meat was too damp. If you don’t pat the beef dry with paper towels, the oil and herbs won’t adhere properly. Moisture creates steam, and steam is the enemy of a crispy, flavorful crust.
Preparing the Creamy Horseradish Accompaniment
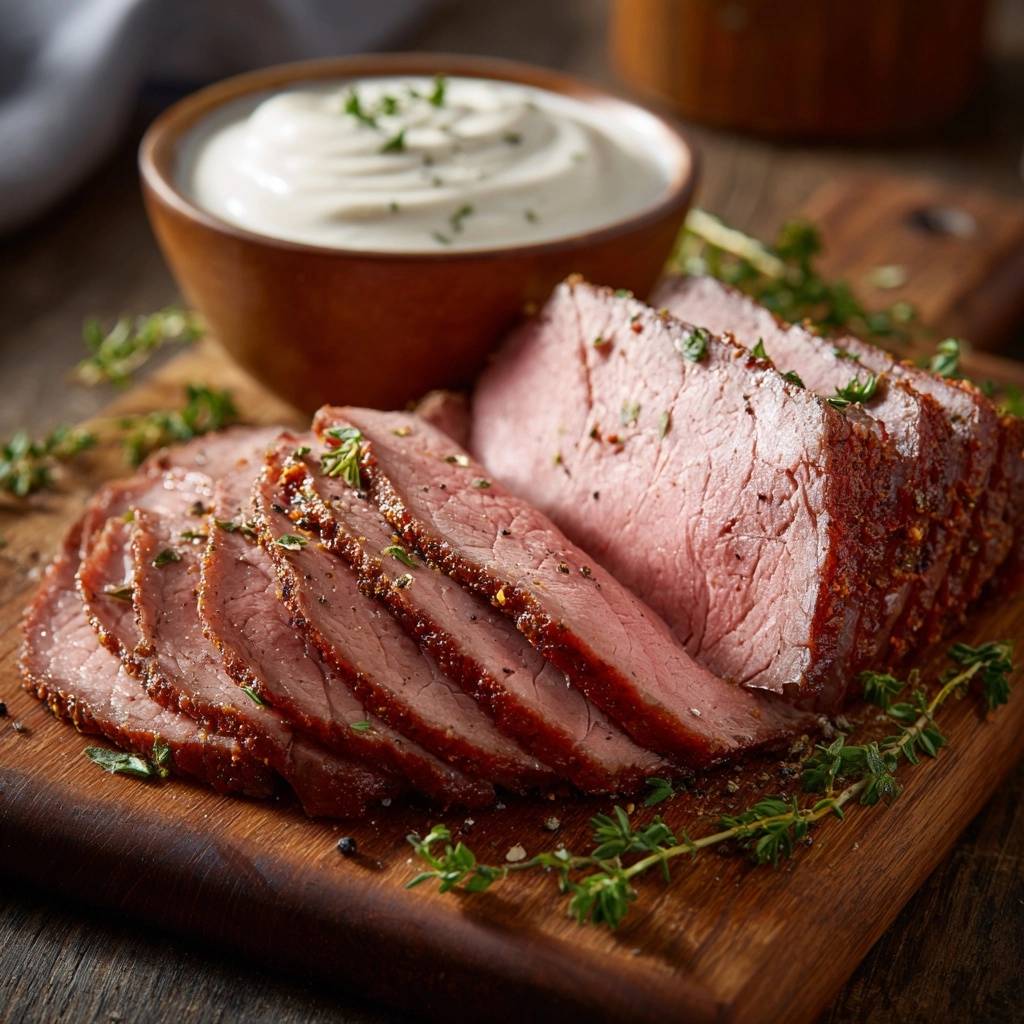
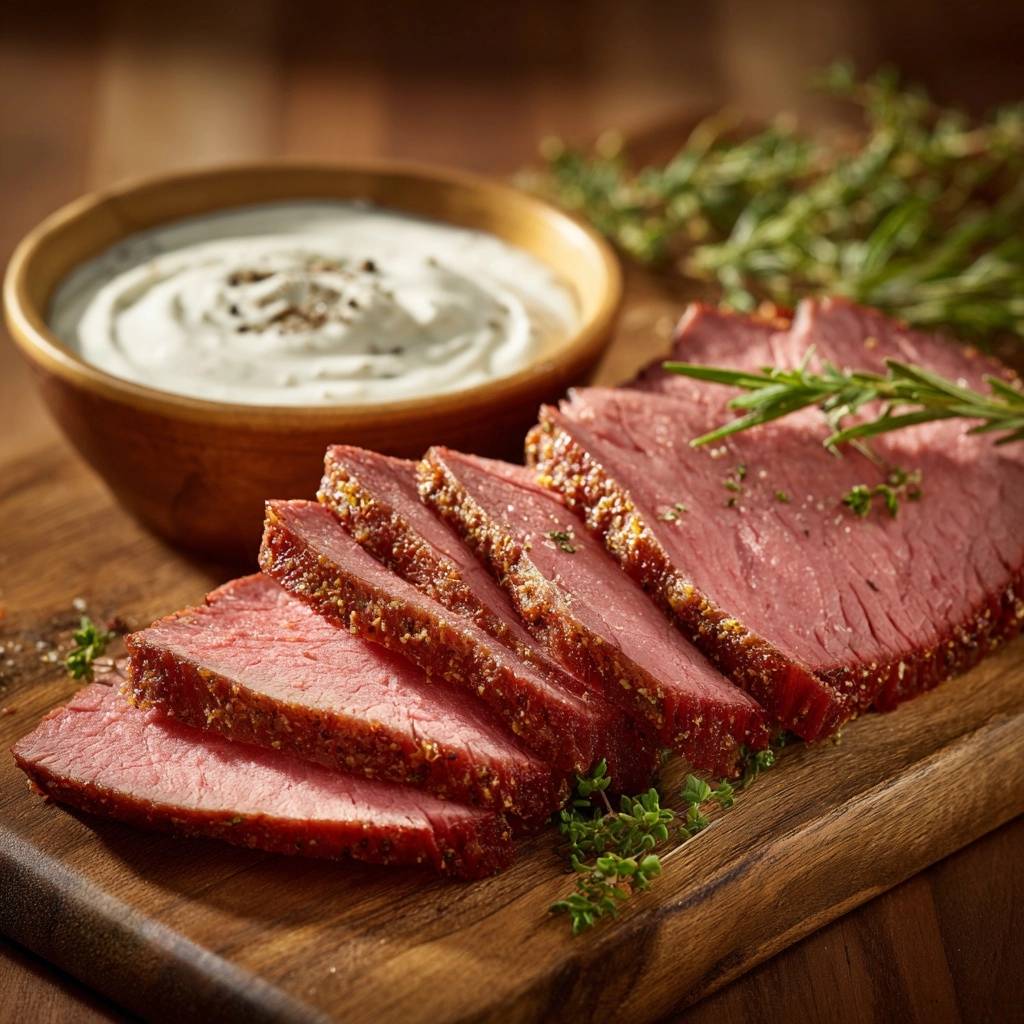
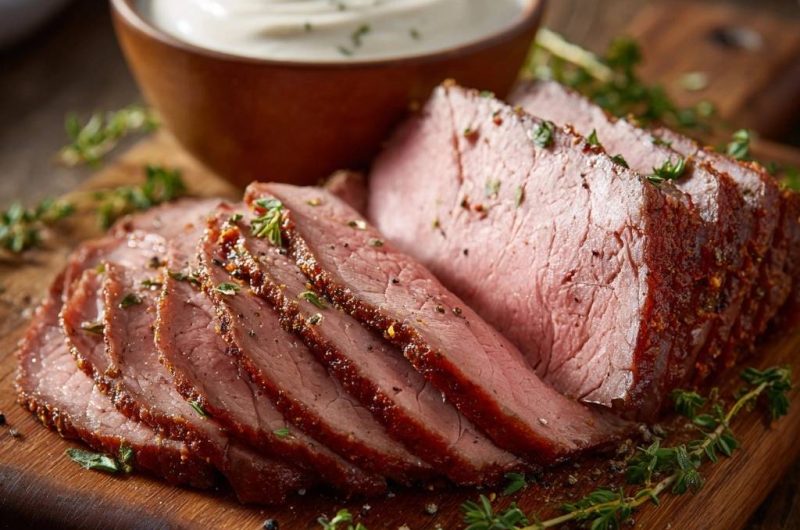
A lean roast needs a bit of fat and acid to really shine. The horseradish sauce provides a sharp, creamy contrast to the savory garlic and thyme. The lemon juice is the secret ingredient here; it brightens the whole dish and cuts through the richness of the sour cream.
You can easily adjust the heat of this sauce. If you love a sinus-clearing kick, add an extra tablespoon of prepared horseradish. If you prefer something milder, stick to the recipe and let the fresh thyme garnish provide a floral finish that ties the sauce to the meat.
Optimal Slicing Techniques for Maximum Tenderness
To get those “thin ribbons” of beef, you need a very sharp carving knife. Look at the roast and identify the “grain,” which are the long lines of muscle fiber running through the meat. You want to slice perpendicular to these lines.
By cutting across the grain, you are shortening the muscle fibers to the width of the slice. This means your teeth don’t have to do the hard work of breaking them down. Aim for slices about an eighth of an inch thick for the most luxurious mouthfeel.
Pairing Suggestions for a Complete Meal
This Garlic Herb Roasted Beef is the star of the show, so keep the sides simple. Roasted root vegetables like carrots and parsnips are a natural fit because they can roast in the oven at the same time as the beef. Their natural sweetness balances the savory garlic crust.
A sharp arugula salad with a simple lemon vinaigrette also works beautifully. The peppery greens mimic the bite of the horseradish sauce, while the acidity cleanses your palate between bites of the rich, tender beef. It’s a balanced, elegant meal that feels like a celebration.
Expert Tips for Garlic Herb Roasted Beef
1. Invest in a digital probe thermometer that stays in the meat while it roasts. This removes all the guesswork and ensures you never overcook the beef.
2. If you are cooking a larger roast, say 5 pounds or more, keep the oven temperature the same but expect the roasting time to increase to about 2 hours. Always go by temperature, not time.
3. For an even better crust, salt the meat the night before and leave it uncovered in the fridge. This “dry brining” seasons the meat deeply and dries out the surface for an incredible sear.
4. Feel free to swap the thyme for rosemary or oregano. Just make sure to use fresh herbs to maintain that vibrant, aromatic quality that defines this dish.
5. To reheat leftovers without making them tough, slice the beef cold and then briefly dip the slices into warm broth. This warms the meat gently without continuing the cooking process.
How do I prevent the garlic from burning?
The best way to prevent burning is to ensure the garlic is minced very finely and mixed thoroughly with the olive oil. This creates a paste that coats the meat. When you sear the beef, do it quickly—no more than 90 seconds per side. The moisture in the meat and the oil will help protect the garlic from the direct heat of the pan for that short duration.
Can I use a slow cooker for this recipe?
I don’t recommend using a slow cooker for this specific result. A slow cooker uses moist heat, which braises the meat until it falls apart. While that’s delicious for pot roast, it won’t give you the elegant, sliceable, medium-rare texture of a Garlic Herb Roasted Beef. The reverse sear method is essential for that specific steak-like quality.
What if I prefer my beef medium-well?
If you prefer less pink in your meat, simply adjust your “pull temperature.” For medium, take the roast out of the oven when it hits 135°F. For medium-well, wait until it reaches 145°F. Keep in mind that the meat will still rise about 5-10 degrees during the rest, so always pull it slightly before your target doneness.
Is a cast-iron skillet mandatory?
While cast iron is king for heat retention and a perfect crust, you can use a heavy stainless steel pan or even a very hot grill. The goal is a surface that can hold high heat without dropping in temperature when the cold meat hits it. Avoid non-stick pans, as they cannot safely reach the temperatures needed for a proper sear.
How should I store the horseradish sauce?
The creamy horseradish sauce stores beautifully in an airtight container in the refrigerator for up to 5 days. In fact, the flavors often meld and improve after a few hours. Just give it a quick stir before serving, as the lemon juice can cause very slight separation over time. Do not freeze the sauce, as the sour cream will become grainy.
Garlic Herb Roasted Beef
Course: Main CourseCuisine: AmericanDifficulty: easy6
servings15
minutes1
hour30
minutes105
Minutes340
kcalAmerican
Ingredients
3 pound beef top round or eye of round roast
3 tablespoons olive oil
1 tablespoon kosher salt
2 teaspoons cracked black pepper
1 teaspoon red pepper flakes (for the visual crust)
4 cloves garlic, minced
3 tablespoons fresh thyme, chopped (divided)
1 cup sour cream
2 tablespoons prepared horseradish
1 teaspoon lemon juice
1/2 teaspoon flaky sea salt (for finishing)
Directions
- Remove the beef from the refrigerator 1 hour before cooking. This is the first step to solving dryness, as a cold roast cooks unevenly, leaving the outside dry before the middle is done.
- Preheat your oven to 250°F (120°C). Low and slow heat prevents the muscle fibers from seizing up and squeezing out all the moisture.
- Pat the beef completely dry with paper towels. In a small bowl, mix the olive oil, garlic, 2 tablespoons of chopped thyme, kosher salt, cracked black pepper, and red pepper flakes. Rub this paste over the entire surface of the roast.
- Place the beef on a wire rack set over a baking sheet. Roast until an internal thermometer reaches 125°F (52°C) for medium-rare. This typically takes 20-30 minutes per pound.
- Heat a heavy cast-iron skillet over high heat with a splash of high-smoke-point oil. Sear the roast for 1-2 minutes per side until a deep, mahogany crust forms.
- Transfer the beef to a cutting board and tent loosely with foil. You must let it rest for at least 20 minutes. This is the most critical step to fix dryness. If you cut it too soon, the juice runs out on the board instead of staying in the meat.
- While the meat rests, whisk together the sour cream, horseradish, and lemon juice in a small bowl. Garnish the sauce with a pinch of the remaining fresh thyme.
- Slice the beef against the grain into thin ribbons. Sprinkle with flaky sea salt and the remaining fresh thyme sprigs as shown in the image. Serve with the creamy horseradish sauce.
Notes
- The most critical step is resting the meat for at least 20 minutes after searing to ensure the juices redistribute. Always slice against the grain for maximum tenderness.


