
We’ve all been there. You’re craving a side of roasted vegetables, but you end up with a pile of gray, mushy cauliflower and rubbery mushrooms that look more like they were boiled than roasted. It’s a common kitchen tragedy that stems from a lack of heat and too much moisture. When you do it right, however, the transformation is incredible. You get cauliflower with crispy, charred edges and a nutty sweetness that only comes from high-heat caramelization.
The flavor profile here is a bold mix of earthy, savory, and pungent notes. The cremini mushrooms provide a meaty “umami” backbone, while the smoked paprika adds a beautiful golden hue and a hint of campfire warmth. By the time the garlic hits the pan, the aroma in your kitchen will be absolutely intoxicating. It’s the kind of dish that makes you realize vegetables don’t have to be the boring part of the meal.
The secret to this restaurant-quality texture is the thermal mass of a cast iron skillet. Most home cooks start with a cold sheet pan, which means the vegetables sit and steam while the oven slowly heats the metal. By preheating your cast iron, you create an immediate sear the second the vegetables touch the surface. This instant heat transfer locks in the internal moisture while crisping the exterior, ensuring your Garlic Roasted Cauliflower and Mushrooms stay firm and flavorful.
The Physics of High-Heat Vegetable Roasting
Achieving the perfect roast is actually a matter of science, specifically the Maillard reaction. This chemical reaction between amino acids and reducing sugars gives browned food its distinctive flavor. For cauliflower and mushrooms, 425°F is the absolute sweet spot. At this temperature, the natural sugars in the cauliflower caramelize rapidly, creating those delicious dark brown bits that taste like candy.
Mushrooms present a unique challenge because they are roughly 90% water. If you cook them at a low temperature, they simply leak their internal juices and sit in a puddle of gray liquid. High heat is required to evaporate that surface moisture the moment it escapes. Therefore, the 425°F environment acts as a drying agent, allowing the mushroom’s exterior to brown and develop a firm, meaty texture instead of becoming a soggy mess.
Overcrowding the pan is the most frequent mistake in home roasting. When you pack florets and mushroom halves too tightly, the steam escaping from one vegetable gets trapped by its neighbor. This creates a localized “steam zone” that prevents the temperature from rising high enough for browning. If you want that crunch, you must give each piece its own “personal space” on the skillet so the hot air can circulate freely around every edge.
Essential Components for Garlic Roasted Cauliflower and Mushrooms
Success starts at the grocery store. When selecting cauliflower, look for a head that feels heavy for its size with tightly packed curds. If you see dark spots or “fuzz,” the vegetable is starting to turn and will likely have a bitter flavor. A fresh, dense head will hold its shape much better under the intense heat of a 425°F oven, providing that satisfying tender-crisp bite you’re after.
While white button mushrooms are common, I always reach for cremini (often sold as “baby bellas”). Creminis are just slightly more mature, which means they have a lower water content and a much deeper, more complex flavor. They stand up to the roasting process without shrinking into nothingness. If you can find them, they provide a much more robust “steak-like” quality to this vegetarian-friendly side dish.
For the fat, extra virgin olive oil is the gold standard here. You might worry about the smoke point, but the moisture in the vegetables actually keeps the surface temperature of the oil lower than the ambient oven air. The oil acts as a heat conductor, seeping into the nooks and crannies of the cauliflower florets to ensure even browning. Combined with smoked paprika for color and dried thyme for an earthy, floral note, the oil creates a savory “lacquer” that coats every piece.
Why Fresh Garlic Requires Strategic Timing
Garlic is delicate. It contains a high amount of natural sugars that burn at a much lower temperature than the vegetables themselves. If you toss minced garlic in at the very beginning, those 25 minutes of high heat will turn it into bitter, black acrid bits. This is the fastest way to ruin an otherwise perfect dish.
The “15-minute mark” rule is your best friend. By adding the garlic during the final 10 minutes of roasting, you allow it enough time to lose its raw “bite” and become buttery and sweet. It mellows out and infuses the oil without ever reaching the point of scorching. This strategic timing ensures the garlic remains a fragrant highlight rather than a burnt afterthought.
Step-by-Step: Achieving the Perfect Char
Phase one begins with the preheated skillet. You want that cast iron to be screaming hot before it ever sees a vegetable. When you place the pan in the oven during the preheat cycle, you’re building up a reservoir of heat. This thermal energy is what creates the “sizzle” and prevents the mushrooms from sticking to the bottom. If the pan isn’t hot, the vegetables will just sit in the oil and get greasy.
Phase two is the toss. In a large bowl, you need to be thorough. Don’t just drizzle the oil; use your hands or a large spoon to ensure every single crevice of the cauliflower is coated. The oil acts as a protective barrier and a heat distributor. If a spot is dry, it will likely dehydrate and turn “leathery” rather than caramelizing into a crisp, golden brown.
Phase three is the sizzle. When you pour the seasoned vegetables into the hot skillet, you should hear a loud, aggressive hiss. This is the sound of success! Use a spatula to quickly spread them out. You’ll notice the mushrooms start to sear immediately. This initial contact is crucial for building that first layer of flavor. Work quickly so you don’t lose too much heat from the oven or the pan.
Phase four is the finish. After the garlic has been added and the final roast is complete, look for the visual cues. You aren’t just looking for “soft” vegetables. You want to see charred, dark brown tips on the cauliflower and mushrooms that have shrunk slightly and turned a deep mahogany. The texture should be “tender-crisp”—meaning your fork goes in easily, but there is still a slight resistance and a definite snap when you bite into it.
Troubleshooting Common Roasting Obstacles
If you notice your mushrooms are releasing a lot of liquid halfway through, don’t panic. This usually happens if the mushrooms were washed right before cooking. Next time, try wiping them with a damp paper towel instead of submerging them. If it happens mid-roast, simply increase the heat by 10 degrees or leave the oven door cracked for 30 seconds to let the excess steam escape.
Uneven floret sizes can lead to some pieces being burnt while others are raw. Try to cut your cauliflower into uniform, bite-sized pieces. If you have very small “crumb” pieces, keep them! They turn into crispy little flavor bombs. Also, remember that every oven has hot spots. If you notice one side of the skillet is browning faster, give the pan a 180-degree turn when you add the garlic.
Finally, avoid parchment paper for this specific recipe. While it makes cleanup easy, it acts as an insulator between the hot cast iron and the vegetables. To get that true restaurant-style char, the vegetables need direct contact with the seasoned metal. A well-seasoned cast iron skillet is naturally non-stick anyway, especially when it’s properly preheated with a bit of oil.
Flavor Variations and Herb Substitutions
This recipe is a fantastic canvas for different flavor profiles. If you want a Mediterranean twist, swap the dried thyme for dried oregano. Once the vegetables come out of the oven, toss them with a tablespoon of fresh lemon zest and a squeeze of juice. The acidity cuts through the richness of the roasted mushrooms beautifully.
For those who like a bit of heat, you can easily double the red pepper flakes or add a pinch of cayenne pepper to the initial spice toss. The sweetness of the caramelized cauliflower plays very well against a spicy kick. You could even drizzle a little hot honey over the finished dish for a sweet-and-spicy “agrodolce” effect that is incredibly addictive.
If you want to maximize the savory “umami” flavor, try adding a splash of soy sauce or shoyu during the final 5 minutes of roasting. The salt and fermented notes of the soy sauce will glaze the mushrooms, making them taste even meatier. Alternatively, a sprinkle of nutritional yeast at the very end adds a “cheesy” nutty flavor without the need for actual dairy.
Optimal Pairings for Roasted Brassicas and Fungi
These vegetables are hearty enough to act as the star of a grain bowl. Pile them high over a bed of fluffy quinoa or chewy farro. A simple drizzle of tahini sauce or a dollop of hummus on the side creates a filling, nutrient-dense meal that feels much fancier than it actually is. The textures of the grains and the charred vegetables are a match made in heaven.
If you’re serving this as a side, it pairs perfectly with roasted chicken or a pan-seared sea bass. The earthiness of the mushrooms complements the savory skin of the chicken, while the sweetness of the cauliflower balances the delicate flavor of the fish. It’s a versatile side that fits into a casual weeknight dinner or a more formal Sunday roast.
For a vegetarian main, try using these roasted vegetables as the base for a warm lentil salad. Toss the hot cauliflower and mushrooms with cooked French green lentils, some extra fresh parsley, and a bit of crumbled feta or goat cheese. The residual heat from the vegetables will slightly soften the cheese, creating a creamy, savory dressing that ties the whole dish together.
Expert Tips for Storage and Reheating
Whatever you do, stay away from the microwave when reheating leftovers. Microwaves work by heating water molecules, which will turn your beautifully roasted vegetables into a limp, soggy mess in seconds. The cauliflower will lose its char, and the mushrooms will become rubbery. It’s a waste of all that hard work you put into the initial roast!
The best way to revive these vegetables is a quick “flash-fry” in a dry skillet over medium-high heat. Just toss them in the pan for 3-4 minutes until they are warmed through and the edges crisp up again. If you have an air fryer, that’s even better. Three minutes at 380°F will restore almost all of the original texture, making them taste nearly as good as they did the first time around.
Keep in mind that this dish does not freeze well. The cellular structure of mushrooms is quite delicate; once frozen and thawed, they release all their moisture and become incredibly mushy. Cauliflower also tends to get grainy after a trip to the freezer. It’s best to keep these in an airtight container in the fridge and enjoy them within three to four days.
Technical Troubleshooting
Why are my vegetables soft instead of crispy?
Soft vegetables are almost always caused by pan density. If the florets and mushrooms are touching or overlapping, they are steaming in their own moisture rather than roasting. Next time, try using two separate sheet pans or a larger skillet. You want at least a half-inch of space between the pieces to allow the hot air to circulate and evaporate the surface moisture.
Can I use frozen cauliflower for this recipe?
I don’t recommend it for this specific high-heat technique. Frozen cauliflower is blanched before freezing, which breaks down its cell walls. When it thaws, it releases a massive amount of water that will prevent it from ever getting that “snap” and char. For this recipe, fresh cauliflower is mandatory to achieve the caramelized, nutty exterior and tender-crisp interior.
What is the best substitute for cremini mushrooms?
If you can’t find cremini, Shiitake mushrooms are an excellent alternative. They have a very low moisture content and a deep, savory flavor that intensifies when roasted. Large Portobello mushrooms also work well if you cut them into thick, bite-sized chunks. Avoid white button mushrooms if possible, as they tend to be more watery and less flavorful when subjected to high heat.
How do I prevent the smoked paprika from burning?
The key is the olive oil coating. When you toss the vegetables in the bowl, the oil encapsulates the dried spices, acting as a heat buffer. This prevents the delicate paprika from making direct contact with the hot air and scorching. As long as the spices are well-incorporated into the oil and you aren’t roasting for longer than 30 minutes, the paprika will stay vibrant and sweet.
Garlic Roasted Cauliflower and Mushrooms
Course: Side DishCuisine: AmericanDifficulty: easy4
servings10
minutes25
minutes35
Minutes185
kcalAmerican
Ingredients
1 large head cauliflower, cut into bite-sized florets
1 pound cremini mushrooms, halved or sliced thick
4 tablespoons extra virgin olive oil, divided
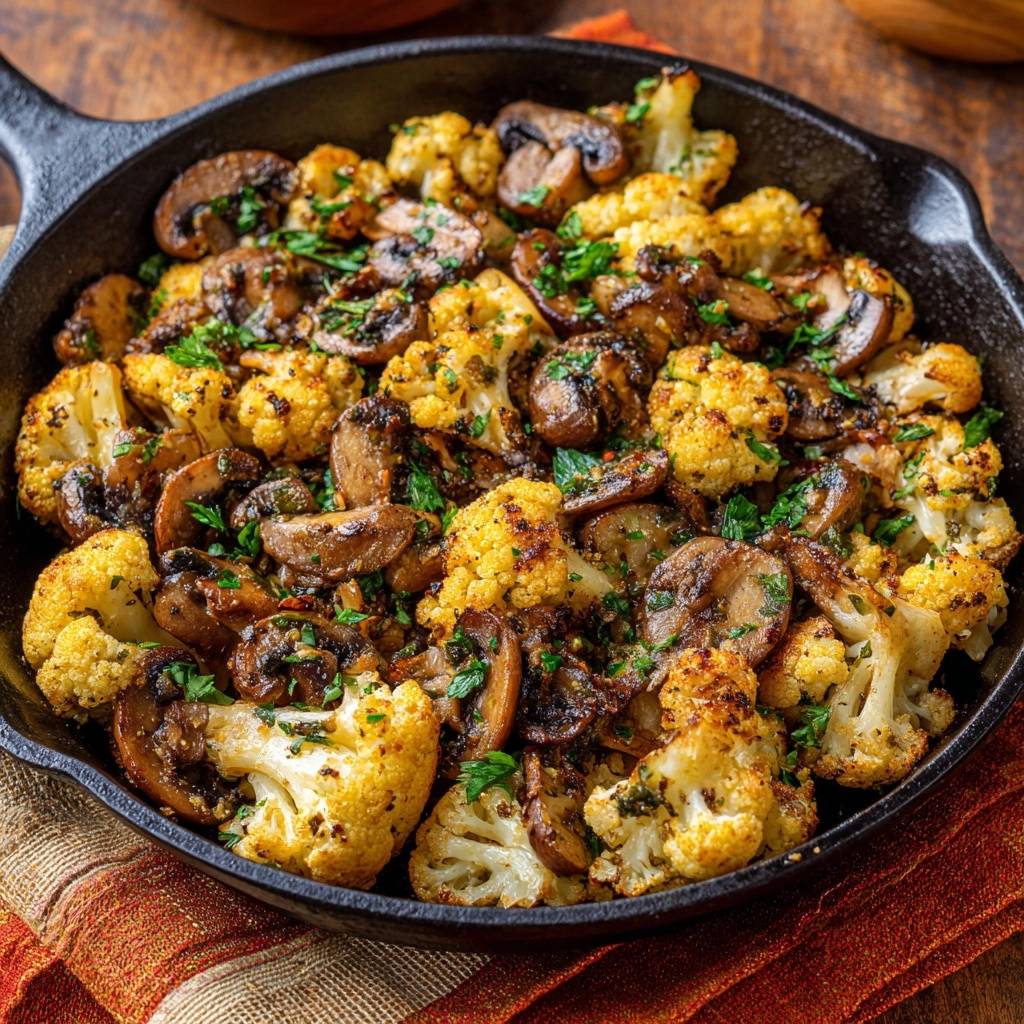
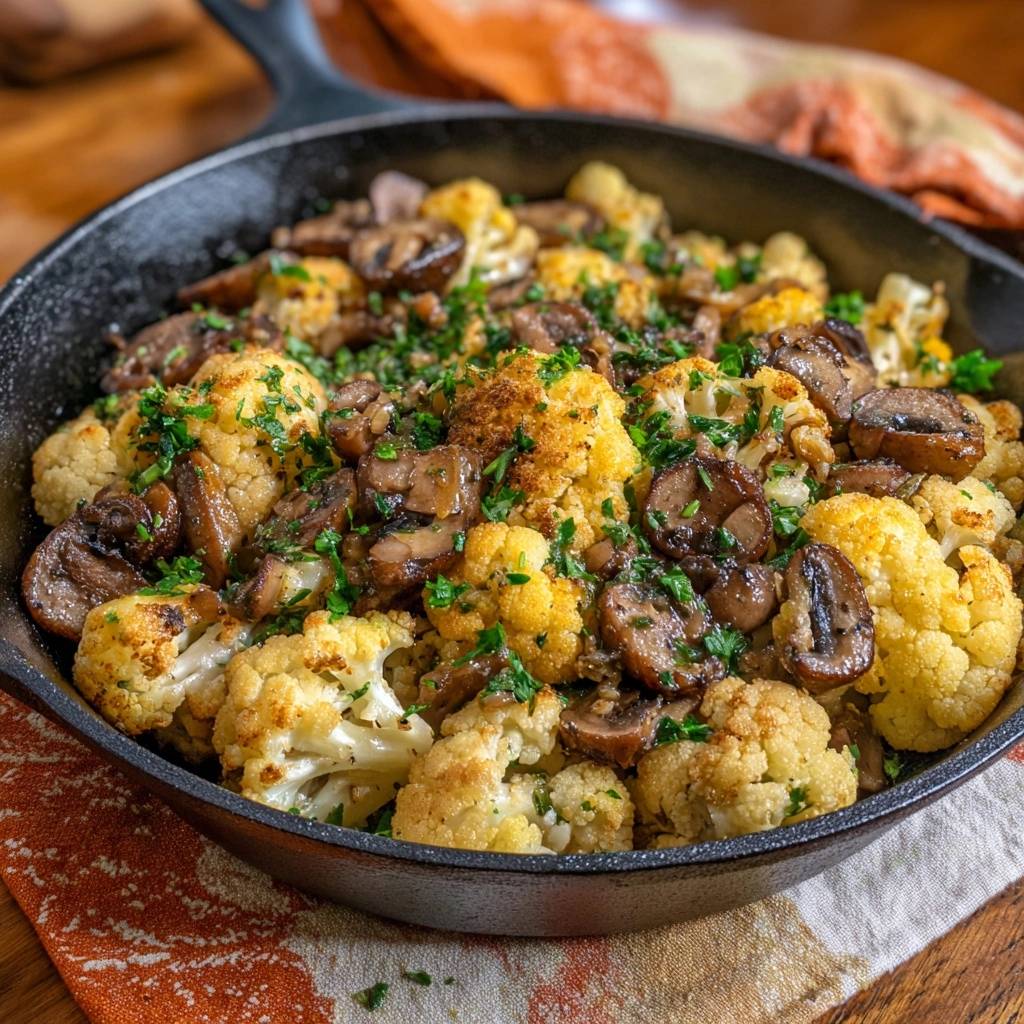
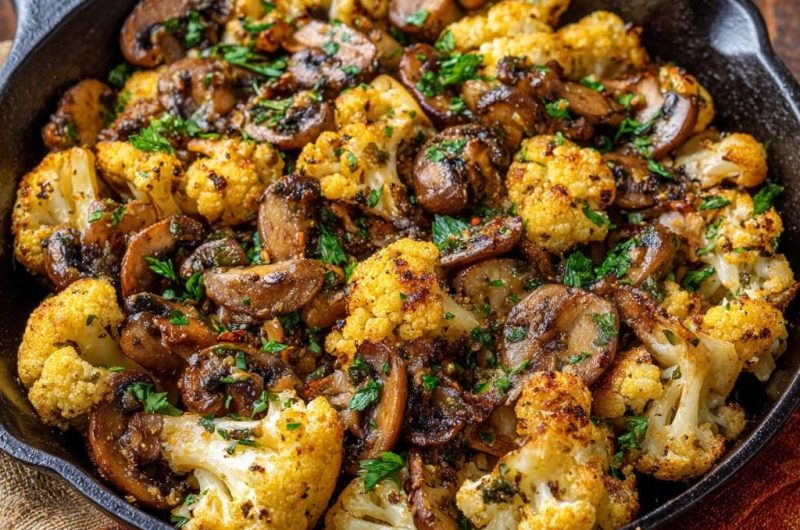
1 teaspoon smoked paprika (for the golden color shown in the image)
4 cloves garlic, minced
1 teaspoon dried thyme
1/2 teaspoon red pepper flakes
Salt and black pepper to taste
1/4 cup fresh parsley, chopped
Directions
- Place a large 12-inch cast iron skillet inside your oven and preheat to 425 degrees F. Heating the pan first is the essential step to prevent sticking and jumpstart the browning process.
- In a large bowl, toss the cauliflower florets and mushrooms with 3 tablespoons of the olive oil, smoked paprika, thyme, red pepper flakes, salt, and pepper. Do not add the garlic yet, as it will burn at this temperature during the full roasting time.
- Carefully remove the hot skillet from the oven. Drizzle the remaining 1 tablespoon of oil into the pan, then pour the vegetable mixture in. You should hear a loud sizzle immediately.
- Use a spatula to spread the vegetables into a single, even layer. If the pan is too full, the vegetables will release steam and become soggy. Use two pans if necessary to maintain space between the pieces.
- Roast for 15 minutes. Remove the skillet, add the minced garlic, and toss the vegetables thoroughly.
- Return to the oven for another 8 to 10 minutes. The high heat and the cast iron surface will lock in the texture, creating the deep golden-brown edges and caramelized mushroom surfaces seen in the image.
- Remove from the oven once the cauliflower is tender with charred tips. Garnish generously with fresh parsley and serve immediately while the texture is at its peak.
Notes
- Preheating the cast iron skillet is essential to prevent sticking and ensure browning. Do not add the garlic until the last 10 minutes of roasting to prevent it from burning. Avoid overcrowding the pan to prevent steaming.


