There is a specific, audible crackle when you bite into a real New York-style bagel. That initial resistance gives way to a dense, tug-of-war chew that feels substantial and satisfying. Most home bakers struggle because their bagels end up tasting like round pieces of white bread, lacking that iconic “snap” and heavy crumb.
The secret to avoiding the “bread-roll-with-a-hole” trap lies in the structural integrity of your dough and the chemistry of the water bath. By controlling the protein development and the exterior starch gelatinization, you can achieve professional results in your own kitchen. It’s about more than just a recipe; it’s about mastering the physics of the rise.
If you want that perfect golden sheen and a crust that doesn’t go soft within an hour, you must use high-protein bread flour. While all-purpose flour is fine for cookies, it lacks the muscle to hold up during the boiling process. This fail-safe method ensures your bagels stay plump and chewy, even after they hit the hot water.
The Anatomy of a Perfect New York-Style Bagel
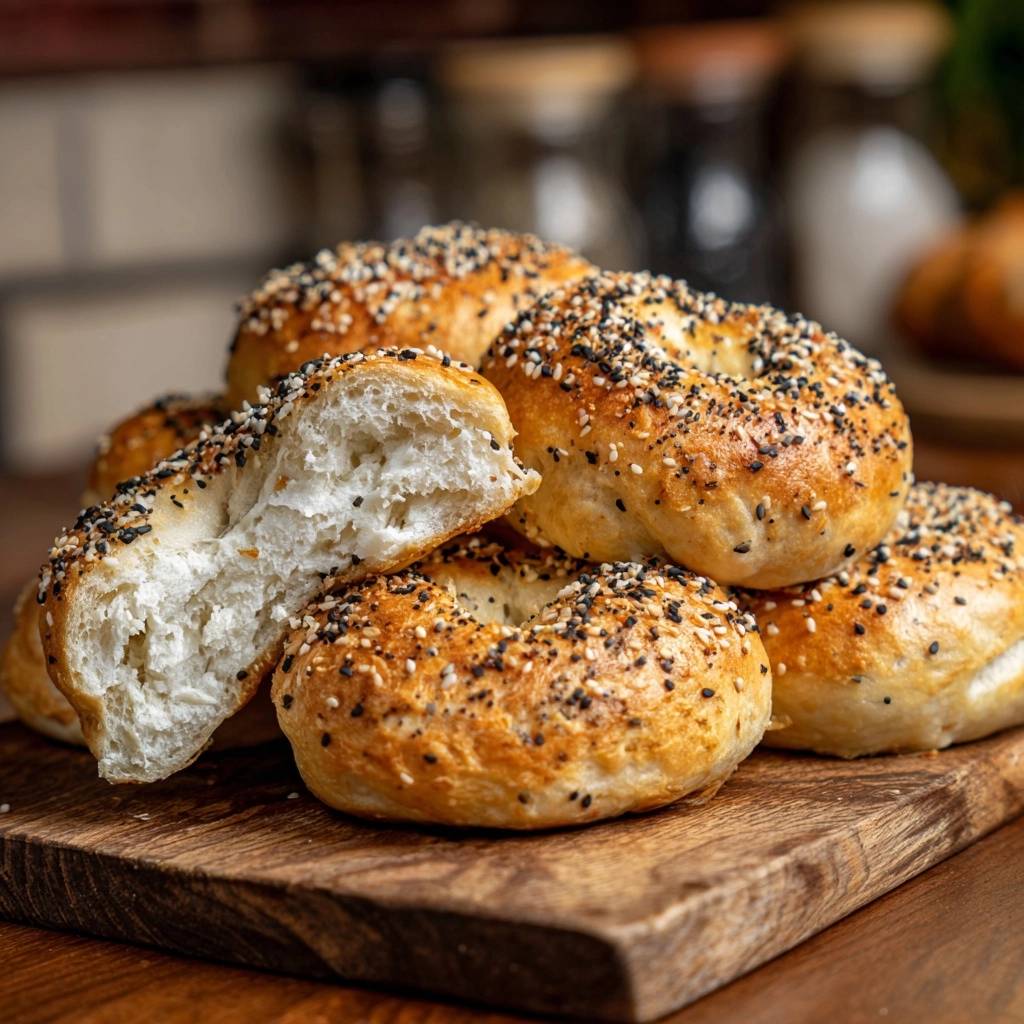
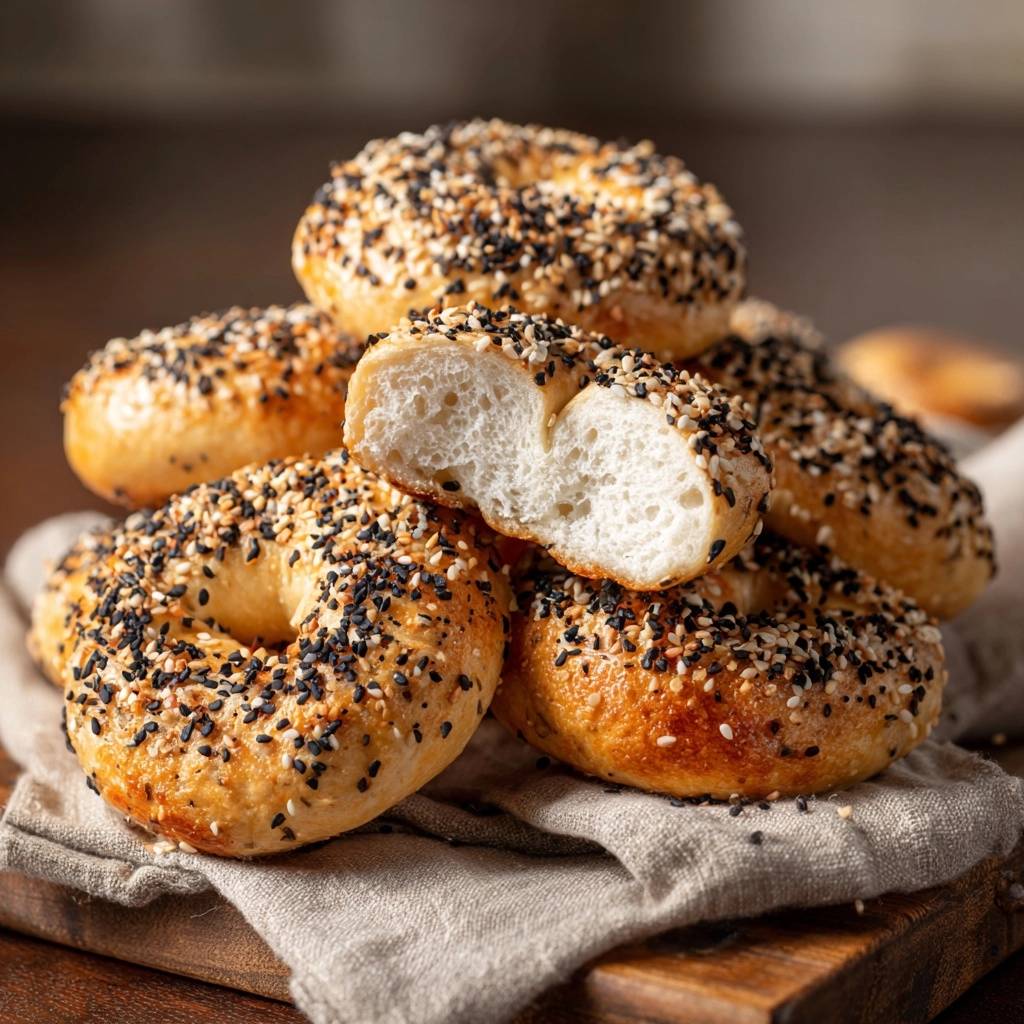
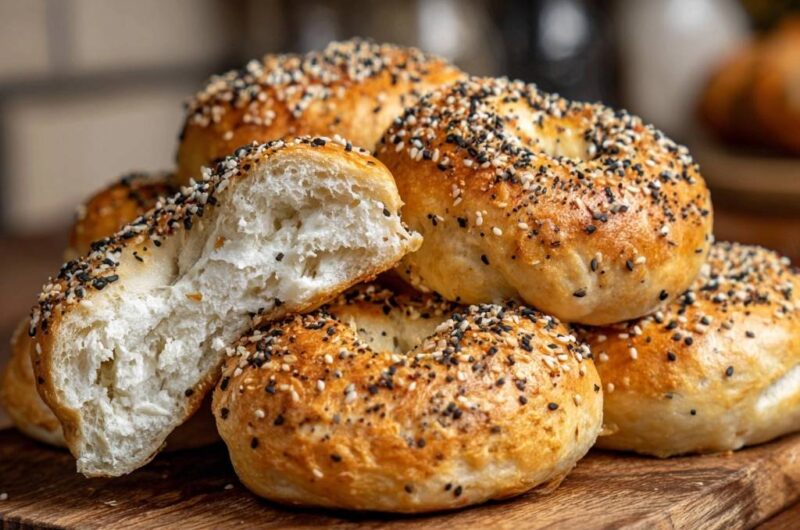
A true bagel is defined by its density. Unlike a baguette or a sandwich loaf, which thrives on large, airy pockets, a bagel should have a tight, uniform crumb. This density provides the “chew” factor that makes it the ultimate vessel for cream cheese or smoked salmon.
The exterior must be thick and slightly shiny, a result of the boiling process. This step “sets” the outside of the dough, preventing it from expanding too much in the oven. Therefore, the bagel grows inward, creating that concentrated, chewy texture we crave.
High-protein flour is the backbone of this entire operation. Without a strong gluten network, the bagel would simply deflate the moment it touches the boiling water. You need that structural strength to trap the small air bubbles produced during the fermentation phase.
Essential Components for Homemade Everything Bagels
Success starts with your pantry choices. Bread flour is the non-negotiable star here because it contains more protein than standard flour. This extra protein translates to more gluten, which provides the elasticity and strength needed for a heavy dough.
Fine sea salt is preferable to standard table salt because it dissolves more evenly into the flour. In addition, the “Everything” seasoning requires fresh aromatics. If your dried garlic or onion has been sitting in the back of the cabinet for two years, it will taste bitter rather than savory once toasted in the oven.
The honey in the boiling water might seem like a small detail, but it is vital. It adds a very subtle floral sweetness that balances the salty seasoning. More importantly, the sugars in the honey assist with the Maillard reaction, giving you that deep mahogany color.
The Role of High-Protein Bread Flour
Gluten is a protein composite that gives dough its “stretch.” In bagel making, we need a high-protein content (usually 12-14%) to create a dough that is stiff and resilient. This allows the bagel to maintain its shape during the boil and provides the characteristic resistance when you take a bite.
Yeast Activation and Temperature Control
Yeast is a living organism, and it is picky about its environment. You must ensure your water is between 105°F and 110°F; any hotter and you risk killing the yeast, any colder and it won’t wake up. When you add the sugar, you are essentially feeding the yeast to jumpstart the fermentation.
You’ll know it’s working when the mixture becomes foamy and smells slightly like bread. If the water remains clear and flat after ten minutes, stop right there. Using “dead” yeast is the number one reason bagels turn out like hockey pucks, so always verify the bloom before adding your flour.
The Science of the Honey-Water Bath
Boiling the dough is what separates a bagel from a roll. When the raw dough hits the boiling water, the starches on the surface gelatinize. This creates a physical barrier that limits how much the bagel can rise once it gets into the oven.
This “pre-cooking” step is why bagels have such a thick, distinct crust. The honey in the water doesn’t just add flavor; it coats the bagel in a thin layer of sugar. Consequently, as the bagel bakes at high heat, those sugars caramelize to create a beautiful, glossy finish.
Step-by-Step: Preparing the Bagel Dough
When you first mix the yeast mixture with the flour and salt, it will look like a “shaggy mass.” Don’t be intimidated by the dry, messy appearance of the dough at this stage. It takes a few minutes of stirring for the flour to fully hydrate and pull away from the sides of the bowl.
As you begin to work the dough, it will feel quite stiff compared to pizza or bread dough. This is intentional. A stiffer dough results in a tighter crumb, so resist the urge to add extra water unless the flour absolutely won’t incorporate.
Mastering the 10-Minute Knead
Kneading is where the magic happens. You need to work the dough for a full 10 minutes by hand to develop the gluten properly. You are looking for the dough to transform from a lumpy, sticky pile into a smooth, elastic ball that bounces back when poked.
You can use the “windowpane test” to check your progress. Pull off a small piece of dough and gently stretch it out; if it stretches thin enough to see light through it without tearing, the gluten is ready. Under-kneading is a common mistake that leads to flat, sad bagels that lack structural integrity.
Managing the Primary Bulk Fermentation
Once kneaded, the dough needs a warm, draft-free spot to rest. A damp cloth is much better than plastic wrap because it allows the dough to breathe while maintaining the necessary humidity. This prevents a dry “skin” from forming on the surface of your dough.
Wait until the dough has truly doubled in size, which usually takes about an hour. If your kitchen is cold, this might take longer. Be patient, as this fermentation period is where the flavor develops and the texture lightens just enough to be edible.
Shaping and Stretching for Uniform Results
After the rise, punch the dough down to release the large air bubbles. For professional-looking results, use a kitchen scale to divide the dough into 110g portions. This ensures every bagel cooks at the same rate and looks uniform on the platter.
The “thumb-poke” method is the easiest for beginners. Poke a hole through the center of a smooth dough ball and twirl it around two fingers. You want to stretch the hole to about 2 inches wide because the dough will “spring” back and shrink during the boiling and baking process.
The Boiling Process: Locking in the Texture
Bring your honey-water to a rolling boil before dropping the bagels in. Work in batches so you don’t crowd the pot, which can drop the water temperature too quickly. Boil them for exactly 60 seconds per side for the perfect balance of chew and crust.
When you flip them, you’ll notice the bagels look slightly wrinkled and puffed up. This is exactly what you want to see. Use a slotted spoon to drain them well before moving them back to the baking sheet, as excess water can cause the bottoms to become soggy.
Applying the Everything Seasoning and Egg Wash
The egg wash is the “glue” that keeps your seasoning from ending up at the bottom of the toaster. Brush it generously over the tops and sides while the bagels are still warm from the boil. This creates a tacky surface that grabs onto every seed and garlic flake.
Don’t be shy with the everything seasoning. Sprinkle it heavily so that every square inch is covered. The salt in the seasoning will draw a little moisture out of the egg wash, helping it bake into a crisp, flavorful topping that stays put when sliced.
Baking to Golden Perfection
A hot oven is essential for that final “oven spring.” At 425°F, the bagels will finish their rise quickly and the crust will harden. Make sure to rotate your pan halfway through the baking time to account for any hot spots in your oven.
You are looking for a deep, rich golden brown color. If they look pale, they aren’t done. That dark color indicates that the sugars have caramelized and the crust has reached its maximum crunch potential. Oh man, the smell in your kitchen at this point will be incredible!
Why the 20-Minute Cooling Period is Mandatory
It is incredibly tempting to slice into a hot bagel the second it leaves the oven. However, you must wait. The internal structure is still setting as the bagel cools, and the steam inside needs time to dissipate through the crust.
If you cut it too early, the interior will feel gummy and wet rather than airy and chewy. Giving it 20 minutes on a wire rack ensures the “carry-over” cooking finishes the job. Trust me, the texture is worth the short wait.
Troubleshooting Common Bagel Baking Issues
If your bagels turn out flat, you likely over-proofed the dough or your yeast was weak. Over-proofing happens when the dough rises for too long, causing the air bubbles to pop. Next time, keep a closer eye on the size of the dough rather than just the clock.
If your seasoning is burning before the bagel is brown, your oven might be running too hot. Use an oven thermometer to verify the temperature. Conversely, if the bagels are tough rather than chewy, you might have added too much flour during the kneading process.
Storage and Longevity: Keeping Bagels Fresh
Fresh bagels are best eaten within 24 to 48 hours. Store them in a paper bag or a loosely closed plastic bag at room temperature. Never put your bagels in the refrigerator! The cold temperature actually accelerates “starch retrogradation,” which makes the bread go stale and hard much faster.
If you can’t finish them quickly, bagels freeze beautifully. They will stay fresh in the freezer for up to three months if wrapped tightly. This allows you to have a “fresh” bagel experience any day of the week without having to start the whole process over.
The Best Way to Freeze and Reheat
The pro move is to slice your bagels before you freeze them. This way, you can take a frozen half and put it directly into the toaster. The high heat of the toaster revives the interior moisture while re-crisping the crust, making it taste almost as good as the day you baked it.
Expert Tips for Bagel Success
Firstly, always use a digital scale. Baking is a science, and measuring flour by the cup can lead to huge variations in weight. A scale ensures your dough consistency is identical every single time you bake.
Secondly, don’t skip the honey in the boiling water. If you don’t have honey, brown sugar or barley malt syrup are excellent alternatives. This addition is the secret to that professional, glossy look that store-bought bagels often lack.
Thirdly, ensure your water is at a rolling boil, not just a simmer. The high heat is necessary to trigger the starch gelatinization immediately. If the water is too cool, the bagels will just sit there and get soggy instead of developing a crust.
Finally, use parchment paper on your baking sheets. Bagels are sticky after the boil and the egg wash, and there is nothing more frustrating than a perfect bagel sticking to the pan. Parchment ensures a clean release and an easy cleanup.
Frequently Asked Questions
Can I use All-Purpose flour instead of bread flour?
You can, but the texture will be significantly different. All-purpose flour has less protein, which results in a softer, more “bread-like” bagel. It won’t have that signature New York chew. If you must use it, try to knead it a few minutes longer to develop as much gluten as possible.
Why did my bagels deflate when I put them in the water?
This usually happens because the dough was over-proofed. If the dough rises too much, the structure becomes fragile. When it hits the boiling water, the heat causes the over-expanded air bubbles to burst. Aim for the dough to double in size, but no more, during the first rise.
Can I let the dough rise overnight in the fridge?
Yes, and many professionals prefer this! After shaping the bagels, you can place them on a tray, cover them tightly, and let them sit in the fridge for 12 to 24 hours. This cold fermentation develops a deeper, more complex flavor and often results in those tiny “blisters” on the crust that bagel aficionados love.
What can I use if I don’t have honey for the water bath?
Barley malt syrup is the most traditional choice and provides a very authentic flavor. However, if you don’t have that or honey, two tablespoons of brown sugar will work well. The goal is to provide a sugar source for browning and a hint of flavor to the crust.
How do I get the seasoning to stay on both sides of the bagel?
The easiest way is to use the “dip” method. Instead of sprinkling the seasoning on top, fill a small shallow bowl with your everything mix. After brushing the boiled bagel with egg wash, pick it up and press the wet side directly into the seasoning. This creates a thick, even coating that is much more secure than sprinkling.
How should I store leftovers so they don’t get hard?
Keep them in an airtight container or a zip-top bag at room temperature for up to two days. If you plan to keep them longer, slice them and freeze them immediately. Avoid the refrigerator at all costs, as it dries out the crumb and ruins the texture within hours.
Homemade Everything Bagels
Course: Bread and Baked GoodsCuisine: AmericanDifficulty: easy8
bagels20
minutes25
minutes115
Minutes280
kcalAmerican
Ingredients
4 cups high-protein bread flour (plus extra for dusting)
1.5 cups warm water (105 to 110 degrees F)
2 teaspoons active dry yeast
1.5 tablespoons granulated sugar
2 teaspoons fine sea salt
2 tablespoons honey (for the boiling water)
1 large egg beaten with 1 tablespoon water (for egg wash)
4 tablespoons everything bagel seasoning (poppy seeds, white and black sesame seeds, dried garlic, dried onion, flaky salt)
Directions
- To ensure the fail-safe rise, whisk the sugar and yeast into the warm water in a small bowl. Let it sit for 5 to 10 minutes until it is foamy. If it does not foam, your yeast is inactive and the bagels will not rise.
- In a large bowl or the bowl of a stand mixer, whisk together the bread flour and salt. Pour in the yeast mixture. Stir by hand or use a dough hook until a stiff, shaggy dough forms.
- Knead the dough on a lightly floured surface for 10 full minutes (or 7 minutes in a mixer). This is the most important step for texture; the dough must be smooth, firm, and elastic to hold the air bubbles during the rise.
- Place the dough in a lightly oiled bowl, cover with a damp cloth, and let it rise in a warm, draft-free spot for 1 hour or until doubled in size.
- Punch the dough down to release air. Divide into 8 equal pieces (approx. 110g each). Roll each into a tight, smooth ball. Use your thumb to poke a hole through the center and gently twirl the dough around two fingers to stretch the hole to about 2 inches wide.
- Place shaped bagels on a parchment-lined tray, cover, and let rest for 10 minutes. Meanwhile, preheat your oven to 425°F (218°C) and bring a large, wide pot of water to a boil. Stir the honey into the boiling water.
- Boil the bagels in batches for 1 minute per side. Do not overcrowd the pot. This honey-water bath gelatinizes the exterior starch, which creates the thick, golden, chewy crust shown in the image and prevents the bagels from deflating.
- Use a slotted spoon to transfer boiled bagels back to the parchment-lined baking sheet. While still wet, brush the tops and sides generously with the egg wash. Sprinkle the everything seasoning heavily over the top so it adheres to the egg wash.
- Bake for 20 to 25 minutes, rotating the pan halfway through, until the bagels are a deep golden brown.
- Transfer to a wire rack. Let them cool for at least 20 minutes before slicing. This allows the internal steam to finish setting the crumb, ensuring the interior is airy yet chewy rather than gummy.
Notes
- Ensure the yeast is foamy before proceeding to guarantee a proper rise. Kneading for the full 10 minutes is essential for the correct gluten structure. Let the bagels cool for 20 minutes after baking to prevent a gummy interior.