Imagine pulling a tray from the oven where a golden, velvet-like cheese sits perfectly intact, its surface glistening with a floral glaze. You press a cracker against the side, and the rind yields to a molten, creamy center that flows like slow silk. This isn’t just a snack; it’s a sensory experience where the earthy, pine-like aroma of fresh thyme meets the deep, mellow sweetness of warm honey.
Most people struggle with baked brie because the cheese often decides to stage a “jailbreak,” bursting through the sides and puddling across the pan. However, achieving that professional, picture-perfect look is actually quite simple once you understand the physics of the rind. The secret lies in using a cold wheel of cheese and a specific scoring pattern that acts as a pressure release valve.
I’ve found that the biggest mistake home cooks make is letting the cheese sit on the counter before baking. You actually want that brie chilled so the center melts at the exact moment the rind reaches its peak structural tension. By following this temperature-controlled method, you ensure the cheese stays exactly where it belongs until the very moment you dive in.
The Physics of the Perfect Rind
Think of a wheel of brie as a tiny, pressurized steam vessel. As the fat globules inside the cheese heat up, they expand and release moisture in the form of steam. If that steam has nowhere to go, it pushes against the white mold rind until it finds a weak point and ruptures.
Therefore, we use a diamond scoring technique to create “controlled vents” across the top surface. This allows the internal pressure to escape upward rather than outward against the delicate sidewalls. In addition, the rind itself is a complex structure of proteins that becomes more fragile as it warms, so keeping the bake time precise is vital for maintaining its shape.
When you score the cheese, you aren’t just making it look pretty; you are engineering a way for the heat to penetrate the center evenly. This ensures the interior reaches that perfect, gooey consistency without the exterior collapsing under its own weight. It is the difference between a messy puddle and an elegant centerpiece.
Essential Components for Honey Thyme Roasted Brie
Quality matters immensely when you only have a handful of ingredients. For this dish, you want a young, firm brie rather than a triple-cream variety. While triple-cream is delicious at room temperature, its high fat content makes it prone to liquefying too quickly in the oven, which often leads to a structural failure.
Fresh thyme is non-negotiable here because dried herbs simply cannot compete with the volatile oils found in fresh sprigs. As the thyme roasts for twelve minutes, those oils seep into the rind, providing a savory counterpoint to the heavy creaminess of the cheese. It adds a layer of sophistication that elevates the entire flavor profile.
Furthermore, choose a high-viscosity honey like Clover or a thick wildflower variety. These denser honeys hold their shape better when they hit the warm cheese, creating a beautiful, slow-moving cascade rather than a watery mess. The honey acts as a natural glaze that traps the herbal notes of the thyme against the salty rind.
Selecting the Right Wheel
When you’re at the grocery store, look for a “stabilized” pasteurized brie wheel, which is common in most US supermarkets. These wheels are designed to have a consistent texture and a sturdy, snowy white rind. Avoid any wheels that feel overly soft or “slumped” in the packaging, as these are already too ripe and will likely melt too fast.
The Role of Olive Oil and Sea Salt
A light brush of olive oil serves as a moisture barrier, preventing the rind from becoming tough or leathery in the dry heat of the oven. It also gives the cheese a professional, glossy sheen. Adding a pinch of flaky sea salt at the end provides a sharp mineral contrast that cuts through the richness of the honey and fat.
Step-by-Step: Preparing the Cold Brie
Firstly, take your brie straight from the refrigerator to the cutting board. Working with cold cheese makes it much easier to get clean, precise cuts without the rind tearing or sticking to your knife. Use a very sharp blade to etch a diamond pattern into the top, spacing the lines about half an inch apart.
You must be careful to only cut about 1-2 millimeters deep. If you slice too far into the paste of the cheese, you’ll create a “leak” that will cause the wheel to deflate during roasting. The goal is to simply pierce the skin so it can expand comfortably as the cheese inside begins to soften and grow.
The Roasting Process: Timing and Temperature
Preheat your oven to exactly 350°F. This temperature is the “sweet spot” because it’s hot enough to melt the fats but gentle enough that it won’t cause the proteins in the rind to seize or brown too quickly. Place your prepared wheel on a parchment-lined sheet to catch any accidental drips.
Set your timer for 10 minutes and start checking the cheese. You are looking for a slight bulge in the sidewalls and a center that feels soft and yielding when you give it a gentle poke. If it still feels firm, give it another two minutes, but do not exceed 15 minutes or you risk a total collapse.
The Finishing Touch: Honey Infusion and Garnish
Once the brie is out of the oven, move it immediately to your serving platter. While the cheese is still radiating heat, drizzle your honey over the top. This “residual heat drizzle” allows the honey to warm up and thin out naturally, letting it seep into the diamond scores you created earlier.
Strip the leaves from your remaining thyme sprigs and scatter them over the honey. The heat from the cheese will “wake up” the herb’s aroma, filling the air with a fresh, earthy scent just as you bring it to the table. This layering of flavors—warm cheese, floral honey, and aromatic herbs—is what makes the dish so addictive.
Avoiding Common Roasted Brie Mistakes
The most common mistake is cutting into the cheese the second it leaves the oven. If you do this, the internal fats are still too fluid, and the cheese will run out like water. Therefore, you must let the wheel rest for 3 to 5 minutes to allow the internal temperature to stabilize into a thick, luscious flow.
Another pitfall is over-baking. If you leave brie in the oven too long, the moisture evaporates and the proteins can actually re-harden, leaving you with a grainy or rubbery texture. If your cheese isn’t melting evenly, it’s usually because the wheel was too thick; in this case, a lower shelf in the oven often helps distribute heat better.
Optimal Pairings for Honey Thyme Roasted Brie
While standard crackers work, you can do so much better by playing with texture and acidity. Sourdough crostini are a fantastic choice because their natural tanginess cuts through the heavy fat of the brie. You want a sturdy vessel that can hold a generous scoop of cheese without snapping in half.
Texture Contrasts: Breads and Crisps
Try using fruit-studded crisps that contain dried cranberries or figs. These echo the sweetness of the honey while providing a loud, satisfying crunch. Sliced baguettes that have been lightly toasted with a bit of butter also provide a soft yet crisp base that complements the molten interior perfectly.
Fruit and Nut Accompaniments
Fresh Bosc pears or crisp apple slices provide a refreshing, watery crunch that cleanses the palate between bites. Additionally, toasted Marcona almonds or walnuts add an earthy depth and a different kind of crunch. The tannins in the fruit skins are particularly good at balancing the richness of the cheese.
Flavor Variations and Substitutions
If you want to change things up for the seasons, you can easily swap the honey for agave nectar or even a thick maple syrup. For those who like a bit of heat, a spicy hot honey works wonders against the creamy brie. You can also replace the thyme with fresh rosemary if you prefer a more resinous, wintry flavor profile.
Expert Troubleshooting
Why did my Brie turn hard after roasting?
This usually happens due to over-cooking. When brie stays in the oven too long, the moisture and fats separate and evaporate, leaving behind only the protein solids. Once those proteins lose their moisture, they become tough and rubbery. Always pull the cheese out when the center is just starting to feel soft to the touch.
Can I prepare the wheel in advance?
Yes, you can score the rind and even apply the olive oil up to 24 hours in advance. Just make sure to wrap it tightly in plastic wrap and keep it in the refrigerator. Do not add the honey or herbs until after it has been roasted, as the honey will become too runny and the herbs will wilt if they sit too long.
What is the best way to reheat leftovers?
Avoid the microwave at all costs, as it will turn the cheese into a rubbery mess. Instead, place the leftovers in a small oven-safe dish and heat them in a 300°F oven for about 5 to 8 minutes. This gentle heat allows the fats to soften slowly without breaking the emulsion of the cheese.
Is the rind actually edible?
Absolutely! The white rind is a bloom of Penicillium camemberti, a safe and delicious mold that gives brie its characteristic earthy, mushroom-like flavor. It is essential to the structure of the dish and provides a nice textural contrast to the gooey interior. Most enthusiasts consider the rind the best part.
How do I scale this for a larger party?
If you are serving a large crowd, it is better to roast two or three small 8-ounce wheels rather than one massive wheel. Smaller wheels cook more evenly and stay warm longer. If you do use a large “party size” wheel, you will need to increase the bake time to about 20-25 minutes and monitor the center closely.
Honey Thyme Roasted Brie
Course: AppetizerCuisine: French InspiredDifficulty: easy6
servings5
minutes12
minutes17
Minutes185
kcalFrench Inspired
Ingredients
1 (8-ounce) wheel of high-quality Brie cheese (cold from the fridge)
3 tablespoons honey
6-8 sprigs fresh thyme (some for roasting, some for fresh garnish)
1 teaspoon olive oil
Flaky sea salt (optional, for finishing)
Crackers or sliced baguette for serving
Directions
- Preheat your oven to 350°F (175°C). Place the cold brie wheel on a parchment-lined baking sheet or in a small oven-safe ceramic dish.
- Use a very sharp knife to gently score the top of the rind in a shallow diamond pattern. Do not cut deep into the cheese; you only want to pierce the white skin. This is the critical step: scoring allows steam to escape so the pressure does not build up and cause the sides to burst.
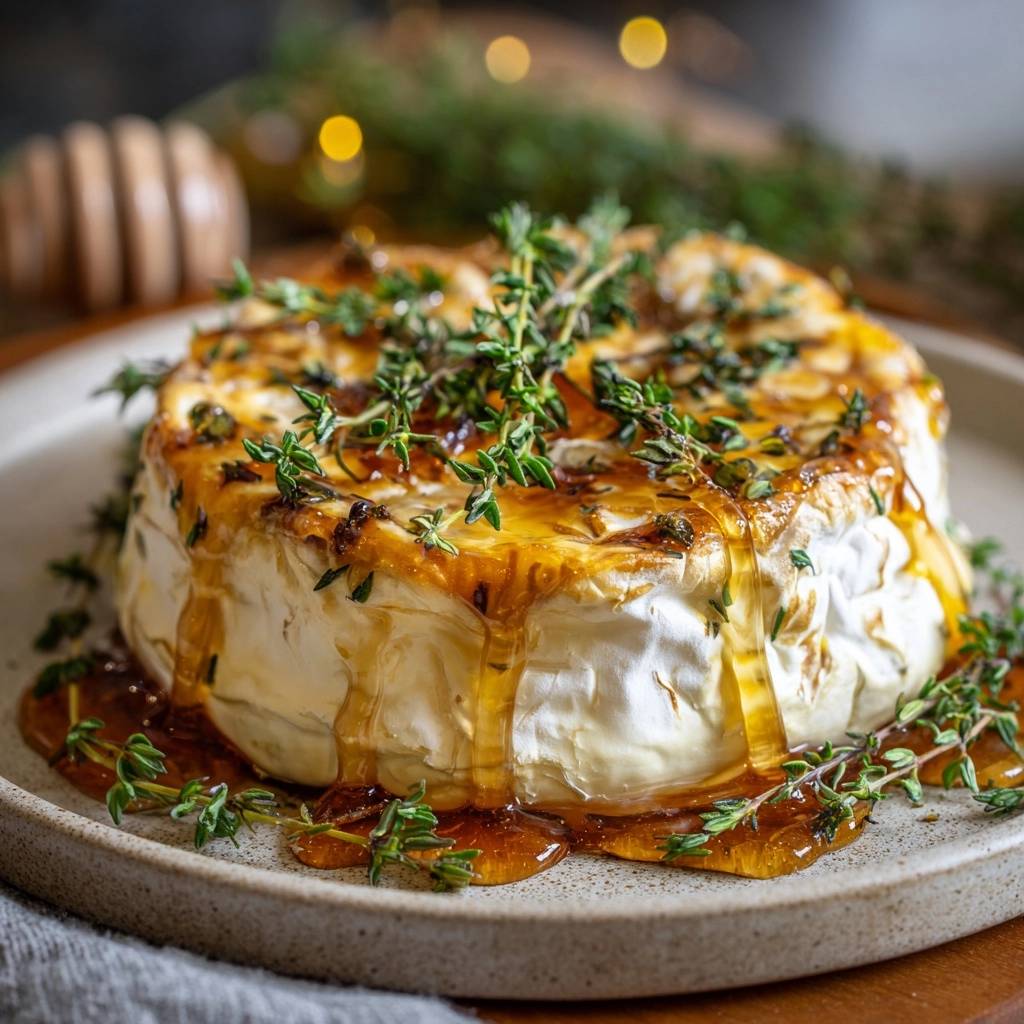
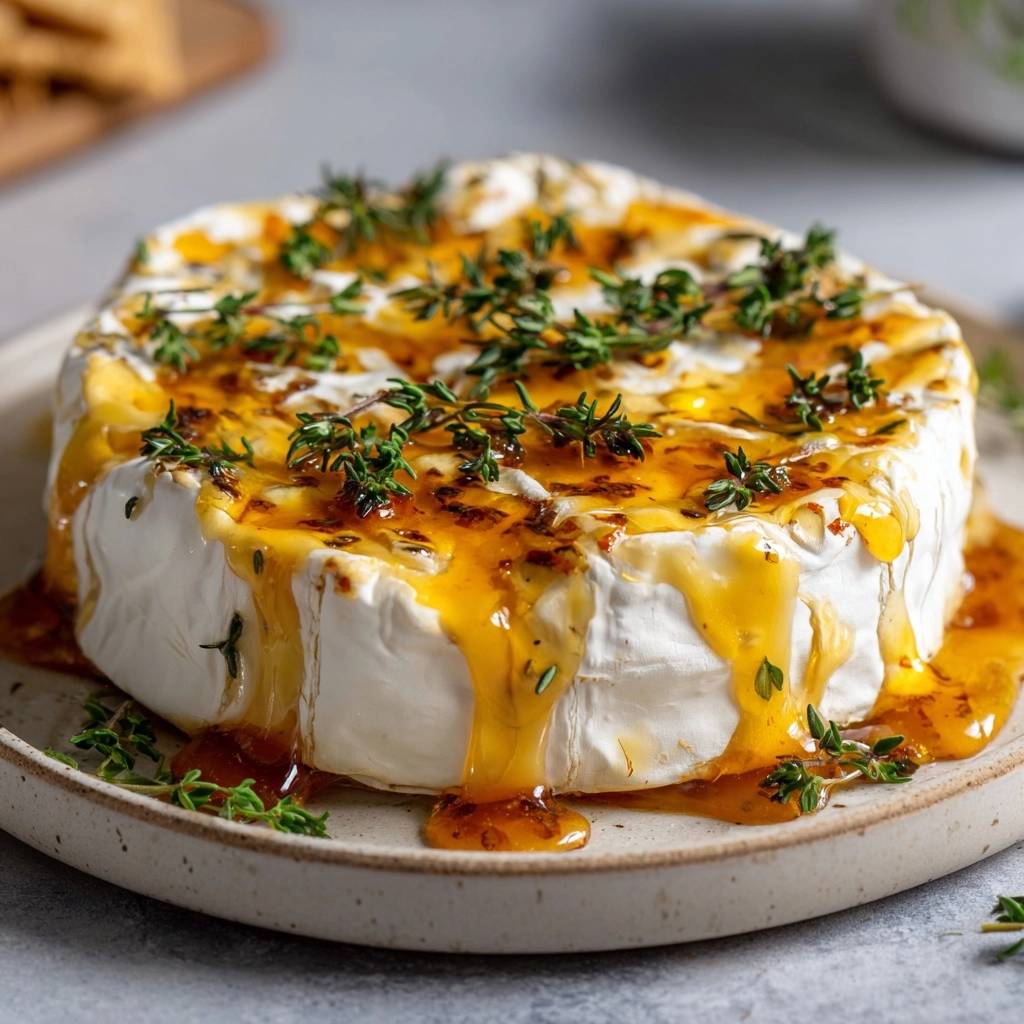
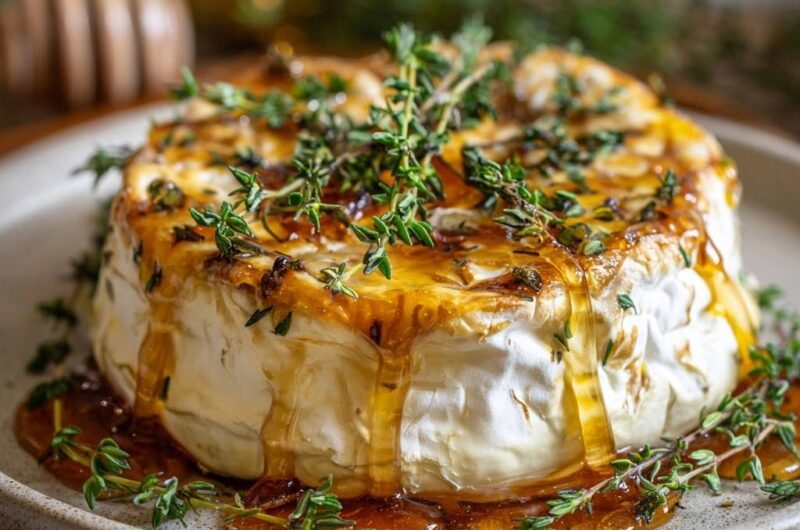
- Lightly brush the top and sides of the brie with olive oil. This prevents the rind from drying out or cracking and gives it the slight sheen seen in the photo.
- Place 2-3 sprigs of thyme directly on top of the cheese. Bake for 10 to 12 minutes. You want the cheese to feel soft and yielding when touched in the center, but the sides must remain firm and upright.
- Remove from the oven and transfer the brie carefully to a serving plate. Immediately drizzle the honey over the warm top. The heat from the cheese will cause the honey to thin and cascade down the sides as shown in the image.
- Strip the leaves from the remaining fresh thyme sprigs and scatter them generously over the honey. Add a few whole sprigs for aesthetic presentation.
- Let the cheese rest for 3 to 5 minutes before serving. This allows the internal temperature to stabilize so the cheese flows perfectly when cut rather than running out like water. Serve with crackers or crusty bread.
Notes
- The secret to preventing a blowout is scoring the top rind to allow steam to escape and using a cold wheel of cheese. Let the cheese rest for 3 to 5 minutes after roasting to ensure the perfect consistency.