Forget everything you know about mushy, steamed potato skins that collapse the second you pick them up. Most home cooks make the fatal mistake of wrapping their spuds in foil, which effectively turns the potato into a soggy, flavorless sponge. We’re looking for a structural masterpiece here, where the skin provides a satisfying crunch that protects a cloud-like interior.
The secret to this recipe lies in the sensory contrast between the salt-rubbed, rigid exterior and the whipped, aerated filling. By ditching the foil and using high heat, we create a sturdy vessel that can actually hold its weight. It’s the difference between a sad, limp appetizer and a professional-grade side dish that commands attention at the table.
I’ve found that the real trick to success is the “Direct Rack” method combined with a specific salt-rub technique. This isn’t just about seasoning; it’s about using chemistry to pull moisture away from the surface. When you nail this, the skin becomes a crisp, golden shell that shatters perfectly with every bite. Oh man, the texture is absolutely addictive!
The Science of the Anti-Soggy Potato Shell
To understand why this method works, we have to look at the chemistry of moisture evaporation in Yukon Gold potatoes. When you wrap a potato in foil, you’re creating a miniature steaming chamber. This trapped steam breaks down the pectin in the skin, leading to a structural collapse that makes the potato feel “wet” and heavy.
However, when you leave the potato exposed to the dry heat of the oven, the moisture has somewhere to go. By rubbing the skin with olive oil and sea salt, you’re initiating a process called osmosis. The salt draws surface moisture out of the skin, allowing it to dehydrate and crisp up while the starch inside gelatinizes into a creamy texture.
Therefore, the skin becomes a rigid, protective barrier rather than a soft wrapper. This dehydration is essential for “mini” potatoes because their high surface-area-to-volume ratio makes them prone to over-steaming. By allowing hot air to circulate entirely around the potato, you ensure the skin stays taut and structural enough to handle the heavy filling later on.
Essential Components for Loaded Twice-Baked Mini Potatoes
Quality ingredients are the backbone of this dish, starting with the potato itself. I always reach for Yukon Golds over Russets for this specific recipe. Yukon Golds have a naturally buttery flavor and a thinner, more resilient skin that crisps up beautifully without becoming leathery or tough.
In addition, the fat content in your dairy matters immensely. Use full-fat sour cream to ensure the filling has enough body to hold its shape when piped. If you use a low-fat version, the filling might weep or lose its “peak” during the second bake. It’s all about that rich, velvety mouthfeel.
Lastly, I recommend using unsalted butter so you have total control over the seasoning. Since we use a generous amount of salt on the skins for texture, using unsalted butter in the mash prevents the final product from becoming a salt bomb. It’s these small adjustments that lead to a balanced, high-end result.
Choosing the Right Potato Size and Shape
When you’re at the market, look for potatoes that are roughly 2 to 3 inches in diameter. Uniformity is your best friend here because it ensures every single potato finishes cooking at the exact same time. If you mix large and small ones, you’ll end up with some that are raw and others that are shriveled.
Furthermore, pay attention to the “roundness” of the spuds. Since we are serving these upright, look for potatoes that aren’t too lopsided. A rounder shape provides a more stable base and a better aesthetic for that professional, high-swirl presentation we’re aiming for.
The Role of Smoked Paprika and Fresh Chives
Smoked paprika is the “secret weapon” in this meat-free recipe. It provides a deep, charred earthiness that mimics the flavor of smoked meats without actually needing them. It adds a beautiful copper hue to the piped peaks that looks stunning under dining room lights.
In addition, never swap fresh chives for the dried version. Fresh chives provide a necessary hit of onion-like acidity and a bright pop of green color. The heat from the potato will gently release the chive oils, creating an aroma that hits you before you even take the first bite.
Phase One: Achieving the Perfect Initial Bake
Before you even think about the oven, you must scrub the potatoes clean and pat them bone-dry. Any leftover water on the skin will turn into steam, which is the ultimate enemy of a crispy shell. I usually let mine air-dry for a few minutes after towel-drying just to be safe.
Once they’re dry, rub them thoroughly with olive oil and salt. Place them directly on the oven rack rather than on a baking sheet. This allows the hot air to hit the potato from 360 degrees, ensuring there are no “bald spots” or soft patches on the bottom.
Just make sure you place a drip tray or a sheet of foil on the lower rack to catch any stray oil drips. You’ll know they’re ready when the skins look slightly wrinkled and taut. When you pierce them with a fork, it should slide in like butter with zero resistance in the center.
Phase Two: The Precision Scoop and Shell Prep
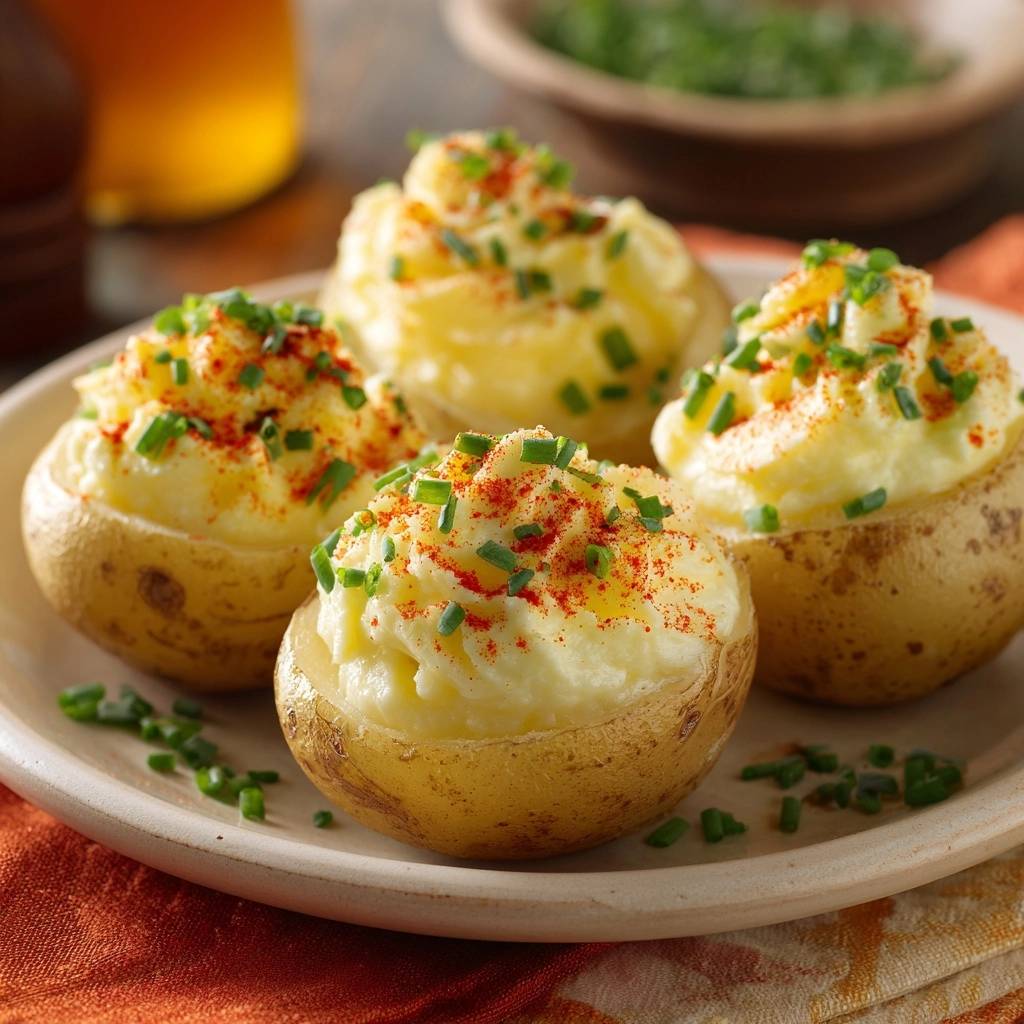
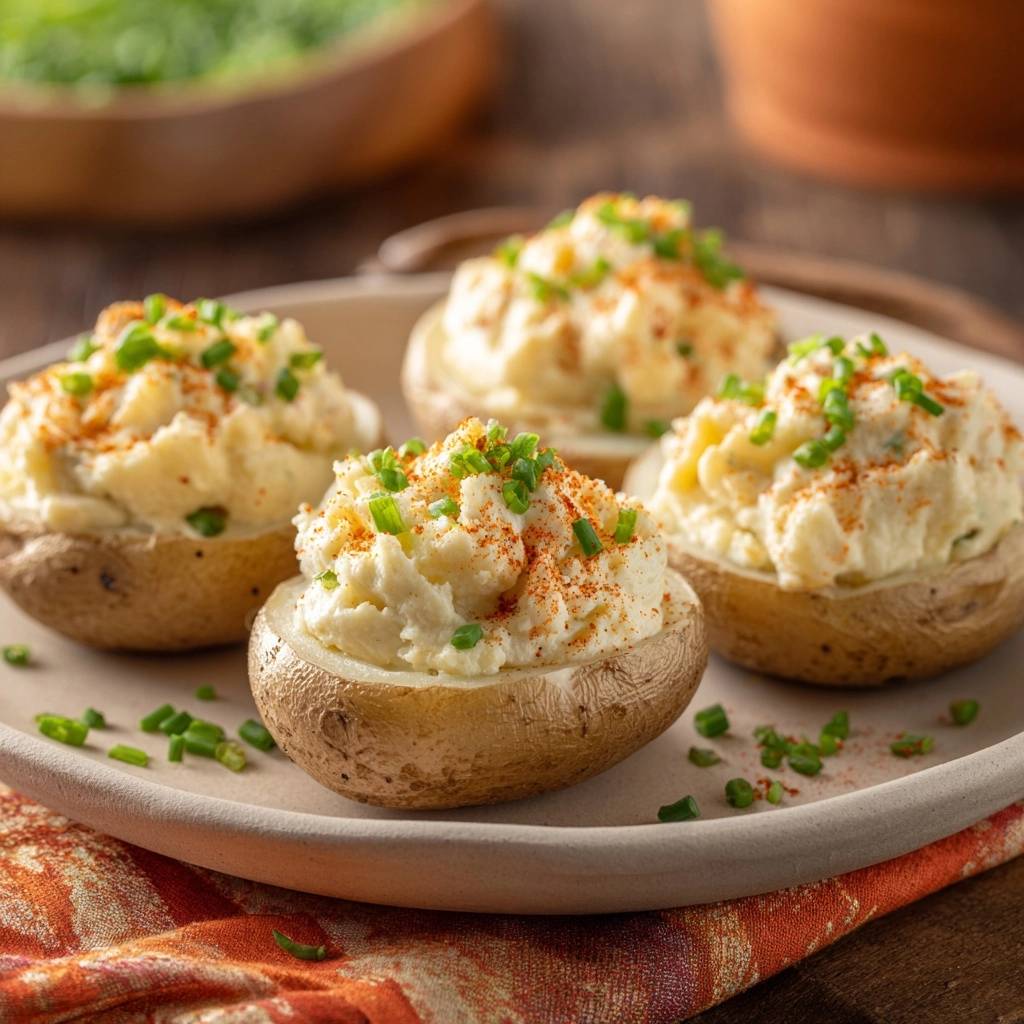
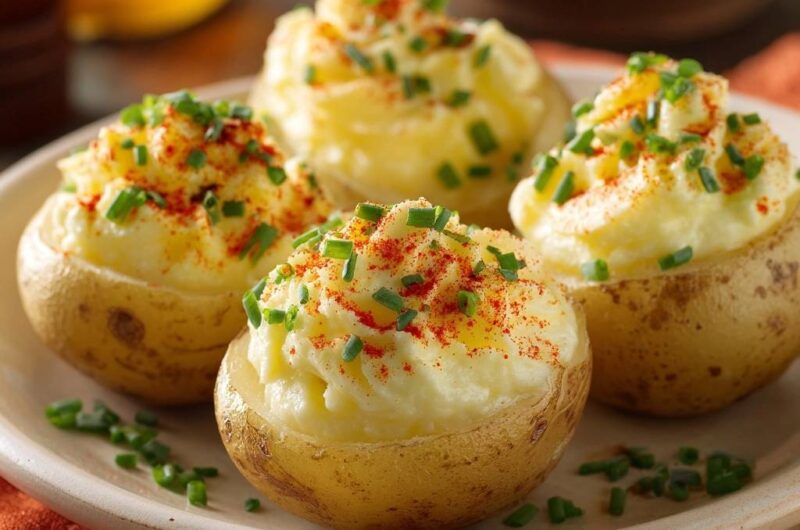
After the potatoes cool for about five minutes, it’s time for the technical work. Instead of the traditional lengthwise slice, we’re going to cut off the top quarter horizontally. This creates a “cup” shape that allows the potato to stand upright on the plate, which looks much more sophisticated.
Use a small spoon or a melon baller to scoop out the warm centers. You must leave exactly 1/4 inch of flesh against the skin. If you scoop too close to the skin, the shell will lose its structural integrity and “blow out” or collapse during the second bake.
Work carefully but quickly while the potatoes are still warm. Warm potato starch is much easier to mash and manipulate than cold starch. If the potatoes get too cold, the filling can become gummy rather than fluffy, so keep that momentum going!
Phase Three: Whipping the Aerated Potato Filling
This is where the magic happens. While you can mash the centers by hand, I highly recommend using a hand mixer. Beating the potato with the butter and sour cream incorporates air, transforming a heavy mash into a mousse-like filling that holds its shape perfectly.
However, make sure your butter and sour cream are at room temperature before you start mixing. Adding cold dairy to warm potatoes can shock the starch, leading to a sticky, gluey texture. We want “stiff peaks” that look like savory meringue, not a heavy paste.
Taste the mixture as you go. The smoked paprika and black pepper should be present but not overwhelming. Once the mixture is smooth and holds its shape on the beaters, you’re ready to pipe. If it feels too stiff, add a tiny splash of milk, but be careful not to make it runny.
Phase Four: Piping and the Final Crisp
Transfer your whipped filling into a piping bag fitted with a large star tip. If you don’t have one, a sturdy plastic bag with the corner snipped off works too, though you’ll miss out on those beautiful ridges. Pipe the filling in a high, swirling motion, starting from the bottom and moving up.
Those ridges created by the star tip aren’t just for looks; they increase the surface area of the filling. This means more edges can catch the heat and turn golden brown. Drizzle that last bit of melted butter over the peaks to act as a “glaze” that helps the browning process.
Pop them back into the oven for about 8 to 10 minutes. You aren’t trying to cook them further; you’re just setting the filling and crisping those piped edges. When the tips of the swirls turn a light golden brown, they are officially ready for the final garnish.
Troubleshooting Common Mini Potato Failures
If your potatoes are tipping over on the tray, don’t panic. Simply slice a tiny, paper-thin sliver off the bottom of the potato to create a flat base. This “leveling” trick ensures they stand perfectly upright like little soldiers on your serving platter.
In addition, if you find your filling is too runny to hold a swirl, you likely added too much sour cream. You can fix this by mixing in a tablespoon of instant potato flakes or a bit of finely grated cheese to tighten the texture. It’s an easy save that won’t ruin the flavor.
Lastly, if the skins are still soft after the first bake, your oven temperature might be running low. Use an oven thermometer to calibrate. You can also increase the salt rub next time, as the salt is what truly drives the dehydration process needed for that crunch.
Flavor Variations and Vegetarian Swaps
While the classic “loaded” profile is hard to beat, you can easily get creative with the flavors. For a Mediterranean twist, swap the sour cream for Greek yogurt and fold in some crumbled feta and fresh dill. It’s bright, tangy, and pairs beautifully with the Yukon Gold’s sweetness.
If you want something with a bit more kick, try a “Spicy Tex-Mex” version. Add a pinch of chipotle powder to the mash and use lime zest instead of chives. The smokiness of the chipotle complements the smoked paprika perfectly while adding a lingering heat that wakes up the palate.
Therefore, don’t feel limited by the traditional toppings. As long as you keep the moisture levels consistent in your filling, you can experiment with various herbs and spices. Just remember to keep the garnishes fresh to provide that necessary contrast to the rich, baked potato.
Strategic Pairings for Loaded Mini Potatoes
These potatoes are quite rich, so they pair best with something bright and acidic. A crisp arugula salad with a sharp lemon vinaigrette is the perfect companion. The peppery bite of the greens cuts right through the buttery, whipped potato filling.
In addition, they make a fantastic side for roasted root vegetables or a hearty vegetable stew. Because they have such a strong structural presence, they don’t get lost on the plate. They provide a satisfying, starchy anchor to any meal without feeling overly heavy or greasy.
Make-Ahead Instructions and Reheating Protocol
You can actually prep these up to 24 hours in advance, which is a lifesaver for dinner parties. Follow the instructions all the way through the piping stage, then store them in an airtight container in the fridge. When you’re ready to serve, just do the final bake and garnish.
However, whatever you do, stay away from the microwave for reheating! Microwaves trap steam, which will instantly turn your crispy skins into a soggy mess. Instead, use an air fryer at 350 degrees for 5 minutes or the oven for 10 minutes to restore that crunch.
If you’re reheating from the fridge, give them an extra few minutes in the oven to ensure the center is hot. The filling is dense, so it takes a moment for the heat to penetrate the middle. Once they’re piping hot and the edges are crisp again, they’ll taste just like they were freshly made.
Expert Tips for Professional Presentation
To get that “restaurant look,” focus on the height of your piping. Don’t be afraid to pile the filling high above the rim of the potato shell. This verticality makes the dish look much more impressive and allows for more surface browning on the ridges.
When applying the smoked paprika, hold the shaker high above the potatoes and use a light tapping motion. This creates a fine “dusting” rather than clumps of spice. It ensures an even color and a subtle flavor that doesn’t overwhelm the delicate chives.
Finally, wait until the very last second to add your chives. If you put them on while the potatoes are screaming hot, they will wilt and turn dark green. Adding them just before the plate hits the table ensures they stay bright, crisp, and aromatic for your guests.
Frequently Asked Questions
Can I use Russet potatoes instead of Yukon Gold?
You can use Russets, but the texture will be significantly different. Russets have a much thicker, starchier skin that can become quite tough when baked twice. Yukon Golds are preferred for “mini” versions because their skins are delicate enough to be eaten easily in one or two bites while still providing a great crunch.
Why did my potato shells crack when I was scooping them?
Cracking usually happens for two reasons: either the potatoes were over-baked and became brittle, or you were a bit too aggressive with the spoon. Make sure to leave at least 1/4 inch of flesh to act as a buffer. If a shell does crack, you can often “glue” it back together with a bit of the potato filling before the second bake.
How do I keep the potatoes upright on a serving platter?
The best trick is to slice a tiny, flat sliver off the bottom of each potato before you fill them. If you’re still worried about them sliding around, you can serve them on a bed of coarse sea salt or crumpled parchment paper. This adds a nice rustic look and provides enough friction to keep them perfectly upright.
Can I make these vegan?
Absolutely! You can substitute the butter with a high-quality plant-based butter and swap the sour cream for a thick cashew cream or a dairy-free sour cream alternative. Just ensure the vegan substitutes are thick enough to hold a peak; if the cashew cream is too watery, the filling will collapse in the oven.
What is the best way to store leftovers?
Store any leftovers in an airtight container in the refrigerator for up to 3 days. I do not recommend freezing these, as the texture of the sour cream and the potato starch will change significantly when thawed, often becoming grainy or watery. For the best results, reheat them in the oven or air fryer to maintain the skin’s crispness.
Loaded Twice-Baked Mini Potatoes
Course: AppetizerCuisine: AmericanDifficulty: easy4
servings15
minutes1
hour75
Minutes210
kcalAmerican
Ingredients
8-10 small Yukon Gold potatoes (roughly 2-3 inches in diameter)
4 tablespoons unsalted butter, melted (divided)
1/4 cup sour cream
1/2 teaspoon sea salt
1/4 teaspoon cracked black pepper
1 teaspoon smoked paprika
3 tablespoons fresh chives, finely chopped
1 tablespoon olive oil
Directions
- Preheat your oven to 400 degrees F. Scrub the potatoes clean and pat them completely dry with a paper towel. Moisture is the enemy of a crispy skin.
- Rub the outside of each potato with olive oil and a generous pinch of salt. Place them directly on the oven rack with a baking sheet on the lower rack to catch drips. Do not use foil. This allows hot air to circulate entirely around the potato, crisping the skin.
- Bake for 35 to 40 minutes (for small potatoes) until the skins are taut and the centers are tender when pierced with a fork.
- Remove from the oven and let cool for 5 minutes. Instead of slicing lengthwise, slice off the top quarter of each potato horizontally so they can stand upright. Carefully scoop out the warm centers into a bowl using a small spoon or melon baller, leaving a sturdy 1/4 inch thick shell at the bottom and sides.
- Mash the potato centers with 3 tablespoons of the butter, the sour cream, salt, and pepper until completely smooth. For the fluffiest texture shown in the image, use a hand mixer to whip air into the filling until it forms stiff peaks.
- Spoon the mixture into a piping bag with a star tip (or use a sturdy plastic bag with the corner snipped) and pipe the filling back into the shells in a high, swirling mound.
- Drizzle the remaining 1 tablespoon of melted butter over the piped peaks. Return the potatoes to the oven for 8-10 minutes to set the filling and lightly brown the edges.
- Garnish with a heavy dusting of smoked paprika and a generous sprinkle of fresh chives before serving.
Notes
- Do not wrap potatoes in foil as it traps moisture and leads to soggy skins. For the best presentation and texture, use a hand mixer to whip the filling and a piping bag to refill the shells.