
Imagine biting through a shatter-crisp, salty potato skin into a center so light and fluffy it practically melts on your tongue. Most home cooks settle for a sad, steamed potato that’s been trapped in a foil-wrapped “steam prison,” resulting in a mushy exterior and a gummy interior. That ends today because we’re focusing on the ultimate moisture-control method for Loaded Twice-Baked Potatoes.
The secret to a restaurant-quality potato isn’t just the toppings; it’s the structural integrity of the shell. By ditching the foil and using a specific salt-rub technique, you create a sturdy, cracker-like crust that can actually hold the weight of all that cheese and bacon. It’s the difference between a potato that collapses on your plate and one that stands tall as the star of the meal.
I’ve found that the real trick to the fluffiest filling is mashing the potatoes while they’re still steaming hot. If you let the potato flesh cool down before mashing, the starches set and become heavy. Work quickly, use a hand masher, and you’ll achieve that cloud-like texture every single time. Oh man, the smell of the salty skins hitting the oven air is enough to make anyone hungry!
The Science of the Perfect Russet Shell
When you’re making Loaded Twice-Baked Potatoes, the variety of potato you choose is the most important decision you’ll make. You need a Russet potato because it’s high in amylose starch. These starch granules are large and tend to separate when cooked, which creates that dry, mealy texture that’s perfect for soaking up butter and sour cream.
Lower-starch potatoes, like Yukon Golds or red potatoes, have more amylopectin, which makes them creamy but also prone to becoming “gluey” if you overwork them. For a twice-baked application, the Russet’s thick skin is its greatest asset. It acts as a natural baking vessel that can withstand high heat and heavy fillings without tearing apart.
The salt-rub technique works through a process called osmosis. When you coat the oiled skin in kosher salt, the salt draws surface moisture out of the skin as it bakes. This dehydrates the exterior, allowing it to crisp up into a rigid, flavorful shell. Without this step, the moisture stays trapped in the skin, leaving you with a leathery, chewy texture instead of a satisfying crunch.
Essential Components for Loaded Twice-Baked Potatoes
Quality ingredients make a massive difference when you’re working with a simple base like a potato. I always reach for a block of sharp cheddar and grate it myself. Pre-shredded cheese is coated in potato starch or cellulose to prevent clumping in the bag, which can make your melted topping feel gritty or oily rather than smooth and gooey.
Fat is your friend here for emulsification. Unsalted butter allows you to control the seasoning perfectly, while full-fat sour cream adds the necessary tang to cut through the starch. If you use low-fat versions, the filling often lacks the body needed to stay “piled high” in the shell, leading to a flat, runny interior that just isn’t as satisfying.
Don’t skimp on the salt for the crust. Use a coarse kosher salt rather than fine table salt. The larger grains provide a better crunch and won’t dissolve instantly into the oil, ensuring that every bite of the skin is seasoned and textured. It’s that contrast between the salty, rugged skin and the rich, velvety mash that makes this dish iconic.
Choosing the Right Potato Size and Shape
Look for potatoes that are roughly the same size so they all finish cooking at the same time. If you have one giant potato and two small ones, the small ones will overcook and become tough before the big one is tender. Uniformity is the key to a stress-free kitchen experience.
Shape matters just as much as size for the “boat” presentation. Choose oblong, symmetrical potatoes rather than round or lumpy ones. An oblong potato provides a longer “vessel” for the toppings, making it easier to scoop out the flesh and much easier for your guests to eat with a fork and knife.
Dairy Ratios: Achieving Creamy vs. Gummy Textures
The ratio of liquid to fat is a delicate balance. I use whole milk and full-fat sour cream because the fat molecules coat the starch granules, preventing them from bonding together into a sticky mess. If you add too much thin liquid, like skim milk, the filling loses its structural integrity and won’t hold those beautiful “craggy” peaks.
Always add your dairy and butter to the potatoes while they are hot. Cold dairy can shock the starches and make the mixture tighten up. By using room-temperature butter and slightly warmed milk, you ensure a seamless, creamy emulsion that stays light and airy even after the second bake.
Step-by-Step: Preparing the Structural Potato Base
Start by preheating your oven to 400 degrees F. This high heat is non-negotiable for getting that skin to crisp up quickly. Prick the potatoes several times with a fork to allow steam to escape; otherwise, the internal pressure can cause the potato to burst, which is a mess nobody wants to clean up.
Rub the potatoes with olive oil and a generous amount of salt before placing them directly on the oven rack. You’ll know they’re done when the skin looks dark and matte, and the potato gives slightly when you squeeze it with an oven mitt. The interior should feel soft and yielding, usually after about an hour of roasting.
The Salt-Rub and Direct-Rack Method
Placing the potatoes directly on the rack allows for 360-degree airflow. If you bake them on a flat cookie sheet, the side touching the metal will often get soggy or “fried” while the top stays soft. Air circulation is the secret to a uniform, cracker-like crust all the way around the tuber.
To keep your oven clean, place a large baking sheet on the rack below the potatoes. This will catch any oil drips or salt that falls off during the cooking process. It’s a simple step that saves you from a smoky kitchen later on while still reaping the benefits of direct-rack roasting.
Precision Slicing and the 1/4-Inch Wall Rule
Once the potatoes are cool enough to handle but still very warm, slice them lengthwise. Use a sharp knife to ensure a clean cut through the crispy skin. If you wait until they are cold, the skin can become leathery and harder to slice without tearing the delicate interior.
When scooping, leave a 1/4-inch “wall” of potato flesh attached to the skin. This layer of potato acts as an insurance policy, providing the structural support needed to keep the shell from collapsing. If you scoop too close to the skin, the shell will become flimsy and won’t be able to hold the heavy, loaded filling.
Mixing the Filling for Maximum Aeration
Put down the food processor! Mechanical blades move too fast and rupture the starch granules in the potato, releasing a sticky substance that turns your mash into a gluey, gummy paste. A simple hand masher or even a sturdy fork is all you need to achieve a light, broken-up texture.
Once you’ve mashed the potatoes with the butter and dairy, gently fold in your bacon, cheese, and green onions. Use a “fold and lift” motion with a spatula rather than stirring vigorously. This keeps the air you’ve worked into the mash from escaping, ensuring the final product is as fluffy as a cloud.
The “Craggy Top” Technique for Texture
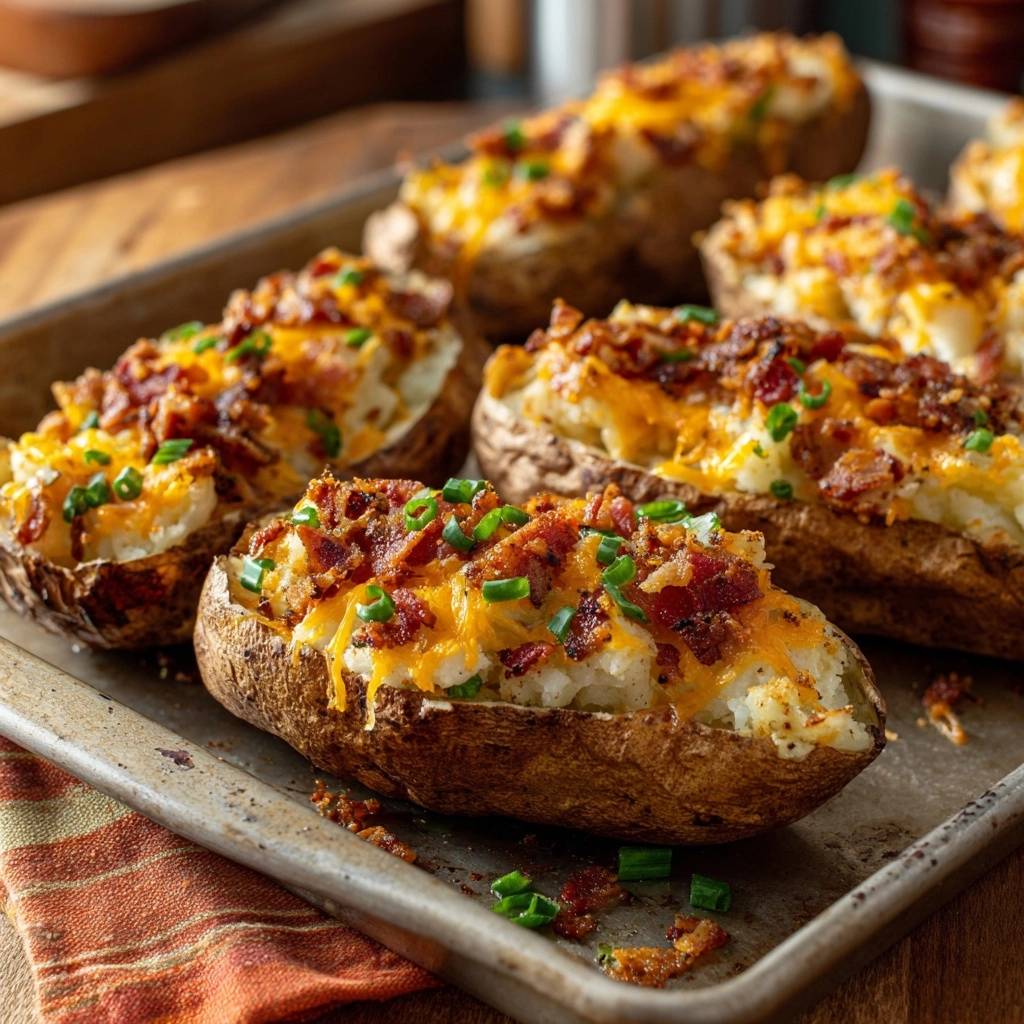
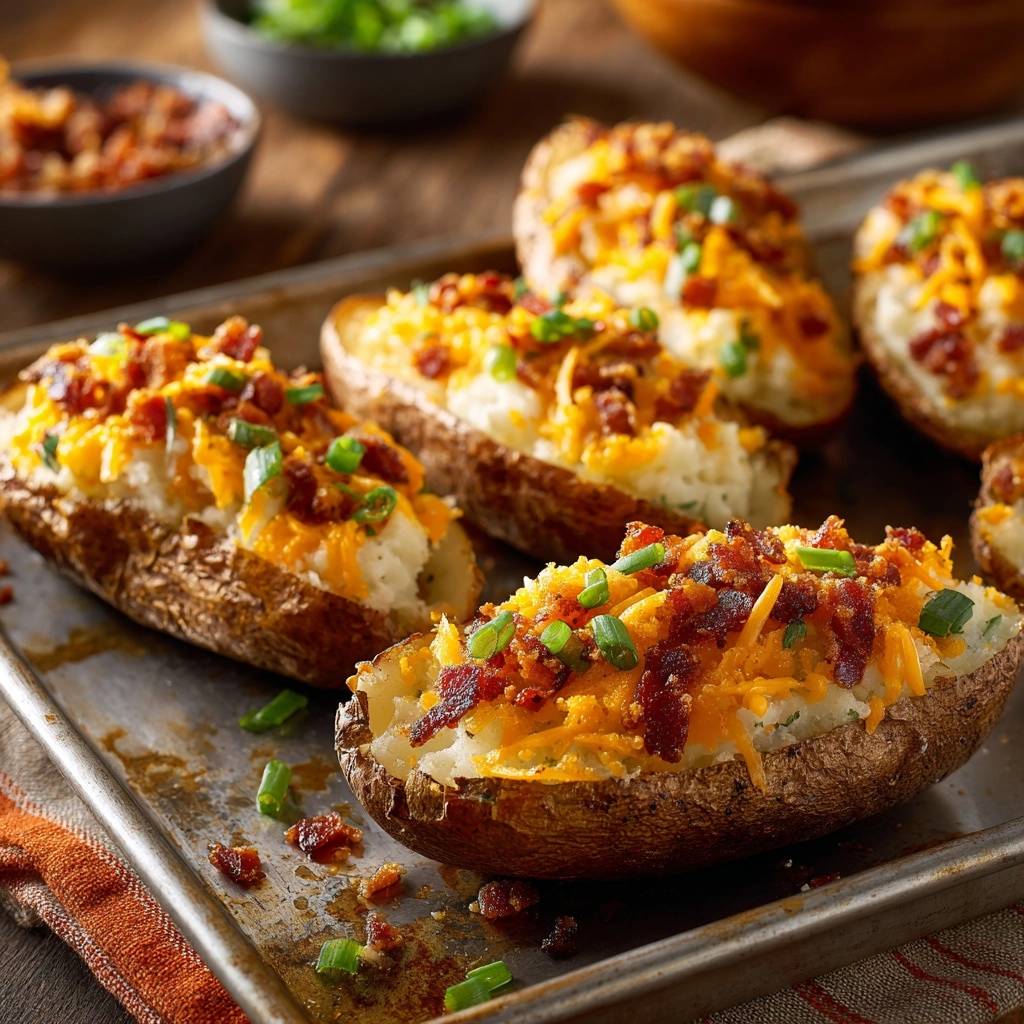
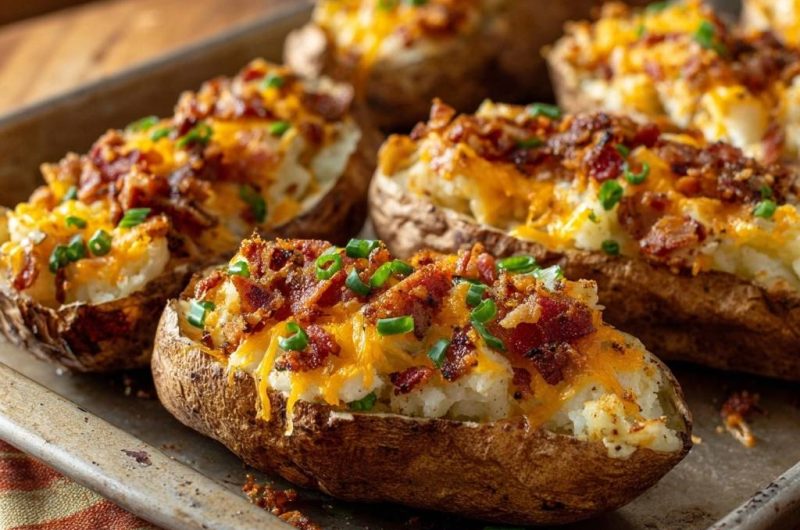
When you spoon the filling back into the shells, resist the urge to smooth it out with the back of a spoon. You want the surface to be rough, with little peaks and valleys. These “craggy” bits are the best part because they catch the extra cheese and bacon bits perfectly.
During the second bake, those high points of the potato mash will brown and caramelize, creating tiny pockets of extra crunch. This adds another layer of texture to the dish, contrasting beautifully with the creamy center and the crispy bottom skin. It looks more rustic and appetizing, too!
The Second Bake: Melting and Setting
The second trip to the oven is all about melting the cheese and heating the filling through so everything is piping hot. It usually takes about 10 to 15 minutes at 400 degrees F. Keep a close eye on them; you want the cheese to be bubbly and just starting to turn golden brown around the edges.
If you overbake them during this stage, the sour cream in the filling can start to break down and release oil, making the potato feel greasy. You’re looking for that perfect moment where the cheese is fully melted but hasn’t separated. The aroma of melting cheddar and toasted potato is absolutely incredible at this stage!
Troubleshooting Common Potato Problems
If your potato skins come out soft, it’s usually because of one of two things: too much oil or too low of a temperature. Make sure you’re only using enough oil to help the salt stick, and ensure your oven is truly at 400 degrees F. A kitchen thermometer can help verify your oven’s accuracy.
If your filling feels dry or crumbly, don’t panic. You can easily fix this by folding in a tablespoon or two of warm milk. Never use cold milk for this, as it won’t incorporate as easily. The goal is a mixture that holds its shape but still looks moist and glistening from the butter and sour cream.
Did a shell tear while you were scooping? It happens to the best of us! You can create a “splint” using a small ring of crumpled aluminum foil to hold the potato together while it bakes the second time. Once the cheese melts and the potato sets, it will usually hold its shape on its own, and you can remove the foil before serving.
Make-Ahead Strategies and Storage Logistics
These potatoes are a fantastic make-ahead side dish. You can prepare them all the way up to the second bake, then cover them tightly and store them in the refrigerator for up to two days. When you’re ready to eat, just add about 5 extra minutes to the second bake time to ensure the chilled center gets hot.
For long-term storage, you can freeze these potatoes. Use the “flash freeze” method: place the filled (but not yet second-baked) potatoes on a tray in the freezer for an hour until they are firm. Then, wrap each one individually in plastic wrap and store them in a freezer bag for up to three months. Do not freeze them after the second bake, as the cheese texture can become grainy.
To reheat from frozen, it’s best to let them thaw in the fridge overnight. However, if you’re in a rush, you can bake them straight from the freezer at 350 degrees F for about 30-40 minutes. An air fryer also works wonders for reheating, as it helps the skin regain that signature “shatter-crisp” texture in just a few minutes.
Pairing Suggestions for a Complete Meal
Since these potatoes are incredibly rich and savory, they pair beautifully with a lean protein. A grilled steak or a simple roasted chicken breast provides a great balance. The saltiness of the potato skin complements the charred flavor of grilled meat perfectly.
To cut through all that heavy dairy and starch, I highly recommend serving something acidic on the side. A bright arugula salad with a lemon vinaigrette or a vinegar-based coleslaw works wonders. The acidity cleanses your palate between bites of the creamy potato, making the whole meal feel much more balanced and less “heavy.”
If you’re serving these at a party, they also work well alongside a platter of roasted vegetables. Asparagus or charred broccoli with a squeeze of lemon juice provides a nice pop of color and a fresh, earthy contrast to the loaded potatoes. It’s a classic comfort meal that never fails to impress.
Expert Tips for Customizing Your Filling
Once you’ve mastered the base recipe, feel free to get creative with your add-ins. You can swap the sharp cheddar for smoked gouda for a deeper, woodsy flavor, or add some roasted garlic to the mash for a sweet, mellow kick. Just remember to keep your moisture-to-solid ratio consistent.
If you want a bit of heat, finely diced jalapeños or a dash of hot sauce in the filling can really wake up the flavors. Caramelized onions are another fantastic addition, providing a jammy sweetness that pairs beautifully with the salty bacon. Just make sure any vegetables you add are cooked first so they don’t release extra water into your fluffy mash.
Always finish with a fresh garnish. Adding the remaining green onions right before serving provides a necessary hit of freshness and a bit of “bite” that cuts through the richness. It also makes the dish look beautiful and vibrant. Cooking is all about those little details that take a dish from “good” to “unforgettable!”
Frequently Asked Questions
How do I store leftover twice-baked potatoes?
Store any leftovers in an airtight container in the refrigerator for up to 3 to 4 days. To maintain the crispy skin, it is best to reheat them in the oven or an air fryer at 350 degrees F until the center is hot. Avoid the microwave if possible, as it will make the potato skin soft and chewy rather than crisp.
Why is my potato filling gummy or sticky?
Gummy potatoes are usually the result of overworking the starch. This happens most often when using a food processor, blender, or electric mixer. The high-speed blades rupture the starch cells, creating a glue-like consistency. Always use a hand masher or a fork and mix only until the ingredients are just combined to keep the texture light and fluffy.
Can I use a different type of potato like Yukon Gold?
While you can use Yukon Golds, they aren’t the best choice for this specific recipe. Yukon Golds have a thinner skin and a waxier texture, which means they won’t get as crispy and the filling won’t be as fluffy. Russets are the gold standard for twice-baked potatoes because their thick skins create a sturdy “bowl” and their high starch content leads to the best mash.
What can I use instead of sour cream?
If you don’t have sour cream, plain Greek yogurt is an excellent substitute. It provides a similar tang and creamy texture while being slightly higher in protein. You could also use heavy cream with a teaspoon of lemon juice mixed in to mimic the acidity of sour cream. Avoid using low-fat yogurt, as it may become watery when heated.
Can I make these without bacon?
Absolutely! You can leave the bacon out for a vegetarian version. To keep that smoky flavor, try adding a teaspoon of smoked paprika to the filling or using a smoked cheese like smoked cheddar or provolone. Sun-dried tomatoes or sautéed mushrooms also make excellent savory replacements for the bacon bits.
How do I prevent the potato shells from falling over in the oven?
If your potatoes are rolling around on the baking sheet, you can slice a tiny, thin sliver off the bottom of the potato skin to create a flat base. Just be careful not to cut all the way through to the filling. Alternatively, you can scrunch up some aluminum foil into small “nests” to hold the potatoes upright during the second bake.
Loaded Twice-Baked Potatoes
Course: Side DishCuisine: AmericanDifficulty: easy6
servings15
minutes1
hour60
Minutes450
kcalAmerican
Ingredients
6 large Russet potatoes, scrubbed and dried thoroughly
2 tablespoons olive oil
1 tablespoon kosher salt
1/2 cup unsalted butter, softened
1/2 cup sour cream
1/4 cup whole milk
2 cups shredded sharp cheddar cheese
1/2 pound crispy cooked bacon bits
3 green onions, thinly sliced
Salt and black pepper to taste
Directions
- Preheat your oven to 400 degrees F. To solve the soggy skin problem, do not wrap your potatoes in foil. Instead, prick them with a fork, rub the outsides with olive oil, and coat them generously with kosher salt. Place them directly on the oven rack with a baking sheet on the rack below to catch drips. Bake for 50 to 60 minutes until the skins are shatter-crisp and the centers are tender.
- Remove potatoes and let them cool just enough to handle. Slice each potato in half lengthwise to create two boat-shaped halves (this matches the visual of the open-faced, high-rimmed shells).
- Carefully scoop out the warm potato flesh into a large bowl, leaving a sturdy 1/4 inch thick shell. This thickness is vital to prevent the potato from tearing when you refill it.
- For the fluffiest filling, mash the potato flesh while it is still hot. Add the butter, sour cream, and milk. Use a hand masher rather than a food processor to avoid a gummy, glue-like texture. Fold in half of the cheese, half of the bacon, and half of the green onions. Season with salt and pepper.
- Spoon the mixture back into the crispy shells. Do not smooth the tops; leave the filling textured and “craggy” to catch the toppings.
- Place the potatoes on a baking sheet. Top with the remaining cheese and bacon bits.
- Return to the oven for 10 to 15 minutes, or until the cheese is bubbly and the filling is heated through. Garnish with the remaining fresh green onions before serving.
Notes
- Do not use a food processor for the filling to avoid a gummy texture; a hand masher is recommended. Ensure potatoes are scrubbed and dried thoroughly before oiling to achieve maximum skin crispness.


