
Have you ever pulled a tray of matcha cookies out of the oven only to find a puddle of green grease instead of a thick, bakery-style treat? It’s incredibly frustrating when that earthy, vibrant tea flavor is wasted on a cookie that turns soggy the moment you add frosting. Most recipes fail because they don’t account for the unique way matcha interacts with moisture, leading to a flat mess that can’t support a beautiful swirl of buttercream.
The secret to a perfect Matcha Chocolate Chip Frosted Cookie lies in structural integrity and temperature control. We’re aiming for a specific texture contrast: a crisp, golden-edged base that stays firm under a cloud of stabilized frosting. By balancing the fats and using a specific chilling method, you’ll create a cookie that looks as professional as it tastes, with a soft, chewy center that never feels heavy or damp.
I’ve found that the real trick to avoiding that dreaded “soggy bottom” is all about flour hydration. When you let the dough rest, the starches actually soak up the liquid from the eggs and butter. This creates a sturdier crumb that stands tall in the oven. If you skip the chill, your cookies will spread into thin pancakes, so patience is truly your best ingredient here!
The Chemistry of Matcha and Moisture Balance
Matcha isn’t just a flavor additive; it’s a highly absorbent, finely ground leaf that behaves much like a secondary flour. Because it’s so concentrated, it acts as a drying agent in your dough. If you don’t balance it with the right amount of fat and sugar, your cookies can end up crumbly or unpleasantly grassy. However, when paired with the 2.5 cups of all-purpose flour in this recipe, it provides the “skyscraper” height that makes these cookies so impressive.
Using a higher flour count is a deliberate choice to ensure the cookies don’t collapse under the weight of the matcha buttercream. Matcha also contains tannins, which provide that signature earthy punch. To keep those tannins from becoming overly bitter, we use a specific blend of granulated and brown sugars. The sugar doesn’t just sweeten; it tenderizes the dough and helps the edges caramelize, creating a protective barrier against the moisture in the frosting.
Culinary grade matcha is the standard for baking because it’s designed to hold its color and flavor at high temperatures. While ceremonial grade is beautiful for drinking, its delicate nuances often disappear in a 350°F oven. The culinary grade provides a robust, punchy green tea profile that stands up to the sweetness of the semi-sweet chocolate chips and the richness of the butter.
Essential Components for Matcha Chocolate Chip Frosted Cookies
The foundation of a great cookie starts with the state of your butter. You want it “softened but cool,” which means it should give slightly when pressed but still feel chilly to the touch. If the butter is too warm or greasy, it won’t hold the air bubbles you create during the creaming process. This lack of aeration is exactly why many cookies come out flat and dense rather than light and fluffy.
We use a mix of granulated and light brown sugar to get the best of both worlds. The granulated sugar helps the edges get that satisfying crunch, while the molasses in the brown sugar keeps the center moist and chewy. It’s a delicate balance that ensures the cookie is sturdy enough to hold in your hand but soft enough to melt in your mouth. In addition, the mini chocolate chips are vital because their small size ensures an even distribution of chocolate in every single bite without weighing down the dough.
Sifting is a non-negotiable step when working with matcha. Matcha powder is notorious for clumping, and biting into a dry, bitter pocket of green tea powder is a quick way to ruin the experience. Sifting it with the flour and baking soda ensures a uniform color and a smooth, consistent flavor throughout the entire batch. For the frosting, a splash of heavy cream is the secret weapon for stabilization, giving the buttercream enough body to hold its shape without weeping into the cookie base.
Selecting the Right Matcha Grade
When you’re at the store, look specifically for high-quality culinary grade matcha. It has a deeper, more intense flavor that survives the baking process much better than the lighter ceremonial versions. This grade also retains its vibrant green hue even after ten minutes in the oven. If your matcha looks dull or brownish in the tin, it has likely oxidized and won’t give you that beautiful forest-green pop you’re looking for.
Step-by-Step: Building the Perfect Cookie Base
The first phase is the creaming method, and you really can’t rush this. You need to beat the butter and sugars for a full 3 to 5 minutes. You’ll watch the mixture transform from a gritty, yellow paste into a pale, voluminous cream. This step is where you build the “bones” of the cookie. Those tiny air pockets will expand in the oven, giving you the lift needed to support a heavy frosting swirl later on.
Next, you’ll emulsify the eggs into the creamed mixture. Add them one at a time, beating thoroughly after each addition. You’re looking for a smooth, glossy batter that looks completely unified. If the mixture looks curdled or broken, keep beating for another minute. A proper emulsion ensures that the fat and water in the dough don’t separate during baking, which is a major cause of greasy, flat cookies.
When it’s time to add the dry ingredients, switch to a low speed or use a spatula. You want to incorporate the sifted flour and matcha just until no white streaks remain. Overworking the dough at this stage develops too much gluten, which will turn your soft cookies into tough, bread-like pucks. Keep it gentle to maintain that tender, melt-in-your-mouth crumb that makes bakery cookies so addictive.
Finally, fold in the mini chocolate chips by hand. Using a spatula allows you to distribute the chips evenly without deflating all that beautiful air you worked so hard to incorporate. You’ll notice the dough is quite thick and holds its shape well. This density is a good sign; it means your cookies have the structural integrity to bake upward and create a thick, domed shape rather than spreading across the pan.
The Anti-Soggy Secret: Temperature and Hydration
The most important step in this entire process is the chill time. You must refrigerate the dough for at least one hour, though 24 hours is even better. During this rest period, a process called “flour hydration” occurs. The flour fully absorbs the moisture from the eggs, which thickens the dough and concentrates the flavors. If you bake the dough while it’s warm, the butter will melt faster than the cookie can set, leading to a thin, greasy result.
A chilled dough also ensures that the cookies bake with a beautiful “set” edge and a soft, underbaked center. If you go for the full 24-hour chill, you’ll notice the matcha flavor becomes more complex and the texture becomes even more substantial. This is the difference between a standard home-baked cookie and a professional-grade treat that stays fresh and crisp for days on end.
Precision Baking for Structural Integrity
When you’re ready to bake, don’t flatten the dough balls. Leave them as tall mounds on the parchment paper. This encourages them to bake “up” rather than “out.” Bake them at 350°F for about 10 to 12 minutes. You’re looking for the edges to be just barely golden and firm to the touch, while the centers should still look slightly soft and “underdone.”
This is where “carryover cooking” comes into play. You must let the cookies sit on the hot baking sheet for exactly 10 minutes after removing them from the oven. The heat from the pan will finish cooking the centers and firm up the bottoms without drying out the rest of the cookie. This creates a sturdy, crisp base that can easily support a mountain of matcha buttercream without bending or breaking.
Crafting the Stabilized Matcha Buttercream
A great frosting should be stiff enough to hold a sharp peak but smooth enough to melt on your tongue. Start by whipping your butter until it’s incredibly pale and airy. When you add the powdered sugar and matcha, do it gradually to avoid a green sugar cloud in your kitchen. Sifting the sugar and matcha together beforehand is vital for a silky finish that won’t clog your piping tip.
The addition of heavy cream is what transforms this from a standard frosting into a stabilized buttercream. Whip it on high for at least two minutes until it’s thick and holds its shape perfectly. This “crusting” buttercream develops a very thin, dry outer layer that prevents it from weeping moisture back into the cookie. This is the final step in our anti-soggy strategy, ensuring your cookies stay crisp even after they’re frosted.
Troubleshooting Common Matcha Baking Issues
If your cookies turned brown instead of green, your oven might have hot spots, or you may have baked them a minute too long. Matcha is sensitive to high heat, so keep a close eye on them at the 10-minute mark. Another common issue is grainy frosting. This usually happens if the powdered sugar wasn’t sifted or if the butter was too cold when you started. Always ensure your frosting butter is pliable but not melted.
If you find the matcha flavor is too weak, check the expiration date on your powder. Matcha oxidizes quickly once opened, losing its vibrant color and punchy flavor. Store your matcha in an airtight, opaque container in a cool, dark place to keep it fresh. If your chocolate chips all sank to the bottom, it’s likely because the dough was too warm when it went into the oven; that’s why the chilling step is so critical!
Storage and Make-Ahead Strategies
To keep that perfect texture, store your frosted cookies in a single layer in an airtight container. They will stay fresh at room temperature for up to three days. Because the buttercream is stabilized, it won’t melt or lose its shape easily. If you need to stack them, place a piece of parchment paper between the layers, but be careful not to crush those beautiful frosting swirls.
You can also make the dough in advance and freeze it. Scoop the dough into balls, flash-freeze them on a tray for an hour, and then toss them into a freezer bag. When you’re ready for a treat, you can bake them straight from the freezer—just add an extra minute or two to the bake time. This is a fantastic way to have “on-demand” bakery cookies whenever the craving strikes.
Expert Tips for Professional Presentation
For that high-end bakery look, use a large open star tip to pipe your frosting. Start in the center of the cookie, spiral outward to the edge, and then spiral back up toward the middle to create a tall, decorative peak. This “high swirl” look adds a lot of visual drama and makes the cookies feel like a special occasion treat.
To finish them off, I love to do a very light dusting of matcha powder over the top of the frosting. It adds a beautiful pop of color and signals the flavor profile to anyone about to take a bite. You can also press a few extra mini chocolate chips into the frosting while it’s still fresh. It’s these little details that make people ask which professional bakery you bought them from!
How should I store these cookies to keep them from getting soft?
The best way to store these is in an airtight container at room temperature for up to 3 days. Because we used the “Anti-Soggy” method with a stabilized buttercream and a well-hydrated dough, they hold their texture much better than standard cookies. Avoid refrigerating them if possible, as the moisture in the fridge can actually soften the cookie base and make the frosting lose its luster.
Why did my cookies spread so much and turn out thin?
This usually happens for two reasons: the butter was too warm when you started creaming, or you skipped the chilling step. If the dough is warm when it hits the oven, the fat melts before the flour structure can set. Always ensure your dough is cold to the touch before baking, and make sure you aren’t over-beating the eggs, which can add too much liquid-like consistency if not balanced by the chill time.
Can I use regular chocolate chips instead of mini chips?
You can, but mini chips are highly recommended for this specific recipe. Because these cookies are thick and topped with a heavy frosting, the mini chips provide a better “structural distribution.” Large chips can create weak spots in the cookie crumb, causing it to break or crumble under the weight of the buttercream. Mini chips ensure you get chocolate in every bite without compromising the cookie’s strength.
What can I use if I don’t have heavy cream for the frosting?
If you don’t have heavy cream, you can use whole milk, but use only half the amount to start. The heavy cream is preferred because its high fat content helps stabilize the buttercream, allowing it to hold those high, decorative peaks. If you use milk, the frosting will be slightly softer and may not “crust” as effectively, so you might need to add a little extra powdered sugar to compensate for the consistency.
My frosting is too soft to pipe. How do I fix it?
If your frosting feels runny or won’t hold a peak, it’s likely because the butter was too warm or the room is too hot. Try chilling the entire bowl of frosting in the refrigerator for 15 to 20 minutes. After it chills, whip it again for a minute. If it’s still too soft, add more sifted powdered sugar, one tablespoon at a time, until it reaches a stiff, pipeable consistency.
Can I freeze the frosted cookies?
Yes, you can freeze them, but it requires a bit of care. Place the frosted cookies on a baking sheet in the freezer for an hour until the frosting is frozen solid. Then, wrap them individually in plastic wrap and store them in a freezer-safe container for up to a month. To eat, thaw them in the refrigerator overnight and then let them come to room temperature before serving to restore the best texture.
Matcha Chocolate Chip Frosted Cookies
Course: DessertCuisine: AmericanDifficulty: easy18
cookies20
minutes12
minutes60
MinutesAmerican
Ingredients
1 cup unsalted butter, softened but cool to the touch
3/4 cup granulated sugar
3/4 cup light brown sugar, packed
2 large eggs, room temperature
1 teaspoon vanilla extract
2 1/2 cups all-purpose flour (increased for structural integrity)
2 tablespoons high-quality culinary grade matcha powder
1 teaspoon baking soda
1/2 teaspoon salt
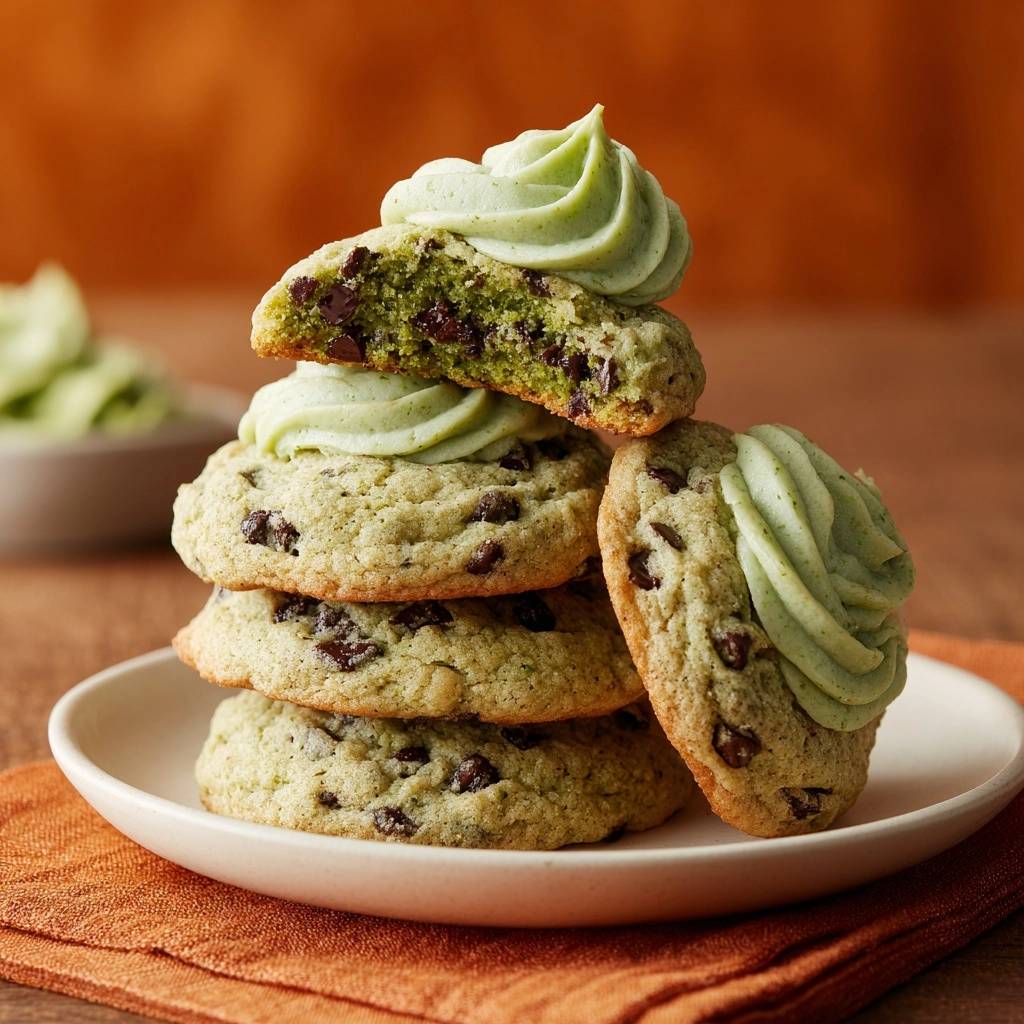
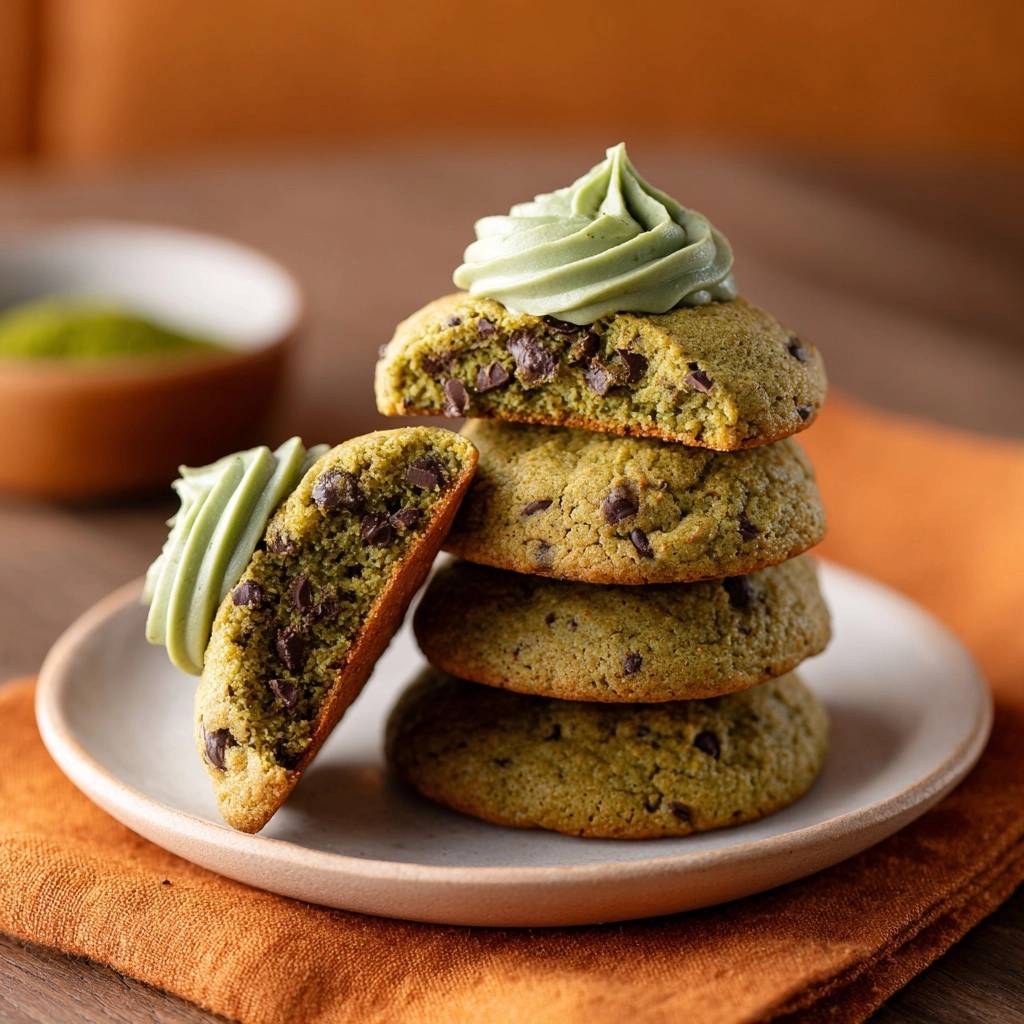
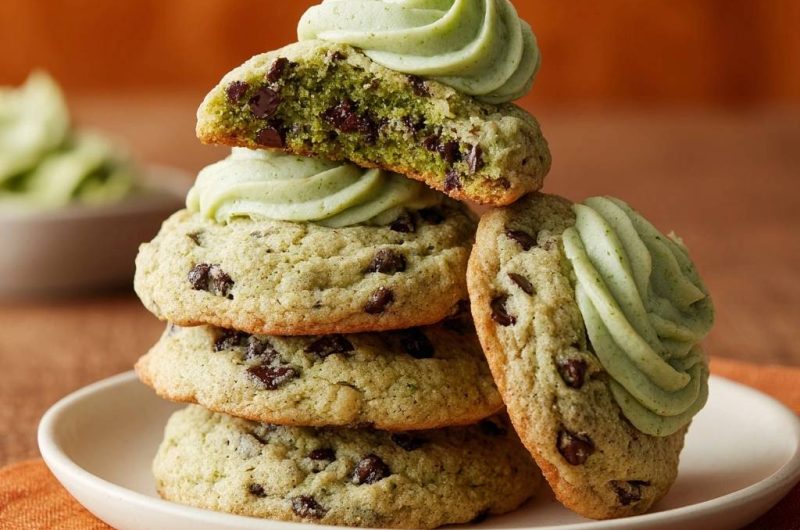
1 1/2 cups mini semi-sweet chocolate chips (to match the fine distribution in the image)
For the Matcha Buttercream:
1/2 cup unsalted butter, softened
2 1/2 cups powdered sugar, sifted
1 1/2 teaspoons matcha powder
1 tablespoon heavy cream
1/2 teaspoon vanilla extract
Directions
- To prevent the common issue of cookies spreading too thin and becoming soggy, start by creaming your butter and sugars for 3-5 minutes until very pale and fluffy. This incorporates air that provides the necessary lift and structure seen in the thick, domed cookies in the image.
- Add eggs one at a time, beating well after each addition, followed by the vanilla.
- In a separate bowl, whisk the flour, matcha powder, baking soda, and salt. Sift these dry ingredients into the wet mixture. Sifting is the essential step to ensure no bitter matcha clumps remain and to keep the crumb light.
- Fold in the mini chocolate chips by hand until evenly distributed.
- The Anti-Soggy Secret: Chill the dough for at least 1 hour (or up to 24 hours) before scooping. This hydrates the flour and solidifies the fats so the cookies bake upward rather than outward, creating a sturdy, thick base for the heavy frosting.
- Preheat your oven to 350°F (175°C). Line a heavy baking sheet with parchment paper or a silicone mat.
- Scoop 2-tablespoon sized balls of dough onto the sheet, spacing them 2 inches apart. Do not flatten them.
- Bake for 10 to 12 minutes. The edges should be lightly golden and set, but the centers should remain soft.
- Let the cookies cool on the baking sheet for at least 10 minutes before transferring to a wire rack. This carryover cooking time ensures the bottom is perfectly crisp and strong enough to hold the topping without bending.
- For the frosting: Beat the butter until smooth. Gradually add powdered sugar, matcha, vanilla, and cream. Whip on high for 2 minutes until the frosting is stiff and holds its shape.
- Once cookies are completely cold, use a piping bag with a large open star or round tip to pipe a high, decorative swirl onto each cookie. The stabilized buttercream will hold its peak and won’t weep into the cookie base, keeping them fresh and crisp for days.
Notes
- The Anti-Soggy Secret: Chill the dough for at least 1 hour to hydrate the flour and solidify fats. Ensure cookies are completely cold before frosting to maintain the structure of the stabilized buttercream.


