
You’ve likely experienced the disappointment of a beautiful pasta dinner that ends with a watery, flavorless puddle at the bottom of your bowl. It’s frustrating when the sauce refuses to cling to the noodles, leaving the spaghetti slick and bland while the good stuff sinks to the bottom. Most home cooks struggle with this because they rely on simmering watery tomatoes rather than concentrating their essence.
The secret to a restaurant-quality tomato pasta isn’t a secret ingredient; it’s a fundamental shift in technique. By moving away from the stovetop and into the high-heat environment of your oven, you transform humble cherry tomatoes into a jammy, concentrated base. This method prioritizes the emulsion, creating a “skyscraper” pasta dish where the sauce builds height and stays exactly where it belongs—wrapped around every single strand.
I’ve found that the real magic happens when you treat your pasta water like liquid gold. That cloudy, starchy liquid is the bridge that connects the fat of the olive oil to the acidity of the tomatoes. If you skip the step of finishing your pasta directly in the skillet with this water, you’ll never achieve that velvety, orange-hued glaze that defines a professional plate. Let’s fix your technique and ensure you never see a watery puddle again.
The Chemistry of a Non-Watery Tomato Sauce
Understanding why this sauce works requires a quick look at the science of heat. When you roast tomatoes at 400°F, you’re triggering the Maillard reaction, which is the chemical dance between amino acids and reducing sugars. This process creates complex, savory flavors that boiling simply cannot replicate. As the water evaporates in the oven, the natural sugars and glutamates in the tomatoes intensify, resulting in a deep umami punch.
Furthermore, cherry tomatoes are packed with pectin, a natural thickening agent found primarily in their skins. While large slicing tomatoes are mostly water and seeds, the high skin-to-flesh ratio of cherry tomatoes provides more pectin. When these skins burst and break down in the oven, they release this natural thickener, helping your sauce achieve a syrupy consistency that naturally resists thinning out.
Why Roasting Beats Simmering
Simmering canned or raw tomatoes on the stove often results in a sauce that tastes “flat” unless it’s cooked for hours. Roasting, however, creates “fond”—those caramelized, browned bits that stick to the sheet pan. These bits are concentrated flavor bombs. When you scrape them into your skillet, you’re adding layers of depth that provide a smoky, sweet foundation for the entire dish.

The Role of Starch and Fat Emulsification
An emulsion is a mixture of two liquids that normally don’t stay together, like oil and water. In this recipe, the starch molecules from the pasta water act as a stabilizer. They grab onto the extra virgin olive oil and the tomato juices, binding them into a unified, creamy sauce. Without that starch, the oil would just sit on top of the tomato juice, making the dish feel greasy rather than silky.
Essential Components for Roasted Cherry Tomato Spaghetti
Success starts with your shopping list. Since this recipe has very few ingredients, the quality of each one is magnified. You aren’t hiding behind heavy creams or meats, so every element needs to pull its weight. Using room temperature tomatoes can actually help them roast more evenly, as they won’t spend the first five minutes in the oven just trying to take the chill off.
Don’t be tempted to use pre-sliced garlic from a jar. The sulfurous bite of jarred garlic is too harsh for this delicate emulsion. Freshly sliced cloves will mellow and sweeten in the oven, turning into buttery slivers that melt into the pasta. Similarly, use a high-quality sea salt; the larger grains provide a better “scrub” when tossing the tomatoes on the pan, helping to release those precious juices.
Selecting the Best Cherry Tomato Varieties
I highly recommend using a mix of red and yellow cherry or grape tomatoes. Red varieties usually offer a classic, sharp acidity, while yellow Sun Gold tomatoes are famously sweet and fruity. Combining them creates a balanced flavor profile that hits every part of your palate. Grape tomatoes are also excellent here because their thicker skins provide even more pectin for a sturdier sauce.
The Importance of High-Quality Extra Virgin Olive Oil
In this dish, olive oil is a primary ingredient, not just a cooking medium. You want a cold-pressed extra virgin olive oil that has a slightly peppery finish. This “bite” complements the roasted garlic and the heat from the red pepper flakes. Save your cheaper “light” olive oil for frying; here, the flavor of the oil is the backbone of the emulsion.
Aged Parmesan vs. Pre-Grated Alternatives
If there is one rule you must follow, it’s this: grate your own cheese. Pre-shredded cheese is coated in potato starch or cellulose to prevent it from clumping in the bag. These anti-caking agents will ruin your emulsion, turning your sauce gritty or clumpy. A block of aged Parmigiano-Reggiano, finely grated on a microplane, will dissolve instantly into the sauce, creating that coveted “velvet” finish.
Step-by-Step: Concentrating Flavor on the Sheet Pan
Preheat your oven to a true 400°F. On a large rimmed sheet pan, toss your tomatoes with half of the olive oil, the garlic, and the spices. It is vital to spread them in a single layer. If the pan is crowded, the tomatoes will steam in their own moisture rather than roasting. You want dry heat to hit every surface so the skins can blister and char.
Watch for the visual cues. You’re looking for the moment the skins “pop” and the juices begin to bubble and turn syrupy. This usually takes about 15 to 20 minutes. If you see a little bit of blackening on the edges of the garlic or the tomato skins, don’t panic! That char is where the smoky complexity lives. Just ensure the garlic doesn’t turn acrid and dark brown.
The Critical “Al Dente” Timing Strategy
Most people overcook their pasta in the boiling water. For this recipe, you must pull the spaghetti out about 2 minutes before the package says it’s “al dente.” The pasta should still have a very firm, almost chalky bite in the very center. This is because the spaghetti will finish its cooking process inside the skillet, submerged in the tomato juices and pasta water.
This “carry-over cooking” is essential. As the pasta finishes softening in the sauce, it absorbs the tomato flavors directly into the grain of the noodle. If you start with fully cooked pasta, it won’t be able to soak up any of the sauce, and the mechanical action of tossing will likely cause the noodles to break and become mushy.
Executing the Emulsion: The Skillet Technique
This is the most active part of the process. Once you move the roasted tomatoes and all those pan juices into your skillet, add the undercooked pasta and a half-cup of that starchy water. Use tongs to toss the mixture vigorously over medium heat. You aren’t just stirring; you are whipping air and starch into the oil and juice.
As you toss, you’ll notice the liquid start to transform. It will go from a thin, watery red to a thick, opaque orange. This is the emulsion forming. If the pan starts to look dry or the pasta is sticking, add another splash of water. The goal is a glossy coating that looks like it was made with cream, even though there isn’t a drop of dairy in it yet.
Scraping the Sheet Pan for Liquid Gold
Do not leave the flavor behind on the roasting pan. Use a flexible spatula to get every drop of oil and every caramelized bit of garlic. If the juices have hardened on the pan, you can pour a tiny bit of the hot pasta water onto the sheet pan to “deglaze” it, scraping up the brown bits before pouring the whole mess into your skillet. That’s where the umami lives!
The Gradual Addition of Pasta Water
Patience is key during the final toss. Add the reserved water a splash at a time. If you dump it all in at once, you might end up with a soup. You want just enough liquid to keep the pasta moving freely. The final result should be a thick glaze that clings to the spaghetti even when you lift a bunch of it up with your tongs.
Flavor Variations and Ingredient Swaps
While this recipe is a masterpiece in its simplicity, you can certainly make it your own. The structural integrity of the sauce depends on the tomato-oil-starch ratio, so as long as you maintain that, you can play with the aromatics. Just be careful not to add ingredients that release too much moisture, like raw zucchini or mushrooms, as they will break the emulsion.
If you want to add a bit of brightness, try grating some fresh lemon zest over the dish right before serving. The citrus oils cut through the richness of the olive oil beautifully. You can also swap the red pepper flakes for a dollop of Calabrian chili paste if you prefer a deeper, more fermented heat that permeates the entire sauce.
Adding Protein Without Compromising Texture
If you want a heartier meal, grilled chicken or seared shrimp are fantastic additions. I recommend cooking your protein separately and resting it on top of the finished pasta. This prevents the protein from releasing juices into your carefully constructed emulsion. For a vegetarian protein boost, crispy roasted chickpeas add a wonderful textural contrast to the soft pasta.
Herb Substitutions and Aromatics
Fresh basil is the classic choice, but don’t overlook other herbs. Fresh oregano or thyme can be roasted right on the sheet pan with the tomatoes to infuse the oil with earthy notes. If you’re using “soft” herbs like parsley or mint, always fold them in at the very end, just like the basil, to keep their color vibrant and their flavor fresh.
Troubleshooting Common Pasta Texture Issues
Even experienced cooks sometimes run into trouble. The most common issue is a sauce that looks “broken” or greasy. This usually happens if the heat is too high or if you didn’t use enough pasta water. Another common pitfall is the “clump,” where the cheese hits a dry pan and sticks to itself rather than melting into the sauce.
If your pasta feels heavy or sticky, it’s likely over-reduced. The starch has become too concentrated. A simple fix is a final splash of hot water and a quick, vigorous toss. Remember, the pasta will continue to absorb liquid even as it sits on the plate, so it’s better for the sauce to look a little “loose” in the pan than too dry.
What to Do if the Sauce Breaks
If you see the oil separating from the tomato juice, don’t panic. Remove the skillet from the heat immediately. Add one teaspoon of pasta water and whisk or toss the pasta rapidly. The sudden introduction of moisture and the drop in temperature usually coaxes the emulsion back together. It’s all about that rapid agitation!
Fixing Overly Acidic or Sweet Batches
Tomatoes vary wildly in flavor depending on the season. If your sauce tastes too acidic, a tiny pinch of salt can actually mask the sourness better than sugar. If it’s too sweet, a few drops of high-quality balsamic or red wine vinegar can provide the necessary balance. Always taste your sauce right before adding the cheese to make these final adjustments.
Optimal Pairings for a Balanced Meal
Because this spaghetti is rich and savory, it pairs perfectly with something bright and bitter. A simple arugula salad with a lemon vinaigrette provides a sharp contrast to the jammy roasted tomatoes. The peppery greens mimic the notes in the high-quality olive oil, creating a cohesive dining experience.
You’ll also want a piece of crusty sourdough or a baguette. Even with a perfect emulsion, there will be concentrated tomato juices left on the plate. Using bread to mop up the remaining “liquid gold” is practically mandatory. Avoid heavy, buttery side dishes, as the pasta already provides plenty of healthy fats and richness.
Expert Tips for Success
Can I use regular large tomatoes for this recipe?
While you can, it isn’t recommended for this specific technique. Large tomatoes have a much higher water-to-skin ratio. They tend to collapse into a watery mess rather than roasting into jammy nuggets. If you must use them, core them and remove the watery seeds first, then chop them into one-inch chunks to mimic the size of cherry tomatoes.
How do I store and reheat leftovers without the pasta getting oily?
Store leftovers in an airtight container for up to three days. When reheating, the emulsion will have “broken” in the fridge. To fix this, add a tablespoon of water to the bowl before microwaving or tossing in a pan. The water will re-hydrate the starch and help the oil re-emulsify, preventing that greasy, fried-pasta texture.
Is there a gluten-free pasta that works with this emulsion?
Yes, but choose wisely. Corn-based gluten-free pastas often release a lot of starch, which is great for emulsions. Brown rice pastas can be a bit more finicky and prone to breaking. If using gluten-free noodles, be even more careful not to overcook them in the water, as they can turn from firm to mushy in a matter of seconds.
Can I make the roasted tomato base in advance?
Absolutely. You can roast the tomatoes, garlic, and oil up to two days in advance. Store the mixture in the refrigerator. When you’re ready to eat, simply warm the tomato mixture in a large skillet while your pasta boils. Since the “fond” and concentrated juices are already developed, you’ll get the same high-quality result with half the active work on dinner night.
The Final Assembly and Presentation
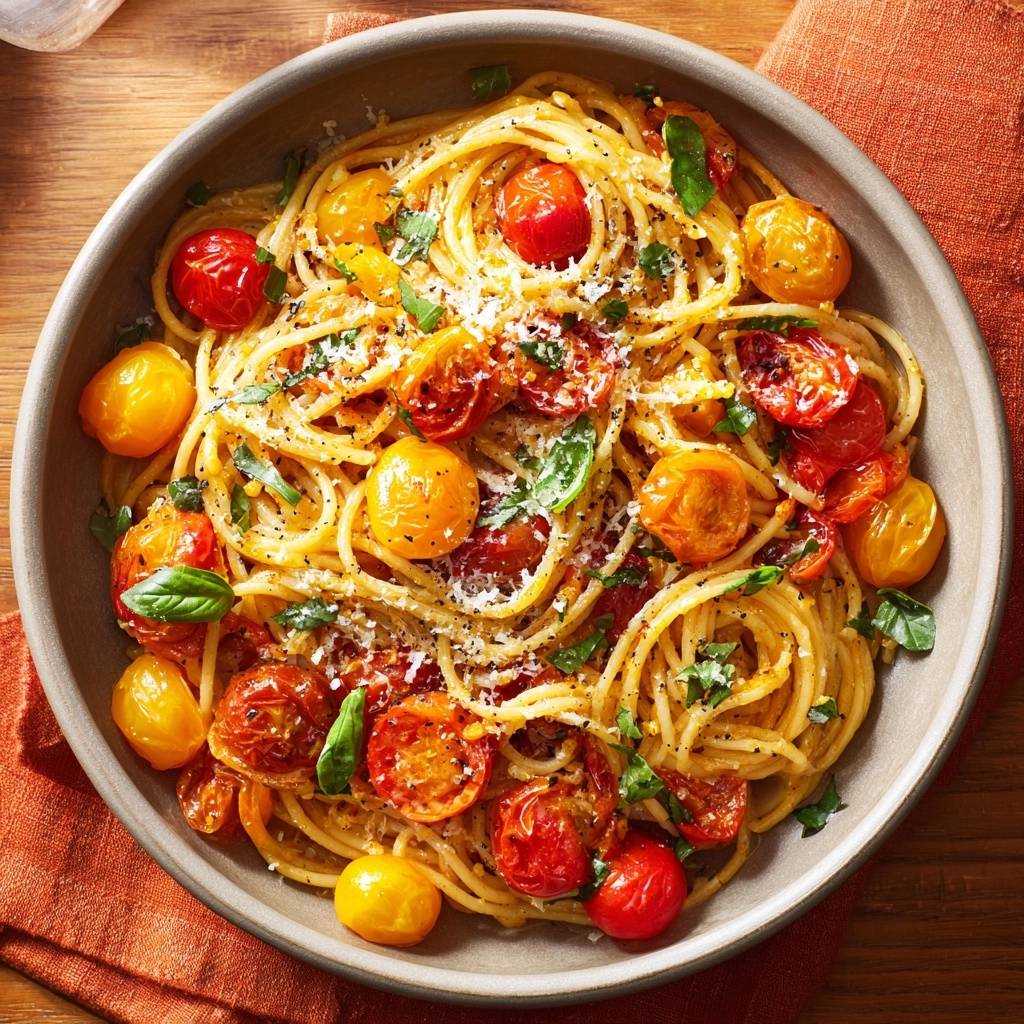
Plating is the final step in ensuring your Roasted Cherry Tomato Spaghetti looks as good as it tastes. Use a large carving fork or long tongs to twirl the spaghetti into a tight nest in the center of the bowl. This creates height, which keeps the pasta warm and allows the sauce to settle into the crevices of the “nest” rather than spreading out and cooling down.
Once the pasta is piled high, spoon any remaining tomatoes and sauce from the skillet directly over the top. Finish with a final, generous dusting of freshly grated Parmesan and a few cracks of black pepper. The contrast of the bright green basil against the deep orange sauce and the white cheese makes for a stunning, vibrant plate that tastes like pure summer.
Roasted Cherry Tomato Spaghetti
Course: Main CourseCuisine: Italian-AmericanDifficulty: easy4
servings10
minutes20
minutes30
Minutes580
kcalItalian-American
Ingredients
1 pound spaghetti
2 pints cherry tomatoes (red and yellow mix)
4 cloves garlic, thinly sliced
1/2 cup extra virgin olive oil, divided
1/2 teaspoon red pepper flakes
3/4 cup finely grated Parmesan cheese (plus extra for garnish)
1 cup fresh basil leaves, torn
Salt and freshly cracked black pepper to taste
Directions
- Preheat your oven to 400°F (200°C). On a large rimmed sheet pan, toss the cherry tomatoes with 1/4 cup of the olive oil, sliced garlic, red pepper flakes, salt, and pepper. Spread them in a single layer. Roast for 15 to 20 minutes until the skins burst, some edges are charred, and the juices have thickened into a syrupy consistency.
- While the tomatoes roast, bring a large pot of heavily salted water to a boil. Cook the spaghetti for 2 minutes less than the package directions for al dente. The pasta should still have a firm “bite” in the center.
- IMPORTANT STEP: Before draining the pasta, reserve 1 full cup of the cloudy, starchy pasta cooking water. This starch is the “glue” that prevents a watery sauce. Drain the pasta.
- Place a large skillet or wide pot over medium heat. Using a spatula, scrape the roasted tomatoes and every drop of the concentrated oil and caramelized juices from the sheet pan into the skillet. Add the undercooked pasta and 1/2 cup of the reserved pasta water.
- Toss vigorously with tongs for 2 minutes. The mechanical action of tossing, combined with the starch in the water and the fats from the oil, will emulsify into a creamy, orange-hued glaze. If the pasta looks dry or the sauce hasn’t fully coated the strands, add the remaining pasta water a splash at a time.
- Remove from heat. Stir in the remaining 1/4 cup of olive oil and the grated Parmesan cheese. Stir rapidly until the cheese melts into the emulsion, creating a “velvet” finish. Fold in the fresh basil.
- Serve immediately. Garnish with an extra dusting of Parmesan and a generous amount of freshly cracked black pepper to match the visual texture of the dish.
Notes
- The key to success is reserving the starchy pasta water and tossing the pasta vigorously in the skillet to create a creamy emulsion. Do not rinse the pasta.


