
If you have ever watched a beautiful bowl of melting chocolate turn into a gritty, clumped-up disaster in a matter of seconds, you have experienced the heartbreak of seizing. It feels like a kitchen betrayal. One moment it is glossy and inviting, and the next, it is a dry, unusable mess that looks more like wet sand than dessert. This recipe is designed to end that frustration forever by focusing on precise thermal control and moisture management.
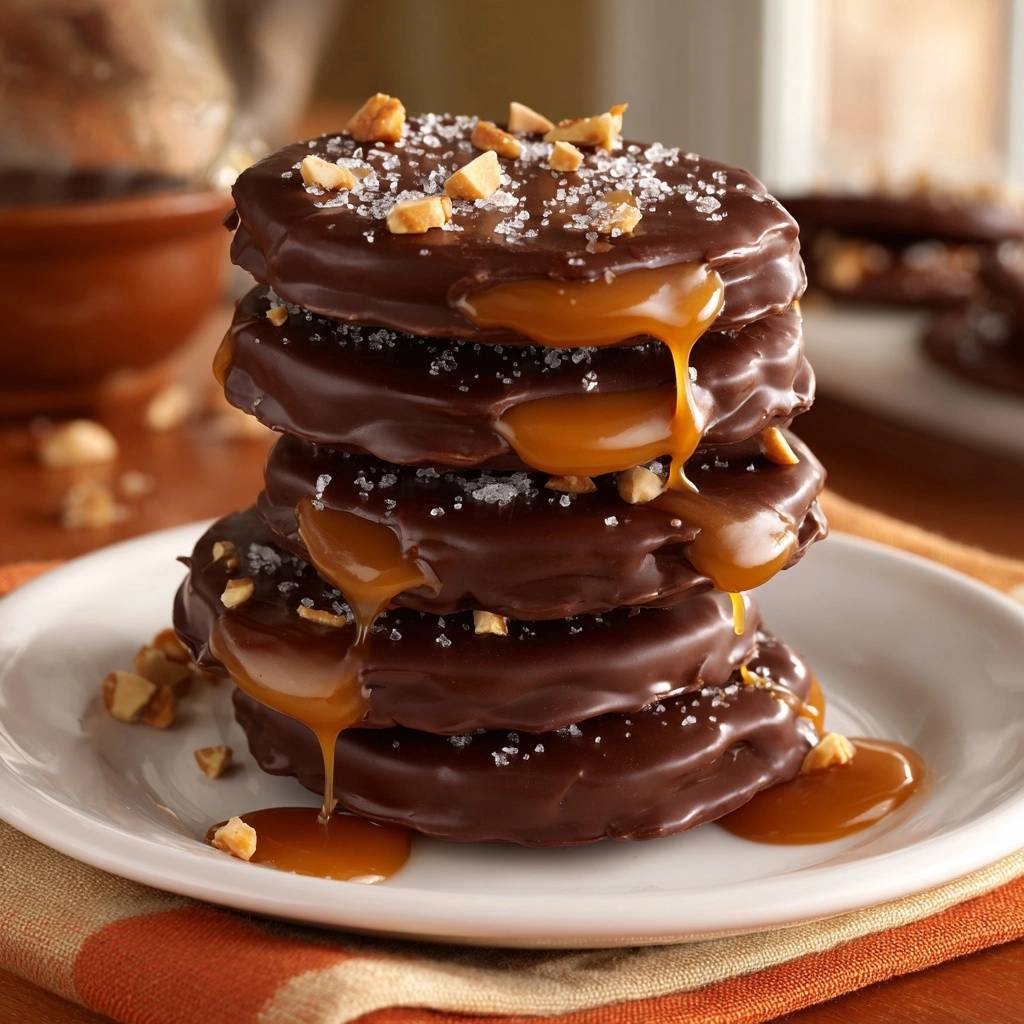
These Salted Caramel Chocolate Discs offer a sophisticated sensory experience that balances a firm, professional snap with a slow, buttery caramel pull. We are moving beyond basic candy making and into the realm of chocolate stability. By layering textures—the crunch of toasted hazelnuts, the sharp bite of sea salt, and the velvet finish of dark cacao—you create a treat that rivals any high-end chocolatier’s display case.
The secret to this recipe’s success lies in the “80 percent rule.” Most home cooks keep the heat going until every last bit of chocolate has melted, which almost always leads to overheating. Instead, I’m going to show you how to use residual heat to finish the job. This keeps the cocoa butter stable, ensures a glossy shine, and prevents that dreaded graininess from ever starting.
The Chemistry of Smooth Salted Caramel Chocolate Discs
Understanding why chocolate behaves the way it does is the first step toward mastering it. At a molecular level, chocolate is a dry mixture of cocoa solids and sugar suspended in cocoa butter. Seizing happens when even a tiny drop of moisture enters the mix. That water acts like glue, binding the sugar and cocoa particles together into clumps rather than letting them glide smoothly in the fat.
Temperature is the other major factor in chocolate chemistry. When dark chocolate climbs above 115°F, the delicate fats begin to separate and the sugars can scorch. This is why we insist on a 60% cacao threshold. Higher cacao percentages contain more cocoa butter and fewer fillers, providing the structural integrity needed to hold a heavy caramel center without collapsing or blooming.
We also introduce a small amount of coconut oil into this equation. While purists might hesitate, coconut oil serves a vital scientific purpose here. It lowers the melting point of the mixture slightly, which creates a smoother “melt-on-the-tongue” sensation. It also adds a beautiful, mirror-like sheen to the finished discs that makes them look professionally tempered without the complex thermometer work.

Essential Components for Professional Results
Quality ingredients are non-negotiable when the list is this short. You must use a thick, chewy caramel for this recipe. If you try to use a thin ice cream topping or a pourable syrup, the moisture will migrate into the chocolate, causing it to soften and lose its snap. Look for caramels that feel firm to the touch at room temperature; they should require a bit of a tug to pull apart.
The salt choice is equally important. Table salt is too fine and will simply make the chocolate taste salty. Coarse sea salt or Maldon flakes provide a specific “pop” of flavor. These large crystals hit the tongue at different intervals, cutting through the richness of the dark chocolate and the sweetness of the caramel core.
Selecting Your Dark Chocolate Base
I always recommend using high-quality chocolate bars rather than standard chocolate chips. Most chips are engineered with stabilizers and less cocoa butter so they hold their shape in the oven. While great for cookies, these stabilizers resist melting and can result in a thick, waxy texture. Finely chopping a bar ensures the chocolate melts evenly and fluidly.
The Role of Fats: Coconut Oil vs. Butter
You might be tempted to swap the coconut oil for butter, but I strongly advise against it. Butter contains about 15% to 18% water. Introducing that water to your melting chocolate is a guaranteed way to cause seizing. Coconut oil is a pure fat, meaning it integrates seamlessly with the cocoa butter to provide shine and fluidity without any risk of breaking the emulsion.
Thermal Control: Preventing the Grainy Mess
The double boiler is your best friend, but only if used correctly. The most common mistake is letting the glass bowl touch the simmering water. This creates a “hot spot” that scorches the chocolate. You want the steam alone to do the work. Keep the water at a bare simmer; if it is boiling violently, the heat is too high and you risk moisture from the steam getting into your bowl.
Apply the “80% Rule” religiously. When you see just a few small lumps of solid chocolate left in the bowl, take it off the heat immediately. Keep stirring with your spatula. The residual heat in the bowl and the already-melted chocolate will gently coax those last bits into liquid form. This prevents the temperature from spiking and keeps the chocolate in a workable, glossy state for much longer.
If you notice the chocolate losing its gloss or becoming thick and “muddy,” it is likely getting too cold or has been slightly overheated. If it’s just cooling down, a 5-second blast of warm air from a hair dryer or a very brief return to the steam can loosen it back up. However, if it has truly scorched and turned grainy, it cannot be saved for dipping, though it still tastes fine in brownies!
Step-by-Step: Constructing the Perfect Chocolate Disc
Success in assembly is all about timing and temperature. You are building layers, and each layer needs to be at the right stage of “set” to support the next. If the base is too soft, the caramel will sink. If the caramel is too cold, the top layer of chocolate won’t adhere properly. It is a dance of textures that results in a perfect bite.
Phase 1: Creating the Foundation
Start by spooning your melted chocolate onto the parchment paper. Use the back of the spoon in a circular motion to spread it out. Aim for a 2.5-inch diameter. This size is the “sweet spot” because it provides enough surface area to hold the caramel while remaining small enough to eat in two bites. Flash-chill these in the fridge for about 5 to 8 minutes. You want them firm enough to handle the caramel but not ice-cold.
Phase 2: Managing the Caramel Core
Your caramel needs to be pliable. If it is too stiff, roll a small piece into a ball and flatten it between your fingers before placing it on the disc. To get that “oozing” look, the caramel should be slightly soft. If it’s rock hard, give it 5 seconds in the microwave. Place the dollop right in the center, leaving a clear border of chocolate around the edges so the top layer has something to grip onto.
Phase 3: The Top Layer and Garnishing
When you spoon the top layer of chocolate over the caramel, start from the center and let it flow outward. Use your spoon to gently nudge it over the edges of the caramel. You want to “enrobe” the center completely. Work quickly now! Sprinkle the crushed hazelnuts and sea salt immediately. If the chocolate begins to set, the garnishes will just bounce off instead of sticking.
Troubleshooting Common Chocolate Obstacles
If your discs are sticking to the parchment paper even after chilling, they likely haven’t set all the way through. Give them another 10 minutes. If they still stick, the chocolate might have been too warm when poured, or the room is too humid. Next time, ensure your baking sheet is completely cold before you start the process.
White streaks or spots on your chocolate are known as “bloom.” This happens when the cocoa butter separates and rises to the surface, usually because the chocolate cooled too slowly or was stored in a place with fluctuating temperatures. While it looks a bit dull, it is perfectly safe to eat. To prevent this, ensure your fridge is cold and move the discs there immediately after garnishing.
If your chocolate starts to seize (turning thick and grainy) while you are working, you can sometimes save it by adding a teaspoon of coconut oil and stirring vigorously. However, the best cure is prevention. Keep all metal spoons and whisks bone-dry, and never cover the melting chocolate with a lid, as condensation will drip right into the bowl.
Texture Variations and Flavor Swaps
Once you master the base technique, you can play with the flavor profile. Toasted hazelnuts offer a classic earthy crunch, but smoked almonds provide a savory depth that is incredible with dark chocolate. If you want something more vibrant, try swapping the nuts for chopped pistachios and adding a pinch of dried rose petals for a Middle Eastern flair.
You can also change the “heat” of the dish. A tiny pinch of chipotle powder or chili flakes mixed into the caramel adds a slow burn that works beautifully with the salt. For coffee lovers, dusting the wet chocolate with finely ground espresso beans instead of salt creates a mocha-caramel hybrid that is perfect for an after-dinner treat.
If you prefer a fruitier finish, try pressing a single freeze-dried raspberry into the caramel before covering it with the top chocolate layer. The tartness of the fruit cuts through the heavy sugar of the caramel. Just ensure any fruit you use is completely dry; fresh fruit will release juice and cause the chocolate to break down quickly.
Storage Logistics and Serving Temperatures
Never serve these discs straight from the fridge. Cold chocolate masks the complex fruity and nutty notes of the cacao, and it makes the caramel center feel like a brick. For the best experience, let them sit at room temperature for at least 15 minutes. This allows the caramel to soften into that signature gooey texture while the chocolate maintains its snap.
Store your discs in an airtight container in a cool, dry place. Chocolate is porous and acts like a sponge for odors. If you leave them uncovered in the fridge next to an onion, your dessert will taste like an onion. Use parchment paper between layers to prevent them from scuffing each other. They will stay fresh for up to two weeks, though they rarely last that long.
I do not recommend freezing these. The expansion and contraction of the caramel and chocolate during the freezing and thawing process often causes the chocolate to crack or bloom. If you must keep them longer, a very cold cellar or a dedicated wine fridge is a better option than a standard freezer.
Expert Tips for Gourmet Presentation
To get perfectly uniform circles, you can draw 2.5-inch circles on a piece of paper and slide it under your parchment as a template. This ensures every disc is the exact same size. Just remember to slide the paper out before putting the tray in the fridge! For a truly high-end look, use a toothpick to swirl a tiny bit of the caramel into the top chocolate layer before it sets.
If you want to go the extra mile, a tiny fleck of edible gold leaf placed right on top of the sea salt adds a stunning visual contrast. You can also melt a small amount of white chocolate and use a fork to drizzle thin, messy lines across the finished discs. This creates a “splatter” effect that looks very modern and artistic against the dark background.
How do I store these so they don’t turn white?
The white coating is called bloom, and it happens when chocolate gets too warm or cools too slowly. To prevent it, store your discs in a cool, dark place with a consistent temperature (around 65°F to 68°F). Avoid putting them in and out of the fridge repeatedly, as the temperature swings encourage the cocoa butter to separate and rise to the surface.
Why did my chocolate turn thick and lumpy while melting?
Your chocolate likely seized. This happens if even a tiny drop of water gets into the bowl or if the chocolate overheats. Make sure all your tools are completely dry and never use a lid on your double boiler. If it’s already lumpy, you can’t use it for these discs, but you can stir in some warm milk and turn it into a chocolate sauce for cake.
Can I use store-bought caramel sauce instead of squares?
No, standard caramel sauce or ice cream topping is too thin. It has a high water content that will prevent the chocolate from setting and will likely cause the discs to fall apart. You need “stand-up” caramel—the kind that comes in wrapped squares or a thick block. If you can’t find those, you can boil a can of sweetened condensed milk (dulce de leche) until it is very thick and dark.
What is the best way to chop the chocolate?
Use a long, serrated knife (like a bread knife). The teeth of the serrated blade grip the smooth surface of the chocolate bar better than a flat chef’s knife, preventing it from slipping. Aim for small, uniform shards. The smaller the pieces, the faster and more evenly they will melt, which reduces the risk of overheating the chocolate.
Can I make these without a double boiler?
You can use a microwave, but you must be extremely careful. Heat the chocolate in 15-second intervals, stirring thoroughly between each one. Stop when there are still visible lumps and let the residual heat finish the melting. The microwave is much riskier than a double boiler because it creates hot spots that can easily scorch the chocolate before you realize it.
How long do these Salted Caramel Chocolate Discs last?
When stored in an airtight container in a cool, dry place, these will stay delicious for up to 14 days. If your kitchen is very warm, you can keep them in the refrigerator, but make sure the container is truly airtight to prevent moisture and odors from affecting the chocolate. Always bring them to room temperature before eating for the best texture.
Salted Caramel Chocolate Discs
Course: DessertCuisine: AmericanDifficulty: easy12
discs20
minutes10
minutes30
Minutes185
kcalAmerican
Ingredients
12 ounces high-quality dark chocolate (60% cacao or higher), finely chopped
1/2 cup thick, chewy caramel squares or homemade stiff caramel (not thin ice cream topping)
1/4 cup crushed toasted hazelnuts
2 tablespoons coarse sea salt
1 teaspoon coconut oil (for extra shine and smooth flow)
Directions
- Prepare a baking sheet with parchment paper or a silicone mat. This is essential for a clean release once the chocolate sets.
- To solve the problem of seized chocolate, use a double boiler over low heat. Ensure the bottom of your glass bowl does not touch the simmering water. This prevents the chocolate from overheating, which is the primary cause of graininess and seizing.
- Add the chocolate and coconut oil to the bowl. Stir constantly with a silicone spatula. As soon as the chocolate is 80 percent melted, remove it from the heat entirely. The residual heat will melt the remaining bits, keeping the chocolate tempered and smooth.
- Spoon one tablespoon of melted chocolate onto the parchment paper and spread it into a 2.5-inch circle. Repeat for 12 discs.
- Place the tray in the refrigerator for 5-8 minutes until the chocolate is firm to the touch.
- Place a small, flattened dollop of thick caramel (about 1 teaspoon) in the center of each chilled disc. To achieve the “oozing” look in the image, ensure the caramel is slightly warm or soft enough to spread toward the edges but thick enough to hold its shape.
- Spoon another tablespoon of melted chocolate over the caramel. Use the back of the spoon to gently push the chocolate over the sides of the caramel, allowing some caramel to peek through or “drip” over the edge of the bottom disc before it sets.
- Immediately sprinkle with crushed hazelnuts and coarse sea salt while the top layer is still wet.
- Chill for at least 30 minutes until completely firm. Serve at room temperature to ensure the caramel remains soft and gooey.
Notes
- To prevent seizing, ensure no water or steam enters the chocolate bowl. Serve at room temperature so the caramel center stays gooey.


