
We’ve all been there. You pull a beautiful, bubbling tray of pasta out of the oven, only to realize the noodles have turned into a soft, gummy mess. It’s heartbreaking when a dish that looks so good on the surface lacks that satisfying bite. Most home cooks struggle with the “mushy pasta” syndrome because they treat baked pasta the same way they treat a standard bowl of spaghetti.
The truth is that a casserole dish is a high-moisture environment that continues to cook your food long after it leaves the stove. To achieve a restaurant-quality result, you have to change your approach to the noodles and the sauce. This recipe focuses on a specific moisture-lock technique that ensures every tube of pasta remains firm and flavorful.
The secret to success lies in the par-boiling stage. You aren’t just cooking the pasta; you’re preparing it to survive a second round of intense heat. By undercooking the rigatoni and applying a specific fat barrier, you prevent the starch from over-hydrating. This results in a Cheesy Baked Rigatoni that holds its shape and delivers a perfect chew in every single bite.
The Physics of Pasta: Why Most Baked Rigatoni Fails
Pasta is essentially a dry sponge made of flour and eggs or water. When you boil it, the starch granules swell and absorb liquid. However, the cooking process doesn’t stop once you drain the pot. In a baked dish, the pasta sits in a hot, acidic tomato sauce for thirty minutes, acting as a vacuum for any available moisture.
If you boil your rigatoni until it’s “al dente” on the stove, it will inevitably become overcooked and mushy in the oven. This happens because of carry-over cooking and starch gelatinization. As the pasta absorbs the water from your marinara, the structural integrity of the noodle collapses. You end up with a dish where the pasta and sauce have merged into a singular, soft texture rather than distinct, sauce-filled tubes.
Essential Components for a Robust Meat Sauce
A great pasta bake requires a sauce with enough body to stand up to the heavy rigatoni. I recommend using a lean ground beef, specifically a 90/10 or 93/7 blend. While fat adds flavor, too much of it will create a greasy pool at the bottom of your baking dish. By using lean meat and browning it until it’s deeply caramelized, you get all the beefy flavor without the oily residue.
Aromatics are the next layer of defense against a bland meal. Always use fresh minced garlic rather than the powdered stuff. The oils in fresh garlic bloom when they hit the hot pan, creating a fragrant base that permeates the entire sauce. When choosing a marinara, look for a brand that lists tomatoes as the first ingredient and has minimal added sugar. A high-quality, thick sauce provides the necessary solids to coat the pasta effectively.
The Role of Heavy Cream in Sauce Emulsification
You might wonder why we add heavy cream to a red sauce. It isn’t just about making it rich; it’s about chemistry. The fat in the cream helps emulsify the sauce, binding the acidic tomatoes to the savory beef. This creates a “velouté-style” texture that clings to the ridges of the rigatoni instead of sliding off.
Visually, the cream transforms the deep red marinara into a vibrant, orange-tinted sauce. This is a hallmark of professional-grade pasta bakes. It signals to your guests that the sauce is balanced, creamy, and thick enough to fill every nook and cranny of the pasta tubes.
Selecting the Right Cheese for Maximum Melt
For the ultimate cheese pull, you should ideally grate your own mozzarella from a low-moisture block. Pre-shredded cheeses are coated in potato starch or cellulose to prevent clumping in the bag. Unfortunately, these anti-caking agents also prevent the cheese from melting into a smooth, stretchy blanket. Freshly grated cheese melts much more fluidly.
In addition to mozzarella, a generous dusting of grated parmesan is essential. While mozzarella provides the stretch, parmesan provides the salt and the “crunch.” The parmesan browns beautifully under the broiler, creating a nutty, savory crust that contrasts with the gooey interior.
The Hydrophobic Barrier: A Revolutionary Prep Technique
This is the step that changes everything. To ensure your pasta never gets soggy, you must follow the 4-minute par-boil rule. This means you boil the rigatoni for exactly four minutes less than the package instructions. The pasta will feel quite hard in the center, which is exactly what you want. It will finish softening inside the oven by absorbing the steam from the sauce.
Once you drain the pasta, immediately toss it with a tablespoon of olive oil. This isn’t just to prevent sticking. The oil creates a microscopic hydrophobic (water-repelling) layer around each noodle. This fat barrier slows down the rate at which the pasta can absorb liquid from the sauce. It forces the sauce to stay on the outside of the noodle rather than soaking into the core and bloating the starch.
Step-by-Step: Constructing the Perfect Cheesy Baked Rigatoni
Start by preheating your oven to 400°F. While the oven warms, get your beef into a large skillet. Don’t just gray the meat; let it sit undisturbed for a few minutes to develop a dark brown crust. This Maillard reaction is where the deep, savory flavor lives. Once the meat is browned and the aromatics are fragrant, stir in your sauce and cream.
Let the sauce simmer on low for about 8 minutes. You are looking for a specific thickness. Perform the “spoon-back test” by dipping a metal spoon into the sauce. Run your finger through the coating on the back of the spoon; if the line stays clean and the sauce doesn’t run, it’s ready. This reduction ensures the sauce is concentrated and won’t turn watery during the baking process.
Layering for Structural Integrity
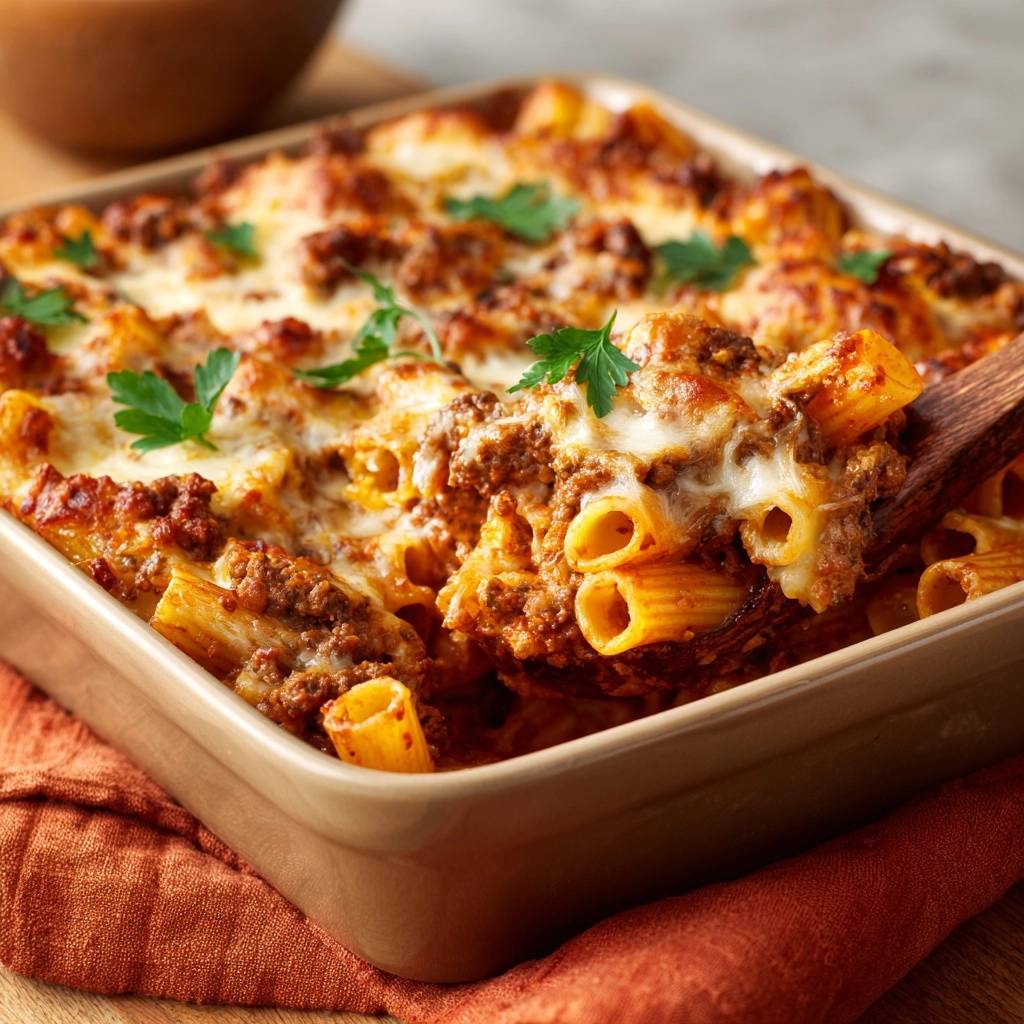
Don’t just dump all the pasta in and throw cheese on top. Layering is key for a consistent experience. By placing a thick layer of mozzarella in the middle of the dish, you create a “cheese vein” that acts as an adhesive. This holds the rigatoni together so you can serve clean, square portions that don’t fall apart on the plate.
When you add the final layer of cheese, make sure you spread it all the way to the very edges of the baking dish. This “seals” the pasta underneath. It traps the steam inside the dish, which cooks the par-boiled pasta to perfection while protecting the top layer of noodles from drying out and becoming crunchy.
The Two-Stage Bake: Heat and Broil
Bake the dish uncovered for 20 minutes. An uncovered bake allows some of the surface moisture to evaporate, which intensifies the flavors. After 20 minutes, the interior should be hot and the cheese melted. However, for that “wow” factor, you need the broiler. Switch your oven to the high broil setting for just 2 or 3 minutes.
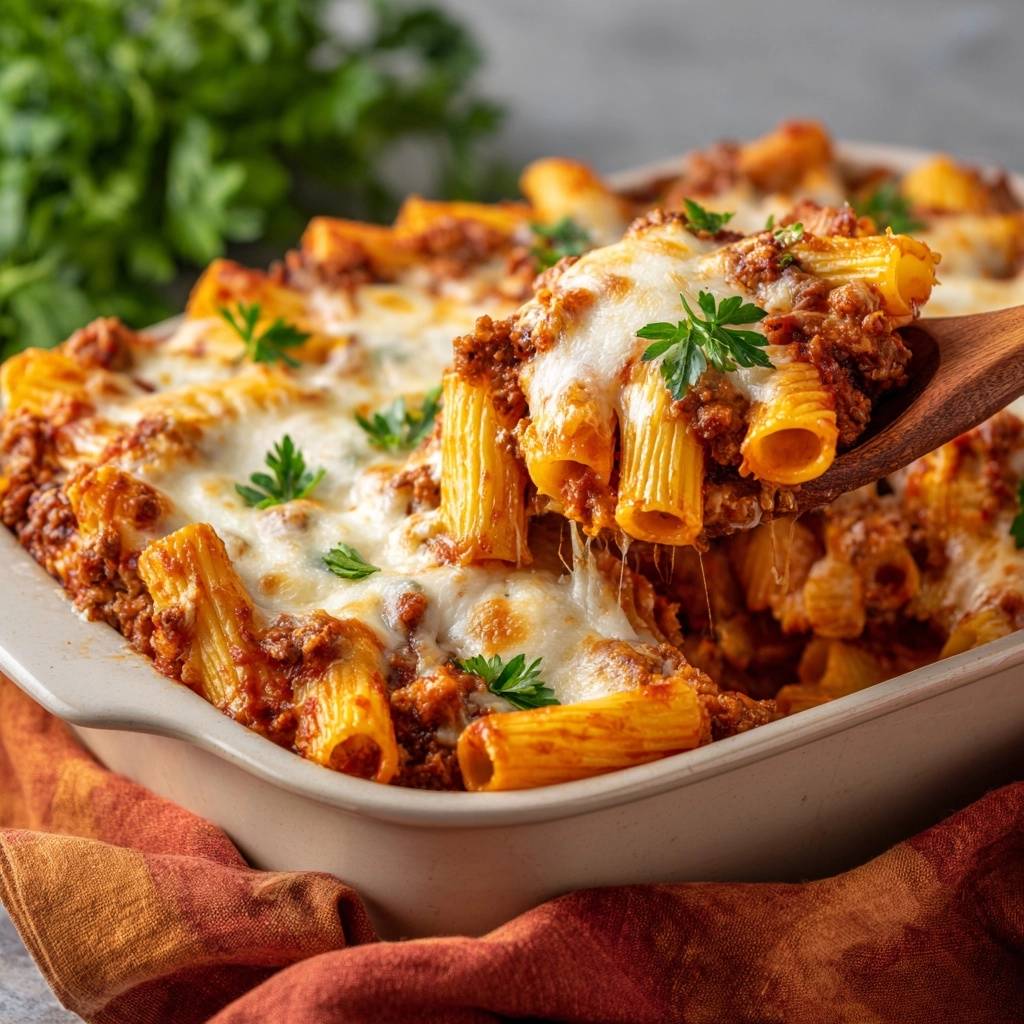
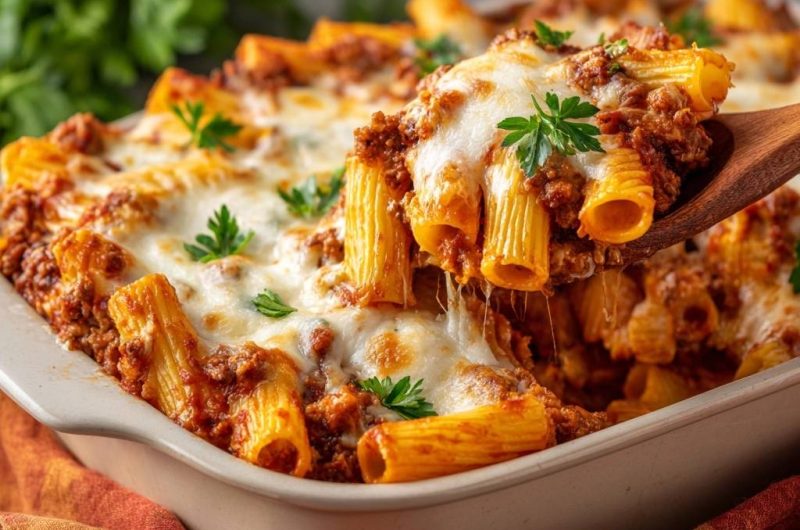
Stay close and watch through the oven window. You are looking for “leopard spotting”—those dark, toasted brown circles that form on the mozzarella. These spots provide a smoky, caramelized flavor that balances the richness of the cream and beef. Once the top looks like a wood-fired pizza, pull it out immediately.
Troubleshooting Common Pasta Bake Obstacles
If you find your sauce looks too thin before you combine it with the pasta, simply simmer it for another five minutes. It’s much easier to fix a thin sauce in the pan than in the baking dish. If the finished dish looks a bit dry, you can splash a tablespoon of hot water or extra marinara over the top before serving to loosen things up.
Oven temperatures can vary wildly. If you are using a convection oven, reduce the heat to 375°F, as the fan-forced air can dry out the cheese too quickly. For conventional ovens, sticking to 400°F ensures the heat penetrates the dense layers of pasta and meat effectively without making the bottom soggy.
Make-Ahead Strategies and Storage Solutions
You can easily prep this dish 24 hours in advance, but there is a trick to it. If you mix the sauce and pasta and let them sit in the fridge overnight, the pasta will absorb all the moisture before it even hits the oven. Instead, store the cooked meat sauce and the par-boiled (and oiled) pasta in separate containers. Combine and top with cheese right before you are ready to bake.
For freezing, this dish is a powerhouse. Assemble the entire rigatoni bake in a disposable aluminum tray but do not bake it. Wrap it tightly in two layers of plastic wrap and one layer of foil to prevent freezer burn. It will stay fresh for up to three months. When you’re ready to eat, thaw it in the fridge overnight and bake as directed, adding about 10 extra minutes to the cook time.
Vegetarian and Protein Variations
If you want to skip the beef, hearty vegetables are your best friend. Sautéed cremini mushrooms or roasted cubes of eggplant provide a similar “meaty” texture and soak up the marinara beautifully. Just make sure to cook the vegetables thoroughly beforehand to release their water, or your pasta bake will end up runny.
Ground turkey or chicken are also great lean alternatives. Since these meats have less fat than beef, they can sometimes taste a bit flat. Boost the flavor by adding an extra teaspoon of oregano or a splash of Worcestershire sauce to the pan while browning. This ensures the lighter protein still packs a punch against the heavy pasta and cheese.
Optimal Side Dishes for a Heavy Pasta Meal
Because this rigatoni is so rich and cheesy, you want side dishes that offer a sharp, acidic contrast. A simple arugula salad with a bright lemon vinaigrette is the perfect palate cleanser. The peppery greens and citrus cut right through the heavy cream and mozzarella, making the whole meal feel lighter.
If you prefer cooked vegetables, try roasted broccolini with plenty of garlic and a squeeze of fresh lemon juice. The charred florets provide a nice crunch that mimics the toasted cheese crust. A crisp fennel and apple slaw is another unconventional but delicious choice, offering a refreshing snap that balances the warm, soft pasta.
Expert Tips for Professional Results
Many people ask if they can swap rigatoni for penne. While you can, rigatoni is superior for baking because of its larger diameter and deeper ridges. The wide opening allows the meat sauce to actually get inside the noodle, while the ridges hold onto the cheese. Penne is often too narrow to be “stuffed” by the sauce during the baking process.
If your cheese ends up rubbery, you likely broiled it for too long or used a very low-fat cheese. Stick to whole-milk mozzarella for the best melt. Also, remember that dry pasta is actually better than fresh pasta for this specific recipe. Fresh pasta is too delicate and will almost always turn to mush in a 400°F oven. Dry, durum wheat pasta has the structural integrity needed to withstand the double-cook method.
The Importance of the 10-Minute Rest Period
The hardest part of this recipe is waiting once it comes out of the oven. However, the 10-minute rest period is non-negotiable. During this time, the starches in the pasta settle and the sauce begins to thicken as it cools slightly. If you cut into it immediately, the sauce will run to the bottom of the dish, leaving the top noodles dry.
After ten minutes, the dish will hold its shape perfectly when scooped. This is the time to add your final garnish. A handful of fresh parsley leaves adds a pop of color and a hit of herbal brightness that wakes up the savory flavors. Serve it warm and enjoy the fact that you’ve finally mastered the art of the al dente pasta bake.
How should I store and reheat leftovers?
Store any leftovers in an airtight container in the refrigerator for up to 4 days. To reheat, place a portion in a microwave-safe dish and add a tiny splash of water or extra marinara sauce. Cover it loosely to trap steam, which prevents the cheese from getting hard. You can also reheat the entire dish in the oven at 350°F for about 15 minutes until the center is hot.
Why is my baked pasta still dry even with the sauce?
This usually happens if the sauce wasn’t thick enough to begin with or if the pasta wasn’t par-boiled sufficiently. If the pasta is too raw, it will suck every drop of moisture out of the sauce to finish cooking. Ensure your sauce passes the “spoon-back test” and that you are using the full amount of marinara and cream called for in the recipe.
Can I use a different type of cheese?
Yes, you can experiment with the flavors! Provolone is a fantastic substitute for mozzarella as it melts similarly but has a sharper tang. Fontina is another great melting cheese that adds a buttery richness. Just ensure that at least 70% of your cheese blend is a high-moisture melting cheese so you don’t lose that classic gooey texture.
What if I don’t have heavy cream?
If you don’t have heavy cream, you can use whole milk mixed with a tablespoon of melted butter, though the sauce won’t be quite as thick. Avoid using fat-free milk or non-dairy milks like almond or oat, as they tend to “break” or curdle when mixed with the acidic tomato sauce at high temperatures. The fat in the cream is vital for that smooth, emulsified finish.
Is it necessary to use a 9×13 dish?
A 9×13 inch dish is ideal because it provides enough surface area for the cheese to brown while keeping the pasta layers thin enough to heat through evenly. If you use a smaller, deeper dish, the center may stay cold while the edges overcook. If you must use a smaller dish, increase the baking time by 10 minutes and cover the top with foil for the first half of the bake to prevent the cheese from burning.
Cheesy Baked Rigatoni
Course: Main CourseCuisine: Italian-AmericanDifficulty: easy6
servings15
minutes30
minutes45
MinutesItalian-American
Ingredients
1 pound rigatoni pasta
1.5 pounds lean ground beef
1 jar (24 ounces) high-quality marinara sauce
1/2 cup heavy cream (to achieve the thick, orange-tinted sauce shown)
3 cups shredded mozzarella cheese, divided
1/2 cup grated parmesan cheese
1 tablespoon olive oil
3 cloves garlic, minced
1 teaspoon dried oregano
1/2 teaspoon red pepper flakes
Fresh parsley for garnish
Salt and black pepper to taste
Directions
- Preheat your oven to 400°F (200°C). Grease a deep 9×13 inch baking dish.
- The Secret to No More Mushy Pasta: Bring a large pot of heavily salted water to a boil. Cook the rigatoni for exactly 4 minutes less than the package directions for al dente. The pasta must be very firm. Drain and immediately toss with 1 tablespoon of olive oil. This oil barrier creates a hydrophobic layer that prevents the pasta from absorbing excess water from the sauce and becoming soggy.
- In a large skillet or dutch oven, brown the ground beef over medium-high heat until deeply caramelized. Drain any excess fat.
- Add the minced garlic, oregano, and red pepper flakes to the beef and cook for 1 minute until fragrant.
- Stir in the marinara sauce and the heavy cream. Simmer for 5-8 minutes on low heat until the sauce is thick and coats the back of a spoon. This reduction ensures the sauce stays on the noodles rather than pooling at the bottom.
- Combine the par-boiled pasta with the meat sauce. Stir gently until every tube is filled with sauce.
- Pour half of the pasta mixture into the prepared baking dish. Sprinkle with 1.5 cups of mozzarella cheese. Top with the remaining pasta mixture.
- Cover the top with the remaining 1.5 cups of mozzarella and the parmesan cheese. Ensure the cheese reaches the edges to “seal” the moisture in.
- Bake uncovered for 20 minutes. Then, turn the broiler to high for 2-3 minutes until the cheese develops the specific golden-brown toasted spots seen in the image.
- Let the dish rest for 10 minutes. This is crucial; it allows the starches to set and the sauce to adhere to the rigatoni. Garnish with fresh parsley leaves and serve.
Notes
- The secret to avoiding mushy pasta is boiling the noodles for 4 minutes less than the al dente instructions and coating them in olive oil to create a moisture barrier. Letting the dish rest for 10 minutes after baking is crucial for the sauce to set.


