
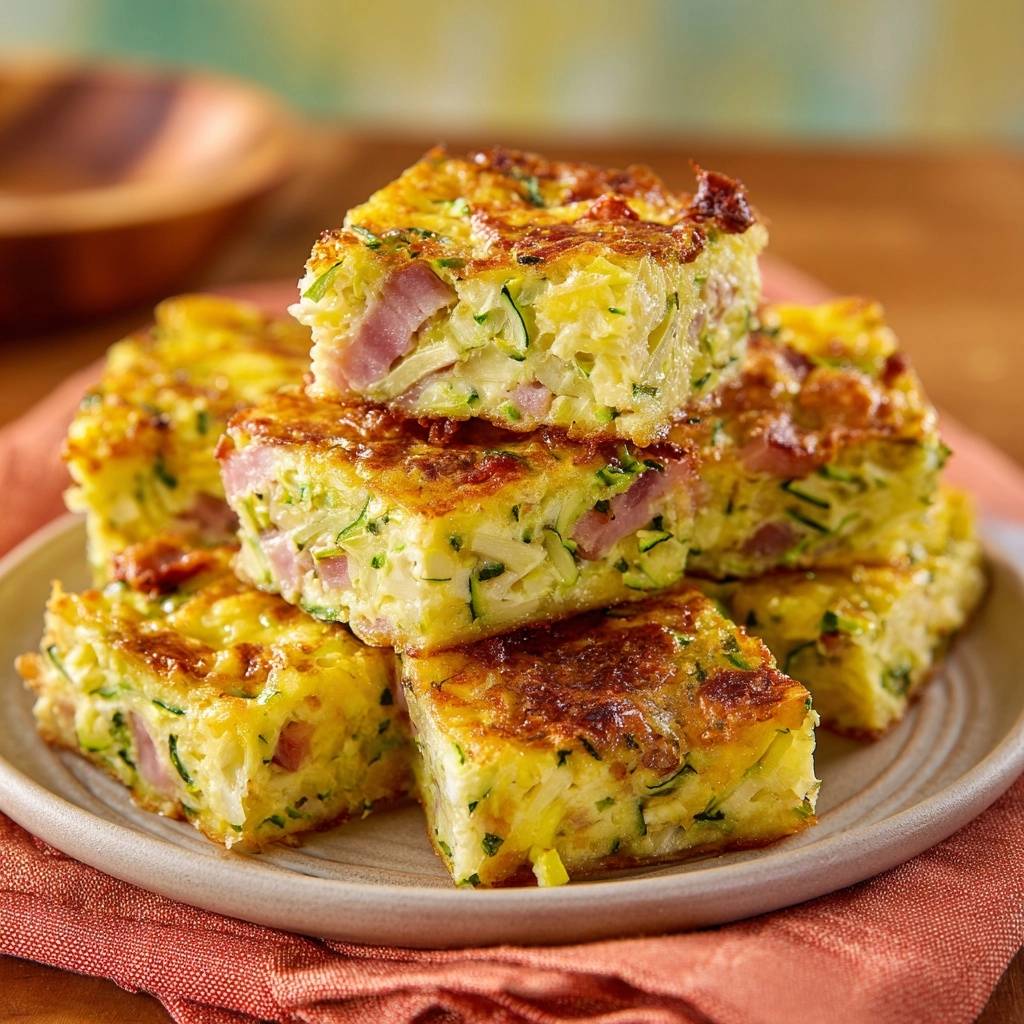
Imagine pulling a tray from the oven where the edges are deeply bronzed and the center is perfectly set, smelling of toasted cheese and savory ham. This Golden Zucchini and Ham Slice isn’t your average watery vegetable bake; it’s a dense, satisfying square that holds its shape beautifully on a plate. The contrast between the caramelized, salty exterior and the tender, savory middle makes it a standout for any meal of the day.
Most people struggle with zucchini recipes because the vegetable is essentially a sponge filled with water, leading to a soggy mess that falls apart. This recipe solves that frustration by using a specific moisture-extraction technique that transforms the texture into something sturdy and stackable. Whether you’re looking for a reliable meal-prep staple or a crowd-pleasing brunch centerpiece, this dish delivers a consistent, professional result every time.
The secret to the incredible structural integrity of this slice lies in the aggressive removal of zucchini juice before it ever touches the flour. By using salt to break down the vegetable’s cell walls, you force the moisture out, ensuring the batter stays thick and the final bake stays firm. If you skip the squeeze, you’re essentially boiling the batter from the inside out, so don’t be afraid to use some muscle when wringing out that kitchen towel!
The Science of Preventing Sogginess
Zucchini is composed of over 90% water, which is why it often ruins baked goods by releasing all that liquid as soon as it hits the heat of the oven. When you grate zucchini and toss it straight into a bowl, those water-filled cells remain intact until the temperature rises. Once they burst during baking, the excess liquid thins out your batter, resulting in a “weeping” dish with a mushy bottom.
To prevent this, we use the power of osmosis. By sprinkling salt over the grated shreds, you create a high-concentration environment outside the vegetable cells, which draws the water out through the cell walls. This process doesn’t just remove water; it seasons the zucchini deeply and softens the fibers, allowing them to integrate seamlessly into the egg and flour base without compromising the bake’s firmness.
Why Salt and Time are Non-Negotiable
The 10-minute resting period after salting is the most critical window in the entire process. During this time, you’ll actually see the zucchini begin to glisten as the salt works its way in and the water beads on the surface. This wait ensures that when you finally squeeze the towel, you’re getting the maximum amount of liquid out, leaving behind a concentrated, flavorful vegetable base.
Without this step, the self-rising flour would hydrate using vegetable juice instead of the rich fats from the eggs and oil. By removing the water first, the flour can properly bond with the proteins in the eggs, creating a tight, bouncy crumb. You’ll know you’ve succeeded when the zucchini feels like a dry, compact ball of yarn in your hands rather than a slippery pile of greens.
Essential Components for the Perfect Bake
Every ingredient in this slice plays a specific role in building flavor and structure. The five large eggs act as the primary binder, providing a protein network that traps the air bubbles from the self-rising flour. Using vegetable oil instead of butter ensures the slice remains moist even when eaten cold the next day, as oil stays liquid at room temperature while butter solidifies and can make the crumb feel heavy.
Sharp cheddar cheese is another heavy hitter here. Unlike milder, softer cheeses like mozzarella, sharp cheddar has a lower moisture content and a punchy flavor that stands up to the ham. As it melts, it creates little pockets of savory fat throughout the slice, while the cheese on the surface browns into a lacy, crisp crust that provides a necessary textural contrast to the soft interior.
Selecting the Best Zucchini and Ham
When shopping, look for medium-sized zucchini about 6 to 8 inches long. These younger vegetables have smaller, less developed seeds and a much lower water content than the giant “baseball bat” zucchini found in late-summer gardens. Smaller zucchini also have a thinner skin that grates easily and disappears into the batter, providing color without any tough, woody bits.
For the ham, skip the thin, watery deli slices which can get lost in the mix. Instead, look for thick-cut “steak-style” ham or a leftover holiday roast. Dicing the ham into sturdy quarter-inch cubes ensures that you get a salty, meaty bite in every forkful. This thicker cut also holds its shape during the 45-minute bake, providing a pleasant chew that balances the softness of the zucchini.
The Role of Self-Rising Flour
Self-rising flour is the “easy button” for this recipe because it already contains the perfect ratio of baking powder and salt. In the dense environment of a vegetable slice, you need that extra lift to prevent the dish from becoming a leaden brick. The leavening agents react twice: once when they hit the wet ingredients and again when they feel the heat of the oven.
This double-action lift creates tiny air pockets that lighten the overall texture. If you only have all-purpose flour on hand, you can make your own version by whisking in 1.5 teaspoons of baking powder and a half-teaspoon of salt for every cup of flour. This ensures the slice has enough “oomph” to rise around the heavy additions of ham and cheese.
Step-by-Step: Preparing the Zucchini Base
Start by grating your zucchini using the large holes of a box grater. Once you have your pile of green shreds, transfer them to a clean, lint-free kitchen towel. Sprinkle the salt evenly over the top and toss it with your hands to make sure every strand is coated. Let it sit and “sweat” for at least ten minutes while you prep your other ingredients.
Now comes the workout. Gather the corners of the towel and twist the top to create a pouch. Squeeze the bundle over the sink with as much pressure as you can muster. You’ll be surprised at how much green liquid pours out! Keep twisting and squeezing until you can’t get another drop out. The resulting zucchini should be a dry, dense mass that easily breaks apart into fluffy, seasoned strands.
Mixing and Aerating the Batter
To ensure an even distribution of ingredients, use a two-bowl method. First, toss your dry, squeezed zucchini with the ham, onions, and cheese in a large bowl. Sprinkle the flour and garlic powder over this mixture and toss until everything is “dredged.” This coating of flour on the individual pieces of ham and zucchini prevents them from sinking to the bottom of the pan during the bake.
In a separate bowl, whisk your eggs, oil, and pepper until they are completely homogenous and slightly frothy. Pour this liquid over the floured ingredients and stir gently. You’re looking for a thick, cohesive batter where every component is suspended in the egg mixture. Don’t overwork it; just stir until the white streaks of flour vanish into the golden egg base.
Achieving the Signature Golden Crust
The beautiful “bronzed” look of this dish comes from the Maillard reaction, which is the chemical reaction between amino acids and reducing sugars that gives browned food its distinctive flavor. Baking at 375°F is the sweet spot; it’s hot enough to caramelize the natural sugars in the onion and the proteins in the cheese without burning the edges before the center is cooked through.
For an even more impressive finish, that optional sprinkle of Parmesan cheese is a game-changer. Parmesan is a dry, hard cheese that browns beautifully and adds a nutty, salty crunch to the top layer. As the slice bakes, the Parmesan fuses with the cheddar and the flour to create a savory “lid” that seals in moisture while providing a satisfying snap when you bite into it.
Oven Positioning and Rack Height
Heat distribution in a home oven can be fickle, so placement matters. Start the dish on the middle rack to ensure the bottom and top cook at the same rate. If the center feels firm but the top looks pale at the 40-minute mark, don’t be afraid to move the pan to the top rack for those final five minutes.
The top of the oven is generally the hottest part because heat rises and reflects off the ceiling. Moving the dish up late in the game gives the crust a final blast of direct heat, intensifying the golden color. You’ll know it’s perfect when the edges are slightly pulled away from the sides of the pan and the top is a deep, uniform amber.
The Importance of the 15-Minute Rest
It is incredibly tempting to slice into the dish the moment it leaves the oven, but patience is a virtue here. When the slice first comes out, the internal structure is still somewhat fluid. The starches in the flour and the proteins in the eggs need a few minutes to “set” as the temperature drops slightly from its peak.
This resting period allows for “carry-over cooking,” where the residual heat finishes the very center of the dish. If you cut it too early, the steam will escape rapidly, and the squares may crumble or appear wet. After 15 minutes, the slice will be firm enough to yield those clean, sharp-edged squares that look so beautiful on a serving platter.
Flavor Variations and Ingredient Swaps
Once you master the base technique, this recipe is a blank canvas for your favorite flavors. For a Mediterranean twist, swap the cheddar for crumbled feta and add a handful of chopped kalamata olives and dried oregano. The salty feta won’t melt quite like cheddar, creating creamy white pockets of flavor throughout the green zucchini base.
If you prefer a bit of heat, try a spicy version by using pepper jack cheese and adding a finely diced jalapeño to the mix. You can even swap the ham for cooked, crumbled turkey sausage or smoked sun-dried tomatoes for a vegetarian-friendly option that still provides that deep, smoky “umami” hit. Just remember to keep the ratios of “dry” additions to “wet” batter the same to maintain the structure.
For a lighter profile, you can replace half of the zucchini with grated carrots or parsnips. Carrots add a lovely sweetness and a bright orange fleck to the finished slice. Regardless of the vegetable you choose, the golden rule remains: squeeze out the moisture! Even carrots benefit from a quick press in a towel to ensure the densest, most satisfying texture possible.
Make-Ahead Strategies and Storage
This is the ultimate meal-prep dish because it actually tastes better the next day after the flavors have had time to meld. Store leftovers in an airtight container in the refrigerator for up to five days. It’s delicious cold, but if you prefer it warm, avoid the microwave if possible, as it can make the crust soft and rubbery.
The best way to reheat a slice is in an air fryer at 350°F for about 3-5 minutes or in a toaster oven. This revives the crispy edges and ensures the center is heated through without losing its firm texture. If you’re packing it for lunch, it holds up perfectly in a container without leaking or getting soggy, making it a great alternative to sandwiches.
Freezing for Long-Term Meal Prep
You can absolutely freeze this slice for a quick “grab-and-go” meal later. To prevent the squares from sticking together, flash-freeze them on a baking sheet for an hour before transferring them to a freezer-safe bag. This keeps each portion individual so you can pull out exactly what you need.
When you’re ready to eat, thaw the slice in the fridge overnight. To avoid re-introducing moisture, pat the surface with a paper towel before reheating in the oven or air fryer. Properly wrapped, these savory squares will stay fresh in the freezer for up to three months, providing a healthy, protein-packed meal whenever you’re in a rush.
Ideal Pairings for a Balanced Meal
Because this slice is quite rich and savory, it pairs beautifully with bright, acidic side dishes. A simple arugula salad dressed with lemon juice and a drizzle of olive oil provides a peppery bite that cuts through the density of the cheese and ham. The acidity helps cleanse the palate between bites of the golden crust.
For a cozy dinner, serve a warm square alongside a bowl of light tomato soup. The sweetness of the tomatoes complements the salty ham perfectly. If you’re serving this for brunch, a side of fresh fruit like sliced melon or berries offers a refreshing contrast to the warm, savory flavors of the zucchini and cheddar.
Troubleshooting Common Texture Issues
If your slice turns out too dry, it’s usually a sign of over-baking or using eggs that were too small. Always use “Large” eggs to ensure there is enough liquid to hydrate the flour. If your oven runs hot, start checking the dish at the 35-minute mark. The center should be firm to the touch but still have a tiny bit of “give” when pressed.
On the flip side, if the slice is still wet in the middle, it’s almost always due to the zucchini moisture. If you find your zucchini was particularly large and watery, you might need to add an extra tablespoon of flour next time. Also, ensure your oven is fully preheated; putting the dish into a cold oven prevents the edges from setting quickly, which can lead to a soggy base.
Why is my slice falling apart?
Structural collapse usually happens for two reasons: cutting it too hot or an incorrect flour-to-egg ratio. Ensure you are using a full cup of self-rising flour and that your eggs are well-beaten before adding them. The “beating” process incorporates air and ensures the proteins are ready to bond. Most importantly, give it that full 15-minute rest to let the starches lock everything into place.
Can I use gluten-free flour?
Yes, you can substitute the self-rising flour with a 1:1 gluten-free baking blend. However, since gluten-free flours lack the natural binding proteins of wheat, you should add 1.5 teaspoons of baking powder and a half-teaspoon of xanthan gum if your blend doesn’t already include it. The texture may be slightly more crumbly, so an extra 5 minutes of resting time is recommended.
How do I scale this for a crowd?
To double the recipe, use two 9×13 inch pans rather than one deep one. If you try to bake a double batch in a single deep dish, the outside will burn before the center is cooked through. If you must use a deeper pan, lower the temperature to 350°F and increase the bake time by 15-20 minutes, tenting the top with foil if it browns too quickly.
Is there a substitute for vegetable oil?
If you prefer not to use vegetable oil, melted butter or a light olive oil are excellent substitutes. Melted butter will give the slice a richer, more shortbread-like crumb and a distinct dairy aroma. Olive oil adds a fruity, peppery note that works exceptionally well with the zucchini and garlic. Both will maintain the necessary fat-to-flour ratio for a tender result.
Golden Zucchini and Ham Slice
Course: Main CourseCuisine: AmericanDifficulty: easy6
servings15
minutes45
minutes60
Minutes285
kcalAmerican
Ingredients
3 medium zucchini (approx. 1.5 lbs), grated
1.5 cups diced thick-cut cooked ham
1 large yellow onion, finely chopped
1.5 cups shredded sharp cheddar cheese
1 cup self-rising flour
5 large eggs, beaten
1/3 cup vegetable oil
1 teaspoon salt
1/2 teaspoon black pepper
1/2 teaspoon garlic powder
Optional: 2 tablespoons grated Parmesan (for the top crust)
Directions
- Preheat your oven to 375°F (190°C). Generously grease a 9×13 inch ceramic or glass baking dish with butter or oil.
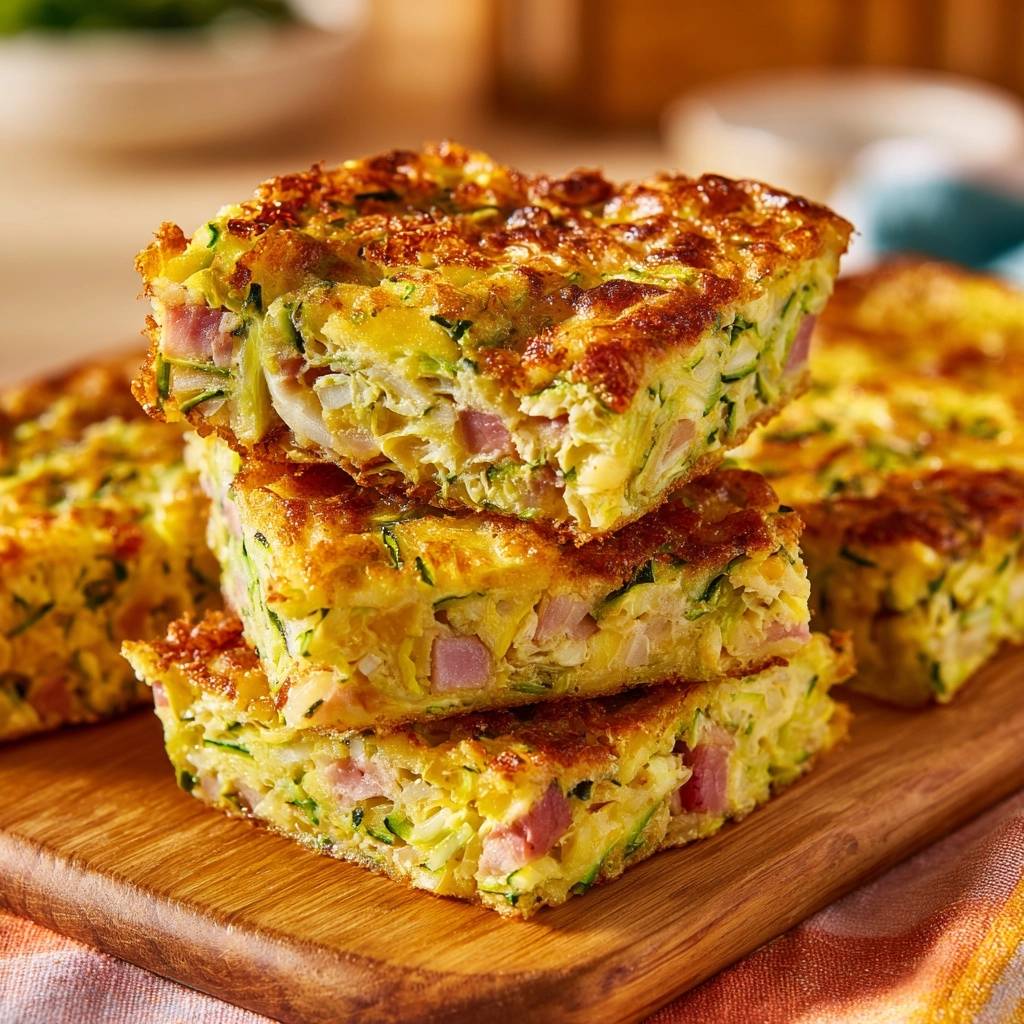
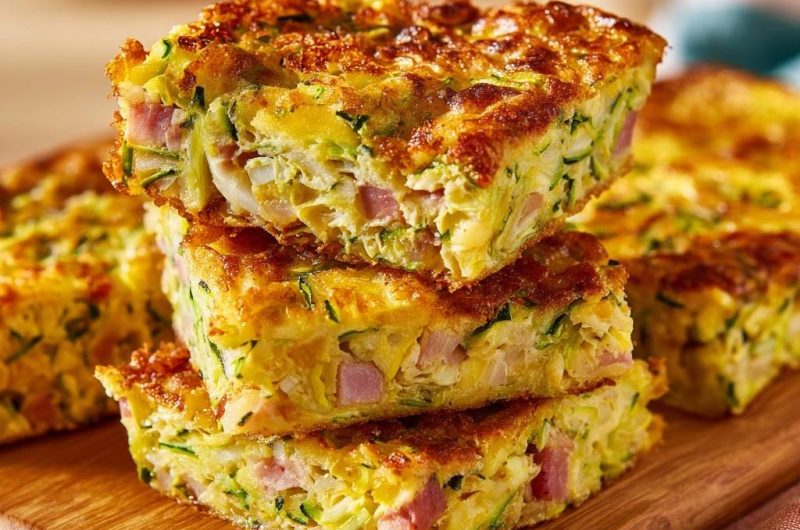
- Solve the sogginess: Place the grated zucchini in a clean kitchen towel or cheesecloth. Sprinkle with the 1 teaspoon of salt and let sit for 10 minutes. Twist the towel tightly and squeeze with all your strength to remove every drop of excess liquid. You should be left with a dry, compact ball of zucchini. This step is mandatory for the firm, non-watery result seen in the photo.
- In a large mixing bowl, combine the squeezed zucchini, diced ham, chopped onion, and shredded cheddar cheese.
- Add the self-rising flour and garlic powder to the bowl and toss until the ingredients are thoroughly and evenly coated in flour.
- In a separate small bowl, whisk together the eggs, oil, and black pepper.
- Pour the egg mixture over the zucchini mixture and stir until a thick, uniform batter forms.
- Spread the batter evenly into the prepared baking dish, smoothing the top with a spatula. For the extra-golden crust shown in the image, sprinkle the optional Parmesan over the top.
- Bake for 40 to 45 minutes. If the top isn’t deeply bronzed by the 40-minute mark, move the dish to the top rack for the final 5 minutes. The slice is done when the center is firm and the edges are pulling away slightly from the sides of the pan.
- Allow the slice to cool in the pan for at least 15 minutes before cutting. This resting period is crucial for the starches to set, allowing you to cut the clean, sharp-edged squares pictured.
Notes
- The secret to the firm texture is squeezing the zucchini until it is a dry, compact ball. Resting the slice for 15 minutes after baking is essential for clean cuts.


