

Most home cooks struggle with the “dry chicken” epidemic, where boneless breasts turn into flavorless, rubbery planks. This Mediterranean Glazed Chicken Breast solves that problem by using a high-heat sear and a glossy balsamic-honey reduction. The result is a deeply caramelized exterior that gives way to an incredibly juicy interior.
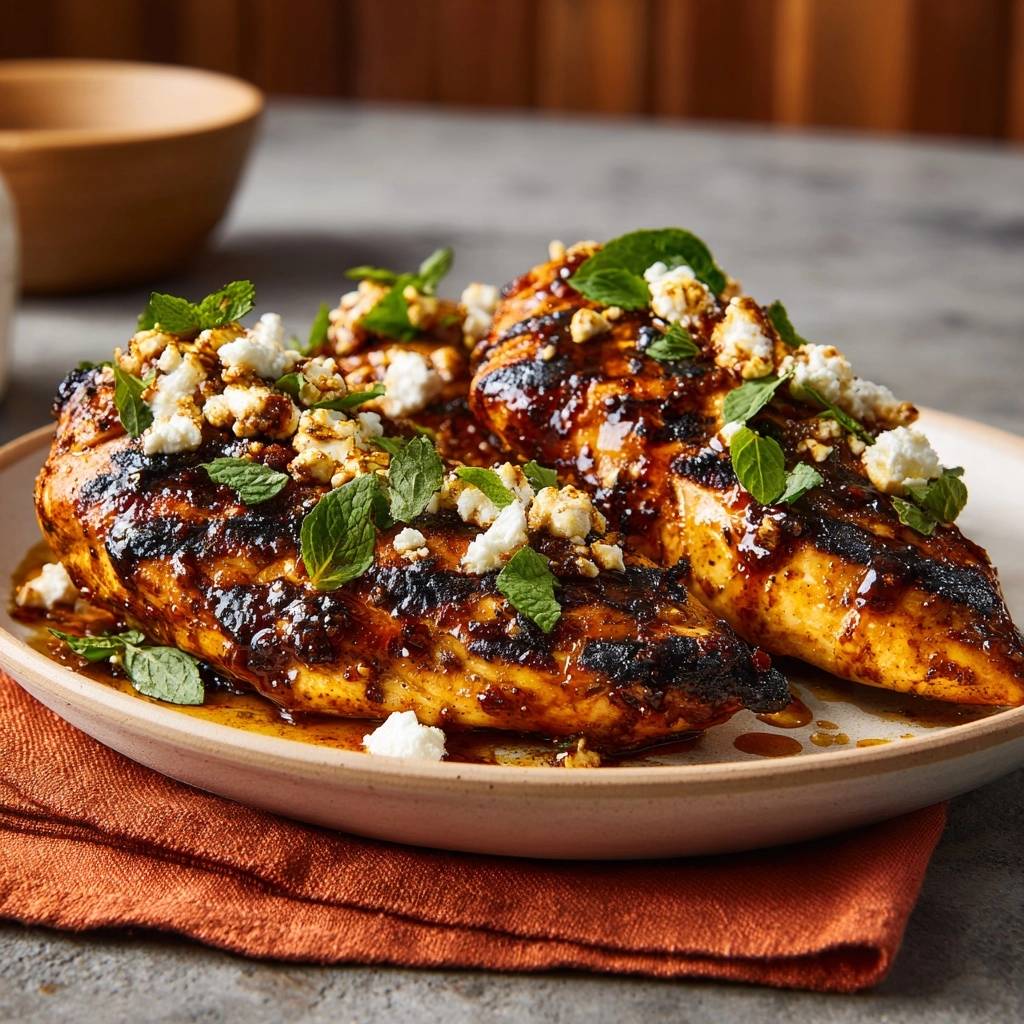
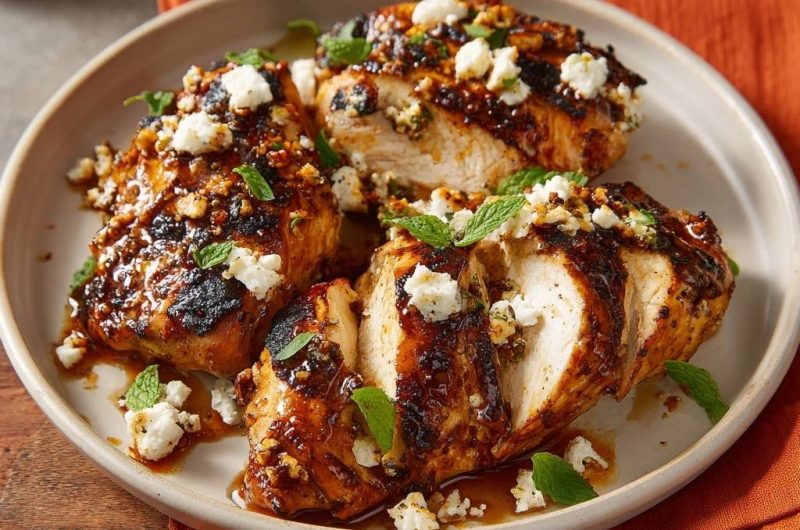
The sensory experience here is a wild ride for your taste buds. You get the sharp tang of aged balsamic, the floral sweetness of honey, and the salty punch of crumbled feta. When you add torn fresh mint at the end, the cooling herb cuts through the richness of the glaze perfectly. It’s a restaurant-quality meal that feels sophisticated but takes very little effort.
The secret to this dish’s success is the “sear-and-baste” method. By searing the meat first to create a crust and then finishing it in a bubbling glaze, you create a protective barrier. This barrier locks in the natural juices while the honey ensures the sauce clings to every nook and cranny. I’ve found that this specific technique is the only way to guarantee moist chicken every single time.
The Science of the Sear-and-Baste Technique
Achieving that dark, mahogany crust isn’t just about luck; it’s about the Maillard reaction. This chemical reaction between amino acids and reducing sugars occurs at high heat, creating hundreds of different flavor compounds. In this recipe, the honey acts as a powerful catalyst, speeding up the caramelization process so you get a rich char without overcooking the center.
High-heat searing creates what I like to call a “moisture lock.” When the surface of the chicken hits the hot oil, it firms up immediately, creating a textured surface that the glaze can grab onto. If you started with a cold pan, the chicken would simply steam in its own juices, leaving you with a grey, unappealing texture.
The viscosity of the balsamic reduction is equally important. As the vinegar and honey simmer, the water evaporates, leaving behind a thick syrup. This syrup acts as an insulator during the final minutes of cooking. It prevents the internal moisture from escaping into the air, ensuring that every bite remains tender and succulent.
Essential Components for the Balsamic Honey Glaze
Quality ingredients make or break a simple glaze like this one. I highly recommend using a syrupy, aged balsamic vinegar rather than the thin, watery versions often found on bottom shelves. Aged balsamic has a natural sweetness and a thicker body that reduces into a professional-grade sauce much faster.
Dijon mustard is the unsung hero of this ingredient list. Beyond adding a subtle spicy kick, it acts as a natural emulsifier. It binds the olive oil and balsamic vinegar together, preventing the glaze from breaking or becoming greasy. This ensures the sauce stays smooth and glossy as it coats the meat.
Don’t reach for the fine-ground table pepper here. Coarse black pepper provides a cracked texture that contributes to the “charred” crust. The larger flakes of pepper stand up to the high heat of the skillet, providing little bursts of heat that balance the sugary honey and acidic vinegar.
Selecting and Preparing the Poultry
Uniformity is the key to even cooking. Chicken breasts are naturally tapered, meaning the thin end will dry out before the thick end is safe to eat. Use a meat mallet or a heavy skillet to pound the chicken to a consistent 1-inch thickness. This ensures every part of the breast finishes at the exact same time.
Surface moisture is the absolute enemy of a golden-brown crust. If the chicken is wet when it hits the pan, it will steam instead of sear. Use paper towels to pat the meat completely dry on both sides before you even think about adding seasoning. You want the oil to fry the meat, not boil the water on its surface.
The Role of Fresh Mint and Feta
The garnishes on this dish aren’t just for show. The feta cheese provides a creamy, salty contrast that cuts right through the intense sweetness of the honey glaze. As the cheese sits on the warm chicken, it softens slightly, creating a beautiful texture that mimics the richness of a heavy sauce without the extra work.
Fresh mint provides the final layer of complexity. The volatile oils in the mint leaves offer a cooling sensation that balances the warmth of the red pepper flakes. Always tear the mint by hand rather than chopping it with a knife to prevent bruising and to release the most aroma right before serving.
Step-by-Step: Achieving the Perfect Char
Phase one begins with the initial sear. Once you place the seasoned chicken in the shimmering oil, leave it alone. It’s tempting to peek, but moving the meat prevents that deep, dark crust from forming. Wait at least five minutes until the chicken releases naturally from the pan; if it’s sticking, it isn’t ready to flip yet.
Phase two involves the aromatics and deglazing. After flipping the chicken, you’ll notice brown bits stuck to the bottom of the pan. This is “fond,” and it’s packed with flavor. When you pour in the balsamic mixture, it will bubble violently. Use this liquid to scrape up those brown bits, incorporating them into the sauce for extra depth.
Phase three is the reduction. Turn the heat down to medium so the sugars don’t burn. Use a large spoon to continuously pour the bubbling liquid over the chicken. You’ll see the glaze transform from a thin liquid into a dark, syrupy coating that clings to the back of your spoon. This basting process infuses the meat with flavor while finishing the cook perfectly.
Managing Skillet Temperature
You need to know the difference between “shimmering” and “smoking” oil. Shimmering oil looks like moving silk and is ready for the chicken. If the oil is billowing heavy smoke, it’s too hot and will turn your spices bitter. If this happens, remove the pan from the heat for a minute before proceeding.
Once the balsamic and honey hit the pan, the sugar content makes the mixture sensitive to heat. If the glaze looks like it’s thickening too fast or smelling slightly burnt, drop the flame immediately. You want a steady, gentle bubble, not a violent boil, to achieve that perfect “skyscraper” glaze effect.
Troubleshooting Common Glazed Chicken Obstacles
If your glaze feels too thin and won’t stick to the chicken, don’t panic. Simply remove the chicken to a plate and keep simmering the sauce on its own for another minute. It will thicken rapidly as the water evaporates. You can also stir in an extra teaspoon of honey to help it tighten up.
If the chicken is sticking stubbornly to the skillet, you likely didn’t let the pan get hot enough or you’re trying to flip too early. Patience is a virtue here. Give it another sixty seconds, and the meat should release itself once the crust has fully carbonized and hardened.
Burning the garlic is a common mistake that ruins the whole dish. Garlic only needs about 30 seconds of heat to become fragrant. Always add it after the flip and right before the liquid ingredients. The moisture from the balsamic vinegar will instantly drop the temperature of the pan, protecting the garlic from scorching.
Why the Seven-Minute Rest is Mandatory
Cooking is essentially the process of tightening muscle fibers. As the chicken heats up, those fibers contract and push all the juices toward the center of the breast. If you slice the meat immediately, those juices will pour out onto the cutting board, leaving you with the very dry chicken we’re trying to avoid.
During a seven-minute rest, the muscle fibers begin to relax and reabsorb those juices. This redistributes the moisture throughout the entire breast. You’ll notice the meat feels much more tender and looks more opaque once it has had time to sit. It’s the most important step in the entire process.
Don’t forget about carry-over cooking. We pull the chicken at 160°F because the internal temperature continues to rise even after it leaves the pan. During the rest, the heat from the exterior travels inward, bringing the chicken to the FDA-recommended 165°F. This ensures the meat is safe but never overcooked.
Mediterranean Side Dishes to Complete the Meal
To soak up every drop of that balsamic glaze, serve the chicken over a bed of lemon-herb couscous or fluffy quinoa. The grains act like a sponge for the extra sauce. I like to toss the grains with a little lemon zest and parsley to keep the flavors bright and Mediterranean-focused.
For a lighter option, roasted zucchini or a crisp cucumber and tomato salad works beautifully. The crunch of fresh vegetables provides a nice textural contrast to the soft, glazed chicken. A simple vinaigrette on the salad will echo the acidity in the balsamic glaze without competing with it.
If you want a truly hearty experience, serve this with garlic-rubbed flatbread or warm pita. You can use the bread to swipe up the melted feta and leftover glaze from the plate. It turns the meal into a rustic, hands-on dinner that everyone at the table will love.
Storage and Reheating for Meal Prep
This chicken stores surprisingly well in an airtight container for up to three days. However, the crust will naturally soften as it sits in the fridge. To keep it as fresh as possible, store the extra glaze separately if you can, or just accept that the texture will be slightly different the next day.
Avoid the microwave when reheating if you want to maintain the moisture. The microwave tends to vibrate water molecules so fast that they steam the meat from the inside out, making it tough. Instead, place the chicken in a cold skillet with a splash of water or chicken broth and cover it with a lid.
Heat the skillet over medium-low. The steam from the added liquid will gently warm the chicken through without drying it out. Once the chicken is warm, remove the lid for the last thirty seconds to let the glaze tighten back up. It will taste almost as good as it did the moment it was first cooked.
Expert Tips for Flavor Variations
While honey is the classic choice for this glaze, you can easily swap it for maple syrup for a more autumnal, woody sweetness. The sugar content is similar, so the caramelization will still be excellent. Just ensure you’re using real maple syrup, not the flavored pancake variety.
If you aren’t a fan of oregano, fresh thyme or rosemary make excellent substitutes. Thyme offers a more earthy, floral note that pairs beautifully with the balsamic vinegar. If you use rosemary, chop it very finely, as the needles can be quite tough if left whole in the glaze.
Always keep the core ratio of balsamic vinegar to sweetener the same. This ratio is what creates that “skyscraper” glaze that stands tall on the meat rather than running off. As long as you maintain that balance, you can experiment with different herbs or even a splash of orange juice for a citrusy twist.
Frequently Asked Questions
Can I use chicken thighs instead of breasts?
Yes, chicken thighs work beautifully with this glaze. Since thighs have a higher fat content, they are even more forgiving and stay very juicy. You will need to increase the cooking time by about 2-3 minutes per side, as dark meat takes longer to reach a safe internal temperature of 175°F, which is the sweet spot for thighs.
What if I don’t have a cast-iron skillet?
A heavy-bottomed stainless steel skillet is your next best option. It retains heat well and allows for a great sear. Avoid using thin non-stick pans for this recipe if possible, as they don’t handle high heat well and won’t produce the same level of dark, flavorful char on the chicken surface.
Is there a good substitute for feta cheese?
If you don’t like feta, crumbled goat cheese is a fantastic alternative. It has a similar tang but a much creamier texture. For something firmer, you could use grilled halloumi or even small pearls of fresh mozzarella, though you’ll lose that specific salty “bite” that feta provides.
How do I make this dish spicier?
The easiest way to kick up the heat is to double the red pepper flakes in the glaze. If you want a deeper, more complex spice, stir a teaspoon of harissa paste into the balsamic and honey mixture before pouring it into the pan. This adds a smoky, North African heat that complements the Mediterranean flavors perfectly.
Why did my garlic turn bitter?
Garlic turns bitter when it burns. This usually happens if the pan is too hot when the garlic is added or if it sits in the dry pan for too long. To prevent this, make sure you add the balsamic liquid almost immediately after the garlic. The liquid acts as a coolant and stops the garlic from over-browning.
Can I freeze the cooked glazed chicken?
I don’t recommend freezing the cooked chicken if you want to preserve the texture. The freezing and thawing process breaks down the cell walls in the meat, and the glaze will become watery and lose its glossy sheen. This dish is best enjoyed fresh or within a few days of cooking from the refrigerator.
Mediterranean Glazed Chicken Breast
Course: Main CourseCuisine: MediterraneanDifficulty: easy4
servings15
minutes15
minutes30
Minutes340
kcalMediterranean
Ingredients
4 boneless skinless chicken breasts (pounded to even 1-inch thickness)
2 tablespoons olive oil
1/4 cup balsamic vinegar
2 tablespoons honey (essential for the thick, dark glaze shown)
1 tablespoon Dijon mustard
3 cloves garlic, minced
1 teaspoon dried oregano
1/2 teaspoon red pepper flakes
1/2 cup crumbled feta cheese
1/4 cup fresh mint leaves, torn
Salt and coarse black pepper to taste
Directions
- Prepare the Chicken: Pat the chicken breasts completely dry with paper towels. Season both sides aggressively with salt, coarse black pepper, and dried oregano. Press the spices into the meat to ensure they stick during the sear.
- The High-Heat Sear: Heat the olive oil in a large cast-iron or heavy-bottomed skillet over medium-high heat. Once the oil is shimmering and just starting to smoke, add the chicken. Sear for 5-6 minutes without moving them until a dark, charred crust forms.
- The Glaze Base: While the chicken sears, whisk together the balsamic vinegar, honey, and Dijon mustard in a small bowl.
- Flip and Infuse: Flip the chicken breasts. Immediately add the minced garlic and red pepper flakes to the center of the pan, stirring for 30 seconds until fragrant but not burnt.
- Glaze and Reduce: Pour the balsamic-honey mixture over the chicken. Reduce heat to medium. Use a spoon to continuously baste the chicken with the liquid as it bubbles and thickens into a dark, syrupy glaze (about 3-4 minutes). The chicken is done when it reaches an internal temperature of 160°F (it will rise to 165°F while resting).
- The Critical Rest: Remove the skillet from the heat. Transfer the chicken to a plate and pour the remaining thick glaze from the pan over the top. Let the meat rest for 7 minutes. This allows the fibers to relax and reabsorb the juices.
- Garnish and Serve: Slice the chicken into thick strips against the grain. Top generously with crumbled feta cheese and fresh mint leaves. The residual heat from the chicken will slightly soften the feta, matching the visual texture of the dish.
Notes
- Pounding the chicken to an even thickness is crucial for uniform cooking. Ensure the meat rests for a full 7 minutes to retain its juices.


