
We have all been there. You pull a beautiful, golden-crusted Shepherd’s Pie out of the oven, only to have it collapse into a soupy, gray puddle the moment your spoon hits the plate. This “soggy bottom” epidemic is the primary reason many home cooks shy away from this classic. When the meat base is too thin, the heavy mashed potatoes sink right into the gravy, creating a muddy texture that ruins the structural integrity of the dish.
Technically, because we are using beef instead of lamb, this recipe is a “Cottage Pie.” However, in most American kitchens, the terms are used interchangeably for this ultimate comfort food staple. The key to a professional-grade version lies in the meat-to-potato ratio and a specific thickening technique. We aren’t just making a meat sauce; we are building a sturdy, savory foundation that can support a thick cloud of buttery potatoes without flinching.
The secret to success is all in the reduction. By simmering the beef broth until it transforms into a glazy, concentrated gravy, you ensure every bite stays exactly where it belongs. I’ve found that taking an extra five minutes to let that liquid cook down makes the difference between a cafeteria-style mess and a dinner-party-worthy masterpiece. You want a base so thick it coats the back of a spoon like velvet.
The Anatomy of a Non-Soggy Meat Base
To build a pie that stands tall, you have to start with the right protein. I recommend using lean ground beef, specifically a 90/10 or 85/15 blend. While fat equals flavor in a burger, too much rendered grease in a Shepherd’s Pie will cause the potato topping to slide right off the meat. If you use a higher fat content, you’ll end up with a pool of orange oil sitting on top of your gravy, which prevents the layers from bonding.
As you brown the beef, look for the “fond”—those little brown bits that stick to the bottom of the skillet. Don’t scrape them away too early! Those caramelized bits are concentrated beef flavor. Once the meat is deeply browned and the moisture has evaporated, those bits will eventually dissolve into your sauce, providing a rich, dark color and a savory backbone that salt alone can’t achieve.
Why We Drain the Fat Completely
After browning your beef, you must drain the excess fat completely. I usually tip the skillet over a heat-safe bowl or use a slotted spoon to move the meat to a plate. If you leave that liquid fat in the pan, it creates a barrier. It prevents the flour from properly hydrating and bonding with the beef broth later on.
When grease is left behind, the sauce often “breaks,” meaning the oil separates from the liquid. This results in a greasy mouthfeel rather than a cohesive, silky gravy. By starting with a clean, drained base of meat, you ensure the flour can do its job as a binder, locking the juices into the meat rather than letting them run wild across your baking dish.
Caramelizing Tomato Paste for Deep Umami
Most people just stir tomato paste into the liquid, but that’s a missed opportunity for flavor. You want to drop the paste directly onto the hot surface of the pan with the meat and onions. Cook it for about two minutes until it shifts from a bright, acidic red to a dark, brick-red color. This process is called “pincé,” and it mellows the sharp vinegary notes of the tomato.
As the sugars in the paste caramelize, they develop a deep, savory umami that mimics the richness of a long-simmered stew. This creates the “backbone” for the beef broth. It adds a layer of complexity that makes the beef taste “beefier” without making the whole dish taste like spaghetti sauce. It’s a small step that yields a massive payoff in the final flavor profile.
Essential Ingredients for a Sturdy Shepherd’s Pie
Quality ingredients are the difference between a bland meal and a memorable one. For the topping, Russet potatoes are non-negotiable. Unlike waxy Yukon Golds or Red potatoes, Russets have a high starch content and low moisture. This allows them to mash into a light, fluffy consistency that acts like a sponge for the butter and milk, staying stiff enough to hold those beautiful peaks in the oven.
When it comes to the beef, freshness matters. Since the meat is the star, try to find ground chuck if possible. It has a more robust flavor than standard “ground beef” packs. For the liquid, a high-quality beef stock or bone broth provides a better gelatinous mouthfeel than a standard bouillon cube, which helps the sauce set firmly as it cools slightly before serving.
The Role of All-Purpose Flour as a Binder
We use the “Singer” method here, which involves sprinkling flour directly over the cooked meat and aromatics. This is superior to using a cornstarch slurry because flour creates a more stable, opaque gravy. Cornstarch can sometimes turn “weepy” or thin out if it’s held at high temperatures for too long in the oven.
The flour coats the beef and absorbs any remaining moisture, creating a roux-like paste right on the meat. When you finally add the broth, the flour expands and thickens the liquid into a sturdy sauce. This ensures the meat layer stays put when you slice into the pie, providing that classic, clean-cut look that every home cook aims for.
Flavor Enhancers: Worcestershire and Dried Thyme
Worcestershire sauce is the “secret weapon” of savory cooking. It’s packed with fermented anchovies, tamarind, and molasses, providing a salty, tangy punch that cuts through the richness of the beef. Just a tablespoon transforms the gravy from one-dimensional to professional-grade. It adds a fermented complexity that you just can’t get from salt and pepper alone.
While I love fresh herbs, dried thyme is actually better for this meat base. Dried herbs have concentrated oils that stand up well to the simmering process. Fresh thyme can sometimes get lost or turn bitter when cooked at high heat, but the dried version infuses the entire gravy with an earthy, floral aroma that perfectly complements the beef and potatoes.
Step-by-Step: Building the Savory Ground Beef Base
Once your meat is browned and the aromatics are soft, it’s time for the most critical phase: the reduction. After you pour in the beef broth and Worcestershire, the mixture will look like a thin soup. Do not panic! This is where patience pays off. You need to simmer this uncovered over medium heat for at least 10 to 12 minutes.
Watch the bubbles. At first, they will be thin and watery. As the liquid evaporates, the bubbles will become larger and “lazier,” popping more slowly. You are looking for a thick, dark gravy that heavily coats every piece of meat. If you drag a wooden spoon through the center of the pan, it should leave a clear path for a second before the sauce fills back in.
If the base looks even slightly runny, keep simmering. Any extra liquid in the pan will eventually boil up through the potatoes in the oven, causing that dreaded soggy texture. The goal is a concentrated, intense beef mixture that looks almost like a thick chili. This density is what allows the potato topping to sit proudly on top without sinking into the abyss.
The Science of the Perfect Potato Topping
The secret to a stiff, pipeable mash is the “dry-mashing” technique. After boiling your Russets until tender, drain them thoroughly in a colander. Then, return them to the still-hot pot over low heat for about two minutes. Shake the pot gently. You’ll see steam rising rapidly—this is excess moisture leaving the potato.
By evaporating that extra water, you make room for the butter and milk to be absorbed more effectively. This results in a mash that is incredibly creamy but structurally sound. If you skip this, the water trapped inside the potatoes will leak out during baking, thinning your meat sauce from the top down. It’s a simple step that guarantees a fluffy, non-watery topping.
Achieving the Golden Parmesan Crust
To get those gorgeous brown ridges, we rely on the Maillard reaction. This is the chemical reaction between amino acids and reducing sugars that gives browned food its distinctive flavor. By using a fork to create deep ridges and peaks across the surface of the potatoes, you increase the surface area that is exposed to the heat of the oven.
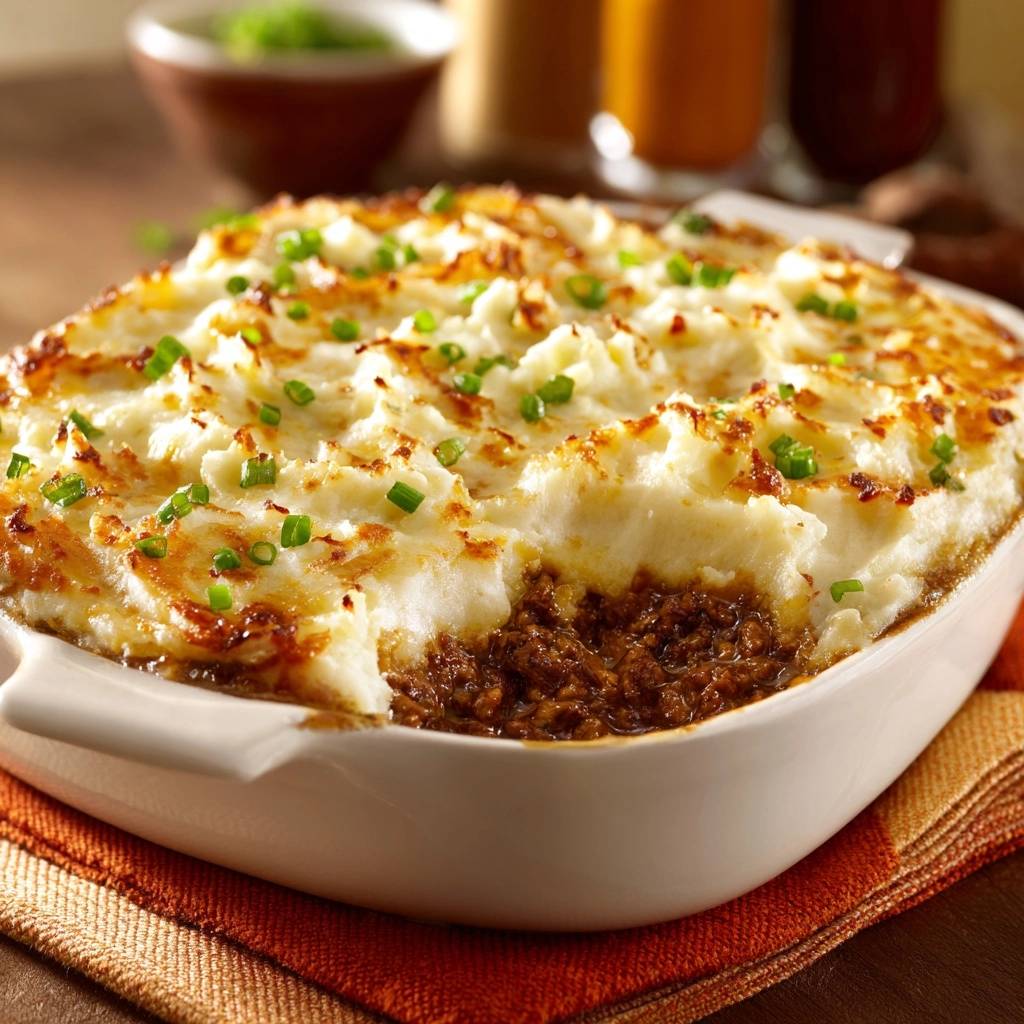
The addition of Parmesan cheese is a game-changer here. The proteins in the cheese brown beautifully under the broiler, creating a salty, crispy crust that contrasts with the soft potato underneath. When those peaks catch the heat, they turn into crunchy little “flavor nuggets” that make every bite interesting. Don’t be afraid to let it get a little dark; that color is where the flavor lives!
Avoiding Common Shepherd’s Pie Mistakes
If your potatoes sink into the meat, the culprit is usually too much liquid in the mash or a meat base that wasn’t reduced enough. Next time, try adding your milk to the potatoes a tablespoon at a time. You want the mash to be stiff enough to hold its shape on a spoon. If it’s “soupy” before it goes in the oven, it will definitely sink during the bake.
Is your sauce a bit bland? This usually happens if the tomato paste wasn’t caramelized or if you were shy with the salt. Beef and potatoes both require a generous amount of seasoning. Always taste your meat mixture before putting it in the baking dish. It should taste slightly “over-seasoned” because the unseasoned potatoes will balance it out once they are combined.
Make-Ahead Strategies and Freezing Instructions
This is a fantastic “prep-ahead” meal. You can actually make the meat base and the mashed potatoes up to 24 hours in advance. Store them in separate containers in the fridge. When you are ready to bake, the chilled meat base will be firm, making it incredibly easy to spread the potatoes on top without them mixing into the gravy.
For freezing, I recommend assembling the pie in a freezer-safe foil tin but stopping before the baking step. Wrap it tightly in plastic wrap and then a layer of heavy-duty foil. It will stay fresh for up to three months. When you’re ready to eat, bake it directly from frozen at 350°F for about an hour, then turn the heat up to 400°F to crisp the top.
Vegetable Pairings and Serving Suggestions
Since Shepherd’s Pie is very rich and starch-heavy, you want side dishes that offer a bright, acidic contrast. A simple arugula salad with a sharp lemon vinaigrette is my personal favorite. The peppery greens and citrus juice cut right through the heavy beef and butter, refreshing your palate between bites.
If you want more cooked vegetables, try honey-glazed carrots or roasted green beans with plenty of garlic. Avoid serving this with more starch, like bread or rice. Instead, focus on vibrant, crunchy vegetables that add a pop of color to the plate. A side of pickled red onions also works wonders to brighten up the deep, savory flavors of the gravy.
Expert Troubleshooting
Can I use ground turkey instead of beef?
Yes, you can certainly use ground turkey or chicken. However, poultry is much leaner and has less natural “umami” than beef. I recommend adding an extra teaspoon of Worcestershire sauce and perhaps a splash of soy sauce to the meat base to help build that deep, savory color and flavor that turkey often lacks.
How do I fix a sauce that is too salty?
If you accidentally over-salted the meat base, don’t panic. You can add a splash of water or a little more unsalted beef broth and simmer it again. Alternatively, you can leave the mashed potatoes entirely unsalted. When the two layers are eaten together, the unseasoned potatoes will pull the excess salt from the meat, balancing the dish out.
Why use Russets instead of Red potatoes?
Red potatoes are “waxy,” meaning they hold their shape well when boiled but don’t mash into a fluffy consistency. They tend to become gummy or “gluey” when over-worked. Russets are starchy and fall apart easily, which creates that light, airy texture that is essential for a traditional Shepherd’s Pie topping.
Can I add frozen peas and carrots?
Absolutely! Many people love the addition of peas and carrots. The trick is to add them at the very end of the reduction phase, just before you pour the meat into the baking dish. This prevents the vegetables from turning into mush during the 20-minute bake in the oven, keeping them bright and slightly firm.
How should I store and reheat leftovers?
Store leftovers in an airtight container in the refrigerator for up to four days. To reheat, I recommend using the oven or a toaster oven at 350°F rather than the microwave. This helps recrisp the potato topping. If you must use a microwave, heat it in short bursts so the meat doesn’t get rubbery.
The Importance of the Ten-Minute Rest
I know it’s tempting to dive in the second the timer beeps, but you must let the pie rest for at least ten minutes. This isn’t just about the temperature; it’s about physics. During this time, “carry-over cooking” continues to firm up the sauce. The starches in the flour and the potatoes need a moment to “lock” together as the temperature drops slightly.
If you cut into it immediately, the gravy will be too fluid and will run all over the plate. By waiting, you allow the layers to set, ensuring that every scoop comes out as a perfect, distinct stack of savory beef and golden potatoes. This rest period is the final step in conquering the soggy bottom and serving a truly professional Shepherd’s Pie.
Savory Ground Beef Shepherd’s Pie
Course: Main CourseCuisine: AmericanDifficulty: easy6
servings20
minutes40
minutes60
Minutes450
kcalAmerican
Ingredients
1.5 lbs lean ground beef
1 large onion, finely diced
2 cloves garlic, minced
2 tablespoons tomato paste
2 tablespoons all-purpose flour
1.5 cups beef broth
1 tablespoon Worcestershire sauce
1 teaspoon dried thyme
2 lbs Russet potatoes, peeled and cubed
4 tablespoons butter
1/2 cup whole milk
1/2 cup shredded parmesan cheese
3 tablespoons chopped green onions (scallions)
Salt and black pepper to taste
Directions
- Boil the potatoes in salted water until tender, about 15 minutes. Drain thoroughly and return them to the hot pot over low heat for 2 minutes, stirring occasionally, to let excess steam escape. This “dry-mashing” prep is the first step to preventing a watery dish. Mash with butter, milk, and salt until smooth and stiff.
- While potatoes boil, brown the ground beef in a large skillet over medium-high heat. Drain the excess fat completely. This is crucial to prevent a greasy, runny base.
- Add the diced onion and garlic to the beef and cook until softened. Stir in the tomato paste and cook for 2 minutes to caramelize the sugars and deepen the flavor.
- Sprinkle the flour over the meat and stir well for 1 minute to cook out the raw flour taste. Slowly pour in the beef broth, Worcestershire sauce, and thyme. Simmer uncovered for 10 to 12 minutes. You must simmer until the liquid has reduced into a thick, dark gravy that coats the meat heavily. If it looks like soup, keep simmering. This thick, concentrated base is the secret to the anti-soggy bottom.
- Pour the thickened meat mixture into a baking dish. Spread the mashed potatoes over the top, using a fork to create deep ridges and peaks across the entire surface. Sprinkle the parmesan cheese evenly over the potatoes.
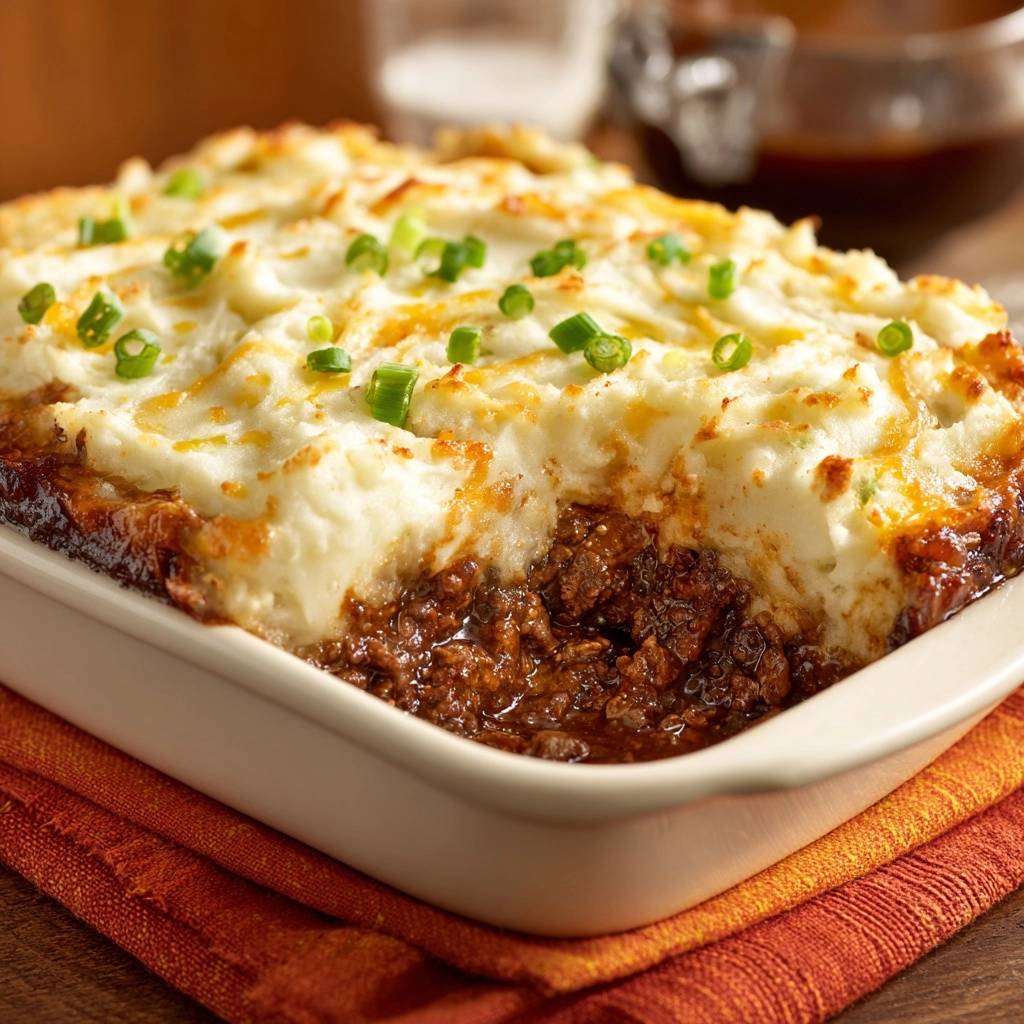
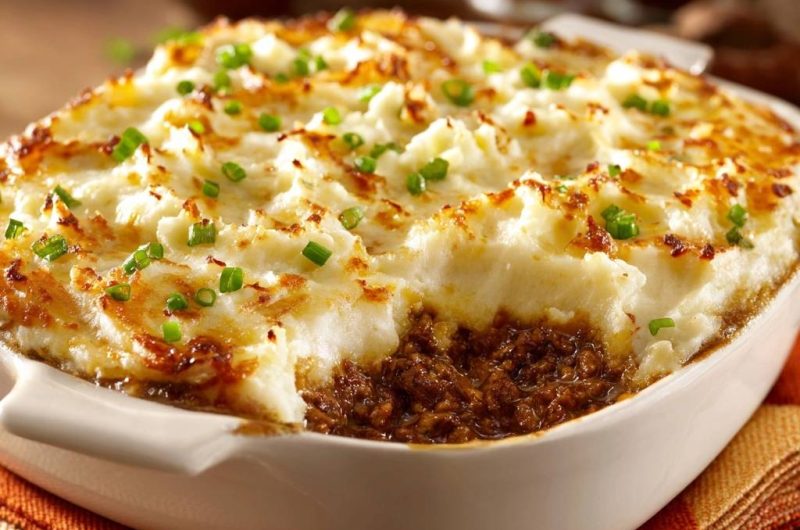
- Bake at 400 degrees F for 20 minutes, then switch to the broiler for 2 to 4 minutes. Watch closely until the potato peaks are deeply browned and crispy, matching the golden-crusted visual in the image.
- Let the dish rest for 10 minutes before serving. This allows the sauce to set completely so you get perfect, clean layers in every scoop. Garnish generously with fresh green onions.
Notes
- The secret to the ‘anti-soggy bottom’ is ensuring the meat sauce is heavily reduced and the potatoes are dried out over heat before mashing.


