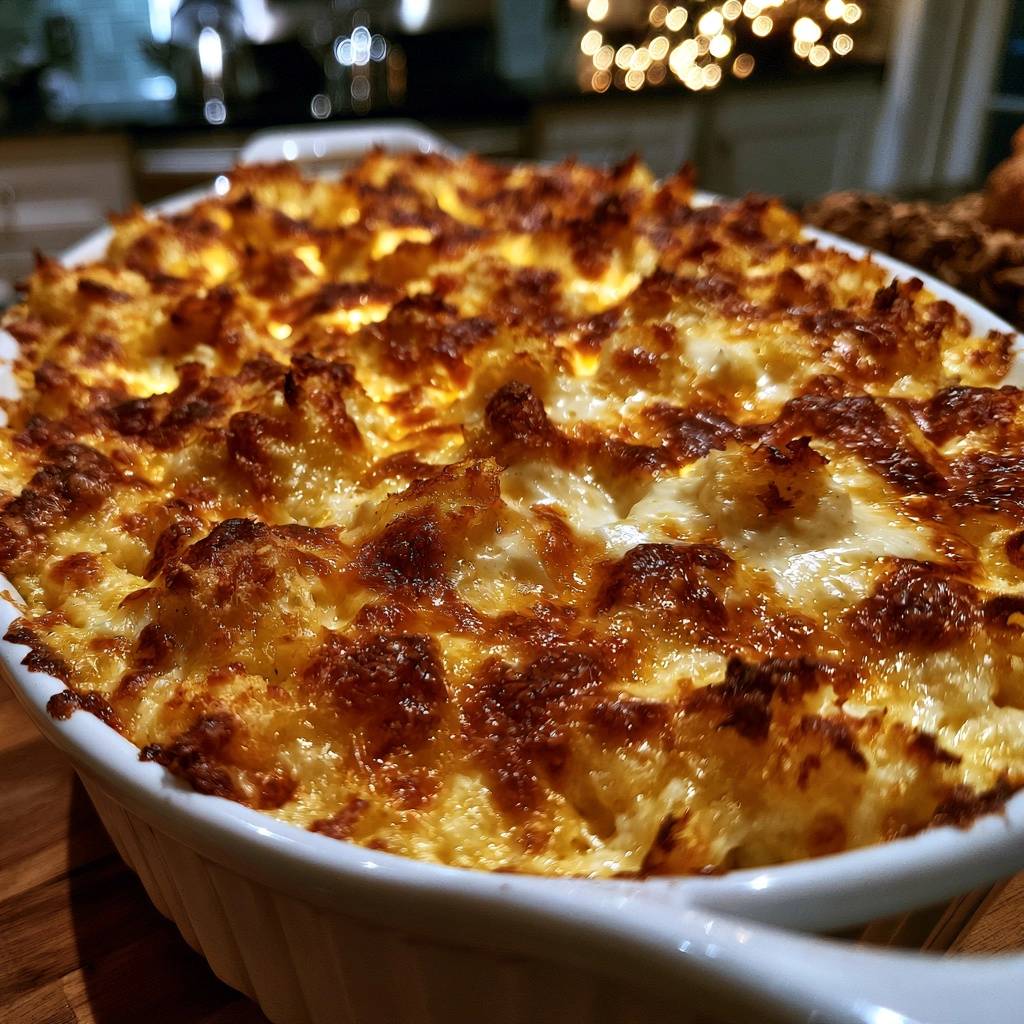
The ultimate comfort food should feel like a warm hug, but so often, homemade baked mac and cheese falls short. You’ve likely experienced the disappointment of a dish that looks beautiful on top but reveals a grainy, oily, or dry interior once you dive in. True “Ultra-Creamy” macaroni and cheese is a study in contrast, featuring a velvety, fluid sauce that coats every noodle and a deeply caramelized Gruyère crust that shatters under your fork.
Achieving this professional-grade texture isn’t about luck; it’s about controlling the science of the sauce. We aren’t just making a cheese dip; we’re building a stable emulsion that can withstand the high heat of the oven without breaking. When you pull this casserole out, the sauce should still be luscious and glossy, never soaked up entirely by the pasta or separated into a pool of oil.
The secret to this success lies in the temperature of your ingredients and the timing of your cheese. I’ve found that the most common mistake is adding cheese to a boiling liquid, which causes the proteins to seize and turn gritty. By mastering the tempering technique and using room-temperature dairy, you’ll ensure a smooth-as-silk finish every single time. Let’s get into the details of how to make this the last mac and cheese recipe you’ll ever need.
The Chemistry of a Smooth Cheese Sauce
At the heart of this dish is a Mornay sauce, which starts with a classic roux of equal parts butter and flour. This roux serves as the stabilizer, creating a network that holds the fat and liquid together in a perfect emulsion. Without this foundation, the cheese would simply melt and separate, leaving you with a greasy mess rather than a creamy coating.
High heat is the absolute enemy of cheese proteins, specifically casein. When cheese is exposed to extreme temperatures, those proteins tighten up and squeeze out the fat, resulting in that dreaded “seizing” or grainy texture. This is why the “Tempering Technique” is a non-negotiable step in this recipe. You must remove the pot from the heat source entirely before you even think about stirring in your shredded cheese.
By killing the heat, you allow the residual warmth of the thickened milk and cream to melt the cheese gently. This preserves the protein structure, keeping the sauce elastic and glossy. It’s the difference between a sauce that feels like velvet on the tongue and one that feels like fine sand. Trust the process and let the residual heat do the heavy lifting.
Essential Components for Ultra-Creamy Baked Macaroni and Cheese
Your results are only as good as your ingredients, and there is one rule you cannot break: the “Block Cheese Mandate.” Please, step away from the bags of pre-shredded cheese. Those convenient pouches are coated in cellulose and potato starch to prevent the shreds from clumping in the bag. While that’s great for storage, those anti-caking agents prevent the cheese from melting into a cohesive sauce, almost guaranteeing a gritty texture.
Freshly grated cheese from a block melts significantly better because it lacks those dusty additives. Additionally, the fat content in this recipe is intentional. We use a combination of whole milk and heavy cream to achieve a specific mouthfeel. The whole milk provides the bulk of the liquid, while the heavy cream adds the necessary fat to ensure the sauce stays rich and doesn’t get absorbed by the pasta during the baking process.
Selecting the Right Pasta Shape
While elbow macaroni is the traditional choice, cavatappi is a fantastic alternative for those who want a bit more “bite.” Both shapes are ideal because they feature internal ridges and hollow centers that act as tiny sauce traps. You want a noodle that can hold onto that liquid gold, ensuring every mouthful is packed with flavor.
Don’t forget to heavily salt your pasta water. This is your only chance to season the noodles themselves from the inside out. If the water doesn’t taste like the sea, your final dish will likely taste flat, no matter how much cheese you add later. The pasta should be flavorful enough to stand on its own before it ever meets the sauce.
The Three-Cheese Profile: Cheddar, Mozzarella, and Gruyère
We use a trio of cheeses to hit every sensory note. Sharp cheddar provides that classic, aggressive “bite” and deep color that we all associate with great mac and cheese. However, cheddar alone doesn’t provide much of a “pull,” which is where the mozzarella comes in. It adds elasticity and that iconic stringy texture that makes the dish so fun to eat.
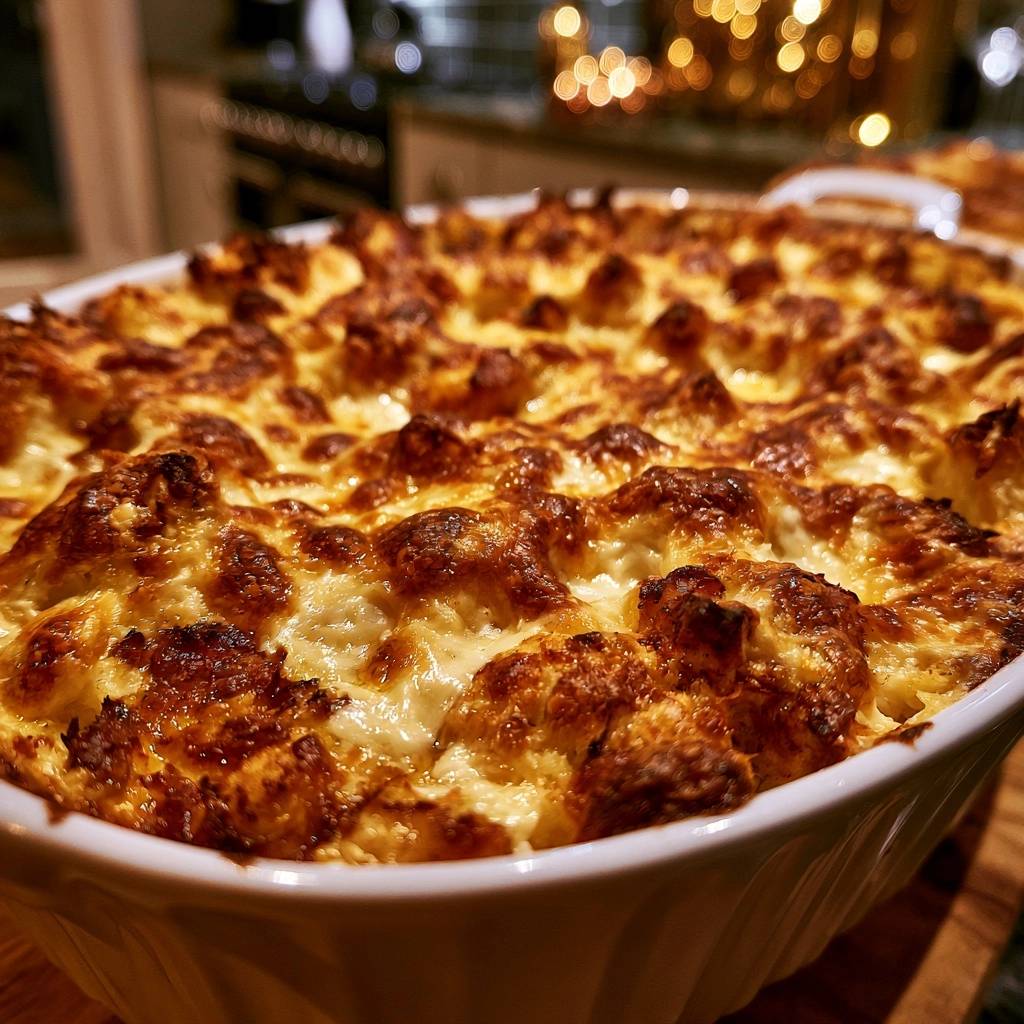
Finally, we use Gruyère for the crust. Gruyère is a sophisticated Swiss-style cheese that offers a nutty, complex flavor profile. More importantly, it has a lower moisture content than mozzarella, which allows it to brown beautifully. It creates those dark, crispy peaks that provide a necessary textural contrast to the soft, creamy interior.
Phase One: Preparing the Pasta and Roux
The most critical rule for the pasta is the “3-minute under-boil.” If you cook your noodles to al dente on the stove, they will turn into mush in the oven. By boiling them for three minutes less than the package directions, you leave them firm enough to absorb the cheese sauce without losing their structural integrity. They’ll finish softening during the 30-minute bake, reaching perfection just as the cheese browns.
While the pasta drains, start your roux. Melt your butter and whisk in the flour, cooking it for about two minutes. You’re looking for a specific visual cue: the mixture should be bubbling and smell slightly nutty, but it must remain pale. If it turns brown, you’ve made a dark roux for gumbo, which will change the flavor of your cheese sauce too much.
When you begin adding your liquid, use a vigorous whisking motion. Start with just a splash of the room-temperature milk to create a thick paste, then gradually add the rest. This prevents lumps from forming and ensures your base is perfectly smooth before the cheese is even introduced. If you see lumps, keep whisking; they will eventually smooth out as the liquid heats up.
Phase Two: Emulsifying the Ultra-Creamy Sauce
As you pour in the milk and heavy cream, maintain a steady, slow stream. Using room-temperature liquids is a pro tip that prevents “thermal shock,” which can cause the roux to clump up instantly. Continue whisking over medium heat until the sauce thickens. You’ll know it’s ready when it reaches the “Nappé” stage, meaning it’s thick enough to coat the back of a spoon without running off.
Once you hit that consistency, turn off the burner and move the pot to a cool spot on the stove. This is the moment of truth. Stir in your spices—the garlic powder, smoked paprika, and mustard—then begin folding in your shredded cheddar and mozzarella. Do this in batches, stirring until each handful is completely melted and the sauce looks glossy and uniform.
If the sauce looks too thick at this stage, don’t panic. You can whisk in an extra splash of milk to loosen it up. Remember, the sauce needs to be slightly thinner than you think, as the starch from the pasta will naturally thicken it further once they are combined. It should look like a rich, pourable fondue.
Phase Three: Layering for Maximum Texture
When you fold the pasta into the sauce, it should look almost “soupy.” This is intentional! That extra liquid is what prevents the dish from becoming a dry block of noodles after it spends 30 minutes in a hot oven. Every single noodle should be heavily submerged in that golden sauce before it goes into the baking dish.
We use a layering method to create “pockets” of molten cheese. By pouring half the pasta in, topping it with a layer of shredded cheese, and then adding the rest of the pasta, you ensure there’s a gooey surprise in the middle. This creates a different texture than the emulsified sauce, giving you those long, stretchy cheese pulls that everyone loves.
Finally, top the whole thing with the shredded Gruyère. Don’t be shy with this layer; it’s the shield that protects the creamy interior while providing that essential crunch. Make sure the cheese reaches all the way to the edges of the dish, as those corner bits are often the most coveted parts of the casserole.
Achieving the Caramelized Gruyère Crust
The final five minutes of baking are where the Maillard reaction happens. This is the chemical reaction between amino acids and reducing sugars that gives browned food its distinctive flavor. The Gruyère will begin to bubble and develop dark, caramelized spots that smell incredibly nutty and savory.
If your oven doesn’t brown the top as much as you’d like after 25 minutes, turn on the broiler. Stay right there and watch it! The transition from perfectly browned to burnt happens in seconds. You want deep brown peaks and a bubbling surface. This crust acts as a flavorful lid, keeping the moisture trapped inside the pasta layer below.
Once it’s out of the oven, you must let it rest for at least 10 minutes. I know it’s tempting to dig in immediately, but the sauce needs this time to “set.” If you scoop it too early, the sauce will run to the bottom of the dish. A short rest allows the emulsion to stabilize so every scoop stays perfectly coated and creamy.
Troubleshooting Common Macaroni and Cheese Issues
If your sauce ends up grainy, it’s almost certainly because the cheese was added to a liquid that was too hot, or you used pre-shredded cheese with cellulose. To fix a grainy sauce in the future, always kill the heat before adding cheese. If the sauce is too thick before you add the pasta, simply whisk in a little more room-temperature milk until it reaches a pourable consistency.
Dry mac and cheese is usually the result of overcooking the pasta on the stove or not having enough sauce-to-noodle ratio. Always err on the side of “too much sauce” before baking. If your dish comes out oily, the sauce “broke,” likely because the heat was too high or the cheese was low-quality. Using a heavy-bottomed pot helps distribute heat evenly and prevents these sudden temperature spikes.
Make-Ahead Strategies and Storage
You can absolutely prep this dish 24 hours in advance, but don’t bake it yet. I recommend par-boiling the pasta and making the sauce, then storing them separately in the fridge. If you assemble the whole dish and let it sit overnight, the pasta will drink up all the moisture, leaving you with a dry bake the next day.
When you’re ready to bake, gently reheat the sauce on the stove with a splash of milk to loosen it up, fold in the cold pasta, and then proceed with the layering and baking. If you have leftovers, store them in an airtight container for up to 3 days. To reheat, add a tablespoon of milk to your bowl before microwaving; this helps “re-emulsify” the sauce so it becomes creamy again rather than oily.
Professional Serving Suggestions
Because this dish is incredibly rich and decadent, it pairs best with something bright and acidic. A simple arugula salad with a sharp lemon vinaigrette is the perfect palate cleanser. The peppery greens and citrus cut right through the heavy fats of the cheddar and cream, making every bite of mac and cheese feel fresh again.
Roasted broccoli with a pinch of red chili flakes is another excellent side. The charred bits of the broccoli mimic the caramelized Gruyère crust, while the heat from the chili flakes adds a nice contrast to the savory cheese. Whatever you choose, remember that 10-minute rest rule—it’s the difference between a messy plate and a perfect, professional presentation.
Expert Tips for Customizing Your Sauce
You can easily elevate the flavor profile with a few pantry staples. Ground mustard is a classic addition because its acidity cuts through the richness of the dairy without adding a distinct “mustard” flavor. Similarly, a pinch of smoked paprika adds a subtle wood-fired note that complements the sharpness of the cheddar.
Some chefs swear by a tiny pinch of nutmeg, which enhances the nutty notes of the Gruyère. Just be careful with the salt! Between the salted pasta water and the natural sodium in the cheeses, you often don’t need much extra salt in the sauce. Always taste the sauce after the cheese has melted before adding more seasoning.
Frequently Asked Questions
Can I use gluten-free pasta for this recipe?
Yes, you can use gluten-free pasta, but be very careful with the boil time. Gluten-free noodles tend to release more starch and can fall apart quickly. Reduce the initial boil time even further, and ensure you use a sturdy shape like penne or fusilli. You will also need to use a gluten-free flour blend for your roux to ensure the sauce thickens correctly.
What can I substitute for Gruyère if I can’t find it?
If Gruyère isn’t available, Fontina or Swiss cheese are the best substitutes. Fontina melts beautifully and has a mild, buttery flavor, while Swiss provides that similar alpine nuttiness. Both will brown well under the broiler, though Gruyère remains the gold standard for that specific caramelized crust.
Why is it so important to use room temperature milk?
Using cold milk straight from the fridge can cause the hot butter and flour in your roux to seize up into tiny, hard clumps. Room temperature milk integrates much more smoothly, allowing for a gradual temperature increase that results in a perfectly homogenous, lump-free sauce. It’s a small step that makes a massive difference in the final texture.
Can I freeze this baked macaroni and cheese?
Dairy-based casseroles can be tricky to freeze because the sauce often breaks or becomes grainy upon thawing. If you must freeze it, do so after assembling but before baking. Wrap it tightly in plastic wrap and foil. Thaw it completely in the fridge before baking, and keep in mind you may need to add a little extra milk to the top to restore the moisture levels.
Is a cast-iron skillet better than a ceramic dish for baking?
A cast-iron skillet is excellent for heat retention and will give you very crispy edges, but a ceramic 9×13 dish provides more even heat distribution for a large batch. If you want those specific “dark, bubbly peaks” across the entire surface, a ceramic dish is usually the safer bet. However, for a smaller, rustic portion with extra-crunchy sides, cast iron is a fantastic choice.
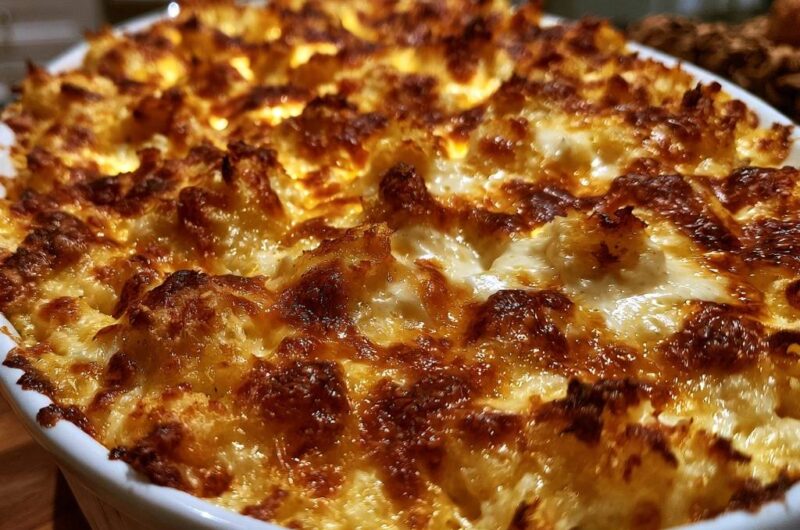
Ultra-Creamy Baked Macaroni and Cheese
Course: Main CourseCuisine: AmericanDifficulty: easy8
servings15
minutes30
minutes45
Minutes620
kcalAmerican
Ingredients
1 pound elbow macaroni or cavatappi pasta
4 cups sharp cheddar cheese, freshly shredded from a block (divided)
2 cups mozzarella cheese, freshly shredded (divided)
1/2 cup Gruyère cheese, freshly shredded (for the crust)
1/2 cup unsalted butter
1/2 cup all-purpose flour
4 cups whole milk, room temperature
1 cup heavy cream
1 teaspoon garlic powder
1/2 teaspoon smoked paprika
1/2 teaspoon ground mustard (optional, for depth)
Salt and black pepper to taste
Directions
- Preheat your oven to 375°F (190°C). Grease a large 9×13 inch deep-dish baking vessel.
- Boil the pasta in heavily salted water for 3 minutes less than the package directions for al dente. The pasta must be firm and slightly undercooked as it will absorb the sauce and finish softening in the oven. Drain and set aside.
- Shred all cheeses from blocks. Avoid pre-shredded bagged cheese; the cellulose coating prevents smooth melting and causes the “grainy” texture this recipe avoids.
- In a large heavy-bottomed pot, melt the butter over medium heat. Whisk in the flour and cook for 2 minutes, whisking constantly, to create a roux and remove the raw flour taste.
- Slowly pour in the room temperature milk and heavy cream in a steady stream while whisking vigorously. Using room temperature liquid prevents clumping. Continue to whisk until the sauce thickens enough to coat the back of a spoon (about 5-8 minutes). Season with garlic powder, paprika, mustard, salt, and pepper.
- Remove the pot from the heat entirely. This is the critical step: adding cheese to boiling liquid causes the proteins to seize and become gritty. Stir in 3 cups of the cheddar and 1 cup of the mozzarella until the sauce is completely smooth and glossy.
- Fold the undercooked pasta into the cheese sauce until every noodle is heavily submerged. The mixture should look slightly “soupy”-this ensures it won’t be dry after baking.
- Pour half of the mixture into the baking dish. Sprinkle with the remaining 1 cup of cheddar and 1 cup of mozzarella. Add the remaining pasta mixture on top.
- Top the dish with the 1/2 cup of Gruyère. This creates the specific dark, crispy, and bubbly peaks seen in the image.
- Bake for 25 to 30 minutes. For the exact visual result in the photo, turn on the broiler for the final 2 minutes until the cheese peaks are deeply browned and caramelized. Let it rest for 10 minutes before serving to allow the sauce to set.
Notes
- Always shred cheese from a block to avoid the grainy texture caused by cellulose in pre-shredded bags. Ensure the sauce is removed from heat before adding cheese to prevent the proteins from seizing.