
Oh, the joy of a perfectly crafted pie! There’s something truly special about bringing a beautiful dessert to the table, especially one that requires no baking and evokes sweet, nostalgic memories. But let’s be honest, we’ve all been there: you slice into a gorgeous no-bake pie, full of anticipation, only for the filling to ooze and spread across the plate like a sad, sugary puddle. It’s disappointing, messy, and utterly defeats the purpose of creating a stunning dessert.
That’s exactly why I poured my heart (and many test batches) into perfecting this Orange Creamsicle Pie recipe. I wanted that creamy, dreamy flavor of a classic creamsicle, translated into a luscious pie, but with a texture so delightfully firm, you can actually get a picture-perfect slice every single time. No more dessert disasters, just pure citrusy, creamy bliss that holds its shape beautifully.
For another fruity, no-bake option that sets just right, check out this easy no-bake strawberry pie.
This isn’t just any no-bake pie; it’s the answer to your firm-slice prayers. It captures that beloved Orange Creamsicle flavor profile – the vibrant tang of orange meeting the sweet, cool embrace of vanilla cream – but does so with impressive structural integrity. Whether you’re looking for a refreshing summer dessert, a simple holiday treat, or just a moment of creamy, citrusy comfort, this Orange Creamsicle Pie delivers on flavor and, crucially, on texture.
If you appreciate a no-bake pie that holds its shape, you’ll want to try this no-bake strawberry banana cheesecake pie.
Why You’ll Fall in Love with This Pie
Beyond the promise of a perfectly firm slice, there are so many reasons this Orange Creamsicle Pie will become a fast favorite in your recipe collection:
- Effortlessly No-Bake: Forget turning on the oven, especially when it’s warm outside! This pie comes together with just a little mixing and chilling time.
- Quick Prep: With only 20 minutes of active preparation, you can have this pie assembled and chilling in no time, leaving you free to enjoy your day.
- Nostalgic Flavor Bomb: That classic orange and vanilla combination is universally loved and instantly transports you back to carefree summer days and childhood treats.
- Simple Ingredients: You won’t need any fancy or hard-to-find items for this recipe; everything is readily available at your local grocery store.
- Guaranteed Success: I’ve cracked the code for a stable no-bake filling, so you can confidently serve this pie knowing it will look as good as it tastes.
It’s the ideal dessert for busy weeknights, casual get-togethers, or whenever you crave something sweet and satisfying without the hassle of baking. Plus, that vibrant orange swirl is just so pretty!
Gathering Your Ingredients for This Creamy Dream
Creating this delightful Orange Creamsicle Pie starts with a few simple yet essential components. Each ingredient plays a specific role in building the creamy texture, bright flavor, and the crucial firmness that makes this pie a winner. Let’s gather what we need:
For the Crust:
- 1 prepared graham cracker crust (9 inch): Opting for a pre-made crust makes this recipe super quick and easy. A graham cracker crust is the perfect textural and flavor complement to the creamy, citrusy filling, providing a subtle sweetness and satisfying crunch. You could also make your own graham cracker crust from scratch if you prefer!
For the Creamy Orange Filling:
- 16 ounces cream cheese softened but still cool: Cream cheese provides the rich, tangy, and creamy base for our filling. It’s vital that it’s softened enough to beat smooth, but still cool – not warm or at room temperature for hours. Starting with slightly cool cream cheese helps maintain a thicker consistency right from the start.
- 1 cup powdered sugar: Also known as confectioners’ sugar, this sweetens the cream cheese mixture and also contributes to the smooth, melt-in-your-mouth texture of the filling, as it dissolves easily without leaving a grainy feel.
- 1 teaspoon vanilla extract: This classic flavor enhancer pairs beautifully with both the cream cheese and the orange, reinforcing that familiar “creamsicle” profile. Use a good quality pure vanilla extract for the best flavor.
- 1/4 cup orange juice: This is where our primary orange flavor comes in! Freshly squeezed or good quality bottled orange juice will work. This small amount adds just the right citrus tang without making the mixture too thin.
For the Stabilizing Whipped Cream:
- 2 cups cold heavy whipping cream: This is the secret weapon for structure in our no-bake pie! It’s absolutely critical that the cream is very cold. Cold cream whips up light, airy, and most importantly, stable, which is what gives the pie filling its firmness.
- 1/4 cup granulated sugar: A little granulated sugar sweetens the whipped cream and helps it whip to stiff peaks. Add it gradually as the cream thickens for best results.
For the Signature Swirl:
- 1/2 cup orange marmalade or orange sauce: This provides a more intense, slightly tangy orange element and creates that beautiful, inviting swirl on top. Orange marmalade works wonderfully, offering little bits of citrus peel for texture and a concentrated flavor. If you have a smooth orange sauce (like a simple reduction of orange juice and sugar), that works too.
Optional Garnish:
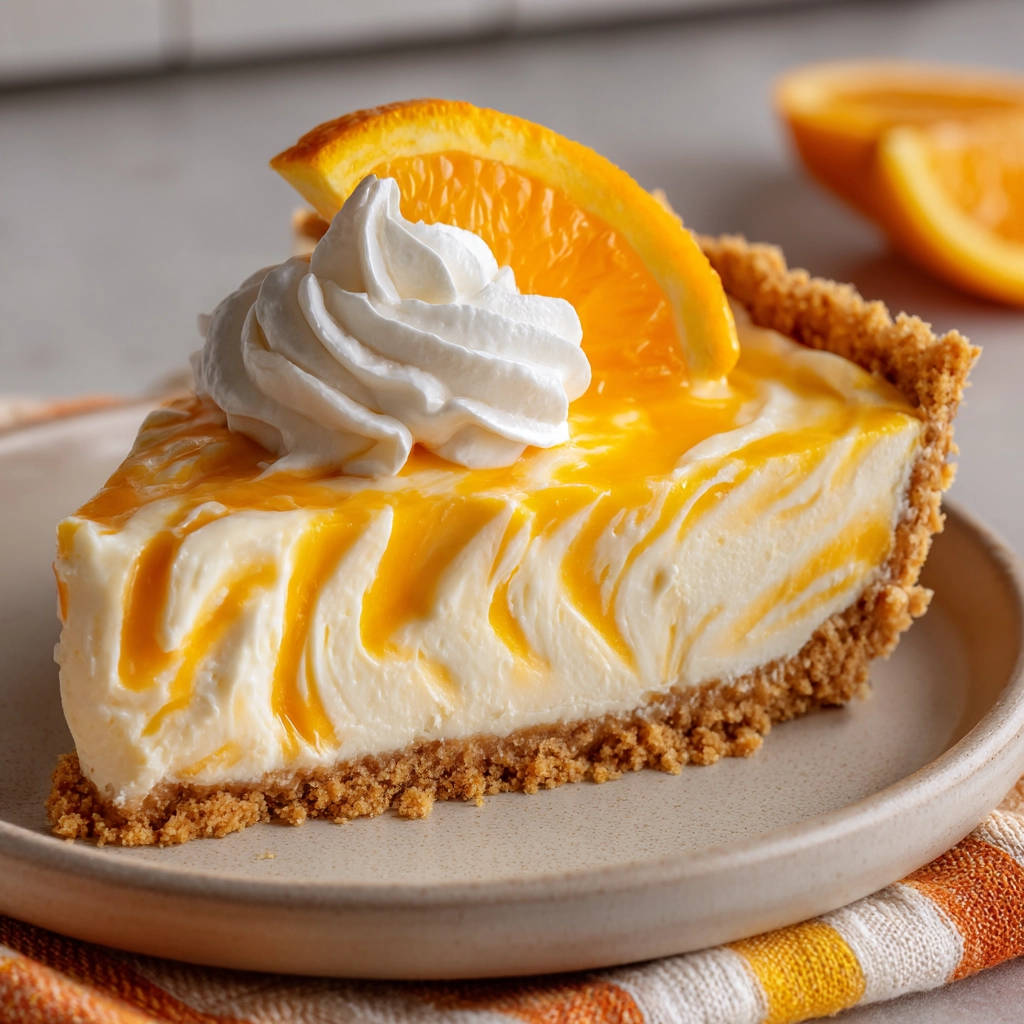
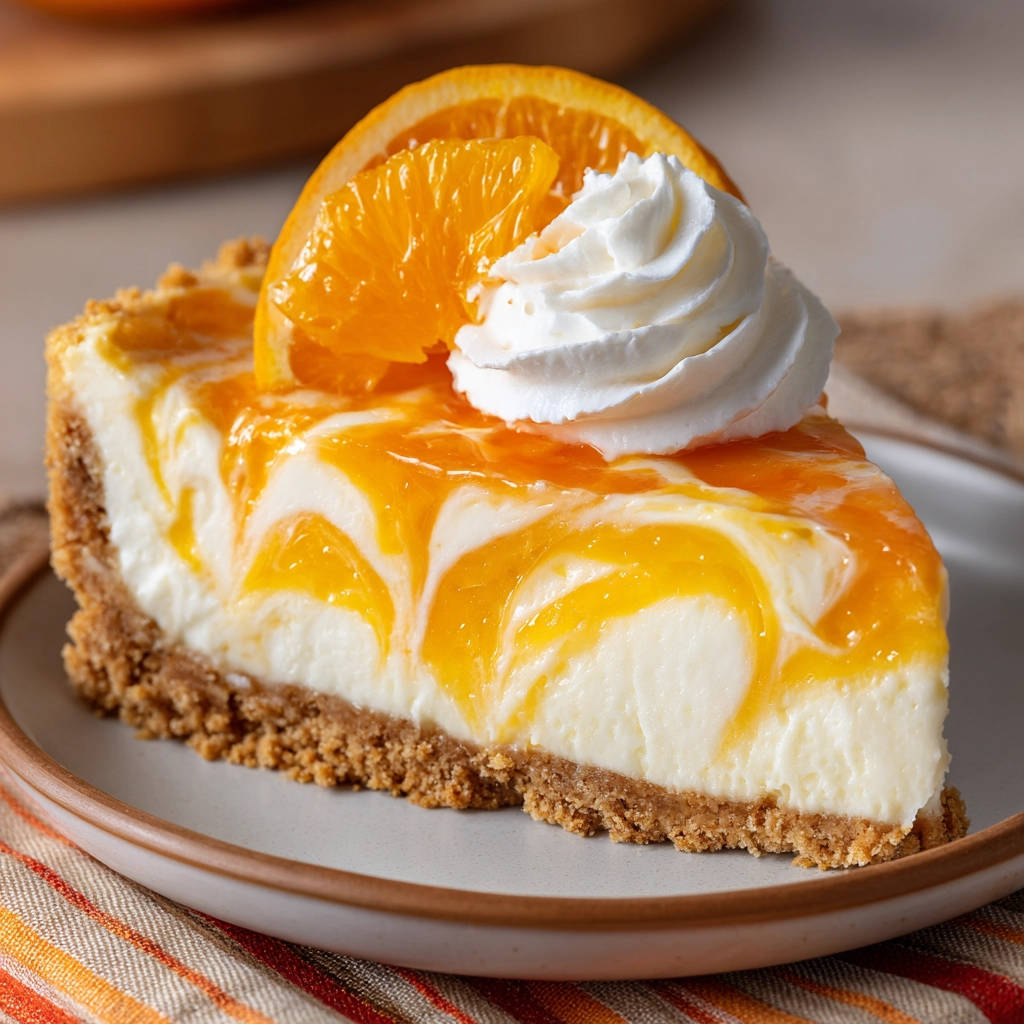
- Extra whipped cream and orange slices for garnish: For serving, a dollop of extra whipped cream and a fresh orange slice make the finished pie look even more appealing and add a little extra freshness.
Having these simple ingredients ready is the first step to creating a truly delightful and perfectly set Orange Creamsicle Pie that will impress everyone who tries it.
Crafting Your Orange Creamsicle Pie: Step-by-Step Guide
Putting this pie together is straightforward and fun! The key is paying attention to temperatures and techniques, especially when it comes to whipping the cream and combining the mixtures. Follow these steps for guaranteed success:
Start with the Creamy Base: Grab a large mixing bowl and your electric mixer. Add the softened, but still cool, cream cheese. Beat it on medium speed until it’s wonderfully smooth and lump-free. This ensures a silky texture in your final pie. Next, add the powdered sugar and vanilla extract. Continue beating until everything is well combined and the mixture looks light and fluffy. Now, gradually pour in the 1/4 cup of orange juice while the mixer is on low speed. Keep beating just until it’s fully incorporated and the mixture is smooth again. At this stage, the mixture should be quite thick; this is exactly what we want.
Whip the Cream to Stiff Peaks: In a separate bowl – make sure this bowl is very cold! You can even pop it in the freezer for 10-15 minutes beforehand – add your cold heavy whipping cream. Seriously, the colder, the better for achieving stable peaks. Begin beating the cream on high speed with your electric mixer. As the cream starts to thicken (you’ll see soft waves forming), gradually sprinkle in the granulated sugar. Continue beating until you achieve stiff peaks. This means when you lift the beaters, the peaks of cream stand straight up and don’t flop over. Be careful not to overbeat, or you’ll end up with butter!
The Secret to Firmness: Gentle Folding: This step is absolutely CRUCIAL for ensuring your pie sets up firmly and slices beautifully. Take about one-third of your stiffly whipped cream and add it to the cream cheese mixture. Using a rubber spatula, very gently fold the whipped cream into the cream cheese. The goal here is to lighten the cream cheese mixture without deflating the whipped cream. Use an under-and-over motion, turning the bowl as you go, lifting the heavier cream cheese mixture and folding it over the airy whipped cream. Repeat this process with the remaining whipped cream, adding it in two more additions. Keep folding gently until there are no more white streaks of whipped cream visible. Stop mixing as soon as it’s just combined. Overmixing will knock out all the air you worked so hard to whip in, resulting in a softer pie.
Fill the Crust: Carefully pour the finished, airy filling into your prepared graham cracker crust. Use the spatula or the back of a spoon to spread the filling evenly across the bottom and right up to the edges of the crust, creating a smooth surface.
Add the Signature Swirl: If your orange marmalade or sauce is very thick, warm it slightly in a small saucepan or microwave-safe bowl just until it’s pourable. You don’t want it hot, just liquid enough to drizzle easily. Spoon dollops or drizzles of the warm orange topping over the surface of the creamy filling. Take a knife or a skewer and gently swirl the orange through the cream cheese mixture. Don’t over-swirl, or you’ll lose the definition; a few deliberate passes are all you need to create that lovely marbled effect.
Cover and Chill: This might seem simple, but it’s important. Carefully cover the pie with plastic wrap. Try your best to tent the plastic wrap slightly or use toothpicks to prevent it from touching the swirled surface if possible, preserving that pretty design. This also prevents the surface from drying out or picking up refrigerator odors.
The Patience Factor: Chilling is Key: Place the covered pie in the refrigerator. Now comes the hardest part: waiting! For the filling to properly set and become firm enough to slice cleanly, it needs adequate chilling time. Refrigerate for at least 4 hours, but for the absolute best, most guaranteed-firm slice, leaving it to chill overnight (8+ hours) is highly recommended. This extended time allows the ingredients to meld and the structure from the whipped cream and cream cheese to fully stabilize.
Slice and Serve: When you’re ready to serve, grab a sharp knife. For the cleanest slices, dip the knife in hot water and wipe it dry between each cut. This helps the blade glide through the creamy filling without dragging. Serve slices of your beautiful, firm Orange Creamsicle Pie. Add an optional flourish of extra whipped cream and a fresh orange slice on top if desired. Get ready for compliments!
Following these steps, especially the gentle folding and the extended chilling, will ensure you achieve that sought-after firm slice every single time you make this pie. It’s incredibly satisfying!
Tips for a Perfect Orange Creamsicle Pie Every Time
While the steps above are your roadmap to success, a few extra tips can elevate your Orange Creamsicle Pie from great to absolutely perfect. These little details make a big difference in achieving the ideal texture and flavor:
- Mind the Temperature of Your Ingredients: I mentioned it in the ingredients and steps, but it bears repeating: temperature matters! Your cream cheese should be softened enough to beat smooth, but not warm and greasy. Your heavy whipping cream MUST be very cold to whip properly and achieve stiff, stable peaks.
- Chill Your Equipment: For whipping cream, a cold bowl and cold beaters will make your job so much easier and result in much better, firmer whipped cream. Pop the bowl and beaters in the freezer for 10-15 minutes before you start whipping.
- Don’t Skip the Gentle Fold: This is the core technique for incorporating the airy whipped cream into the dense cream cheese mixture without losing the volume. Think of it as persuading the two mixtures to combine rather than forcing them. Be patient and gentle.
- Chilling Time is Non-Negotiable: Seriously, don’t rush it. While 4 hours is the minimum for it to start setting, overnight chilling is the true secret to a rock-solid, perfectly sliceable pie. Plan ahead!
- Quality of Orange Marmalade/Sauce: Use a marmalade or sauce you truly enjoy the taste of, as its flavor will be prominent. If using marmalade, bits of peel add lovely texture; if you prefer smooth, a good quality orange sauce is the way to go.
- Clean Slices: The hot water trick for your knife is a game-changer for getting those clean, appealing slices that don’t look like they’ve been attacked.
- Crust Variations: While graham cracker is classic, feel free to experiment! A vanilla wafer crust or even a shortbread crust would be delicious with this filling.
- Make it Gluten-Free: Easily adapt this by using a gluten-free graham cracker crust.
By keeping these simple tips in mind, you’ll consistently create a beautiful, delicious, and perfectly firm Orange Creamsicle Pie that everyone will rave about.
Your Orange Creamsicle Pie Questions Answered (FAQ)
Making a no-bake pie can sometimes bring up a few questions, especially when aiming for that perfect, firm slice. Here are some common queries answered:
Why isn’t my Orange Creamsicle Pie firm enough?
There are typically a few culprits if your pie filling is too soft:
The most common reason is insufficient chilling time. The filling needs ample time in the refrigerator (at least 4 hours, preferably overnight) for the fats in the cream cheese and whipped cream to solidify and create structure.
Another reason could be overmixing when combining the whipped cream and cream cheese. If you beat the mixture too vigorously after adding the whipped cream, you’ll knock out all the air you whipped in, which is essential for firmness. Use that gentle folding technique!
Lastly, ensuring your heavy cream is very cold before whipping is critical. Cold cream whips up much more stably than warmer cream, providing a stronger foundation for the pie filling.
Can I use Cool Whip instead of homemade whipped cream?
While you could technically use a stabilized whipped topping like Cool Whip for ease, the texture and flavor will be different. Homemade whipped cream, made from cold heavy cream and sugar, provides a richer taste and, when whipped to stiff peaks and gently folded, offers superior structure and stability compared to many pre-made toppings, contributing significantly to that “guaranteed firm slice.” If you do use Cool Whip, ensure it’s thawed but still very cold, and gently fold it in as directed.
Can I make my own graham cracker crust?
Absolutely! Making your own graham cracker crust is simple and adds a wonderful fresh element. You’ll need graham cracker crumbs (about 1 ½ cups), melted butter (around ¼ to ½ cup, depending on how buttery you like it), and sometimes a little sugar. Mix them together, press firmly into the pie plate, and chill or bake briefly (check a standard graham cracker crust recipe for specifics) before adding the filling. Using your own crust is a great way to enhance the overall homemade feel, much like pairing this pie with other homemade goodies like fluffy homemade biscuits for a complementary meal.
Does it matter if I use fresh orange juice versus bottled?
Either fresh or good quality bottled orange juice will work for the flavor. If using fresh, make sure it’s strained to remove any pulp, as pulp can affect the smooth texture of the filling. The key is the quantity – only a ¼ cup is needed to infuse the orange flavor without making the filling too liquidy.
How long will this pie last in the refrigerator?
Properly covered, this Orange Creamsicle Pie will stay delicious in the refrigerator for 3-4 days. Keep it tightly wrapped to prevent it from drying out or absorbing other smells. Due to the dairy content, it should always be stored in the fridge.
Can I add orange zest to the filling?
Yes, absolutely! Adding a teaspoon or two of finely grated orange zest to the cream cheese mixture along with the orange juice will boost the fresh orange flavor even further. It’s a great way to intensify that citrus punch.
Enjoy Your Homemade Orange Creamsicle Pie!
There you have it – the secret to a perfectly set, wonderfully creamy, and utterly delicious Orange Creamsicle Pie that won’t disappoint when it comes time to slice. This recipe proves that no-bake doesn’t have to mean no-structure!
The combination of tangy cream cheese, airy whipped cream, and bright orange flavors creates a dessert that is both refreshing and comforting, evoking fond memories with every bite. It’s simple enough for a beginner but impressive enough for any occasion.
Give this recipe a try, follow the steps carefully, especially the chilling time and gentle folding, and prepare to enjoy slices of pure, creamsicle heaven that hold their shape beautifully. I’d love to hear how yours turns out!
Round Out Your Meal
Planning a full menu around your Orange Creamsicle Pie? Consider these complementary recipes.
- For a bright breakfast or snack to go with your dessert, try these Glazed Zesty Orange Muffins, which share citrus notes.
- If you’re looking for a savory bake that complements sweet flavors, consider the Cheesy Sausage Crescent Ring for a satisfying contrast.
Don’t forget to leave a comment below and let me know what you thought, or share a photo of your beautiful, perfectly sliced pie!
Orange Creamsicle Pie
Course: DessertCuisine: AmericanDifficulty: easy550
kcalGet the recipe for a perfect Orange Creamsicle Pie with a guaranteed firm slice! Easy, no-bake, and full of nostalgic flavor.
Ingredients
1 prepared graham cracker crust (9 inch)
16 ounces cream cheese softened but still cool
1 cup powdered sugar
1 teaspoon vanilla extract
1/4 cup orange juice
2 cups cold heavy whipping cream
1/4 cup granulated sugar
1/2 cup orange marmalade or orange sauce
Optional: extra whipped cream and orange slices for garnish
Directions
- In a large bowl, beat the cream cheese with an electric mixer until smooth. Add the powdered sugar and vanilla extract, beating until combined and fluffy. Gradually beat in the 1/4 cup orange juice until smooth. The mixture should be thick.
- In a separate, very cold bowl, beat the cold heavy whipping cream with an electric mixer on high speed. Gradually add the granulated sugar as the cream thickens. Continue beating until stiff peaks form.
- This is the key step for a firm slice: Gently fold about one third of the stiff whipped cream into the cream cheese mixture using a spatula. Be gentle to keep the air in the whipped cream. Repeat with the remaining whipped cream, folding just until no white streaks remain. Do not overmix.
- Pour the filling into the prepared graham cracker crust, spreading it evenly.
- Warm the orange marmalade or orange sauce slightly if needed to make it pourable. Drizzle spoonfuls over the top of the pie filling. Use a knife or skewer to gently swirl the orange through the cream cheese mixture for a marbled effect.
- Cover the pie carefully with plastic wrap, ensuring the plastic doesn’t touch the top surface if possible to preserve the swirl.
- Refrigerate the pie for at least 4 hours, or preferably overnight, until it is completely set and firm. This long chilling time is crucial for the filling to firm up properly.
- Slice the chilled pie with a sharp knife dipped in hot water for clean cuts. Serve with extra whipped cream and an orange slice if desired.


