

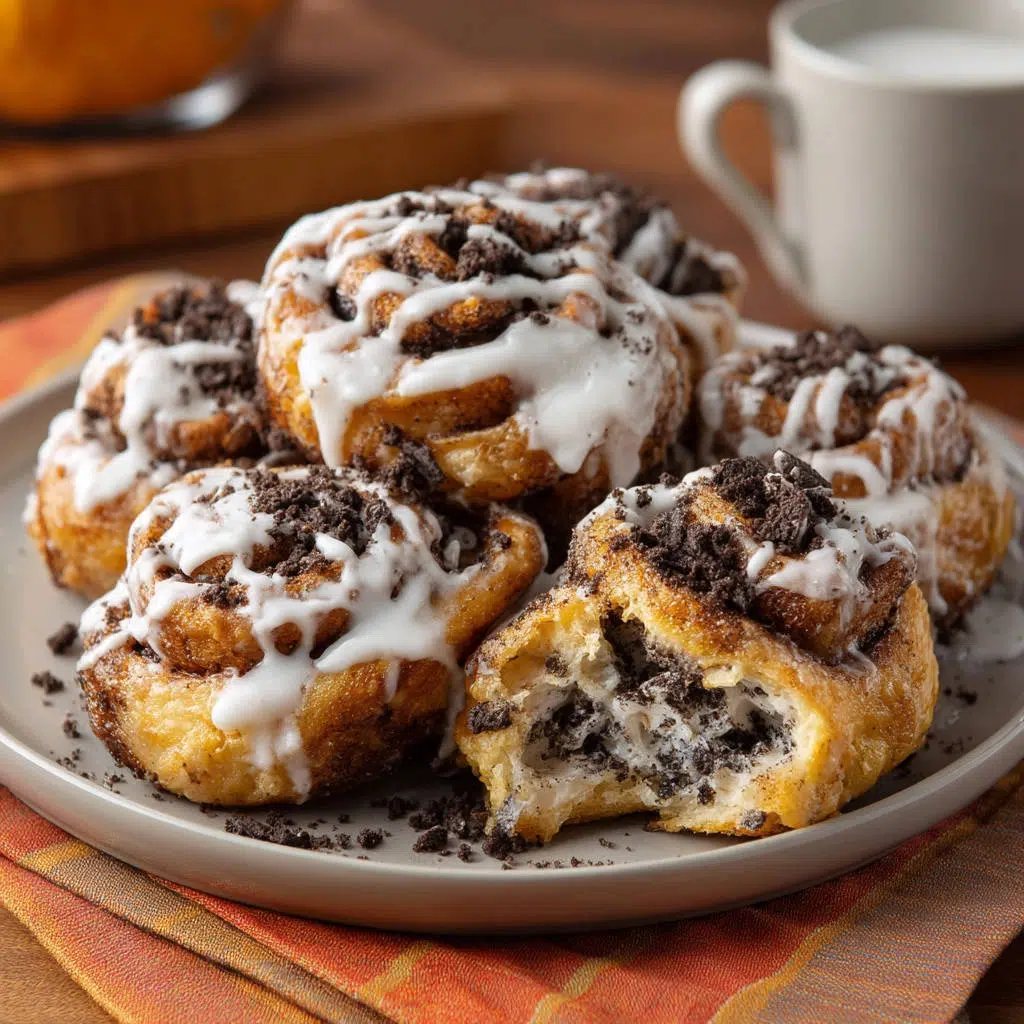
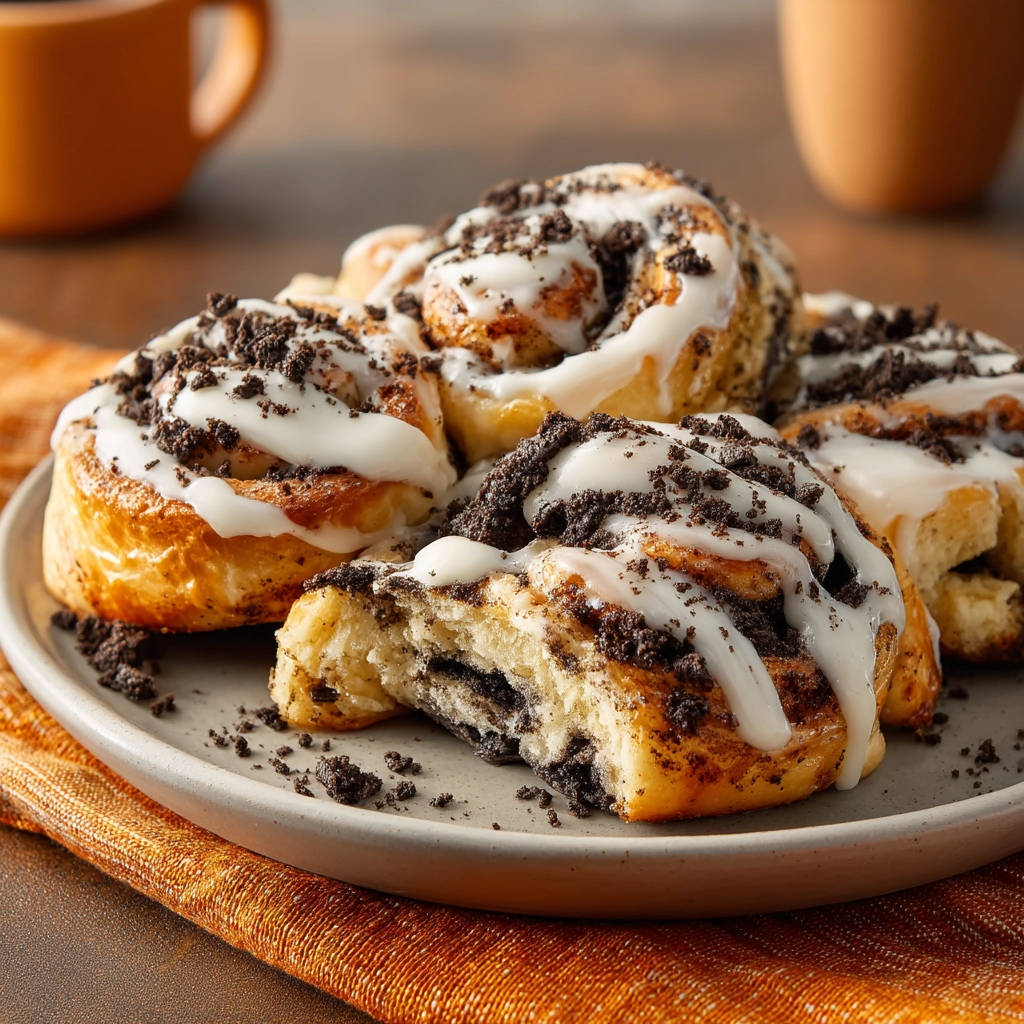
Have you ever dreamt of pulling a pan of impossibly soft, gooey cinnamon rolls from the oven, only for them to cool into disappointingly dense hockey pucks? You’re not alone! It’s a common baking heartbreak. But what if I told you there’s a simple, game-changing secret to achieving bakery-level softness every single time, combined with the irresistible flavor of Oreo cookies? Get ready to meet your new favorite treat: Oreo Crumble Cinnamon Rolls that are guaranteed to be never dense!
This recipe takes the classic comfort of warm cinnamon rolls and adds a delightful twist with crushed Oreo cookies woven into the filling and sprinkled generously on top. But the real magic, the secret weapon against dryness, comes right at the end. Trust me, this simple step will change your cinnamon roll baking forever. Forget dry, heavy rolls and say hello to fluffy, melt-in-your-mouth perfection!
Why You’ll Love These Oreo Crumble Cinnamon Rolls
Beyond just being incredibly delicious, there are so many reasons these Oreo Crumble Cinnamon Rolls will earn a permanent spot in your recipe box:
- Guaranteed Softness: That unique moistening trick after baking ensures a tender, fluffy texture unlike anything you’ve experienced before. No more dense rolls!
- Irresistible Flavor Combo: The classic cinnamon roll swirl meets the beloved chocolatey crunch of Oreos, all finished with a sweet glaze and more cookie crumbles. It’s a match made in dessert heaven.
- Surprisingly Easy: While yeast dough can seem intimidating, this recipe is designed to be straightforward and forgiving, even for beginners.
- Perfect for Any Occasion: Serve them warm for breakfast, brunch, or as a decadent dessert. They’re always a crowd-pleaser!
- Made from Scratch Goodness: There’s nothing quite like the smell and taste of fresh, homemade cinnamon rolls.
The Ingredients for Exceptionally Soft Oreo Cinnamon Rolls
Creating these dreamy rolls starts with gathering quality ingredients. Each component plays a vital role, from the foundational dough that provides the fluffy structure to the generous layers of chocolatey, buttery filling and sweet icing. Let’s walk through what you’ll need and why these particular ingredients are key to success, ensuring your homemade Oreo cinnamon rolls are everything you dream of.
We begin with the dough, which needs to be soft and elastic. You’ll need warm milk, ideally heated to between 105-115°F. This specific temperature range is crucial for activating active dry yeast, allowing it to bloom and create the gas needed for the dough to rise and become airy. Granulated sugar isn’t just for sweetness; a small amount in the dough also feeds the yeast, helping it become active. A single room temperature egg adds richness and helps bind the dough, contributing to a tender crumb. Melted unsalted butter provides flavor and softness, while salt balances the sweetness and controls the yeast activity. Finally, all-purpose flour forms the structure. Using the lower amount initially and adding more only as needed (up to 3 1/2 cups) helps prevent a dry, stiff dough, which is a common cause of dense rolls.
The star of the filling is, of course, crushed Oreo cookies! About 10-12 cookies should give you the required cup of crumbles, providing that iconic chocolate-vanilla flavor and delightful texture. Granulated sugar sweetens the filling, while melted unsalted butter binds it together and adds richness. The recipe suggests ground cinnamon as optional, but its warm spice beautifully complements the chocolate and pairs perfectly with the traditional cinnamon roll vibe. If you’re a cinnamon purist, you’ll definitely want to include it!
Here’s the full list to make shopping easy:
- For the Dough:
- 1 cup warm milk (105-115°F)
- 1 tablespoon active dry yeast
- 1/4 cup granulated sugar
- 1 egg, room temperature
- 1/4 cup unsalted butter, melted
- 1/2 teaspoon salt
- 3 to 3 1/2 cups all-purpose flour
- For the Filling:
- 1 cup crushed Oreo cookies (about 10-12 cookies)
- 1/4 cup granulated sugar
- 1/4 cup unsalted butter, melted
- 1/2 teaspoon ground cinnamon (optional)
- For the Moistening Trick:
- 1/2 cup warm milk or heavy cream
- For the Icing:
- 1 1/2 cups powdered sugar
- 2 tablespoons milk or heavy cream
- 1/2 teaspoon vanilla extract
- For Topping:
- 1/2 cup crushed Oreo cookies
Make sure all your cold ingredients, especially the egg, are at room temperature before starting. This helps them incorporate more evenly into the dough and promotes better rising.
Baking Bliss: Step-by-Step Guide to Never Dense Rolls
Ready to transform simple ingredients into incredibly soft and decadent Oreo Crumble Cinnamon Rolls? This process breaks down the steps, guiding you from activating the yeast to applying the magical moistening trick that ensures your rolls are never dense. Follow along closely, and you’ll be rewarded with warm, gooey perfection.
- First things first, let’s awaken that yeast! Grab a large mixing bowl and pour in your warm milk. Remember, the temperature (105-115°F) is key here – too cold and the yeast won’t activate; too hot and you’ll kill it. Sprinkle the active dry yeast over the milk. Give it a gentle stir, then just let it sit for about 5 to 10 minutes. You’re looking for the surface to become foamy or bubbly. This foam is proof that your yeast is alive and ready to make your rolls rise!
- Once your yeast is bubbly and happy, whisk in the granulated sugar (for sweetness and to feed the yeast!), the room temperature egg, the lovely melted butter, and the salt. Give it all a good mix to combine these liquid and wet ingredients smoothly.
- Now it’s time to add the flour. Start by adding just one cup at a time, mixing it into the wet ingredients. You can use a wooden spoon, a stand mixer with a dough hook, or even your hands. Keep adding flour, mixing after each addition, until the dough starts to pull away from the sides of the bowl and forms what looks like a shaggy, rough mass. Don’t add all the flour at once; you want to add just enough to get the right consistency.
- Turn this shaggy dough out onto a surface that you’ve lightly dusted with flour. Now comes the kneading! Knead the dough for about 5 to 7 minutes. As you knead, you’ll feel the dough transform from sticky and rough to smooth and elastic. It should still be slightly sticky to the touch, but shouldn’t aggressively stick to your hands or the surface. Proper kneading develops the gluten, which gives the rolls their structure and contributes to that desired chewiness and softness.
- Prepare a clean bowl by lightly coating the inside with oil (vegetable oil or non-stick spray works well). Place your kneaded dough into this bowl, then turn it over so the top is also lightly oiled. This prevents the dough from drying out as it rises. Cover the bowl tightly with plastic wrap or a clean kitchen towel. Find a warm spot in your kitchen for the first rise. This could be near a sunny window (not hot!), on top of a warm (but not hot!) appliance, or even in an oven that’s turned off but had the light on for a few minutes. Let the dough rise for 1 to 1.5 hours, or until it has visibly doubled in size. This rise time allows the yeast to produce carbon dioxide, making the dough light and airy.
- While your dough is enjoying its first rise, let’s get the decadent filling ready. In a small bowl, combine the cup of crushed Oreo cookies, the 1/4 cup of granulated sugar, and the 1/4 cup of melted butter. If you’re opting to include cinnamon, stir in the 1/2 teaspoon now. Mix everything together until you have a moist, crumbly mixture. This is going to spread into pure delight!
- Once your dough has triumphantly doubled in size, gently punch it down to release the air. Turn the dough out onto your lightly floured surface again. Using a rolling pin, roll the dough into a rectangle approximately 12 inches wide and 9 inches tall. Try to get the thickness relatively even for consistent rolls.
- Spread the prepared Oreo filling evenly across the rolled-out dough. Make sure to go almost all the way to the edges, but leave a small, unfilled border (about 1/2 inch) along one of the long edges. This border will help seal the roll closed.
- Starting from the long edge opposite the border you left empty, tightly roll the dough up into a log. Try to keep the roll as tight as possible without tearing the dough, as a tight roll helps the cinnamon rolls keep their shape during baking.
- Now it’s time to slice your log into individual rolls. You can use a sharp knife, but for clean, even cuts that don’t squish the rolls, dental floss is the secret! Slide a piece of unflavored dental floss under the log, cross it over the top, and pull to slice through the dough. Aim for 9 equally sized pieces. Grease a 9×9 inch baking pan (or a similar sized oven-safe dish) and arrange the cut rolls in the pan, cut side up.
- Cover the pan containing your rolls again. This second rise is shorter, about 30 to 45 minutes. Place the covered pan in a warm spot again and let the rolls rise until they look puffy and are nearly doubled in size within the pan. This final proofing makes them extra tender before baking.
- While the rolls are finishing their second rise, preheat your oven to 375°F (190°C).
- Pop the pan into the preheated oven and bake for 18 to 22 minutes. You’re looking for the rolls to be lightly golden brown on top and appear baked through in the center. Baking time can vary depending on your oven, so keep an eye on them.
- And now, the moment of truth! This is the unparalleled secret to achieving that incredibly soft, never-dense texture. As soon as the rolls come out of the hot oven, gently and evenly pour the 1/2 cup of warm milk or heavy cream over the tops of all the rolls. You’ll see it soak in quickly. This liquid is immediately absorbed by the hot bread, adding crucial moisture deep within the rolls and creating steam that keeps them wonderfully tender as they cool slightly. Do not skip this step if you want the softest rolls ever!
- While the rolls are absorbing that glorious moisture and cooling just slightly (they’ll still be quite warm), quickly whisk together the powdered sugar, milk or heavy cream, and vanilla extract in a small bowl until you have a smooth, pourable icing. If it seems too thick, add another tiny splash of milk; if too thin, add a little more powdered sugar.
- Once the liquid soak has been fully absorbed (it only takes a couple of minutes) and the rolls have cooled enough to handle the icing without melting it completely, generously drizzle the icing over the tops of all the rolls. Don’t be shy!
- Finish off your masterpiece by sprinkling the remaining crushed Oreo cookies over the icing. Serve these warm, pull-apart delights immediately for the best experience!
Tips for Mastering Your Oreo Crumble Rolls
Even with the magic moistening trick, a few extra tips can elevate your Oreo Crumble Cinnamon Rolls from great to absolutely perfect. Keep these in mind as you bake to ensure the best possible texture and flavor.
- Don’t Add Too Much Flour: This is one of the most common culprits for dense rolls. Start with the lower amount of flour (3 cups) and only add more if the dough is excessively sticky after kneading. A slightly sticky dough is good! It means you haven’t added too much flour.
- Check Your Yeast: Make sure your active dry yeast is fresh and that your milk is the correct temperature (105-115°F). If your yeast doesn’t get foamy in step 1, it’s likely dead, and your dough won’t rise. Time to get new yeast.
- Find a Warm Rising Spot: Dough rises best in a consistently warm, draft-free environment. If your kitchen is cool, try the oven-with-the-light-on trick mentioned in the steps, or place the bowl in a warm (but not hot!) water bath.
- Roll Dough Evenly: Aim for an even thickness when rolling out the dough. This helps the rolls bake consistently and look uniform.
- Cut with Dental Floss: Seriously, try it! It makes such clean cuts compared to a knife which can sometimes smoosh the layers together.
- Don’t Skip the Moistening Trick: I know I’ve said it before, but this is the key to their incredible softness. Make sure the milk or cream is warm when you pour it.
For those who love baking desserts, mastering dough techniques like the one used here can open up a world of possibilities! If you enjoy working with yeast dough or simply crave more homemade baked goods, perhaps you’d like to explore classic blueberry scones for a less yeasted but equally delightful breakfast treat, or even venture into fluffy homemade biscuits.
What to Serve With Your Sweet Rolls
These Oreo Crumble Cinnamon Rolls are certainly a showstopper on their own, but they pair wonderfully with a hot cup of coffee or a cold glass of milk. For a full brunch spread, consider serving them alongside some fresh fruit or complementing their sweetness with a savory option.
If you’re hosting brunch or simply want to make a weekend meal extra special, consider pairing these sweet rolls with a delightful breakfast casserole. Something like Baked Berry French Toast Casserole offers a fruity contrast and can often be prepared ahead of time, making entertaining a breeze.
Your Oreo Cinnamon Rolls Questions Answered (FAQ)
Got questions about making the perfect batch of Oreo Crumble Cinnamon Rolls? Here are some common inquiries and helpful answers to ensure your baking success.
Why is my dough not rising?
The most likely culprits are inactive yeast or the wrong temperature for the milk. Ensure your active dry yeast isn’t expired and that your warm milk is within the 105-115°F range. Too hot will kill the yeast; too cold won’t activate it sufficiently.
Can I make these cinnamon rolls ahead of time?
Yes! You can make the rolls up to the point of the second rise (Step 10), cover the pan tightly with plastic wrap, and refrigerate overnight (up to 12-18 hours). In the morning, take them out of the fridge and let them sit at room temperature for 60-90 minutes to warm up and finish rising before baking as directed.
What if I don’t have a 9×9 inch baking pan?
A slightly larger pan (like a 9×13 inch pan) can work, but the rolls won’t be as snugly packed, which might affect their rise slightly. You could also use two smaller round cake pans or oven-safe dishes. Just ensure the pan is greased well.
Why are my cinnamon rolls dense even after following the recipe?
While this recipe is designed to prevent density, the common reasons include adding too much flour during kneading, not allowing sufficient time for both rises, or most importantly, skipping or improperly executing the warm milk/cream moistening trick right after baking. Ensure your dough is slightly sticky after kneading and don’t rush the rising times.
Can I use milk instead of heavy cream for the moistening trick and icing?
Yes, the recipe provides both options. Using heavy cream will result in a slightly richer, more decadent texture in both cases, but warm milk still works beautifully for the moistening trick and creates a perfectly delicious icing.
Time to Indulge!
There you have it – the secret to unbelievably soft, flavorful Oreo Crumble Cinnamon Rolls. This recipe is more than just a list of instructions; it’s your guide to baking happiness, ensuring that every bite is filled with tender dough, sweet chocolatey filling, and creamy icing. Say goodbye to dense, dry rolls forever!
Ready to give them a try? Gather your ingredients, set aside some time for the magic of yeast, and prepare yourself for a truly delightful baking experience. Once you’ve pulled that pan of gooey goodness from the oven and performed the secret trick, your kitchen will be filled with the most inviting aroma. I can’t wait for you to taste the difference! When you make them, leave a comment below and let me know how much you loved the softness. Happy baking!
Oreo Crumble Cinnamon Rolls
Ingredients
- For the Dough:
- 1 cup warm milk (105-115°F)
- 1 tablespoon active dry yeast
- 1/4 cup granulated sugar
- 1 egg, room temperature
- 1/4 cup unsalted butter, melted
- 1/2 teaspoon salt
- 3 to 3 1/2 cups all-purpose flour
- For the Filling:
- 1 cup crushed Oreo cookies (about 10-12 cookies)
- 1/4 cup granulated sugar
- 1/4 cup unsalted butter, melted
- 1/2 teaspoon ground cinnamon (optional, not clearly visible but common)
- For the Moistening Trick:
- 1/2 cup warm milk or heavy cream
- For the Icing:
- 1 1/2 cups powdered sugar
- 2 tablespoons milk or heavy cream
- 1/2 teaspoon vanilla extract
- For Topping:
- 1/2 cup crushed Oreo cookies
Directions
- In a large bowl, combine the warm milk and yeast. Let stand 5-10 minutes until foamy.
- Stir in the sugar, egg, melted butter, and salt. Gradually add the flour, one cup at a time, mixing until a shaggy dough forms.
- Turn the dough out onto a lightly floured surface and knead for 5-7 minutes until smooth and elastic. The dough should be slightly sticky.
- Place the dough in a lightly oiled bowl, turning to coat. Cover and let rise in a warm place for 1-1.5 hours, or until doubled in size.
- While the dough is rising, prepare the filling by combining the crushed Oreos, sugar, melted butter, and cinnamon (if using) in a small bowl.
- Once the dough has doubled, punch it down and turn it out onto a lightly floured surface. Roll it into a 12×9 inch rectangle.
- Spread the filling evenly over the dough, leaving a small border on one long edge.
- Tightly roll up the dough starting from the long edge with the filling to the opposite edge.
- Cut the roll into 9 equal pieces using a sharp knife or dental floss. Place the rolls in a greased 9×9 inch baking pan.
- Cover the pan and let the rolls rise again for 30-45 minutes, or until puffy and nearly doubled.
- Preheat oven to 375°F (190°C). Bake rolls for 18-22 minutes, or until lightly golden brown and baked through.
- This is the key to soft, non-dense rolls: While the rolls are still hot from the oven, gently pour the 1/2 cup warm milk or heavy cream evenly over the tops of the rolls. This moisture will soak in, keeping them incredibly tender.
- While the rolls cool slightly, whisk together the powdered sugar, milk, and vanilla extract for the icing until smooth.
- Once the liquid has soaked in and the rolls have cooled for a few minutes, drizzle the icing generously over the tops.
- Sprinkle with the remaining crushed Oreo cookies. Serve warm.


