
Cracked cheesecake tops ruin the whole vibe. You’ve baked one, pulled it out looking perfect, then bam, those ugly fissures appear overnight. This cherry cheesecake recipe fixes that heartbreak with a water bath and slow-cooling trick for a silky, crack-free top every time.
Therefore, you get that pro-level smooth surface without the stress. In addition, the glossy fresh cherry topping adds juicy tartness that cuts through the richness. It’s the cherry cheesecake home bakers dream of, no disasters required.
The secret lies in room-temperature ingredients and gentle mixing. Overmix those eggs, and you whip in air bubbles that puff up then collapse into cracks. Follow this method, however, and you’ll nail it.
Crust Foundation for Cherry Cheesecake
Graham Cracker Crumbs Selection
Fine graham cracker crumbs make the perfect crust texture for cherry cheesecake. They bind evenly without big chunks that crumble under the fork. Go for store-bought if you’re short on time, but homemade pulsed in a food processor gives you control over the fineness.
Therefore, that even texture holds up to the creamy filling. Plus, it absorbs just enough moisture without turning soggy.
Melted Butter and Sugar Ratios
Unsalted butter keeps the crust from getting soggy in your cherry cheesecake. It melts evenly and doesn’t add extra salt that could clash with the sweet cherries. Stick to 1/2 cup butter for 2 cups crumbs; it’s the ideal ratio for firmness.

In addition, 1/4 cup sugar brings subtle sweetness. It complements the filling without overpowering those tart cherries.
Pressing and Pre-Baking Technique
Press the crumb mix firmly into the bottom and 1 inch up the sides of your 9-inch springform pan. Use the bottom of a glass for even pressure. Then bake at 325°F for 10 minutes until it smells toasty and sets.
Therefore, cooling it fully prevents the warm crust from melting the filling later. You’ve got a solid base now.
Silky Filling Secrets in Cherry Cheesecake
Softening Cream Cheese Properly
Four 8-oz packages of cream cheese, softened to room temp, ensure no lumps in your cherry cheesecake. Cold cream cheese beats into gritty bits no matter what. Leave them out for 1-2 hours, or microwave in 10-second bursts if rushed.
Beat with 1 1/4 cups sugar until super smooth and creamy. You’ll see it lighten and hear the mixer change pitch. That’s your cue it’s ready.
Incorporating Eggs Without Overmixing
Add 4 room-temp eggs one at a time on low speed. Scrape the bowl after each, mixing just until combined. Overmixing puffs in air that expands then cracks the top during baking.
Therefore, this gentle approach keeps the dense, silky texture. Pro tip: room-temp eggs blend seamlessly for even baking.
Sour Cream, Vanilla, and Flour Blend
One cup room-temp sour cream adds tang and extra creaminess to cherry cheesecake. Blend in 2 tsp vanilla for depth, then 1/4 cup flour to stabilize. It prevents cracks without making it grainy.
Mix on low until smooth. Pour over the crust, and you’re set for the bath.
Water Bath Science for Crack-Free Cherry Cheesecake
Why Water Bath Ensures Even Baking
The water bath steams gently around your cherry cheesecake pan. It delivers uniform heat, so the top doesn’t dry out and crack. Wrap the springform in two layers of heavy-duty foil first; water leaks are the enemy.
Place it in a roasting pan, add hot water halfway up the sides. Bake at 325°F for 50-55 minutes. The edges set, but the center jiggles like Jell-O. Perfect.
Setting Up Roasting Pan Properly
Fill the roasting pan with hot tap water right to halfway up the springform sides. It insulates against oven hot spots. Check doneness by that slight center jiggle; overbaking toughens it.
Therefore, you avoid the dry, cracked tops that plague most bakers.
Slow Cooling Method Prevents Cracks
Post-Bake Oven Cooling Process
Turn off the oven, crack the door, and let your cherry cheesecake cool inside for 1 hour. This gradual temp drop avoids shocking the surface into cracks. You’ll smell the sweet vanilla lingering.
Then transfer to the fridge for 6 hours or overnight. Patience pays off here.
Chilling and Unmolding Steps
Overnight chill firms everything up perfectly. Run a thin knife around the edges to release steam buildup. Pop the springform sides, and it slides out smooth.
Pro tip: chill the knife first for cleaner cuts later.
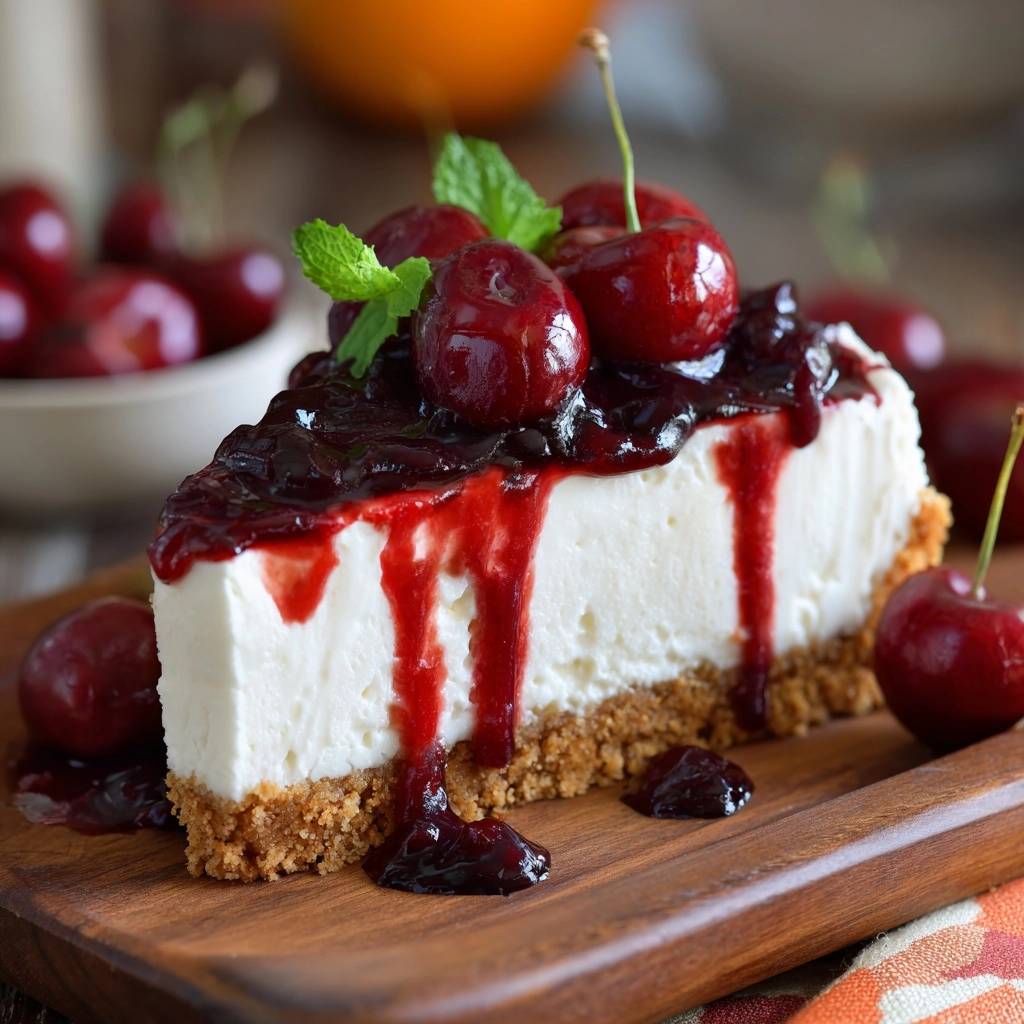
Glossy Cherry Topping for Cherry Cheesecake
Pitting and Preparing Cherries
Use 4 cups fresh or frozen pitted cherries for the topping. Fresh ones in season burst with flavor and juice. Frozen work great too; just thaw and drain excess liquid first.
Therefore, you get that vibrant color and tart pop against the creamy cherry cheesecake.
Simmering with Cornstarch Thickener
Combine cherries, 1/2 cup sugar, 2 tbsp cornstarch, and 1 tbsp lemon juice in a saucepan. Simmer over medium heat 8-10 minutes, stirring until it thickens to a glossy sauce. Bubbles slow, and it coats the spoon.
Cool completely before spooning on. Hot topping melts the cheesecake underneath.
Mint Garnish Finishing Touch
Fresh mint leaves add a cool contrast to cherry cheesecake slices. Tuck one or two per piece for that visual pop. It brightens the whole dessert.
Equipment Essentials for Cherry Cheesecake Success
Springform Pan and Foil Wrapping
A 9-inch springform pan is non-negotiable for cherry cheesecake. It releases cleanly. Double-wrap the outside in heavy-duty foil to block water.
Therefore, no leaks ruin your bake.
Mixer and Roasting Pan Needs
Stand mixer on low speed prevents overmixing in cherry cheesecake. A large roasting pan fits the springform with room for water. Hand mixers work, but tire out fast.
Avoiding Common Cherry Cheesecake Mistakes
Overmixing and Temperature Issues
Cold ingredients lump up; always use room temp. High-speed beating adds air bubbles that crack tops. Skip the water bath, and uneven heat does the same.
Fixes: plan ahead for softening, mix low and slow, always bathe it.
Topping and Slicing Pitfalls
Hot cherry topping melts the chilled cheesecake. Watery cherries? You skipped cornstarch. For slices, warm your knife in hot water and wipe dry between cuts.
Therefore, clean edges every time.
Make-Ahead Guide for Cherry Cheesecake
Freezing Baked Cheesecake Layers
Bake and cool the cheesecake, then wrap tightly in plastic and foil. Freeze up to 2 months. Thaw overnight in the fridge; texture stays perfect.
Add fresh topping after thawing for best results.
Topping Storage and Assembly
Make cherry topping 3 days ahead; store in a jar in the fridge. Full cherry cheesecake lasts 5-7 days covered. Assemble just before serving.
Flavor Twists on Classic Cherry Cheesecake
Berry Mix or Almond Extracts
Swap cherries for 4 cups mixed berries; same cooking method. Add 1/2 tsp almond extract to the filling for nutty warmth that pairs beautifully. It elevates the fruitiness without overpowering.
Or mix blueberries and cherries for a twist.
Chocolate or Nut Crust Variations
Crush Oreos for a chocolate crust; use 2 cups crumbs, same butter and sugar. Pecan crust? Pulse 1 1/2 cups pecans with 1/2 cup crumbs, up butter to 6 tbsp. Both crunch great under cherry cheesecake.
Pairing Sides with Cherry Cheesecake
Coffee and Tea Matches
Bold roast coffee slices through the richness of cherry cheesecake. Herbal teas like chamomile add a soothing note.
Light Salads or Fruit Sides
A simple green salad balances the indulgence. Fresh fruit platters echo the cherries.
Cherry Cheesecake Troubleshooting
Crust Too Crumbly Fixes
If crumbly, add 1-2 tbsp more melted butter next time. Press harder with a measuring cup. It binds better when chilled briefly before baking.
Soggy Bottom or Runny Filling
Soggy? Foil leaked; double up next time. Runny filling means underbaked; wait for that center jiggle only. Full chill sets it.
Topping Not Thickening
Make a slurry with 1 tsp cornstarch and water, stir in. Simmer 2 more minutes. Always cool fully.
Cherry Cheesecake Queries Answered
Can I Use Low-Fat Cream Cheese?
Low-fat works but trades silky texture for denser results in cherry cheesecake. Full-fat melts smoother and cracks less. If dieting, mix half low-fat, but expect slight graininess.
Frozen Cherries Work Equally?
Yes, thaw and drain frozen cherries first. Pat dry to avoid watery topping. They cook up just as glossy.
How Long Does It Last in Fridge?
Covered cherry cheesecake keeps 5-7 days in the fridge. Texture holds well.
Gluten-Free Crust Options?
Use gluten-free graham crackers or almond flour mix. 2 cups GF crumbs, same butter and sugar. Bakes identical.
Why My Cheesecake Still Cracked?
Checklist: cold ingredients? Overmixed eggs? No water bath? Sudden fridge transfer? Foil leak? Double-check all steps. Most cracks come from temp shocks or air bubbles.

Cherry Cheesecake
Course: DessertCuisine: AmericanDifficulty: easy12
servings30
minutes1
hour480
Minutes450
kcalAmerican
Ingredients
Crust:
2 cups graham cracker crumbs
1/2 cup unsalted butter, melted
1/4 cup granulated sugar
Filling:
4 (8-oz) packages cream cheese, softened
1 1/4 cups granulated sugar
4 large eggs, room temperature
1 cup sour cream, room temperature
2 tsp vanilla extract
1/4 cup all-purpose flour
Cherry Topping:
4 cups fresh or frozen cherries, pitted
1/2 cup granulated sugar
2 tbsp cornstarch
1 tbsp lemon juice
Fresh mint leaves for garnish
Directions
- Preheat oven to 325°F. Wrap the outside of a 9-inch springform pan tightly in two layers of heavy-duty foil to prevent water leaks.
- Mix graham cracker crumbs, melted butter, and sugar. Press firmly into the bottom and 1 inch up sides of the pan. Bake 10 minutes, then cool.
- Beat softened cream cheese and sugar until smooth. Add eggs one at a time, mixing gently on low speed just until combined (overmixing causes cracks). Blend in sour cream, vanilla, and flour until smooth.
- Pour filling over crust. Place springform pan in a large roasting pan. Fill roasting pan with hot water halfway up the springform sides (the water bath ensures even, gentle baking for no cracks).
- Bake 50-55 minutes until edges are set but center jiggles slightly. Turn off oven, crack door open, and cool cheesecake inside for 1 hour (slow cooling prevents sudden temperature shocks and cracks).
- Refrigerate 6 hours or overnight.
- For topping, simmer cherries, sugar, cornstarch, and lemon juice in a saucepan over medium heat 8-10 minutes until thickened and glossy. Cool completely.
- Run a knife around pan edge, release sides, slice, and spoon cherry topping over each piece. Garnish with mint. Enjoy crack-free bliss!
Notes
- Use room temperature ingredients for filling to prevent cracks. Water bath and slow cooling are key to success.


