
If you grew up visiting local bake sales or community fairs, you likely remember the vibrant, candy-sweet charm of coconut ice. It’s a nostalgic classic that promises a tropical escape in every bite, yet so many homemade versions fall short of that memory. Have you ever tried to slice into a batch only to have it shatter into a million dry, sugary shards? It’s frustrating when a simple treat turns into a crumbly mess on your cutting board.
The “shatter factor” is the most common complaint with this no-bake dessert, but it doesn’t have to be your reality. Most traditional recipes rely on a boiled sugar syrup that crystallizes too quickly, leading to a brittle texture. This recipe solves that problem by using a specific moisture-locking ratio that keeps the bars chewy and pliable. We’re moving away from the temperamental stovetop methods and focusing on a structural assembly that guarantees a clean, professional slice every single time.
The secret to success lies in the compression of the base layers versus the aeration of the top. By mastering the “tacky paste” consistency and using a heavy-pressure packing technique, you’ll create a bar that holds its shape while remaining melt-in-your-mouth soft. I’ve found that the temperature of your ingredients and the specific grind of your coconut are the two biggest variables that determine whether your bars look like a bakery masterpiece or a pile of sweet sawdust.
The Anatomy of a Perfect Coconut Ice Bar
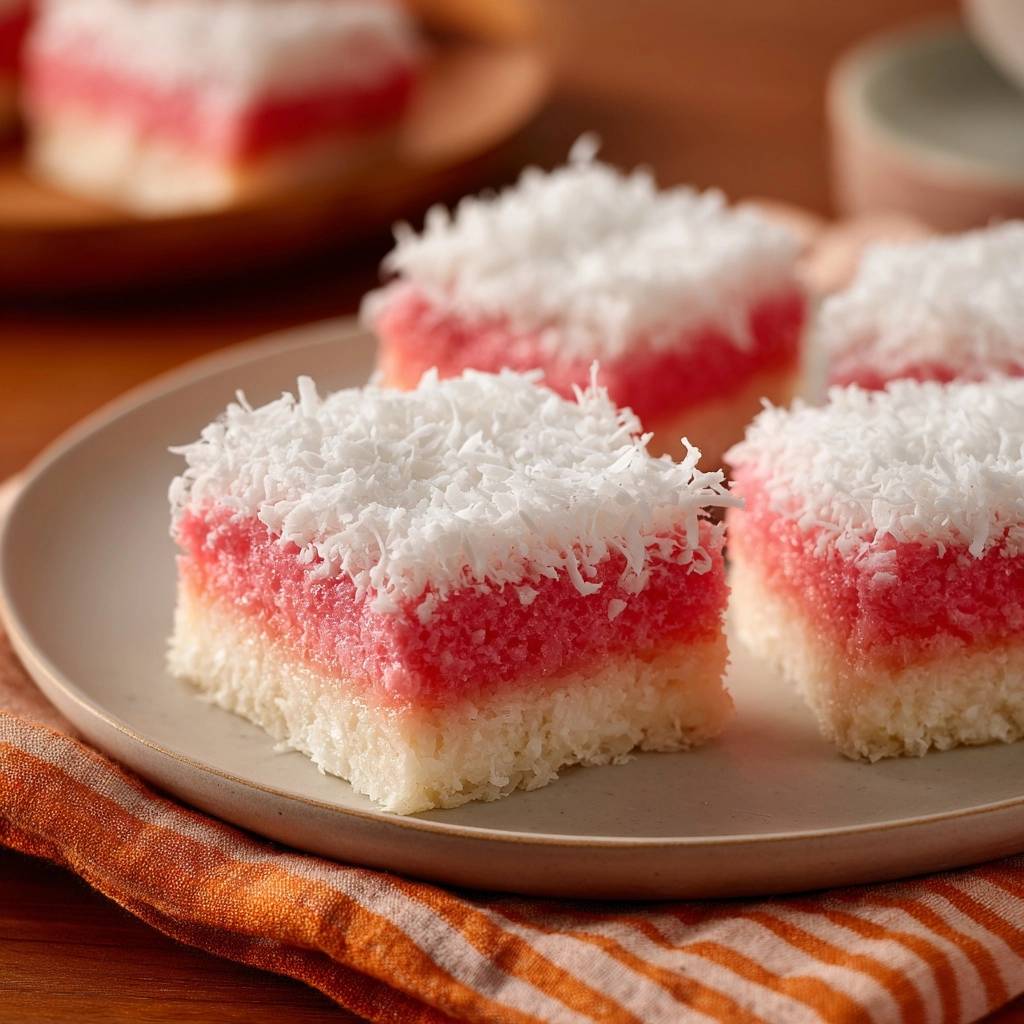
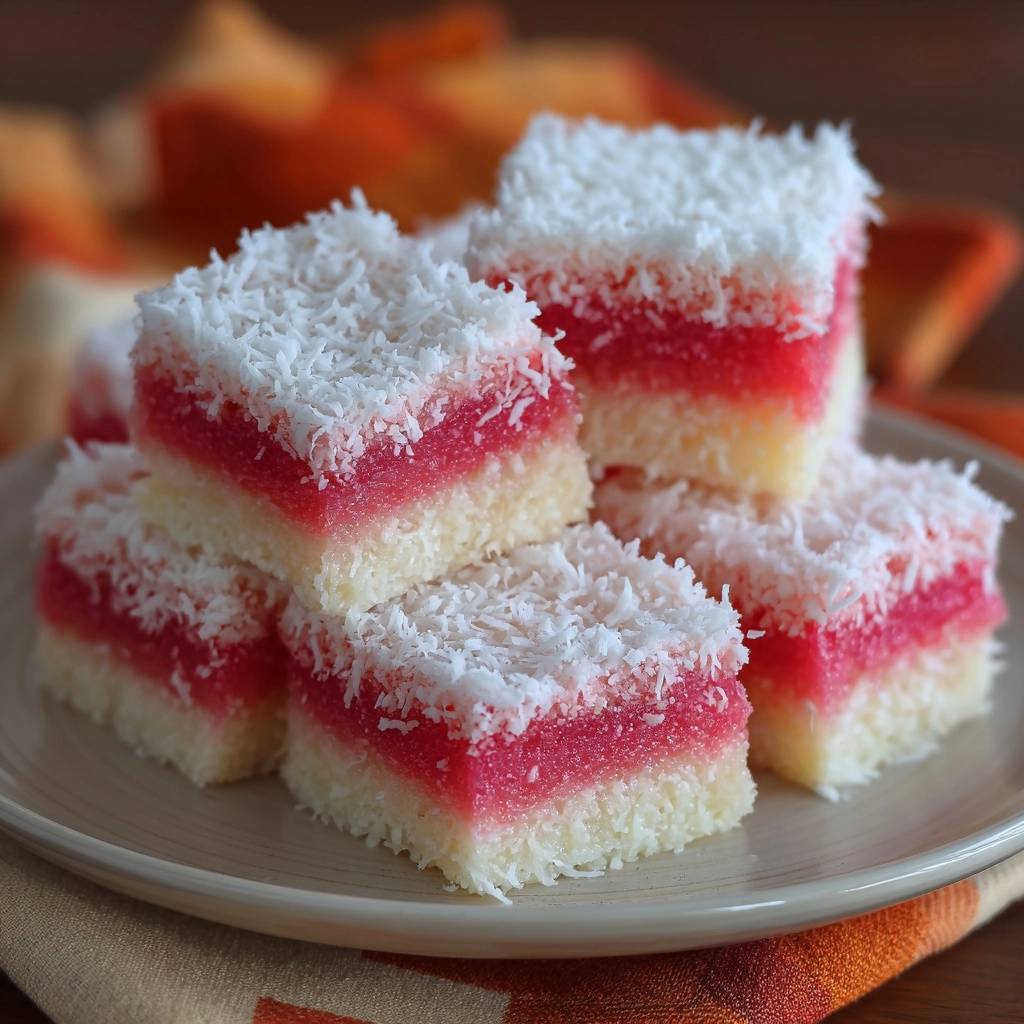
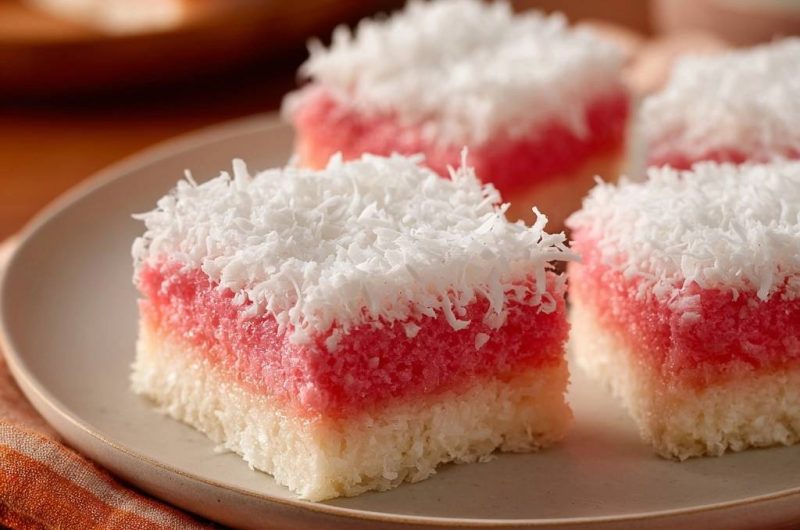
A professional-grade coconut ice bar is all about the contrast in textures. You want a dense, fudge-like base that provides a satisfying chew, topped with a light, airy layer of shredded coconut that mimics fresh snowfall. This dual-texture approach isn’t just for looks; it actually changes how the sweetness hits your palate, making the bar feel lighter than it actually is.
The “Pink Ribbon” aesthetic is more than just a pretty color choice. That distinct line between the snowy white and the vibrant pink layers creates a visual rhythm that makes these bars a staple for gifting and fundraisers. When you achieve that sharp, clean line between the colors, it signals to everyone that you’ve mastered the structural bond required for high-quality confections.
Essential Components for Pink Ribbon Coconut Ice Bars
Success starts with your pantry choices, and for this recipe, the type of coconut you grab off the shelf is everything. You need unsweetened desiccated coconut for the main body of the bars. Because it has a fine, sandy texture and a higher surface area, it absorbs the sweetened condensed milk much more efficiently than larger flakes would.
Sweetened condensed milk acts as our primary binder and humectant. It doesn’t just hold the coconut together; the milk sugars and fats wrap around each coconut fiber, creating a moisture barrier. This prevents the bars from drying out even if they sit on a dessert table for a few hours. Always use the full-fat version to ensure the bars set firmly enough to be handled.
Desiccated vs. Shredded: Choosing Your Textures
It’s easy to think all dried coconut is the same, but using the wrong one in your base is a recipe for structural failure. Desiccated coconut is bone-dry and finely ground, which allows it to form a tight, cohesive dough when mixed with the milk. If you try to use long-thread shredded coconut for the base, the large pieces will create air pockets, and your bars will simply slide apart when you try to eat them.
However, that long-thread shredded coconut is exactly what we want for the very top. It provides that “fluffy” visual appeal and a different mouthfeel. By using two different grinds of coconut, you’re adding a level of sophistication to a very simple recipe. It’s a small detail that makes a massive difference in the final professional look.
The Role of Salt and Vanilla in Sweet Confections
With a recipe this high in sugar, salt is your best friend. A mere quarter-teaspoon of fine sea salt works behind the scenes to cut through the intense sweetness of the condensed milk. It balances the flavors and actually makes the coconut taste more “coconutty” rather than just sugary. Don’t skip it, or the bars will feel one-dimensional.
Since this is a no-bake recipe, the quality of your vanilla extract is front and center. In baked goods, some of the vanilla flavor burns off in the oven, but here, it stays fully intact. Using a pure vanilla extract instead of an imitation essence provides a floral, creamy undertone that complements the milk beautifully. It adds a “gourmet” scent the moment you open the storage container.
The Science of the No-Crumble Slice Secret
The reason these bars stay together is a concept called the “Moisture-Locking Ratio.” By saturating the desiccated coconut until it forms a tacky, heavy paste, we ensure there is no “free” dry coconut left to cause brittleness. Every single grain of coconut is coated in a sticky film of milk solids and sugar, which acts like a flexible glue.
There is also a bit of physics at play here known as capillary action. As the mixture sits, the liquid milk is drawn into the tiny pores of the coconut fibers. This hydration process takes time, which is why the chilling phase is so vital. If you cut the bars too early, the moisture hasn’t fully “locked” into the fibers, and the pressure of the knife will cause the layers to separate.
Required Tools for Professional Results
You don’t need fancy equipment, but the geometry of your pan matters. An 8×8 inch square baking pan is the gold standard for this recipe. It provides the perfect height-to-width ratio, ensuring your squares are thick enough to show off the pink and white layers without being so tall they become unstable.
Parchment paper is also non-negotiable. You want to create a “sling” by leaving an overhang on at least two sides of the pan. This allows you to lift the entire block of coconut ice out at once. Trying to cut these inside the pan is a mistake; you won’t be able to get the knife angle right, and the first piece will almost certainly crumble as you try to pry it out.
Step-by-Step: Building the Structural White Base
When you mix your coconut, milk, vanilla, and salt, keep stirring until you see a thick, tacky paste. It should look a bit like wet snow that’s perfect for a snowball. If it looks loose or individual grains are still falling away, give it another minute of vigorous stirring to ensure the milk is fully distributed.
The “Compression Technique” is where the magic happens. Once you put the white mixture into the pan, don’t just smooth it with a spoon. Take a flat-bottomed measuring cup and press down with significant force. You are trying to eliminate every single air pocket. This creates a solid, candy-like foundation that can support the weight of the layers above it without sagging.
Achieving the Vibrant Pink Ribbon Layer
After dividing your mixture, it’s time to add the color. I recommend adding the food coloring one drop at a time. You want a soft, rosy pink that looks intentional and appetizing. Stir it thoroughly in the bowl before adding it to the pan to avoid “streaking,” which happens when undiluted dye touches the white base layer.
To create a “Structural Bond,” you must press the pink layer onto the white layer while the white layer is still slightly tacky. Use that same flat-bottomed measuring cup to pack the pink layer down firmly. This physical pressure fuses the two layers together into a single unit. If you’re too gentle here, the layers will slide apart like a deck of cards when you try to take a bite.
Creating the Signature Fluffy Snow Top
Now that you have two densely packed layers, it’s time for the aesthetic finish. Scatter the long-thread shredded coconut loosely over the pink surface. You want it to look wild and unrefined, contrasting with the sharp lines of the base. This is the “snow” that gives the dessert its name and charm.
Use the very light pressure of your palm to just barely press the threads into the sticky pink surface. You aren’t trying to crush them or pack them down like the previous layers. You just want enough contact so the coconut doesn’t fall off when you flip the bars or plate them. It should look airy and delicate, like it just drifted down onto the bar.
The Critical Setting Phase: Why Patience Prevents Cracks
I know it’s tempting to dive in, but these bars need at least four hours in the fridge—overnight is even better. This is the “Thermal Setting” phase. As the mixture cools, the fats in the condensed milk firm up and the sugars begin to stabilize. This cold temperature is what turns a sticky paste into a sliceable confection.
If you try to slice the bars at room temperature, the knife will drag through the soft milk sugars, causing the layers to “smear” into each other. A cold bar offers resistance to the knife, which is exactly what you need for those crisp, clean edges. Patience here is the difference between a “homemade” look and a “professional” finish.
Mastering the Clean Cut: Knife Techniques
To get those perfect, Instagram-worthy squares, you need a sharp, thin-bladed knife and a tall glass of hot water. Dip your knife into the hot water, wipe it completely dry with a clean towel, and then make one long, vertical press through the coconut block. The heat from the blade slightly softens the sugars, allowing the knife to glide through without snagging the coconut fibers.
Crucially, you must wipe the blade clean and re-dip it in hot water between every single cut. If you don’t, the sticky pink residue from the previous cut will smear onto the white layer of the next square. Also, avoid a “sawing” motion at all costs. A straight, downward press ensures the layers stay compressed and the edges remain perfectly flat.
Troubleshooting Common Coconut Ice Failures
If your layers are sliding apart, it almost always comes down to insufficient compression during the assembly phase. You really have to put some muscle into packing those first two layers down. If it’s already happened, you can sometimes “rescue” the block by placing a piece of parchment on top and weighted it down with a heavy book for an hour in the fridge to force the layers to bond.
If the texture feels gritty or “sandy,” your coconut might have been too old or dry. Coconut loses its natural oils over time. To fix this in future batches, you can let the mixture sit in the bowl for 10 minutes before pressing it into the pan, giving the coconut more time to hydrate. If the bars are “sweating,” it’s likely due to moving them from a very cold fridge to a very humid room; keep them covered until you are ready to serve.
Flavor Variations and Natural Substitutions
While the classic pink and white is iconic, you can easily play with the flavors. A teaspoon of lime zest folded into the white layer adds a bright, citrusy punch that cuts the sweetness beautifully. Alternatively, a few drops of rosewater in the pink layer creates a sophisticated, floral version that pairs wonderfully with hot tea.
If you prefer to avoid artificial dyes, freeze-dried raspberry powder is a fantastic substitute. It provides a stunning deep pink hue and a tart berry flavor that balances the sugar. Just be sure to sift the powder to avoid any clumps. Beet powder also works for color, though you should use it sparingly to ensure the earthy flavor doesn’t overpower the delicate coconut.
Storage Logistics and Shelf Life
Coconut is like a sponge for odors, so you must store these in a truly airtight container. If you leave them uncovered in the fridge, they will start to taste like whatever else is in there—nobody wants onion-flavored coconut ice! When stored correctly, they will stay fresh and moist in the refrigerator for up to two weeks.
You can keep them at room temperature for a few days if you’re displaying them for an event, but they are best served slightly chilled. If you notice the edges starting to look a bit dry or white, it’s a sign that air is getting into your container. A layer of plastic wrap pressed directly onto the surface of the bars before closing the lid can provide an extra moisture barrier.
Make-Ahead Guide for Events and Gifting
These are the ultimate make-ahead treat because they actually improve after a day or two of “curing” in the fridge. You can easily make a batch on a Monday for a Saturday event. Just keep the block whole and unsliced until the day you plan to serve them to keep the interior as moist as possible.
When gifting, place small squares of parchment paper between the layers in your gift box. This prevents the “snowy” top of one bar from sticking to the bottom of the one above it. Since they don’t melt easily at room temperature, they are perfect for shipping in care packages, provided they are packed tightly so they don’t rattle around and break.
Expert Tips for Large Batch Production
If you’re scaling up for a big fundraiser, you can double the recipe and use a 9×13 inch pan. However, keep in mind that a larger surface area requires even more pressure to compress. I often use a heavy marble rolling pin to roll over the top of the parchment paper to ensure the layers are perfectly even and dense across the larger pan.
When working in large batches, the mixture can start to dry out in the bowl if you’re working slowly. Keep the bowl covered with a damp kitchen towel while you’re pressing the first layer into the pan. This maintains the humidity and ensures the second layer is still tacky enough to bond to the first. Consistency is key when you’re producing dozens of squares at once!
Can I use low-fat condensed milk?
It is highly recommended to use full-fat sweetened condensed milk. The fat content is essential for the setting process; it acts as a structural stabilizer when chilled. Low-fat versions often result in a softer, stickier bar that doesn’t hold its shape well at room temperature and is much more prone to crumbling when sliced.
Why is my coconut ice oily?
Oily coconut ice usually happens for two reasons: over-mixing or heat. If you stir the mixture too aggressively or for too long, you can actually “bruise” the coconut, causing it to release its natural oils. Additionally, if your kitchen is very warm, the fats in the milk and coconut can begin to separate. Always mix until just combined and work in a cool environment if possible.
Can I freeze these for long-term storage?
Yes, these freeze beautifully! Wrap the sliced bars individually in plastic wrap and then place them in a freezer-safe bag for up to three months. To thaw, move them to the refrigerator overnight. Avoid thawing them on the counter, as rapid temperature changes can cause condensation to form, making the “snow” top soggy and the colors bleed.
How do I get a deeper pink without making it bitter?
If you want a very “hot pink” look, use gel food coloring rather than liquid drops. Gel is much more concentrated, so you get a vibrant hue with very little moisture added. Liquid dyes can sometimes have a slightly metallic or bitter aftertaste if you use too much, whereas a tiny toothpick-dab of gel will give you intense color without affecting the flavor profile.
My layers separated; can I fix it?
If you’ve already chilled the bars and the layers are sliding apart, you can try a “steam rescue.” Briefly hold the block over a pot of simmering water (don’t let it touch the water!) for about 30 seconds to slightly soften the sugars on the surface. Immediately place it back in the pan, put a piece of parchment on top, and press down firmly with a heavy weight. Re-chill for two hours to let them re-bond.
Pink Ribbon Coconut Ice Bars
Course: DessertCuisine: AustralianDifficulty: easy16
squares15
minutes240
Minutes210
kcalAustralian
Ingredients
4 cups unsweetened desiccated coconut (fine texture works best for the base)
1 can (14 ounces) sweetened condensed milk
1 teaspoon pure vanilla extract
1/4 teaspoon salt
3 drops pink food coloring
1 cup long-thread shredded coconut (for the fluffy top layer)
Directions
- Line an 8×8 inch square baking pan with parchment paper, leaving an overhang on two sides for easy removal.
- In a large mixing bowl, combine the 4 cups of desiccated coconut, sweetened condensed milk, vanilla, and salt. Stir until the coconut is completely saturated and forms a thick, tacky paste.
- Divide the mixture into two equal portions.
- Press the first portion (white) firmly into the bottom of the prepared pan. Use the bottom of a flat measuring cup to pack it down with significant pressure. This compression is the key to a solid base that won’t fall apart.
- Add the pink food coloring to the second portion of the coconut mixture and stir until the color is uniform.
- Spread the pink layer over the white layer. Again, use the flat measuring cup to press down firmly. This creates a structural bond between the layers so they don’t slide apart during slicing.
- To achieve the visual texture in the image, take the 1 cup of long-thread shredded coconut and scatter it loosely over the pink layer. Press very lightly with your palm just so it adheres to the sticky surface without crushing the fluffy “snow” effect.
- Refrigerate for at least 4 hours, or ideally overnight. Cold temperatures set the milk sugars and fats, which is the final step in preventing crumbles.
- Use the parchment paper to lift the block out of the pan. Use a sharp, thin-bladed knife dipped in hot water (and wiped dry) to slice into squares. Wipe the blade clean between every single cut for perfect, professional edges.
Notes
- To ensure clean edges, use a sharp knife dipped in hot water and wiped dry between every cut. Pressing the layers firmly with a flat measuring cup is essential to prevent the bars from crumbling.


