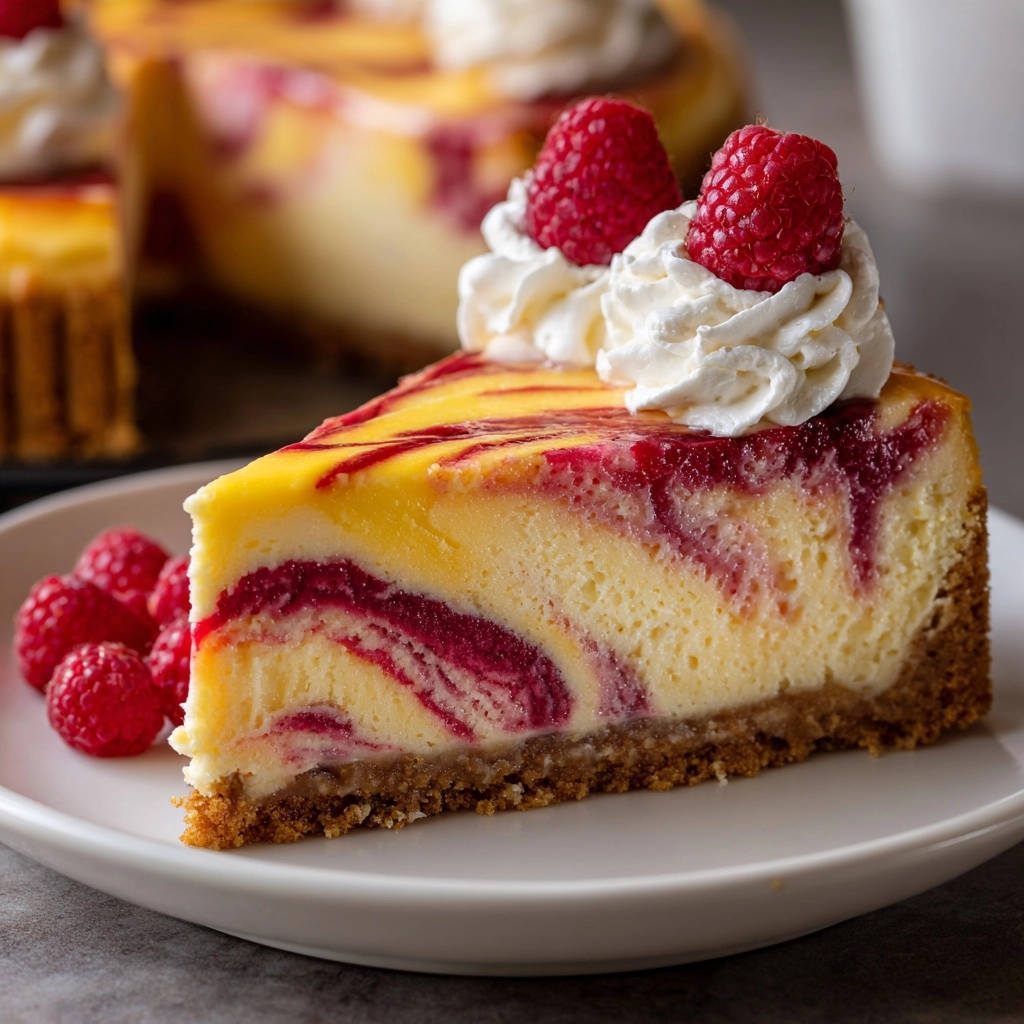
There’s nothing quite as frustrating as pulling a beautiful cheesecake out of the oven only to see it crack right down the middle. I’ve been there, but I’ve discovered a simple, foolproof technique that helps achieve that perfectly smooth, gorgeous top every single time for this spectacular Raspberry Swirl Cheesecake.
Get ready to bake a showstopper that will wow everyone with its flawless finish and vibrant berry flavor!
Unveiling the Perfect Raspberry Swirl Cheesecake
Why This Recipe Stands Out From the Rest
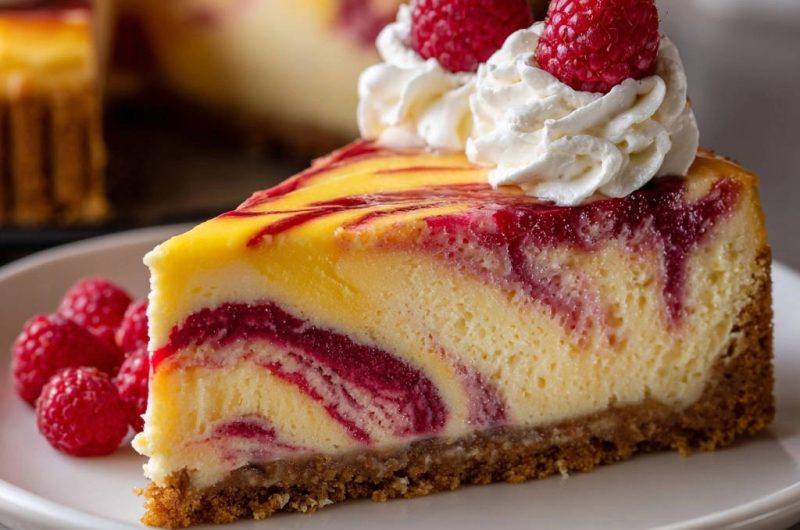
This Raspberry Swirl Cheesecake recipe isn’t just about a beautiful presentation; it delivers exceptional taste and texture. You’ll achieve a velvety, creamy filling that melts in your mouth, perfectly balanced by the bright tang of fresh raspberries and a buttery graham cracker crust.
It’s the ultimate dessert for any occasion, combining classic comfort with a touch of elegance.
A Masterpiece, Minus the Mystery: No More Cracks!
The secret to a crack-free cheesecake often feels like a closely guarded baking mystery. This recipe meticulously guides you through the critical steps that eliminate common pitfalls, ensuring your Raspberry Swirl Cheesecake emerges with a flawless, smooth top every single time.
We’ll tackle temperature control and gentle mixing to guarantee success.
Quick Glance: Prep, Cook, and Chill Times
Prep Time: 45 minutes
Cook Time: 1 hour 15 minutes
Total Time: 5 hours (includes chilling)
Servings: 12
The Heart of the Matter: Assembling Your Ingredients
Foundation First: The Graham Cracker Crust
A great cheesecake starts with a sturdy, flavorful base. The graham cracker crust provides a delightful textural contrast and buttery flavor that complements the creamy filling.
1 ½ cups graham cracker crumbs: Ensure finely crushed crumbs for a compact, even crust. You can achieve this using a food processor or by crushing them in a bag with a rolling pin.
¼ cup granulated sugar: Adds a touch of sweetness to the crust, enhancing its flavor.
6 tablespoons unsalted butter, melted: The melted butter binds the crumbs together, creating a firm and delicious base that holds its shape.
Bursting with Berry Brightness: The Raspberry Swirl
The vibrant raspberry swirl isn’t just visually stunning; it adds a burst of fruity flavor and a pleasing tang that cuts through the richness of the cheesecake.
1 ½ cups fresh or frozen raspberries: Both work beautifully. If using frozen, there’s no need to thaw beforehand.
¼ cup granulated sugar: Sweetens the raspberries, balancing their tartness.
1 tablespoon lemon juice: Brightens the berry flavor and helps to thicken the sauce slightly during cooking.
Achieving Creamy Perfection: The Cheesecake Filling
The filling is the star, and using the right ingredients at the correct temperature is paramount for that signature creamy, smooth texture of a perfect Raspberry Swirl Cheesecake.
3 (8-ounce) blocks full-fat cream cheese, softened to room temperature: Full-fat cream cheese is essential for richness and proper texture. Softened cream cheese ensures a smooth, lump-free batter.
1 ¼ cups granulated sugar: Provides the perfect level of sweetness without overpowering the subtle flavors.
1 teaspoon vanilla extract: A classic flavor enhancer that deepens the overall dessert profile.
½ cup full-fat sour cream, room temperature: Sour cream adds a crucial tang and richness, contributing to a wonderfully moist and tender cheesecake. Its room temperature helps it blend seamlessly.
3 large eggs, room temperature: Eggs provide structure and binding. Using room temperature eggs helps them emulsify better into the batter, preventing lumps and ensuring a smooth finish.
For Garnish (Optional)
Fresh raspberries: A beautiful and flavorful topping.
Whipped cream: Adds a light, creamy contrast.
Your Baking Arsenal: Essential Tools for Success
Having the right tools makes all the difference in achieving a professional-looking and perfectly baked cheesecake.
9-inch Springform Pan: This is indispensable for easily releasing the cheesecake without damaging its delicate sides.
Heavy-Duty Aluminum Foil: Essential for wrapping the springform pan to create a waterproof barrier for the water bath.
Large Roasting Pan: Used for the water bath, providing even, gentle heat for the cheesecake to bake.
Electric Mixer: Handheld or stand mixer is crucial for achieving a smooth, lump-free cream cheese batter.
Fine-Mesh Sieve: For straining the raspberry sauce, ensuring a silky-smooth swirl without seeds.
From Prep to Perfection: Your Step-by-Step Cheesecake Guide
Setting the Stage: Pan Preparation & Oven Warm-Up
Preheat your oven to 325°F (160°C). Accurate oven temperature from the start is important for even baking.
Wrap the bottom and sides of a 9-inch springform pan tightly with several layers of heavy-duty aluminum foil. This creates a secure, waterproof barrier, essential for preventing water from seeping into the crust when using a water bath.
Building the Base: Crust Creation
In a medium bowl, combine the graham cracker crumbs and 1/4 cup granulated sugar. Pour in the melted butter and mix until the crumbs are evenly moistened.
Press the mixture firmly and evenly into the bottom of the prepared springform pan. Use the bottom of a flat glass or measuring cup to help compact it for a dense, stable crust.
Bake for 10 minutes to set the crust, then remove from oven and let it cool completely while you prepare the filling.
Crafting the Swirl: Raspberry Sauce Magic
In a small saucepan over medium heat, combine the raspberries, 1/4 cup granulated sugar, and lemon juice. Bring to a gentle simmer, stirring occasionally, until the raspberries break down and the mixture thickens slightly, typically 5-7 minutes.
Press the cooked mixture through a fine-mesh sieve into a small bowl to remove all seeds, leaving a beautifully smooth raspberry sauce. Set this aside to cool completely; it must be cool before adding to the batter to prevent mixing and color bleed.
The Filling Formula: Smooth Batter, No Lumps
In a large mixing bowl, using an electric mixer on medium-low speed, beat the softened cream cheese until it is completely smooth and creamy, with absolutely no lumps. This initial step is vital for a luxurious, uniform texture in your cheesecake.
Gradually add the 1 1/4 cups granulated sugar, continuing to beat on low speed until just combined. Mix in the vanilla extract and sour cream until they are fully incorporated, scraping down the bowl as needed.
For the crucial no-crack step, add the eggs one at a time, mixing on VERY LOW SPEED just until each egg yolk disappears. Do not overmix! Overmixing introduces too much air into the batter, which expands during baking and contracts during cooling, leading directly to cracks.
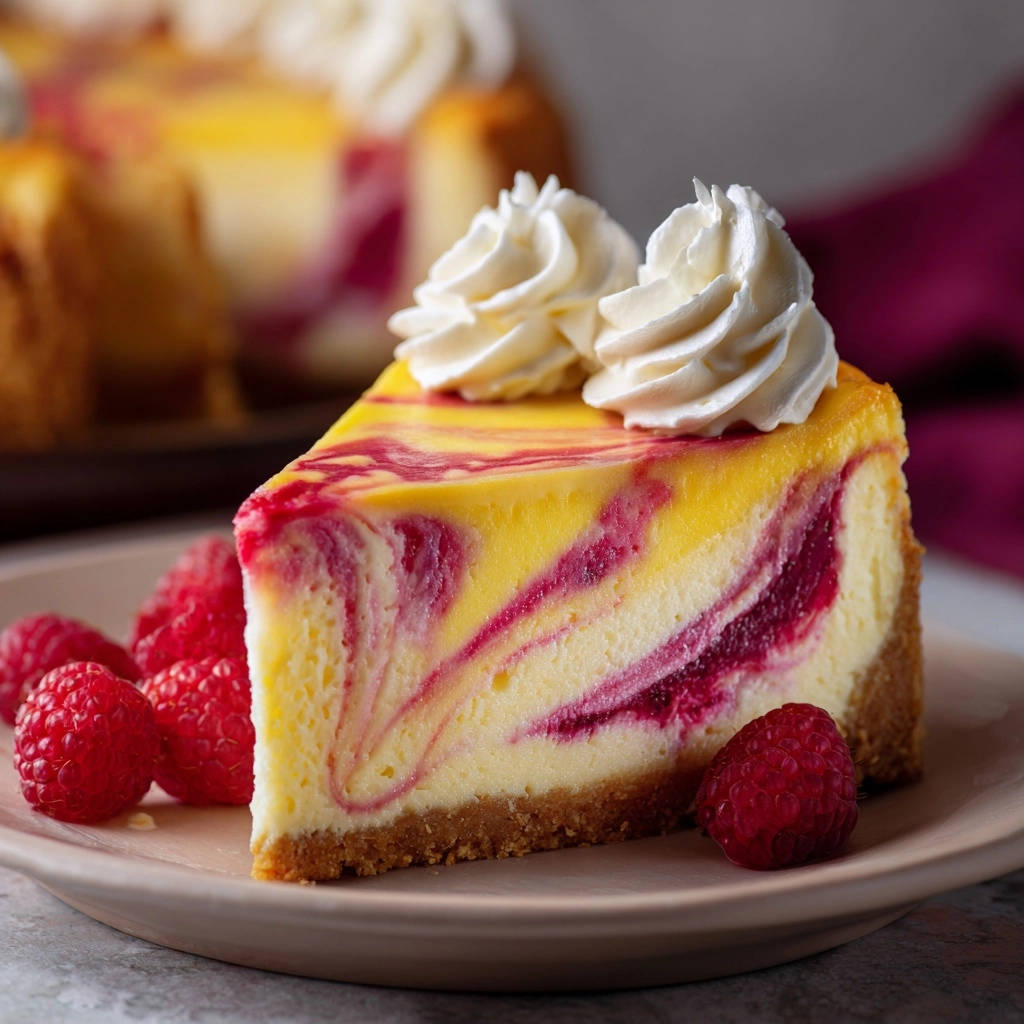
The Artistic Touch: Swirl Assembly
Carefully pour the creamy cheesecake batter over the cooled crust in the springform pan. Drizzle spoonfuls of the completely cooled raspberry sauce over the top of the batter.
Use a butter knife or a skewer to gently swirl the raspberry sauce into the batter, creating an elegant marbled effect. Be careful not to swirl too much, or the colors will blend entirely instead of creating distinct swirls.
Baking with Precision: The Water Bath Method
Place the foil-wrapped springform pan inside a larger roasting pan. Carefully pour hot water into the larger roasting pan, ensuring it reaches about halfway up the sides of the springform pan.
Carefully transfer the entire roasting pan with the cheesecake to the preheated oven. Bake for 60-75 minutes, or until the edges are set and lightly golden, but the center 2-3 inches still jiggles slightly when gently shaken.
The Waiting Game: Cooling & Chilling for Flawless Texture
Once baked, turn off the oven but DO NOT remove the cheesecake immediately. Leave the cheesecake in the oven with the oven door propped open about an inch for 1 hour.
This gradual cooling prevents a drastic temperature change, which is a major cause of cracking. After 1 hour, remove the cheesecake from the oven and carefully lift it out of the water bath. Remove the foil.
Let it cool completely on a wire rack at room temperature for another 1-2 hours. Once cooled, transfer the cheesecake to the refrigerator and chill for at least 4 hours, or preferably overnight, before serving.
This extended chilling allows the cheesecake to firm up completely, achieving its perfect creamy texture and making it easier to slice without crumbling.
The Grand Reveal: Slicing and Serving
Once fully chilled, carefully remove the sides of the springform pan. For clean slices, use a sharp knife dipped in hot water and wiped clean between each cut.
Serve your perfectly smooth, crack-free Raspberry Swirl Cheesecake with fresh raspberries and a dollop of whipped cream, if desired. Enjoy the masterpiece you’ve created!
The “No-Crack” Guarantee: Cheesecake Secrets Revealed
Achieving a flawless, crack-free Raspberry Swirl Cheesecake isn’t magic; it’s about understanding the science behind the bake. Here’s a deeper dive into the techniques that guarantee success.
The Art of Gentle Mixing: Avoiding Air Bubbles
Overmixing cheesecake batter, especially after adding eggs, is a primary culprit for cracks. Excessive beating introduces too much air into the batter, causing it to puff up significantly during baking.
As the cheesecake cools, this trapped air contracts, pulling the surface down and resulting in unsightly fissures. By mixing only until ingredients are just combined and using low speed, you keep the batter dense and smooth, preventing air pockets.
Embracing the Water Bath: Even Heat Distribution
A water bath (bain-marie) creates a humid, gentle cooking environment for your cheesecake. It conducts heat evenly around the entire pan, preventing the edges from baking and setting too quickly while the center remains raw.
This uniform cooking allows the cheesecake to expand and set gradually, minimizing stress on the delicate custard and drastically reducing the chances of cracking. This technique is also crucial for preventing a dry cheesecake.
The Slow Cool-Down: Preventing Temperature Shock
Rapid temperature changes are a shock to a delicate cheesecake, causing it to contract suddenly and crack. Turning off the oven and leaving the cheesecake inside with the door propped open allows it to cool very gradually.
This slow descent in temperature, followed by cooling on a wire rack at room temperature, gives the cheesecake structure time to set and firm up gently, eliminating the risk of surface cracks.
Beyond the Recipe: Advanced Tips & Troubleshooting
Even with the best recipe, a few expert tips can elevate your baking and help you navigate common challenges.
Perfecting Your Raspberry Swirl Pattern
For distinct, beautiful swirls, ensure your raspberry sauce is completely cooled before adding it to the batter. This prevents it from sinking or bleeding too much.
Drizzle the sauce in a circular pattern on top, then use a butter knife or skewer to gently create 2-3 passes in one direction, followed by 2-3 passes in the opposite direction. Overworking the swirl will muddy the colors.
Spotting Doneness: The Jiggle Test Explained
The jiggle test is key for a perfectly baked cheesecake. The edges should appear set and firm, perhaps slightly golden, while the very center (about a 2-3 inch diameter) should still have a slight, uniform jiggle.
It will resemble firm Jell-O. This slight movement indicates the center is not yet fully set but will continue to cook from residual heat as it cools, resulting in a creamy, never-dry texture.
Common Hurdles: Troubleshooting Cheesecake Woes
If your cheesecake does crack, it’s often due to overbaking or sudden temperature changes. Always trust the jiggle test over strict timing, as oven temperatures can vary.
For more specific guidance on different dessert settings, you might find useful tips in our guide to mini chocolate caramel cheesecakes that always set, which covers similar principles for preventing common issues.
Crust Concerns: Preventing Soggy Bottoms
While the water bath is crucial for the filling, it can sometimes lead to a slightly soft crust. To combat this, ensure your springform pan is wrapped with several layers of heavy-duty foil, leaving no gaps.
Additionally, baking the crust for 10 minutes before adding the filling helps to set it and create a barrier against moisture, ensuring a crispier base for your Raspberry Swirl Cheesecake.
Enjoying & Preserving Your Raspberry Swirl Cheesecake
Elegant Presentation Ideas
Beyond fresh raspberries and whipped cream, consider dusting your cheesecake with a light coating of powdered sugar. A sprig of fresh mint can also add a pop of color and freshness.
For an extra touch, you could serve slices with a side of extra raspberry sauce or a light drizzle of white chocolate ganache.
Optimal Storage for Lasting Freshness
Store your cheesecake in an airtight container in the refrigerator for up to 5 days. This keeps it fresh, prevents it from absorbing odors, and maintains its creamy texture.
Allowing it to come to room temperature for about 15-20 minutes before serving can enhance its flavor and creaminess.
Planning Ahead: Make-Ahead & Freezing Tips
This Raspberry Swirl Cheesecake is an excellent make-ahead dessert, as it benefits greatly from overnight chilling. You can prepare it up to 2-3 days in advance.
For longer storage, cheesecake freezes beautifully. Wrap individual slices or the whole cheesecake tightly in plastic wrap, then in foil. It can be frozen for up to 1 month.
Thaw overnight in the refrigerator before serving. If you enjoy make-ahead berry desserts, you might also like our recipe for easy creamy berry crumble cheesecake bars.
Your Top Raspberry Swirl Cheesecake Questions Answered
Can I substitute cream cheese brands or types?
For the best results and texture, always use full-fat brick cream cheese, not whipped or spreadable varieties. Brands vary slightly, but any reputable full-fat cream cheese will work well.
What if my raspberries aren’t fresh?
Frozen raspberries work perfectly and are often more economical. There’s no need to thaw them before cooking for the swirl; simply add them to the saucepan as directed.
Trouble with Lumps in My Batter?
Lumps typically occur if cream cheese isn’t soft enough or if it’s not beaten thoroughly before other ingredients are added. Ensure your cream cheese is truly at room temperature (let it sit out for at least an hour).
Beat it on its own until incredibly smooth and creamy before adding sugar or other wet ingredients. This foundational step is key for a silky smooth cheesecake.
How to Prevent My Crust from Sticking?
Properly greasing the bottom of your springform pan before adding the crust mixture can help, but the best method is lining the bottom with a circle of parchment paper. The springform pan’s design allows you to easily remove the sides, but the parchment ensures the crust never sticks to the base.
Time to Shine: Share Your Cheesecake Masterpiece!
Now that you’re equipped with the secrets to a truly flawless and delicious Raspberry Swirl Cheesecake, it’s time to put your skills to the test. This recipe promises not only incredible flavor but also the satisfaction of baking a visually perfect dessert.
Impress your family and friends with this creamy, fruity masterpiece. We can’t wait to hear how it turns out!
Raspberry Swirl Cheesecake
Course: DessertCuisine: American CuisineDifficulty: easy12
servings45
minutes1
hour300
minutesAmerican Cuisine
Ingredients
For the Graham Cracker Crust:
1 1/2 cups graham cracker crumbs
1/4 cup granulated sugar
6 tablespoons unsalted butter, melted
For the Raspberry Swirl:
1 1/2 cups fresh or frozen raspberries
1/4 cup granulated sugar
1 tablespoon lemon juice
For the Cheesecake Filling:
3 (8-ounce) blocks full-fat cream cheese, softened to room temperature
1 1/4 cups granulated sugar
1 teaspoon vanilla extract
1/2 cup full-fat sour cream, room temperature
3 large eggs, room temperature
For Garnish (Optional):
Fresh raspberries
Whipped cream
Directions
- Prepare for Baking: Preheat your oven to 325°F (160°C). Wrap the bottom and sides of a 9-inch springform pan tightly with several layers of heavy-duty aluminum foil. This is essential for the water bath. Set aside.
- Make the Crust: In a medium bowl, combine the graham cracker crumbs and 1/4 cup granulated sugar. Pour in the melted butter and mix until well combined and the crumbs are evenly moistened. Press the mixture firmly and evenly into the bottom of the prepared springform pan. You can use the bottom of a glass to help compact it. Bake for 10 minutes, then remove from oven and let cool while you prepare the filling.
- Prepare the Raspberry Swirl: In a small saucepan over medium heat, combine the raspberries, 1/4 cup granulated sugar, and lemon juice. Bring to a simmer, stirring occasionally, until the raspberries break down and the mixture thickens slightly, about 5-7 minutes. Press the mixture through a fine-mesh sieve into a small bowl to remove seeds, leaving a smooth raspberry sauce. Set aside to cool completely.
- Make the Cheesecake Filling (The No-Crack Key!): In a large mixing bowl, using an electric mixer on medium-low speed, beat the softened cream cheese until it is completely smooth and creamy, with no lumps. This is important for a smooth texture. Gradually add the 1 1/4 cups granulated sugar, continuing to beat on low speed until just combined. Mix in the vanilla extract and sour cream until incorporated.
- Crucial Step for No Cracks: Add the eggs one at a time, mixing on VERY LOW SPEED just until each egg yolk disappears. Do not overmix! Overmixing introduces too much air into the batter, which expands during baking and contracts during cooling, leading to cracks. The goal is a smooth, not airy, batter.
- Assemble the Cheesecake: Pour the cheesecake batter over the cooled crust in the springform pan. Drizzle spoonfuls of the cooled raspberry sauce over the top of the batter. Use a butter knife or a skewer to gently swirl the raspberry sauce into the batter, creating a marbled effect. Be careful not to swirl too much.
- Bake in a Water Bath (The No-Crack Key!): Place the foil-wrapped springform pan inside a larger roasting pan. Carefully pour hot water into the larger roasting pan, reaching about halfway up the sides of the springform pan. Carefully transfer the entire roasting pan with the cheesecake to the preheated oven. Bake for 60-75 minutes, or until the edges are set and lightly golden, but the center 2-3 inches still jiggles slightly when gently shaken.
- Cool Slowly (The No-Crack Key!): Once baked, turn off the oven but DO NOT remove the cheesecake immediately. Leave the cheesecake in the oven with the oven door propped open about an inch for 1 hour. This gradual cooling prevents a drastic temperature change, which is a major cause of cracking. After 1 hour, remove the cheesecake from the oven and carefully lift it out of the water bath. Remove the foil. Let it cool completely on a wire rack at room temperature for another 1-2 hours.
- Chill: Once cooled to room temperature, transfer the cheesecake to the refrigerator and chill for at least 4 hours, or preferably overnight, before serving. This allows the cheesecake to firm up completely and achieve its perfect creamy texture.
- Serve: Carefully remove the sides of the springform pan. Slice with a sharp knife and serve with fresh raspberries and whipped cream, if desired. Enjoy your perfectly smooth, crack-free cheesecake!
Notes
- This recipe includes crucial steps to prevent cheesecake cracks.