
Imagine biting into a golden, buttery crust that shatters into a thousand delicate flakes before hitting a rich, velvety center of seasoned beef and tangy cream cheese. Most savory pies suffer from the dreaded “soggy bottom,” where the juices from the meat turn the pastry into a gummy, unappealing mess. This recipe changes the game by focusing on moisture control and structural integrity, ensuring every single bite maintains that satisfying crunch.
The secret to this superior savory pie lies in the contrast between the airy, high-rise puff pastry and the dense, savory filling. By balancing the heavy proteins of the beef with a triple-threat cheese blend, we create a filling that stays put rather than running all over your plate. It’s a sophisticated, comforting meal that looks like it came from a high-end bakery but relies on smart, simple techniques you can master at home.
To get that professional finish, you have to treat your ingredients with respect. The most important tip I can give you is to let your browned beef cool completely before it ever touches the cheese. If you mix hot meat into cold cream cheese, the fats will liquefy and separate, leading to a greasy filling that will soak right through your bottom crust. Patience in the cooling phase is the difference between a masterpiece and a mushy disappointment.
The Science of the Anti-Soggy Pastry Crust
Puff pastry is a marvel of culinary engineering, relying on hundreds of thin layers of dough separated by cold fat. When that cold pastry hits a hot 400°F oven, the water in the dough turns to steam almost instantly. This steam pushes the layers apart, creating that signature “puff” and a light, airy texture that provides a beautiful loft to your pie.
However, this process is easily sabotaged by excess moisture from the filling. If your beef mixture is too wet, the steam from the meat will move downward into the bottom pastry layer instead of escaping through the top. This prevents the bottom layers from crisping up, leaving you with a raw, doughy base. This is why we take the extra step of draining the beef in a colander and patting it dry with paper towels.
We also use a “barrier method” by incorporating high-fat cheeses like cream cheese and ricotta. These fats act as a protective shield, coating the pastry and preventing the small amount of remaining moisture in the meat from migrating into the dough. By controlling the physics of steam and fat, we ensure the bottom crust stays as crisp as the top.
Essential Components for the Savory Beef Filling
Choosing the right meat is the first step toward a perfect pie. I always recommend using lean ground beef, specifically a 90/10 or 93/7 blend. While fat usually equals flavor, too much rendered fat in a pastry-enclosed environment will pool at the bottom and create a heavy, oily mouthfeel. The lean beef provides plenty of hearty flavor without the structural risks of a higher fat percentage.
The “Cream Cheese Trifecta”—a combination of cream cheese, ricotta, and sour cream—is what gives this filling its incredible stability. Cream cheese provides the thick, spreadable base, while ricotta adds a slight grain and structure that holds up under heat. The sour cream introduces a necessary tang and a silky visual texture that makes the filling look as good as it tastes. Together, they form an emulsion that stays creamy without becoming runny.
When it comes to seasoning, dried oregano is actually your best friend here. While fresh herbs are great for garnishing, dried oregano holds its flavor much better during the long, high-heat baking process. Fresh herbs can sometimes turn bitter or lose their punch when tucked inside a hot pastry, but the dried version blooms in the beef fat, providing a consistent, savory aroma throughout the entire dish.
Why Puff Pastry Outperforms Phyllo or Shortcrust
You might be tempted to swap the puff pastry for phyllo or a standard pie crust, but the results won’t be the same. Phyllo is far too delicate to support the weight of a dense beef and cheese filling; it often shatters prematurely or becomes translucent and oily. Shortcrust, or standard pie dough, is sturdy but can feel very heavy and dense when paired with such a rich interior.
Puff pastry provides the perfect middle ground. It has the structural “bones” to hold the meat in place, but the laminated layers provide a much-needed lightness. The “loft” of the puff pastry balances the richness of the cream cheese, making the entire meal feel elegant rather than weighed down.
Preparing the Beef and Cheese Emulsion
Creating the filling is more than just stirring ingredients together; it’s about managing temperatures. After browning your beef and onions, you must drain the fat thoroughly. I like to use a colander and then firmly press the meat with paper towels. You’ll be surprised how much hidden liquid you can remove, and every drop you catch now is a drop that won’t soak your crust later.
The “Cooling Phase” is non-negotiable. At a molecular level, adding hot meat to cold dairy causes the emulsion to “break.” The heat snaps the proteins in the cheese, causing them to tighten and squeeze out their fat content. This results in a grainy, greasy mess. By letting the beef reach room temperature, you ensure the cheese stays smooth and the filling remains a cohesive, velvety emulsion that bakes evenly.
Step-by-Step: Constructing the Savory Beef and Cream Cheese Puff Pastry Pie
The foundation of your pie starts with the bottom sheet of pastry. When you roll it out on your floured surface, be careful not to pull or stretch the dough. Stretching the gluten will cause the pastry to shrink back during baking, which can pull the edges away from the sides of your dish. Gently drape it into the pan, letting it settle naturally into the corners.
Once your filling is spread evenly, leaving that crucial half-inch border, it’s time for the seal. This is where many home cooks lose their filling to “leakage.” Dip your finger in a little water and run it along the border before placing the top sheet on. Press the edges together firmly with your fingers or the tines of a fork. This creates a “lock” that keeps the steam-pressured cheese inside the pastry where it belongs.
The final architectural step is scoring the top. Use a very sharp knife to lightly draw a diamond pattern across the top sheet. You aren’t trying to cut through to the meat; you are simply creating vents. These scores allow steam to escape in a controlled way, preventing the top from bubbling up into one giant, uneven dome. It also creates those beautiful, professional-looking “tiles” that make the pie easy to slice later.
The Egg Wash: Achieving a Lacquered Golden Finish
That deep, mahogany glow you see on professional pastries is the result of the Maillard reaction, and it’s triggered by the egg wash. Using a whole egg provides both the proteins from the white and the fats from the yolk, giving you the best of both worlds: shine and color. If you used just the white, it would be shiny but pale; just the yolk would be dark but dull.
Adding a tablespoon of water to your egg is a pro move. It thins out the thick proteins, allowing the wash to glide over the pastry in a thin, even layer. This prevents those unsightly yellow streaks or “scrambled egg” patches in the crevices of your scoring. Brush it on generously, making sure to hit the edges for a uniform, lacquered finish.
Thermal Precision: Baking for Maximum Rise
Temperature is everything when working with laminated doughs. You must preheat your oven to a full 400°F. If the oven is too cool, the butter between the layers of the pastry will melt slowly and soak into the dough instead of creating steam. This results in a flat, greasy, and heavy pastry rather than a tall, flaky one.
Don’t just rely on the timer; use your eyes. You are looking for a deep golden brown across the entire surface, with the edges looking almost like dark mahogany. If the pastry looks pale or “blonde,” it hasn’t fully cooked through the center layers, and it will likely collapse once you take it out. That extra five minutes of baking often makes the difference between “good” and “perfect.”
Troubleshooting Common Savory Pastry Issues
If you notice the top of your pie is browning too quickly while the center still looks a bit doughy, don’t panic. Simply “tent” the dish with a piece of aluminum foil. This reflects the direct heat away from the top while allowing the internal temperature to continue rising. It’s a simple fix that saves the crust from burning.
Should you see a small leak in the side of the crust mid-bake, leave it alone until the pie is finished. Trying to patch hot pastry usually just creates a bigger hole. Once the pie comes out and rests, the cheese will firm up, and you can easily trim away any escaped bits with a knife before serving.
The hardest part of this recipe is waiting, but the 15-minute rest period is vital. During this time, the proteins in the ricotta and cream cheese “set.” If you cut into the pie immediately, the filling will be too fluid and will run out, leaving the pastry empty. Resting ensures every slice stays perfectly intact with beautiful, clean layers.
Optimal Side Dishes for Rich Meat Pies
Because this beef and cream cheese pie is incredibly rich and savory, you want side dishes that offer a sharp, acidic contrast. A simple arugula salad tossed in a bright lemon vinaigrette is the perfect partner. The peppery bite of the greens and the acid from the lemon cut right through the heavy fats of the beef and cheese.
Pickled red onions are another fantastic accompaniment. Their bright pink color looks beautiful on the plate, and their vinegary crunch cleanses the palate between bites of buttery pastry. If you want something warm, try roasted Brussels sprouts drizzled with a balsamic glaze. The slight bitterness of the sprouts balances the sweetness of the cooked onions in the beef filling.
Make-Ahead Strategies and Storage Logistics
This pie is a fantastic candidate for make-ahead meals, but there is a trick to it. For the best texture, you should assemble the pie and freeze it *unbaked*. Wrap it tightly in plastic wrap and foil; it will stay fresh for up to a month. When you’re ready to eat, bake it straight from the freezer, adding about 10-15 minutes to the total bake time. This ensures the pastry puffs for the first time in the oven, giving you that maximum “shatter.”
If you have leftovers, avoid the microwave at all costs. Microwaves heat the water molecules in the pastry, turning it soft and rubbery. Instead, reheat slices in a 350°F oven or an air fryer for 5-8 minutes. This recrisps the fat in the layers and restores that crunch. Store any cooked leftovers in an airtight container in the fridge for up to three days.
Expert Tips for Professional Results
If you have a pizza stone, place it in the oven while it preheats and set your baking dish directly on top of it. The intense, direct heat from the stone hits the bottom of the pan immediately, giving the bottom crust a “head start” and ensuring it gets just as crisp as the top.
If you aren’t using a pizza stone, take a fork and “dock” the bottom layer of pastry before adding the filling. This means poking small holes across the bottom sheet. It prevents large air bubbles from lifting the meat and creates a more even base for your filling to sit on.
Always use full-fat dairy for the filling. Low-fat or “light” cream cheese and sour cream have a higher water content and use stabilizers that can break down under high heat. Full-fat versions provide the structural stability needed to keep the pie from becoming watery or collapsing.
When it’s time to serve, use a long serrated knife (like a bread knife). Use a gentle sawing motion rather than pressing straight down. This allows you to cut through the delicate layers of the puff pastry without crushing the air pockets you worked so hard to create, keeping the presentation beautiful.
How do I prevent the bottom of the pie from getting soggy?
The key to a crisp bottom is removing as much moisture as possible from the beef. After browning the meat and onions, drain them in a colander and pat them firmly with paper towels. Additionally, letting the meat cool completely before mixing it with the cheese prevents the fats from melting prematurely and soaking into the dough. Using a preheated pizza stone under your baking dish can also provide the direct heat needed to crisp the base.
Can I substitute the ground beef with something else?
Yes, you can use ground turkey or ground chicken, but keep in mind they are often leaner and may need a bit more seasoning to match the richness of beef. If you use a meat alternative, ensure it is cooked and dried just as thoroughly as the beef. Avoid using ingredients with high water content, like mushrooms, unless you sauté them until all their liquid has evaporated first.
Why did my puff pastry fail to rise?
The most common reason for flat pastry is an oven that isn’t hot enough. Puff pastry relies on a “thermal shock” to turn the water in the dough into steam. If your oven is below 400°F, or if you put the pastry in before the oven was fully preheated, the fat will melt instead of creating layers. Also, make sure your pastry was still cold when it went into the oven; if the dough gets too warm during assembly, the layers can stick together.
How should I store and reheat leftovers?
Store leftovers in an airtight container in the refrigerator for up to three days. To reheat, use an oven or air fryer at 350°F until the center is warm and the pastry is crisp again. Do not use a microwave, as it will make the buttery pastry layers soft, tough, and chewy rather than flaky.
Can I make this pie ahead of time?
You can assemble the pie up to 24 hours in advance and keep it in the fridge, but do not apply the egg wash until right before you put it in the oven. For longer storage, you can freeze the unbaked pie. Wrap it tightly in plastic wrap and aluminum foil. Bake it directly from frozen at 400°F, adding roughly 10 to 15 minutes to the baking time. This actually results in a better texture than freezing a pre-baked pie.
What is the purpose of scoring the top of the pastry?
Scoring serves two purposes: function and fashion. Functionally, the shallow cuts act as vents that allow steam from the filling to escape. Without these vents, the steam would build up and cause the top crust to separate entirely from the filling, creating a large hollow gap. Visually, scoring creates a beautiful diamond or square pattern that makes the pie look professional and provides natural “guides” for easier slicing.
Savory Beef and Cream Cheese Puff Pastry Pie
Course: Main CourseCuisine: AmericanDifficulty: easy8
servings20
minutes35
minutes55
Minutes485
kcalAmerican
Ingredients
1 pound lean ground beef
2 sheets frozen puff pastry, thawed (Phyllo is too thin for this visual height; puff pastry is required)
8 ounces cream cheese, softened
1/2 cup ricotta cheese
1/4 cup sour cream (to achieve the creamy visual texture in the image)
1 small yellow onion, finely diced
2 cloves garlic, minced
1 teaspoon dried oregano
1/2 teaspoon salt
1/2 teaspoon black pepper
1 egg, beaten with 1 tablespoon water (egg wash)
Fresh parsley for garnish
Directions
- Preheat your oven to 400 degrees F (200°C). High heat is essential for the puff pastry to rise and stay crisp.
- To prevent a soggy bottom, you must remove all excess moisture from the filling. Brown the ground beef and diced onion in a large skillet over medium-high heat until the meat is fully cooked and slightly browned. Drain the fat thoroughly in a colander and pat the meat with paper towels.
- Return the meat to the pan and stir in the garlic, oregano, salt, and pepper. Cook for 1 minute, then remove from heat and let it cool completely. Mixing hot meat into cheese will cause the oils to separate and make the pastry soggy.
- In a medium bowl, whisk the softened cream cheese, ricotta, and sour cream until smooth. Fold the cooled beef mixture into the cheese.
- On a lightly floured surface, roll out one sheet of puff pastry to fit a 9×13 inch baking dish. Place it in the bottom of the dish.
- Spread the beef and cheese mixture evenly over the bottom pastry layer, leaving a 1/2 inch border around the edges.
- Roll out the second sheet of puff pastry and place it over the filling. Pinch the edges of the top and bottom pastry sheets together to seal the filling inside.
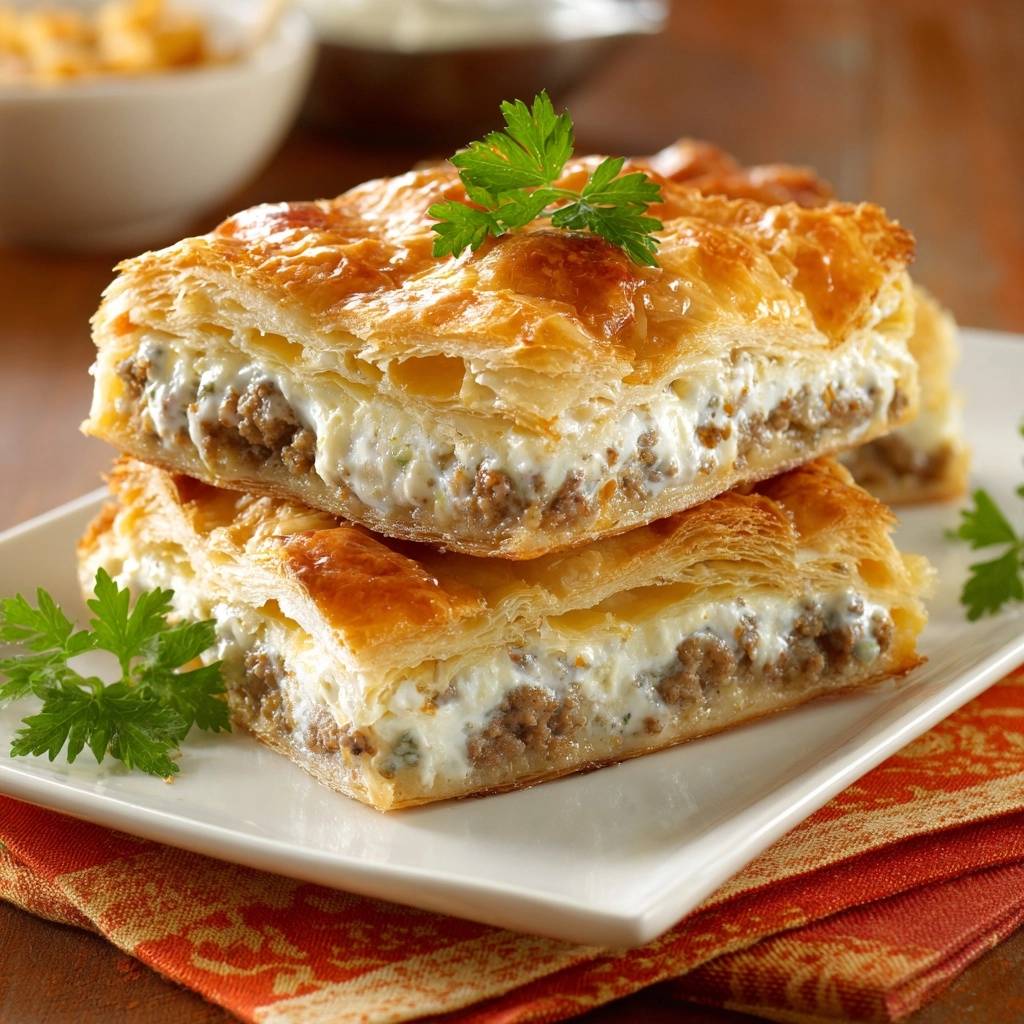
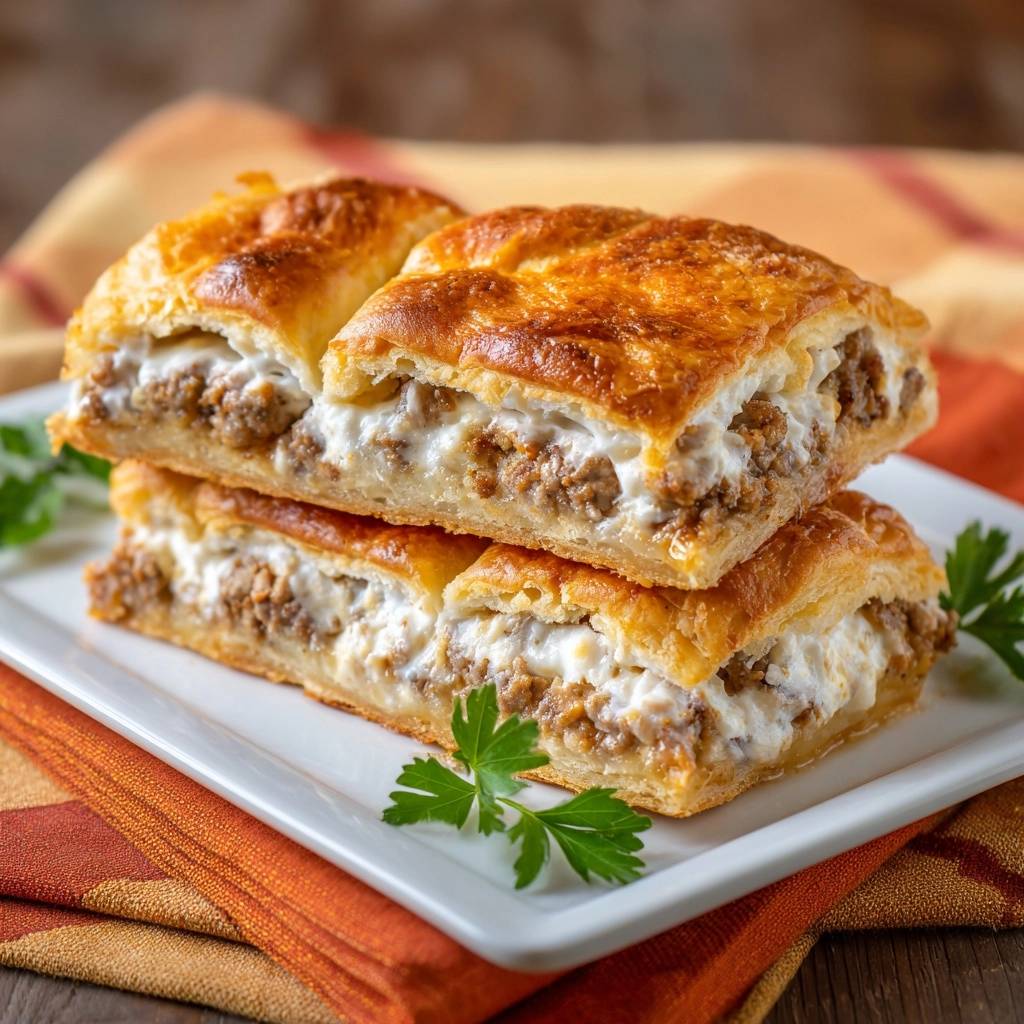
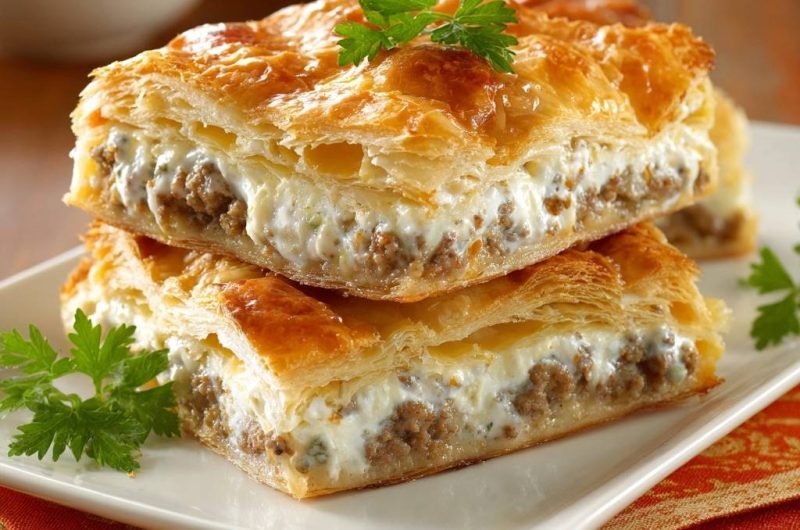
- Use a sharp knife to score the top layer of the pastry into squares or diamonds. Do not cut all the way through to the filling; scoring allows steam to escape and creates the distinct flaky “tiles” seen in the image.
- Brush the top generously with the egg wash. This provides the deep golden, lacquered finish shown in the photo.
- Bake for 30 to 35 minutes until the pastry is puffed and a deep golden brown. Let it rest for 15 minutes before slicing. This resting period allows the cheese filling to set so it doesn’t run when cut. Garnish with fresh parsley sprigs.
Notes
- Cooling the meat completely before mixing with cheese is essential to prevent the pastry from becoming soggy. Scoring the top layer helps create the signature flaky texture.


