

Alright friends, let’s talk about weeknight dinners. We all want something delicious, something easy, and something that doesn’t leave us with a mountain of dishes, right? Enter the glorious sheet pan meal! It’s a culinary superhero, bringing flavors together beautifully on a single pan. But, if you’ve ever tried to make a lovely, glazed, or sticky chicken dish this way, you might have run into a common problem: the dreaded soggy coating. Ugh, nobody wants that!
I hear you! I used to struggle with getting that perfect texture too. You crave that delightful balance of tender chicken, vibrant veggies, and a glossy, clingy sauce, but often the chicken ends up… well, wet rather than wonderfully sticky. But fear not! I’ve cracked the code for making the most amazing Sheet Pan Sticky Chicken that guarantees a beautiful, non-soggy coating every single time. This recipe is packed with incredible Asian-inspired flavors, comes together with minimal fuss, and yes, cleanup really is a breeze. Get ready for a new favorite!
Why You’ll Absolutely Love This Sheet Pan Sticky Chicken
This isn’t just another chicken dinner. It’s a strategic weeknight win! Here’s why this particular Sheet Pan Sticky Chicken recipe stands out and is destined for your regular rotation:
- No More Soggy Woes: Seriously, the simple technique we use ensures your chicken develops a lovely texture before it gets coated in that irresistible glaze. It’s a game-changer!
- Incredible Flavor: The sauce hits all the right notes – sweet, savory, tangy, with a hint of warming ginger and pungent garlic. It perfectly complements the chicken and vegetables.
- Effortless Cleanup: One pan, folks! Lining your baking sheet means you’re mostly just washing a bowl and a small saucepan. Weeknight perfection!
- Quick & Easy: From start to finish, you’re looking at under an hour. Most of that time is hands-off while the oven does the work.
- Nutrient-Packed: Loaded with lean protein from the chicken and plenty of colorful vegetables, this is a meal you can feel good about serving your family.
- Versatile: It pairs beautifully with rice, noodles, or even just a simple side salad. More on serving ideas below!
Gathering Your Ingredients for Perfect Sticky Chicken
Creating that signature sticky, glazed texture with tender chicken and perfectly cooked vegetables starts with a thoughtful selection of ingredients. Each component plays a vital role, from providing the core protein and fiber to building that complex, craveable sauce.
For our chicken and veggie base, we’re using boneless, skinless chicken, which is wonderfully versatile. You can opt for breasts, cut into uniform 1-inch pieces for quick, even cooking, or go with thighs, which offer a bit more richness and stay incredibly juicy. The vegetables bring color, sweetness, and essential texture – a medley of red, green, and yellow bell peppers provides sweetness and vibrant hues, while onion adds a necessary savory depth. Tossing these with a touch of vegetable oil, salt, and pepper ensures they roast nicely alongside the chicken, getting slightly tender and caramelized.
The magic in avoiding that dreaded soggy coating lies in a bit of simple cornstarch, initially used to lightly coat the chicken pieces. This creates a thin barrier that helps the chicken crisp slightly in the oven before the sauce is introduced. You’ll also need a little extra vegetable oil for tossing both the chicken and the vegetables, plus salt and black pepper for seasoning throughout.
The star, of course, is the sticky glaze! This sweet and savory concoction relies on foundational Asian pantry staples. Soy sauce (or tamari for a gluten-free option) provides the salty, umami base. Rice vinegar adds necessary tang and brightness to cut through the richness. Honey or brown sugar is crucial for that signature sticky sweetness – honey contributes a lovely floral note, while brown sugar adds a hint of molasses depth. A drizzle of sesame oil brings a nutty aroma that screams “delicious Asian flavors.” Fresh aromatics, minced garlic and grated fresh ginger, infuse the sauce with warmth and punch. Finally, a cornstarch and water slurry is used to thicken the sauce into that beautiful, glossy glaze that clings perfectly to every piece.
Don’t forget the finishing touches! A sprinkle of sesame seeds adds a delicate crunch and visual appeal, while sliced green onions provide a fresh, slightly sharp bite and a pop of vibrant green just before serving.
Here’s a breakdown of everything you’ll need:
- 1.5 pounds boneless skinless chicken breasts or thighs, cut into 1-inch pieces
- 1 large red bell pepper, cut into 1-inch chunks
- 1 large green bell pepper, cut into 1-inch chunks
- 1 large yellow bell pepper, cut into 1-inch chunks
- 1 large onion, cut into 1-inch chunks
- 2 tablespoons vegetable oil, divided
- 1/4 cup cornstarch (for coating)
- Salt and black pepper to taste
- 1/2 cup soy sauce (or tamari for gluten-free)
- 1/4 cup rice vinegar
- 1/4 cup honey or brown sugar
- 1 tablespoon sesame oil
- 2 cloves garlic, minced
- 1 teaspoon grated fresh ginger
- 1 tablespoon cornstarch mixed with 2 tablespoons water (for sauce)
- Sesame seeds for garnish
- Sliced green onions for garnish
Crafting Your Sticky Chicken: Step-by-Step Perfection
Making this Sheet Pan Sticky Chicken is incredibly straightforward, but there are a couple of key moments that make all the difference between a soggy disappointment and a gloriously glazed success. Pay attention to the timing of the sauce addition and the pan spacing, and you’ll be golden!
Prepare for Takeoff (Preheat & Prep):
Start by setting your oven to preheat to a hot 400 degrees F (200 degrees C). A hot oven is essential for getting good browning and crisping on the chicken and vegetables. While it heats up, get your large baking sheet ready. Lining it with parchment paper or foil is your best friend for minimizing cleanup later – trust me on this!
Coat the Chicken Right:
Grab a large mixing bowl. Add your cut chicken pieces. Drizzle them with 1 tablespoon of the vegetable oil. This bit of oil helps the cornstarch adhere evenly. Now, sprinkle the 1/4 cup of cornstarch over the chicken, along with salt and pepper to your liking. Toss everything together really well. You want each piece of chicken to be lightly but completely coated in that cornstarch mixture. This coating is the secret weapon against sogginess!
Prep the Veggies:
No need to dirty another bowl! Add your chopped bell peppers and onion right into the same bowl the chicken was in. Drizzle with the remaining 1 tablespoon of vegetable oil and season with a little more salt and pepper. Toss the vegetables until they’re lightly coated in the oil and seasoning. They’ll cook alongside the chicken, soaking up the surrounding flavors.
Spread Out for Success:
This is perhaps the most critical step for texture! Carefully spread the coated chicken and the seasoned vegetables onto your prepared baking sheet in a single layer. It’s crucial not to overcrowd the pan. If your sheet pan looks too full or the pieces are touching or piled up, grab a second pan and divide the mixture. Giving everything space is how the chicken and vegetables will roast and develop that desirable texture instead of steaming and becoming soggy.
Initial Bake (The Crisping Stage):
Pop the sheet pan (or pans) into the preheated oven and bake for 15 minutes. During this time, the chicken starts to cook and, importantly, that cornstarch coating begins to crisp up beautifully. The vegetables will also start to soften and get some color.
Whip Up the Glaze:
While the chicken and veggies are having their initial bake, you’ll make the sticky sauce. In a small saucepan, whisk together the soy sauce, rice vinegar, honey (or brown sugar), sesame oil, minced garlic, and grated fresh ginger. Place the saucepan over medium heat and bring this mixture to a gentle simmer. The heat helps the flavors meld and dissolves the sweetener.
Thicken the Sauce:
In a tiny bowl or cup, stir together the tablespoon of cornstarch with the 2 tablespoons of water until you have a smooth slurry. Once your sauce in the saucepan is simmering, slowly whisk or stir the cornstarch slurry into it. Keep stirring constantly for about 1-2 minutes. You’ll notice the sauce thickening and becoming beautifully glossy. As soon as it reaches this thick, syrupy consistency, remove the saucepan from the heat. You don’t want it to get too thick.
Coat Everything in Sticky Goodness:
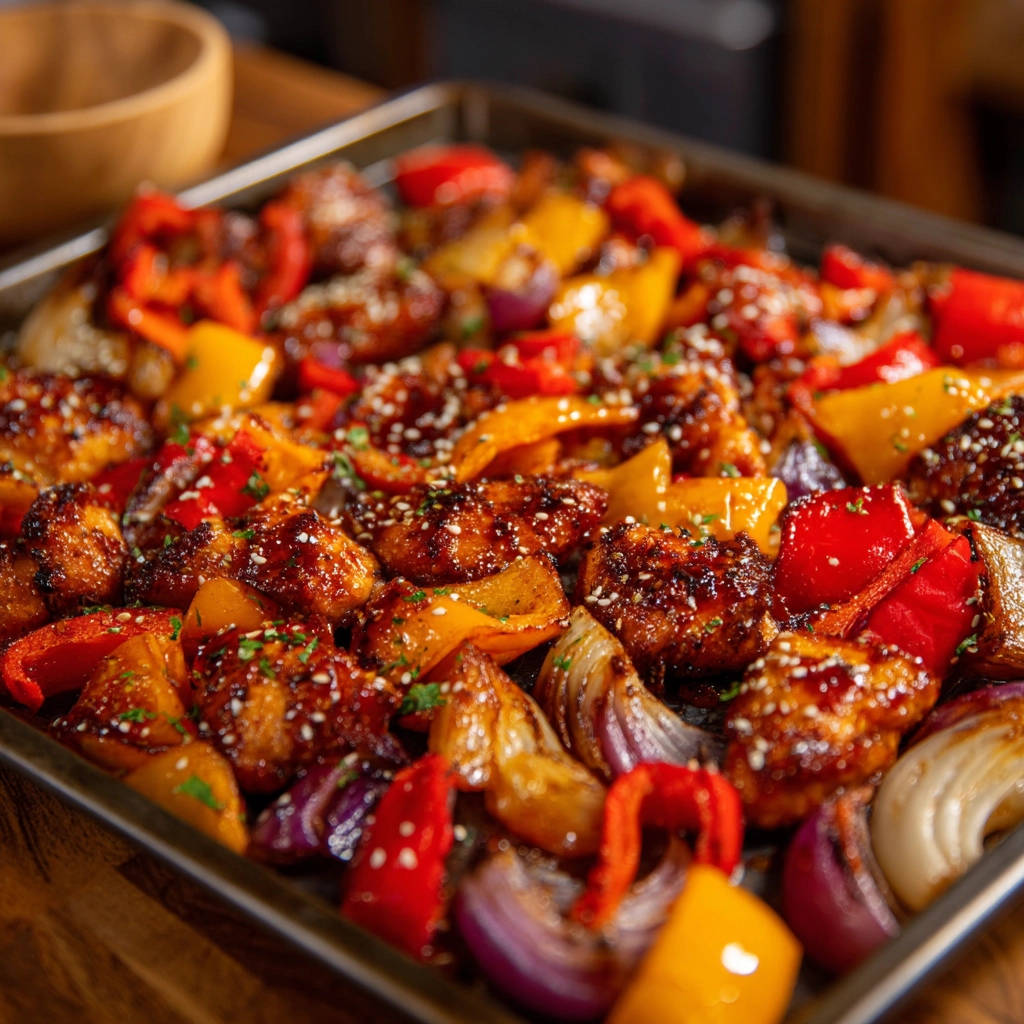
After the initial 15 minutes of baking, carefully pull the sheet pan out of the oven. Pour that gorgeous, thickened sticky sauce evenly over the chicken and vegetables spread on the pan. Using tongs or a spatula, gently toss everything right on the pan. Make sure every piece of chicken and vegetable is coated in that glossy glaze. This is where the magic happens, transforming them into sticky chicken and vegetables!
Final Bake (Glazing Stage):
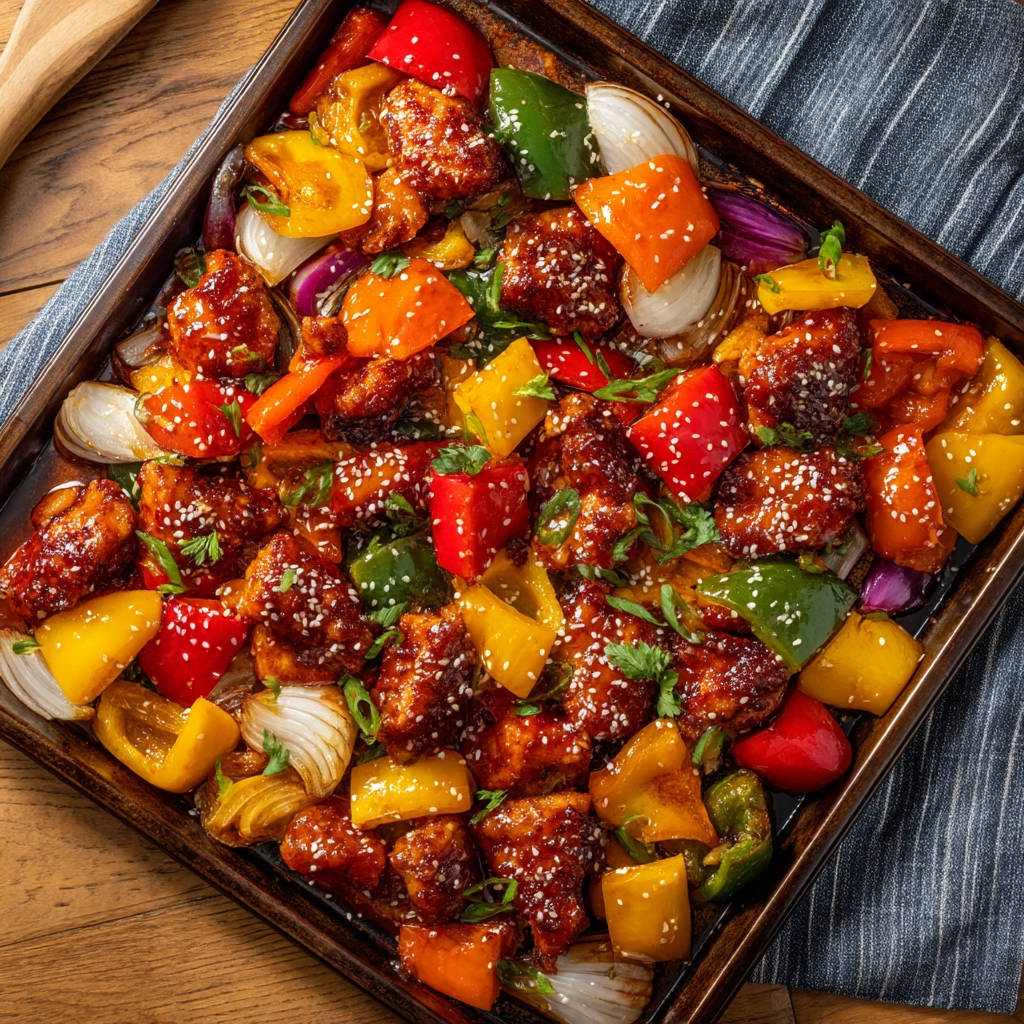
Return the coated chicken and vegetables to the oven. Bake for another 10-15 minutes. The exact time will depend on your oven and how thick your sauce is, but you’re looking for the chicken to be cooked through (it should no longer be pink inside) and the sauce to be bubbling and caramelized onto the pieces, creating that signature glaze. It should look beautifully sticky and slightly caramelized.
Garnish and Serve:
Carefully remove the sheet pan from the oven. The aroma will be incredible! Before diving in, scatter some sesame seeds and sliced green onions over the top for a final touch of flavor, texture, and color. Serve immediately and bask in the glory of your perfectly cooked, non-soggy Sheet Pan Sticky Chicken!
Tips for Perfect Sheet Pan Sticky Chicken Every Time
While the steps are simple, a few pro tips can elevate your Sheet Pan Sticky Chicken from good to absolutely unforgettable and guarantee that wonderful texture:
- Don’t Skip the Cornstarch Coating: This is genuinely the secret ingredient for preventing sogginess. It creates a barrier that allows the chicken surface to get a little crisp before the wet sauce goes on.
- Uniform Piece Size: Cut both the chicken and vegetables into roughly the same 1-inch size. This ensures everything cooks evenly and is ready at the same time.
- The Single Layer Rule: I cannot stress this enough! Overcrowding the pan is the number one cause of steaming instead of roasting, leading to soggy results. Use two pans if needed – it’s worth the extra dish! Parchment paper on both makes cleanup easy.
- Monitor Sauce Thickness: When making the sauce, cook it until it’s thick enough to coat a spoon but still pourable. It will thicken slightly more as it bakes onto the chicken.
- Check Chicken Doneness: The best way to ensure your chicken is cooked through without drying out is to use an instant-read thermometer. Insert it into the thickest part of a piece of chicken; it should read 165°F (74°C).
- Customize Your Veggies: Feel free to swap out the bell peppers and onion for other quick-cooking vegetables like broccoli florets, snap peas, or even chunks of zucchini. Just ensure they are cut to a similar size so they cook within the time frame. For heartier vegetables like carrots or potatoes, you might need to pre-roast them for 10-15 minutes before adding the chicken and faster-cooking veggies.
- Spice it Up: Want a little heat? Add a pinch of red pepper flakes to the sauce mixture or garnish with a drizzle of sriracha before serving.
- Make it Gluten-Free: As mentioned, easily make this recipe gluten-free by using tamari instead of soy sauce. Ensure your other ingredients (like cornstarch) are certified gluten-free if needed.
What to Serve With Your Sticky Chicken Dinner
This Sheet Pan Sticky Chicken is a complete meal with protein and vegetables all on one pan, but it truly shines when served with a little something extra to soak up that glorious sticky sauce.
A classic pairing is steamed white or brown rice. The fluffy grains are the perfect vehicle for carrying the sweet and savory glaze and tender chicken. You could also serve it with noodles, like lo mein or rice noodles, for a takeout-inspired experience. For a lighter option, consider serving it over fluffy quinoa or even alongside some crispy oven potato wedges.
If you want to add another side dish, a simple green salad or blanched broccoli would be lovely. You could also complement the flavors with something like easy Mexican rice for a fun fusion twist, or even a fresh, crunchy slaw.
Your Sheet Pan Sticky Chicken Questions Answered (FAQ)
Here are some common questions folks ask when making this delicious sheet pan meal:
Can I use frozen chicken or vegetables?
It’s best to use thawed chicken and fresh vegetables for this recipe. Frozen chicken tends to release more moisture as it cooks, which can contribute to sogginess, defeating the purpose of our technique. Frozen vegetables also release a lot of water and won’t get the same roasted texture as fresh ones in this application.
Can I make the sauce ahead of time?
Absolutely! You can whisk together the soy sauce, rice vinegar, honey, sesame oil, garlic, and ginger mixture a day or two in advance and keep it covered in the refrigerator. When you’re ready to cook, just heat it in the saucepan, make the cornstarch slurry, and thicken it as directed in step 7.
How do I store leftovers?
Store any leftover Sheet Pan Sticky Chicken and vegetables in an airtight container in the refrigerator for up to 3-4 days. The sauce may thicken further upon chilling.
What’s the best way to reheat leftovers?
For best results, reheat leftovers in a skillet over medium heat or in the oven at 350°F (175°C) until heated through. Microwaving is an option for speed, but it may make the chicken a little less tender and the vegetables softer.
My sauce didn’t thicken enough, what went wrong?
Make sure your sauce was simmering gently when you added the cornstarch slurry and that you stirred it constantly for the full 1-2 minutes. Sometimes, if the sauce isn’t hot enough or you don’t stir continuously, the cornstarch won’t activate properly to thicken the liquid. If it’s still too thin after baking, you could quickly remove the chicken and veggies, return the liquid to the saucepan, and whisk in a tiny bit more cornstarch slurry (like 1/2 teaspoon cornstarch mixed with 1 teaspoon water), heat it for another minute until thickened, then pour it back over everything. Or just enjoy it as a slightly thinner sauce!
Can I add other vegetables besides peppers and onion?
Yes, definitely! Just be mindful of cooking times. Quick-cooking vegetables like broccoli, snap peas, mushrooms, or zucchini work well added at the beginning with the peppers and onions. Denser vegetables like carrots or sweet potatoes would need to be cut into smaller pieces or potentially roasted for 10-15 minutes before adding the chicken and other veggies.
Enjoy Your Homemade Sticky Chicken!
There you have it! The secret to making craveable, perfectly textured Sheet Pan Sticky Chicken right in your own kitchen. No more soggy disappointment, just tender chicken, vibrant roasted vegetables, and a sweet, savory glaze that clings just right. It’s proof that truly delicious and satisfying weeknight meals don’t have to be complicated or require endless cleanup.
Give this recipe a try this week! I have a feeling it’s going to become a new family favorite. And when you do, please come back and let me know how it turned out in the comments below. Did you love the texture? Did you add different veggies? Share your experience! Happy cooking!
Sheet Pan Sticky Chicken
Ingredients
- 1.5 pounds boneless skinless chicken breasts or thighs, cut into 1 inch pieces
- 1 large red bell pepper, cut into 1 inch chunks
- 1 large green bell pepper, cut into 1 inch chunks
- 1 large yellow bell pepper, cut into 1 inch chunks
- 1 large onion, cut into 1 inch chunks
- 2 tablespoons vegetable oil, divided
- 1/4 cup cornstarch
- Salt and black pepper to taste
- 1/2 cup soy sauce (or tamari for gluten-free)
- 1/4 cup rice vinegar
- 1/4 cup honey or brown sugar
- 1 tablespoon sesame oil
- 2 cloves garlic, minced
- 1 teaspoon grated fresh ginger
- 1 tablespoon cornstarch mixed with 2 tablespoons water (for sauce)
- Sesame seeds for garnish
- Sliced green onions for garnish
Directions
- Preheat oven to 400 degrees F (200 degrees C). Line a large baking sheet with parchment paper or foil for easier cleanup.
- In a large bowl, toss the chicken pieces with 1 tablespoon of the vegetable oil, cornstarch, salt, and pepper until evenly coated.
- Add the chopped bell peppers and onion to the same bowl (no need to wash it). Toss with the remaining 1 tablespoon of vegetable oil, salt, and pepper.
- Spread the chicken and vegetables in a single layer on the prepared baking sheet. Make sure not to overcrowd the pan; use two pans if necessary so everything has space to crisp up. This is key to avoiding soggy chicken!
- Bake for 15 minutes.
- While the chicken and vegetables are baking, whisk together the soy sauce, rice vinegar, honey or brown sugar, sesame oil, minced garlic, and grated ginger in a small saucepan. Bring the mixture to a simmer over medium heat.
- Stir the cornstarch and water mixture into the simmering sauce. Cook, stirring constantly, until the sauce thickens and becomes glossy, about 1-2 minutes. Remove from heat.
- After 15 minutes of baking, carefully remove the sheet pan from the oven. Pour the thickened sauce evenly over the chicken and vegetables. Gently toss everything on the pan to coat it well.
- Return the pan to the oven and bake for another 10-15 minutes, or until the chicken is cooked through and the sauce is bubbling and glazed.
- Carefully remove the pan from the oven. Garnish with sesame seeds and sliced green onions before serving.


