For years, I struggled with dry, disappointing taco filling until I cracked the code on achieving restaurant-style moisture retention. Mastering these Shredded Chicken Tacos with Peppers and Cheese relies entirely on the simple but powerful “Moisture Lock Technique.” This method guarantees every strand of chicken is saturated with flavor, delivering the juiciest, most satisfying taco filling you will ever make at home.
Beyond Basic Taco Filling: Why Our Moisture Lock Technique Works
Standard taco recipes often instruct you to cook the chicken, remove it to shred, and then toss it with a small amount of reduced sauce.
This method allows the lean meat to cool and tighten while exposed to the air, leaving the fibers stiff and unable to absorb flavor, resulting in a frustratingly dry filling.
The “Shred and Soak” step works by allowing the newly exposed, porous chicken fibers to immediately re-absorb the highly seasoned liquid before the meat cools down and contracts.
As the saturated meat then reduces along with the sauce, the liquid adheres and thickens, creating a perfect, protective glaze.
This technique guarantees your Shredded Chicken Tacos with Peppers and Cheese are exceptionally juicy and perfectly seasoned from the first bite to the last.
Building the Perfect Plate: Essential Ingredients for Flavor and Texture
Choosing the Best Cuts: Breast vs. Thighs for Shredding
Chicken thighs are highly recommended because their higher fat content makes them richer and far more forgiving against overcooking, resulting in the most succulent shreds.
If you prefer a leaner result, boneless, skinless chicken breasts will work, but ensure all pieces are roughly the same size so they cook through evenly at the same time.
The Liquid Base: Why Broth and Drained Tomatoes Matter
Chicken broth is essential because it is the foundation for the intense final sauce; using plain water will significantly dilute the complexity of the Tex-Mex flavor profile.
Draining the canned diced tomatoes is critical, as this removes excess watery liquid, ensuring the final sauce thickens into a desirable glaze rather than remaining thin and runny.
The Spice Rack Strategy: Achieving Deep Tex-Mex Flavor
Taco seasoning provides a necessary complexity, while the addition of extra cumin boosts the foundational smoky, earthy warmth common in high-quality Mexican cuisine.
Always taste your cooking liquid before reducing; if you use a high-sodium seasoning blend, you will need to hold back on the added salt until the end.
Selecting the Peppers and Cheese: Color, Texture, and Melt
Using a combination of red and green bell peppers provides a beautiful visual contrast and a slightly varied sweetness profile, which holds up well against the rich chicken filling.
A pre-shredded blend of Monterey Jack and Cheddar is ideal because it offers superior meltability and a familiar, creamy sharpness that is perfectly suited for these juicy chicken tacos.
Gather Your Gear: Essential Kitchen Tools for Smooth Sailing
-
Dutch Oven or Large Pot: Necessary for the initial cooking and the critical sauce reduction phase.
-
Two Forks/Stand Mixer: Two forks are effective for manual shredding, but a stand mixer fitted with the paddle attachment makes quick, effortless work of shredding large batches.
-
Separate Large Skillet: Essential for caramelizing the peppers and warming the tortillas simultaneously while the chicken filling finishes reducing.
The Path to Perfection: Mastering the Shredded Chicken Tacos Method
Part I: Implementing the Moisture Lock (Cook, Shred, Soak)
-
Simmering the Chicken Base:
Combine the chicken, broth, drained tomatoes, taco seasoning, cumin, and salt in a large pot and bring the mixture to a gentle simmer.
Do not boil aggressively; a low, slow simmer is key to keeping the chicken tender and prevents the sauce from reducing too quickly before the chicken is fully cooked.
-
The Crucial Shred and Soak Step:
Remove the fully cooked chicken using tongs and shred it finely on a cutting board; smaller, finer pieces absorb more sauce efficiently.
Immediately return all the shredded chicken back into the reserved cooking liquid in the pot. This rapid saturation step is what ensures maximum juiciness.
-
Reducing the Sauce to a Rich Glaze:
Turn the heat back up to medium-high and let the mixture simmer uncovered for 5 to 7 minutes, stirring continuously.
The liquid will reduce dramatically, thickening into a flavorful glaze that perfectly coats every strand of the meat, creating the signature moist texture of this shredded chicken tacos recipe.
Part II: Developing Aromatics and Final Assembly
-
Sautéing the Peppers and Onions:
Heat 1 tablespoon of olive oil in a separate large skillet and sauté the sliced onion and bell peppers until they are tender-crisp, ensuring they do not become mushy.
Caramelizing them separately ensures they retain their texture and a concentrated sweet flavor before being introduced to the rich filling.
-
Combining the Complete Filling:
Gently fold the sautéed peppers and onions into the pot with the saucy shredded chicken filling.
Stir gently to distribute the vegetables evenly and maintain warmth; the filling should be steaming hot when you begin assembly.
-
Perfecting the Tortilla Warmth:
Heat the remaining oil in the same skillet and quickly warm the flour tortillas on both sides until they are soft and pliable, about 30 seconds per side.
A warm tortilla is crucial for the optimal texture and helps slightly melt the shredded cheese blend upon contact.
-
Final Assembly:
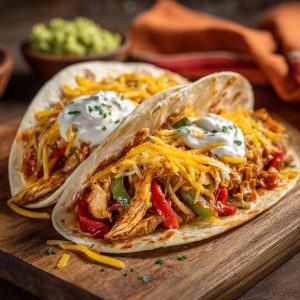
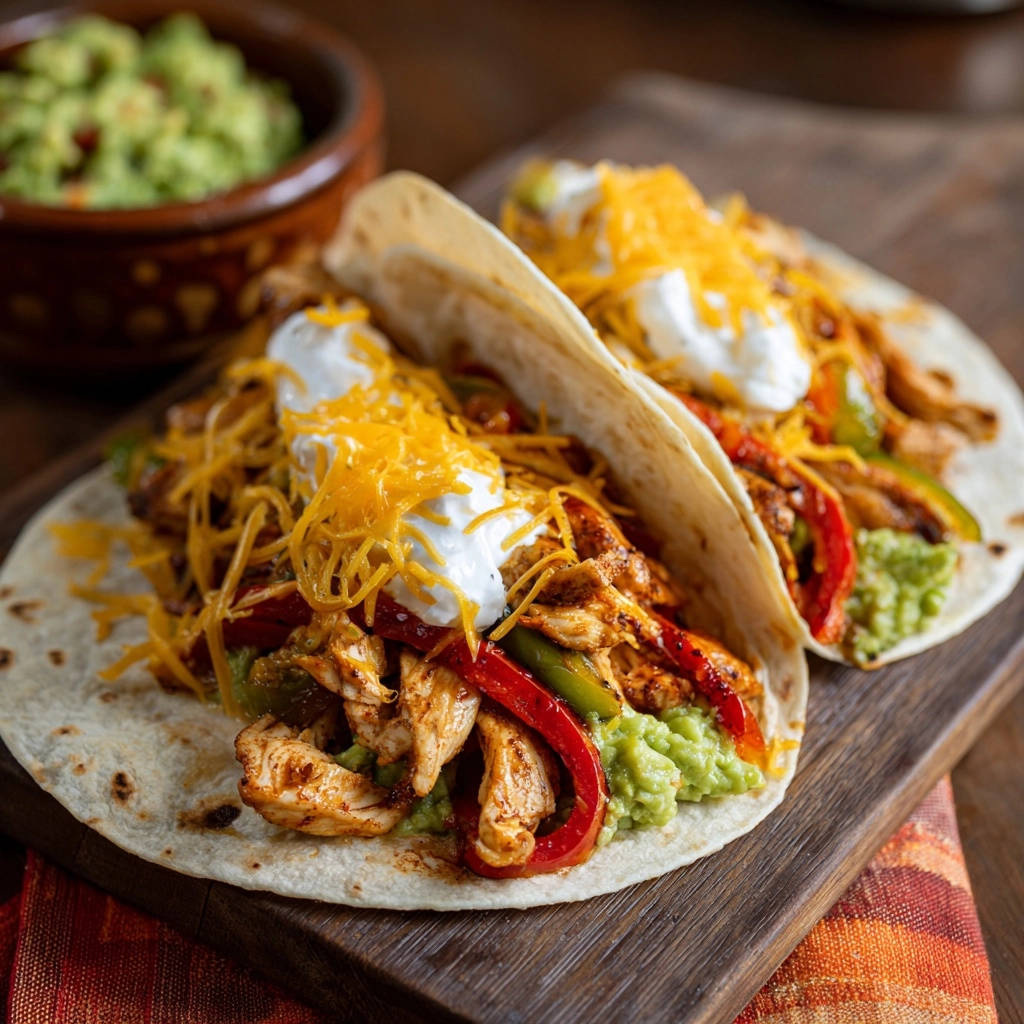
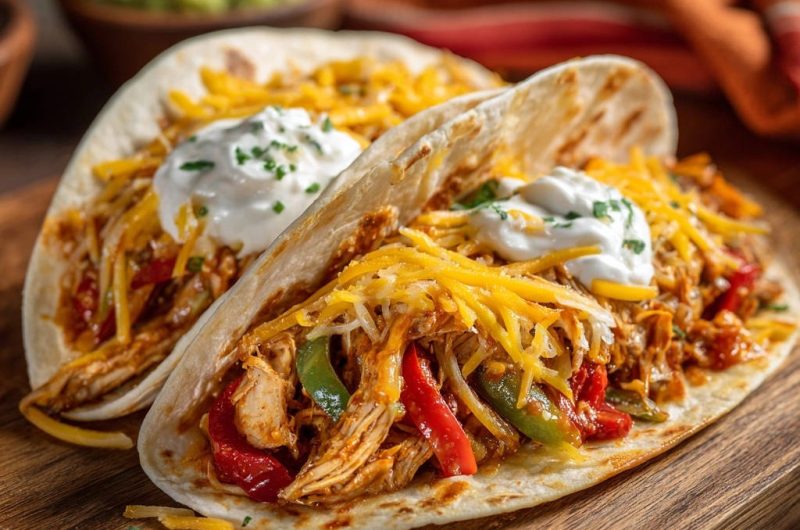
Spoon a generous portion of the juicy shredded chicken filling onto the center of each warm tortilla, top immediately with the cheese blend, and finish with sour cream and any other desired garnishes.
Chef’s Secrets and Smart Swaps: Elevating Your Taco Game
Flavor Enhancements and Ingredient Substitutions
-
Add a Smoky Kick: Introduce a teaspoon of smoked paprika or chipotle powder along with the taco seasoning for a deeper, more complex flavor profile.
-
Dairy-Free Option: If avoiding cheese, top your tacos with thinly sliced avocado, fresh cilantro, and a drizzle of homemade cashew crema or a dairy-free sour cream substitute.
-
Try Corn Tortillas: While flour is classic, heating good quality corn tortillas until slightly blistered provides a robust, authentic flavor and texture contrast to the rich filling.
Troubleshooting: Addressing Common Filling Issues
Why is My Shredded Chicken Tacos Filling Still Watery?
This usually happens if the sauce reduction step (Step 3) was skipped or cut short. Increase the heat slightly and continue simmering uncovered until the sauce clings thickly to the chicken strands and no liquid puddles at the bottom of the pot.
My Chicken Tastes Bland, What Went Wrong?
Ensure you used flavorful chicken broth, not just water, as the broth is the primary liquid flavor carrier. Also, always taste and adjust the salt after the sauce has fully reduced, as the intense reduction concentrates the initial seasoning dramatically.
Meal Prep and Longevity: Storing Your Perfect Taco Filling
Can I Prep the Filling Ahead of Time?
Absolutely. The shredded chicken filling holds up beautifully and can be prepared completely (including the peppers) up to 3 days in advance and stored tightly sealed in the refrigerator.
To reheat, simply place the filling in a skillet with a splash of extra broth or water over medium-low heat and cover until the filling is piping hot throughout.
Freezing and Thawing the Chicken Filling
This fully cooked filling freezes exceptionally well for up to 3 months. Portion it into freezer-safe bags or containers, ensuring you remove as much air as possible to prevent freezer burn.
Thaw the filling overnight in the refrigerator. When reheating, the texture may be slightly looser initially; continue to simmer briefly to allow the sauce to tighten up again before serving.
Frequently Asked Questions About Shredded Chicken Tacos with Peppers and Cheese
Can I Use Rotisserie Chicken for This Recipe?
Yes, using pre-cooked rotisserie chicken will significantly reduce the cook time. Skip Step 1 and 2 of Part I.
Simply shred the rotisserie chicken, add it directly to the heated broth, drained tomato, and seasoning mixture, and proceed immediately with the sauce reduction phase (Step 3).
Is it Possible to Make the Filling in a Slow Cooker or Instant Pot?
Yes. For the slow cooker, combine the chicken and sauce ingredients and cook on low for 4-6 hours.
Shred the chicken, return it to the pot, and then remove the lid and switch the heat to high for 30 minutes to reduce and thicken the sauce before stirring in the sautéed peppers.
What are the Best Topping Combinations?
While the classic cheese and sour cream is perfect, try adding fresh pico de gallo, diced avocado or rich guacamole, sliced pickled jalapeños for heat, and a generous squeeze of fresh lime juice for brightness that cuts through the richness of the filling.
Ready to Delight? Share Your Shredded Chicken Tacos Success Story
Once you adopt the Moisture Lock method, you’ll never settle for dry meat again; this technique ensures every serving of Shredded Chicken Tacos with Peppers and Cheese is exceptionally tender and saturated with deep, satisfying Tex-Mex flavor.
Now it’s your turn: whip up this incredible filling tonight and let us know in the comments how juicy and delicious your new favorite weeknight taco staple turned out!
Shredded Chicken Tacos with Peppers and Cheese
Course: Main CourseCuisine: Mexican cuisineDifficulty: easy4
servings15
minutes35
minutes50
minutesMexican cuisine
Ingredients
1.5 pounds boneless skinless chicken breast or thighs
2 cups chicken broth
1 medium yellow onion, sliced
1 red bell pepper, sliced
1 green bell pepper, sliced
2 tablespoons olive oil, divided
1 (14.5 ounce) can diced tomatoes, drained
3 tablespoons taco or fajita seasoning mix
1 teaspoon cumin
1/2 teaspoon salt
8 soft flour tortillas
1 cup shredded cheddar and Monterey Jack cheese blend
1/2 cup sour cream (for topping)
Guacamole (optional, for serving)
Directions
- Part 1: The Juicy Chicken Filling (The Moisture Lock Technique)
- Cook the Chicken: Place the chicken breasts or thighs in a large pot or Dutch oven. Add the chicken broth, diced tomatoes, taco seasoning, cumin, and salt. Bring the mixture to a low boil, then reduce heat immediately, cover, and simmer for 20 to 25 minutes, until the chicken is cooked through and easily pierced with a fork.
- Shred and Soak: Using tongs, remove the chicken from the pot and place it on a cutting board. Reserve all the liquid in the pot. Using two forks, shred the chicken finely. This is the crucial step: immediately return all the shredded chicken back into the cooking liquid in the pot. Stir well so all the meat strands are saturated.
- Reduce and Coat: Turn the heat back up to medium-high and let the mixture simmer uncovered. Stir frequently for 5 to 7 minutes. The reserved liquid will reduce, thicken, and create a rich, flavorful sauce that completely coats and saturates every single piece of shredded chicken, guaranteeing a perfectly moist filling.
- Part 2: Preparing Vegetables and Assembly
- Saute Vegetables: While the sauce is reducing, heat 1 tablespoon of olive oil in a separate large skillet over medium-high heat. Add the sliced onion and bell peppers. Saute for 5 to 7 minutes until the vegetables are tender-crisp and lightly caramelized. Remove from heat.
- Combine Filling: Add the sauteed peppers and onions into the pot with the saucy shredded chicken. Stir everything together gently to distribute the vegetables evenly through the filling. Keep warm.
- Warm Tortillas: Heat the remaining 1 tablespoon of olive oil in the same large skillet. Quickly warm the flour tortillas on both sides until pliable, about 30 seconds per side. Alternatively, wrap them in a damp paper towel and microwave for 30 seconds.
- Assemble Tacos: Spoon a generous portion of the chicken filling onto the center of each warm tortilla. Top immediately with the shredded cheese blend, allowing the warmth of the meat to slightly melt the cheese. Finish with a dollop of sour cream and serve immediately.