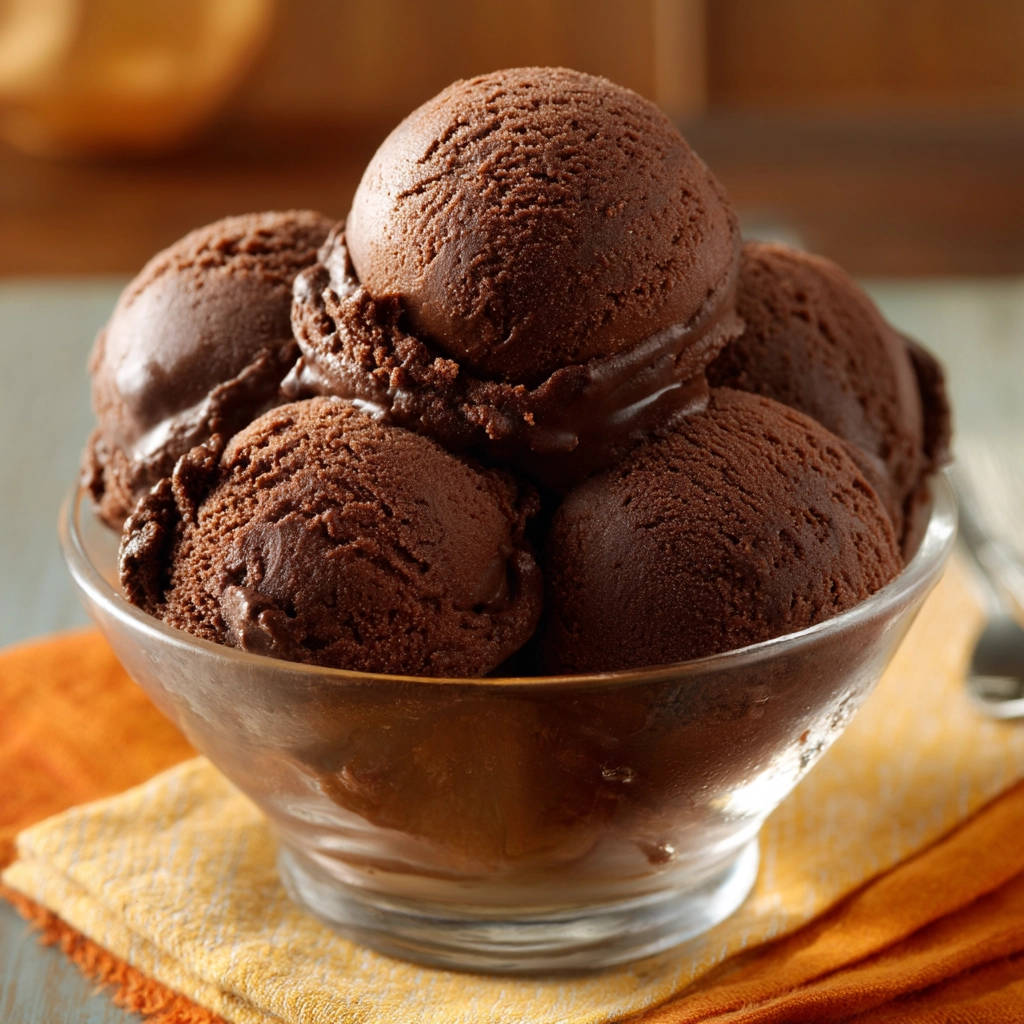
Oh, homemade ice cream. There’s just something so magical about it, isn’t there? That first creamy scoop, bursting with fresh flavor. But let’s be honest, sometimes the dream turns into a frozen, icy nightmare. You scoop into what you hope is velvety goodness, only to hit hard, crystalized chunks. Ugh.
I’ve been there! For years, my attempts at Simple Homemade Chocolate Ice Cream resulted in containers destined for milkshakes rather than glorious, scoopable cones. I tried every trick I could find, but those pesky ice crystals always seemed to win.
Then, I discovered the secret – or rather, a few key secrets – to a consistently smooth, rich, and utterly dreamy chocolate ice cream. It’s not just about the ingredients (though those are important!), it’s about a technique that ensures your base is silky smooth before it even hits the churn. This recipe is that game-changer. Get ready to banish ice crystals forever and make the best homemade chocolate ice cream of your life!
Why You’ll Absolutely Adore This Chocolate Ice Cream
Beyond finally achieving that perfect, scoopable texture, there are so many reasons this Simple Homemade Chocolate Ice Cream recipe will become your go-to:
- Incredible Creaminess: Thanks to a specific technique we’ll cover, you get a luxuriously smooth mouthfeel every single time.
- Rich, Deep Chocolate Flavor: Using quality cocoa powder delivers that intense chocolatey goodness you crave.
- No Ice Crystals, Guaranteed: Seriously, this recipe is designed to prevent them, leaving you with pure, unadulterated creamy bliss.
- Simple Ingredients: You likely have most, if not all, of these pantry staples on hand.
- Customizable Potential: While perfect on its own, this base is a fantastic canvas for adding your favorite mix-ins.
Gathering Your Ingredients for Creamy Chocolate Ice Cream
Making truly exceptional ice cream starts with understanding what each ingredient brings to the party. This recipe relies on a classic custard base, which is key to its richness and smooth texture. Here’s a look at what you’ll need and why:
Our base begins with dairy – lots of it! Heavy cream provides the high-fat content essential for that decadent creaminess we expect from premium ice cream. Whole milk adds liquid and balances the richness of the cream while still contributing to the overall fat content, which helps keep the ice cream softer and less icy once frozen.
Sugar, specifically granulated sugar in this case, not only sweetens the ice cream but also plays a vital role in its texture. Sugar lowers the freezing point of the mixture, which is critical for preventing hard, icy results and ensuring your ice cream remains scoopable straight from the freezer.
For that essential chocolate punch, we’re using unsweetened cocoa powder. The quality of your cocoa powder will significantly impact the final flavor. Opt for a good quality natural unsweetened cocoa powder for a classic, intense chocolate taste. If you prefer a slightly milder, darker chocolate flavor, you could experiment with Dutch-process cocoa, but ensure it’s unsweetened.
The stars of our creamy, crystal-free show are the large egg yolks. Egg yolks are what create a custard base. They contain fat and lecithin, an emulsifier, which helps create a smooth, stable mixture that resists ice crystal formation. The protein in the yolks also helps thicken the base as it cooks, contributing to that rich, velvety texture.
Vanilla extract is a must for rounding out the flavors. It enhances the chocolate notes and adds a touch of warmth and sweetness. Make sure to use pure vanilla extract for the best results.
Finally, just a touch of salt is included. While it might seem counterintuitive in a dessert, a small amount of salt actually enhances the sweetness and deepens the chocolate flavor, making the overall taste more complex and satisfying.
Here is a list of the ingredients you will need:
- 2 cups heavy cream
- 1 cup whole milk
- 3/4 cup granulated sugar
- 1/2 cup unsweetened cocoa powder
- 5 large egg yolks
- 1 teaspoon vanilla extract
- 1/4 teaspoon salt
Crafting Your Perfect Chocolate Custard Base: Step-by-Step
The magic of this Simple Homemade Chocolate Ice Cream lies in creating a perfectly smooth, rich custard base. While it might sound fancy, it’s absolutely achievable in your own kitchen with a little care and attention. Follow these steps, and you’ll be well on your way to ice cream nirvana.
-
Let’s start by combining our main liquid and dry ingredients in a medium saucepan. Measure out your heavy cream, whole milk, granulated sugar, unsweetened cocoa powder, and salt. Add them all to the saucepan. Give everything a good whisk until the cocoa powder is mostly incorporated into the liquids. Don’t worry if there are a few tiny cocoa lumps at this stage; they’ll dissolve as it heats. Place the saucepan over medium heat and begin stirring the mixture frequently. You want to heat this gently. Keep a close eye on the edges of the pan; you’re looking for just the slightest hint of simmering – tiny bubbles starting to form around the perimeter. It’s crucial not to let the mixture come to a rolling boil at this stage. Gentle heat ensures everything melts and combines without scorching.
-
While your dairy mixture is heating, prepare your egg yolks. Crack 5 large eggs, separating the yolks into a separate medium-sized bowl. Discard or save the egg whites for another use. Use a whisk to beat the egg yolks until they are smooth and uniform in color. They should lighten slightly as you whisk them.
-
Now for the secret weapon against ice crystals: tempering the egg yolks. This is arguably the most critical step for a smooth custard. Once your dairy mixture is just starting to simmer around the edges (but not boiling!), carefully scoop about half a cup of the hot mixture into a heatproof measuring cup or ladle. While continuously and vigorously whisking the egg yolks in their bowl, very slowly pour this hot liquid into the yolks in a thin stream. The goal here is to gradually warm the yolks up to the temperature of the hot mixture without cooking them instantly (which would result in scrambled eggs!). Keep whisking constantly as you pour. This process is called tempering, and it equalizes the temperature of the yolks before they are fully combined with the hot base.
-
Once you’ve tempered the yolks by slowly whisking in that first half-cup of hot liquid, it’s time to add them back to the rest of the hot mixture in the saucepan. Pour the tempered yolk mixture from your bowl back into the saucepan, stirring constantly with a whisk to ensure everything is well combined.
-
Reduce the heat under the saucepan to low. Continue cooking the custard base, stirring constantly and scraping the bottom and sides of the pan with a wooden spoon or heatproof spatula. This low and slow cooking allows the egg yolks to gently thicken the mixture without curdling. You’ll know it’s ready when the custard is thick enough to coat the back of your spoon. If you draw a line through the custard on the back of the spoon with your finger, the line should hold and the custard shouldn’t immediately run back together. This usually takes about 5 to 8 minutes of constant stirring. Just like before, it is absolutely essential that you do not let the custard boil once the egg yolks have been added. Boiling will cause the egg yolks to curdle and ruin the smooth texture we’re working so hard to achieve. Proper thickening at this stage is fundamental to a smooth, non-icy end product.
-
Remove the saucepan from the heat immediately after the custard reaches the correct thickness. Stir in the vanilla extract now. The heat from the custard will help the vanilla’s flavor disperse throughout the base.
-
To ensure the smoothest possible ice cream, pour the hot custard through a fine-mesh sieve set over a clean bowl. This step catches any tiny lumps that might have formed during the cooking process, whether it’s a bit of cooked egg or unincorporated cocoa powder. It guarantees a perfectly smooth base for churning.
-
Cool the custard slightly at room temperature for about 10-15 minutes, then cover the bowl. This is where another key anti-crystal step comes in: press plastic wrap directly onto the surface of the custard. This prevents a “skin” from forming on top as it cools, which can create textural issues. Ensure the plastic wrap touches every part of the surface.
Chilling and Freezing for Scoopable Heaven
You’ve made a beautiful, silky custard base. Now comes the waiting game, which is just as crucial as the cooking! Proper chilling and the freezing process are the final steps to transforming your liquid base into scoopable, creamy ice cream.
Step 9 involves chilling the custard thoroughly. Transfer the covered bowl to the refrigerator. It needs to chill for at least 4 hours, but preferably overnight. Why so long? Getting the base very cold is absolutely essential for your ice cream maker to work efficiently. A well-chilled base churns faster and incorporates air more effectively, leading to smaller ice crystals and a smoother texture. Don’t rush this step!
Once your base is completely chilled (it should be very cold to the touch), it’s time to churn! Step 10 is to pour the cold custard into your ice cream maker. Make sure your ice cream maker bowl has been frozen for the recommended time (usually 12-24 hours). Follow your specific ice cream maker’s instructions for churning time. Churning typically takes 20-30 minutes, during which the machine simultaneously freezes the base and whips air into it. The mixture will thicken considerably and resemble soft-serve ice cream.
Finally, in Step 11, transfer the freshly churned, soft ice cream to an airtight container. Press plastic wrap onto the surface of the ice cream in the container again before putting the lid on – this helps prevent freezer burn and ice crystals from forming on the surface. Place the container in the freezer for at least 2 to 4 hours, or until it’s firm enough to scoop cleanly. The longer freezing time allows the ice cream to harden fully to that perfect scoopable consistency we all dream of.
Tips for Simple Homemade Chocolate Ice Cream Success
Want to elevate your Simple Homemade Chocolate Ice Cream from great to absolutely legendary? Here are a few extra tips and tricks:
- Use Quality Ingredients: Since this recipe is so simple, the flavor of your ingredients truly shines. Use good quality heavy cream, whole milk, and especially a high-quality unsweetened cocoa powder. This will make a noticeable difference in the depth of flavor.
- Gentle Heating is Key: Remember the rule: don’t boil the dairy mixture before tempering, and absolutely do not boil the custard once the eggs are added. Low and slow heating prevents scorching and curdling, ensuring a smooth base.
- Master the Tempering: This is the most critical technique. Whisk those yolks constantly and pour the hot liquid in a very thin stream. This gradual heating is your best defense against scrambled eggs and leads to a smoother base.
- Don’t Skip the Straining: Straining might seem like an extra step, but it catches any tiny imperfections, guaranteeing the smoothest possible texture.
- Chill, Chill, Chill!: I can’t stress this enough. A well-chilled base is paramount for proper churning and preventing ice crystals. Overnight chilling is truly best if you have the time.
- Perfect Your Scoop: For easier scooping straight from the freezer, let the container sit at room temperature for 5-10 minutes before scooping. Running your scoop under hot water helps too!
Fun Variations for Your Chocolate Masterpiece
This creamy chocolate base is delicious on its own, but it’s also fantastic for adding your own twist! Just stir these in during the last few minutes of churning:
- Chocolate Chip: Add a cup of your favorite chocolate chips for classic texture.
- Nutty Swirl: Swirl in some melted peanut butter or chopped nuts.
- Chocolate Overload: Stir in chopped chocolate chunks or curls after churning for extra chocolate intensity.
Looking for other creamy, chocolatey desserts? Try our Easy No-Bake Chocolate Cream Loaf or our Classic Chocolate Cream Pie!
Serving Suggestions
A scoop (or three!) of this Simple Homemade Chocolate Ice Cream is a delightful treat all on its own. But if you want to make it an occasion, here are some serving ideas:
- Serve alongside a warm Rich Chocolate Cake or Fudgy Brownies.
- Top with whipped cream, chocolate syrup, or sprinkles for a simple sundae.
- Pair it with fresh berries or sliced bananas.
- Blend it into a thick, dreamy milkshake. For an ultimate frozen chocolate experience, try our Ultimate Frozen Chocolate Drink!
Your Simple Homemade Chocolate Ice Cream Questions Answered (FAQ)
Making ice cream at home can sometimes bring up a few questions. Here are answers to some common ones about this recipe:
Why did my Simple Homemade Chocolate Ice Cream turn out icy?
Icy texture is the nemesis of homemade ice cream, but this recipe helps combat it! Icing can happen for several reasons, often related to large ice crystals forming. The most common culprits are not properly thickening the custard base, skipping the tempering step (which can lead to an unstable base), not chilling the base thoroughly before churning, or a churn that didn’t run long enough to incorporate enough air. Ensuring you cook the custard until it coats the spoon, temper the yolks carefully, chill the base for at least 4 hours (preferably overnight), and churn according to your machine’s instructions will help you achieve that smooth texture.
Can I make this recipe without egg yolks?
This specific recipe relies on egg yolks to create a rich, smooth custard base that resists ice crystals. You can make ice cream without eggs (often called Philadelphia-style or American-style), but the resulting texture will typically be less rich and can be more prone to ice crystals without the emulsifying power of the yolks. If you prefer an egg-free version, you would need a different recipe that uses stabilizers or other techniques to achieve smoothness.
What’s the difference between natural and Dutch-process cocoa powder, and which should I use?
Natural unsweetened cocoa powder is acidic and has a sharp, fruity chocolate flavor. Dutch-process cocoa powder has been treated with an alkaline solution, which neutralizes its acidity, gives it a darker color, and results in a smoother, mellower, less complex chocolate flavor. This recipe was developed using natural unsweetened cocoa, which reacts with the slight alkalinity of the dairy to develop flavor as it heats. You can substitute Dutch-process, but the flavor profile might be slightly different. Just ensure whichever you use is unsweetened.
How long does homemade chocolate ice cream last in the freezer?
Homemade ice cream is best enjoyed within the first week or two for optimal texture and flavor. While it’s safe to eat for longer, beyond two weeks, it can start to lose its fresh flavor and may develop freezer burn, which causes a decline in texture and can lead to more ice crystals.
Can I halve or double this recipe?
Yes, you can certainly halve or double this recipe. Just make sure to adjust all ingredient quantities proportionally. When doubling, you might need a larger saucepan and a bigger ice cream maker capacity. Ensure you still give the base ample time to chill thoroughly, which might take a bit longer for a double batch.
Enjoy Your Dreamy Chocolate Scoop!
Making Simple Homemade Chocolate Ice Cream that’s free of ice crystals and bursting with rich flavor is incredibly rewarding. By taking a little extra care with the custard base, mastering the tempering technique, and allowing for proper chilling, you’ll create a dessert that rivals any gourmet shop. So gather your ingredients, get whisking, and prepare to enjoy the smoothest, most delicious chocolate ice cream you’ve ever made at home. Your taste buds will thank you!
Tried this recipe? Let me know in the comments below how it turned out! Did you add any fun mix-ins? Your feedback helps our community of home cooks!
Simple Homemade Chocolate Ice Cream

Ingredients
- 2 cups heavy cream
- 1 cup whole milk
- 3/4 cup granulated sugar
- 1/2 cup unsweetened cocoa powder
- 5 large egg yolks
- 1 teaspoon vanilla extract
- 1/4 teaspoon salt
Directions
- In a medium saucepan, whisk together the heavy cream, milk, sugar, cocoa powder, and salt. Heat over medium heat, stirring frequently, until the mixture just begins to simmer around the edges. Do not boil.
- In a separate bowl, whisk the egg yolks until smooth.
- This is the crucial step to avoid ice crystals: While whisking the egg yolks constantly, slowly pour about half a cup of the hot cream mixture into the yolks. This is called tempering the yolks and it prevents them from scrambling.
- Pour the tempered yolk mixture back into the saucepan with the remaining hot cream mixture.
- Reduce the heat to low and cook, stirring constantly with a spoon or spatula, until the custard thickens enough to coat the back of the spoon (it should hold a line drawn through it with your finger). This usually takes about 5 to 8 minutes. Do not let it boil once the yolks are added. The proper thickness helps create a smooth, non-icy texture.
- Remove the saucepan from the heat and stir in the vanilla extract.
- Pour the custard through a fine-mesh sieve into a clean bowl to remove any potential small lumps.
- Cover the bowl with plastic wrap, pressing it directly onto the surface of the custard to prevent a skin from forming.
- Chill the custard thoroughly in the refrigerator for at least 4 hours, or preferably overnight, until it is very cold. Proper chilling is essential for churning and achieving a smooth texture.
- Once the base is completely chilled, pour it into your ice cream maker and churn according to the manufacturer’s instructions.
- Transfer the churned ice cream to an airtight container and freeze for at least 2 to 4 hours, or until firm enough to scoop.