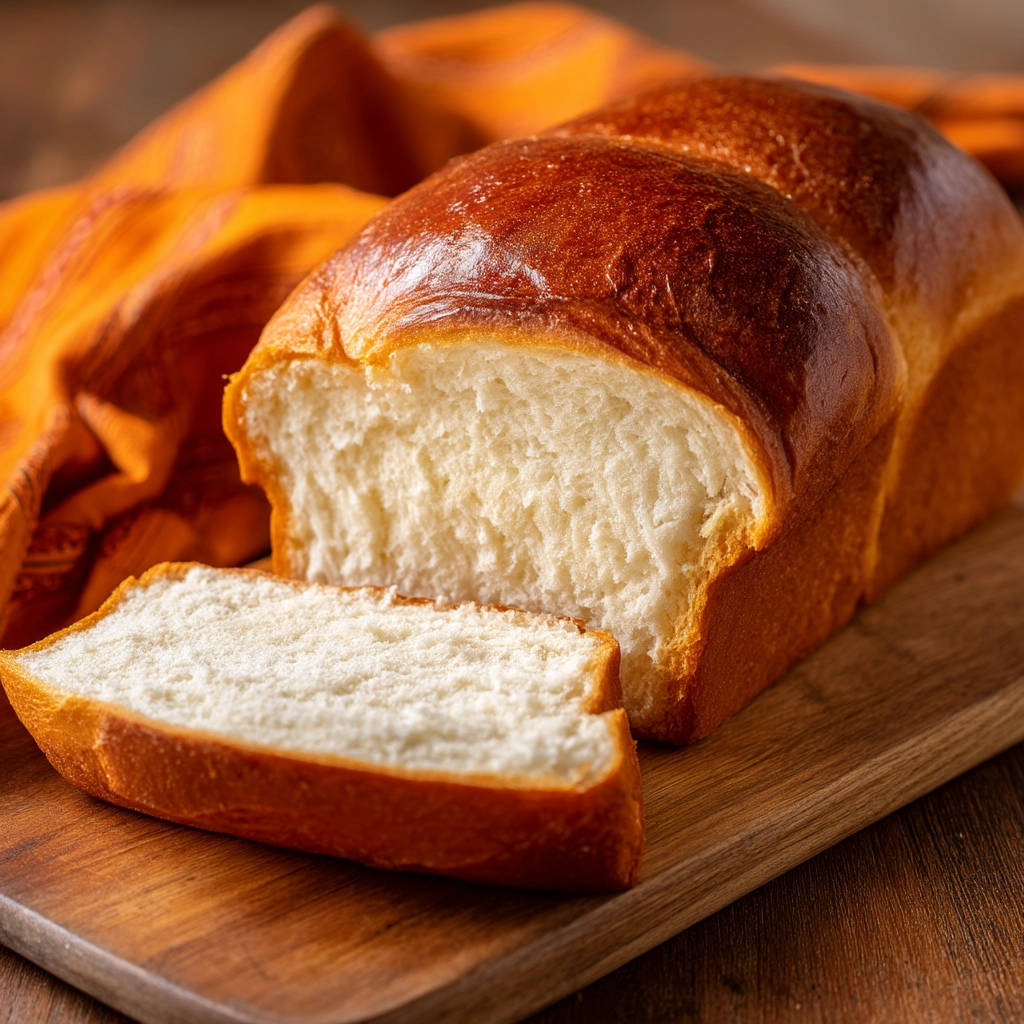
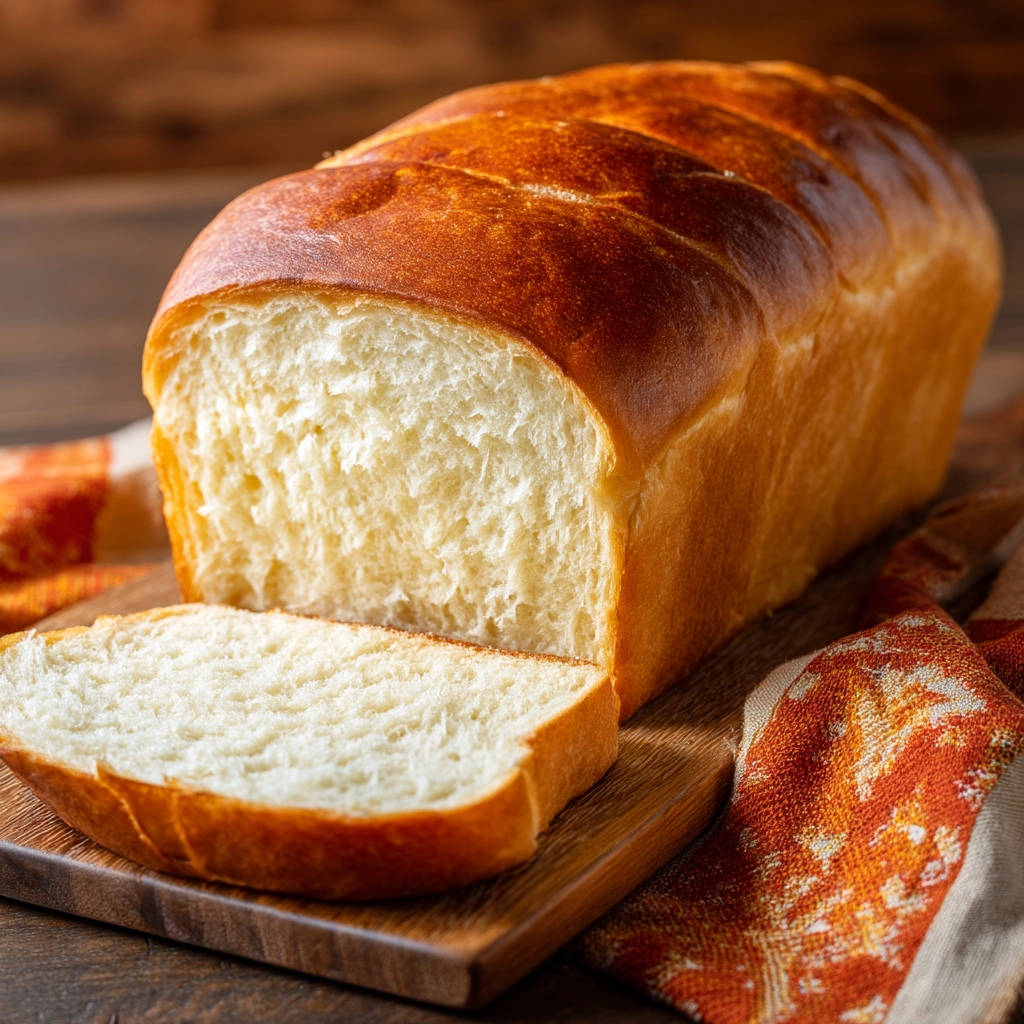
There’s something truly special about a slice of warm, homemade bread. The aroma filling your kitchen is pure comfort, and the taste? Unbeatable! However, if you’ve ever tried your hand at baking bread, you might know that sometimes the results aren’t quite as light and fluffy as you dream. It can feel like a mystery why one loaf rises beautifully and another turns out dense.
For the longest time, I chased that perfect, cloud-like texture in my homemade scones. It took trial and error, but I finally cracked the code for simple sandwich bread that delivers on fluffiness every single time. This recipe is straightforward, uses basic pantry staples, and walks you through the key techniques that make all the difference.
Say goodbye to store-bought loaves and hello to the most delightful, soft, and airy simple sandwich bread you’ve ever made. This recipe is perfect for beginners but yields results that will impress even seasoned bakers. Ready to bake? Let’s dive in!
Why You’ll Absolutely Love Making This Simple Sandwich Bread
Aside from the undeniable bragging rights of saying “I made that!”, baking your own simple sandwich bread comes with a heap of benefits. It’s not just about the loaf itself, but the entire experience and the results you get.
- Unbeatable Freshness: Nothing compares to the taste and texture of bread that’s just come out of your oven. It’s warm, fragrant, and incredibly tender.
- Guaranteed Fluffiness: This recipe specifically targets that elusive fluffy texture, giving you dependable results unlike those unpredictable loaves of the past.
- Simple Ingredients: You likely have most of the necessary ingredients in your pantry right now. No need for specialty flours or hard-to-find items.
- Control Over Your Food: Know exactly what goes into your bread – no weird additives or preservatives.
- Amazing Aroma: The smell of baking bread is pure bliss. It’s worth making this loaf just for the incredible scent that fills your home.
- Versatile Base: This fluffy loaf is the perfect canvas for everything from classic sandwiches to breakfast toast.
Gathering Your Ingredients for Fluffy Homemade Sandwich Bread
Making truly delicious homemade bread starts with understanding the role each ingredient plays. While the list is simple, the quality and handling of these basic components are key to achieving that wonderful soft and fluffy texture we’re after in our simple sandwich bread.
- Warm Milk (105-115°F): The liquid base. Using milk instead of water adds richness and helps create a softer crumb. The specific temperature is critical – too cold and the yeast won’t activate; too hot and it will die. Think like a warm bath, not hot tub!
- Active Dry Yeast: The magical leavening agent that makes the bread rise. Ensuring your yeast is active is the first step to a successful loaf.
- Sugar: Food for the yeast! A little sugar gives the yeast a boost to start working its magic, contributing to a faster rise and also adding a touch of sweetness and helping with browning.
- Salt: Don’t skip the salt! While it might seem counterintuitive, salt is crucial for flavor. It also helps control the yeast’s activity and strengthens the gluten structure.
- All-Purpose Flour: The main building block. All-purpose flour has the right protein content to develop sufficient gluten for a tender, yet structured loaf. You’ll need a little extra for kneading.
- Melted Butter: Butter adds flavor and tenderness to the dough, contributing significantly to that desired soft texture. Using melted butter makes it easy to incorporate.
- Egg, beaten (for egg wash): This is brushed on top before baking to give the loaf a beautiful golden-brown crust and a slightly richer flavor.
That’s it! Just a handful of everyday ingredients stand between you and the best simple sandwich bread you’ll ever bake.
Crafting Your Fluffy Simple Sandwich Bread: Step-by-Step
Baking bread is a process, a journey from sticky dough to golden loaf. Each step in this simple sandwich bread recipe builds upon the last, guiding you towards that perfect fluffy outcome. Pay attention to the details, and you’ll be rewarded with delicious results.
-
Activate the Yeast: Start by combining your warm milk (remember, the temperature is important!), active dry yeast, and sugar in a large mixing bowl. Give it a gentle stir. This step is like waking up your yeast. Let it sit for 5 to 10 minutes. You’ll know it’s ready when the mixture becomes visibly foamy or bubbly on top. If it doesn’t foam, your milk might have been too hot or too cold, or your yeast might be old. Time to start this step over!
-
Combine Wet and Dry: Once your yeast is happy and bubbly, stir in the salt and the melted butter. Now, begin adding the all-purpose flour, about a cup at a time. Mix it in using a spoon or a stand mixer with a dough hook until the mixture looks shaggy – that means it’s coming together but is still rough and not smooth.
-
Develop the Gluten Through Kneading: This is arguably the most important step for achieving a fluffy loaf. Turn the shaggy dough out onto a lightly floured surface. Now, it’s time to knead! Work the dough for 8 to 10 minutes. You’ll feel it transform from a sticky, unmanageable mass into a smooth, elastic ball. The dough should feel alive and spring back when you gently poke it.
A great way to check if you’ve kneaded enough is the windowpane test. Pinch off a small piece of dough (about the size of a grape) and gently stretch it between your fingers. If you can stretch it thin enough to see light passing through it without it tearing, your gluten is well-developed. This strong gluten network is what traps the gases produced by the yeast, creating that airy, fluffy texture.
-
First Rise (Bulk Fermentation): Lightly grease the large bowl you used earlier. Place the kneaded dough in the bowl, turning it over so it’s coated in a thin layer of oil or butter. Cover the bowl snugly with plastic wrap or a clean kitchen towel. Find a warm, draft-free place in your kitchen for the dough to rise. This usually takes about 1 to 1.5 hours, or until the dough has doubled in size. The poke test can help here too: gently press two fingers into the dough. If the indentation slowly springs back but doesn’t disappear completely, it’s ready for the next stage.
-
Shape the Loaf: Once the dough has doubled, it’s time to ‘punch down’ the dough. This doesn’t mean aggressively punching it! Gently deflate the dough by pressing it down to release the built-up gases. Turn the dough out onto a lightly floured surface. Shape it into a smooth loaf that will fit neatly into your standard 9×5 inch loaf pan. Be gentle during this shaping process; you want to preserve as many tiny air pockets as possible.
-
Second Rise (Proofing): Grease your 9×5 inch loaf pan. Carefully place the shaped loaf into the prepared pan. Cover the pan again and let it rise in a warm place for another 30-45 minutes. This second rise is crucial for the final texture and height of your simple sandwich bread. The dough should nearly double again, rising just above the rim of the pan. The poke test now should leave an indentation that either springs back very slowly or doesn’t spring back at all.
-
Prepare for Baking: While the loaf is on its second rise, preheat your oven to 375°F (190°C). In a small bowl, whisk together the beaten egg and a tablespoon of water. This is your egg wash. Just before the loaf goes into the oven, gently brush the top surface with the egg wash. This helps create that beautiful golden crust and contributes to a lovely finish.
-
Bake: Carefully place the pan in your preheated oven. Bake for 30 to 35 minutes. The bread is done when the crust is a deep golden brown and, ideally, when the internal temperature reaches 190-200°F (88-93°C) when checked with an instant-read thermometer. If the top is browning too quickly, you can loosely tent the pan with foil.
-
Cool Completely: This step requires patience, but it’s essential! Let the loaf cool in the pan for at least 10 minutes before attempting to remove it. This allows the structure to set slightly. Then, turn the loaf out onto a wire rack to cool completely. Slicing hot bread can result in a gummy texture. Waiting until it’s fully cool ensures that light, fluffy crumb you worked so hard for.
Tips for Perfect Simple Sandwich Bread Every Time
Achieving consistently perfect results with homemade bread is easier when you know a few pro tips. These pointers will help you avoid common pitfalls and ensure your simple sandwich bread turns out beautifully fluffy and delicious batch after batch.
- Check Your Yeast: Always start with the yeast activation step (Step 1). If your mixture doesn’t foam after 10 minutes, your yeast is likely dead, and the bread won’t rise. Get fresh yeast and try again.
- Measure Flour Correctly: Too much flour is a common culprit for dense bread. The most accurate way to measure flour is by weight (using a kitchen scale), but if using cups, gently spoon the flour into your measuring cup and level it off with a straight edge. Don’t scoop directly from the bag, as this compacts the flour.
- Knead Thoroughly: The windowpane test isn’t just a suggestion; it’s your indicator that the gluten is developed enough. Don’t rush the kneading process. If you have a stand mixer, use the dough hook on medium-low speed; it makes kneading much easier!
- Warm Place for Rising: Yeast loves warmth. An oven with the light on (but the oven OFF!) is a great warm spot. You can also place the covered bowl or pan in a warm, draft-free room. The rising time is an estimate; focus on whether the dough has doubled in size rather than strictly adhering to the clock.
- Be Gentle During Shaping: Once the dough has had its first rise and you’ve punched it down, handle it gently when shaping. You want to maintain as much of that airy structure as possible.
- Don’t Skip the Egg Wash (for Crust): The egg wash is optional but highly recommended for that classic golden-brown, slightly richer crust. If you skip it, the crust will be paler and less shiny.
- Cooling is Crucial: Resist the urge to slice into the hot loaf immediately! Letting it cool on a wire rack allows steam to escape and the internal structure to set, ensuring a light, non-gummy texture.
- Storage: Store cooled bread at room temperature in a bread box or airtight container for 2-3 days. For longer storage, slice and freeze the bread in freezer-safe bags or containers.
What to Serve With Your Homemade Loaf
Once you have this incredibly fluffy simple sandwich bread, the possibilities are endless! It’s fantastic on its own with just a smear of butter, but it also makes the perfect base for so many meals and snacks.
Of course, classic sandwiches are a must! Pile on your favorite fillings. For a hearty lunch, pair a slice with a comforting bowl of soup, like our Creamy Tomato Tortellini Soup or Grandma’s Comfort Chicken Soup. Toast a slice and serve it alongside eggs for breakfast, or use it to soak up the delicious sauces from dishes like Beef Ragu or Creamy Garlic Herb Chicken Thighs. Thick slices make wonderful French toast, too!
Your Simple Sandwich Bread Questions Answered (FAQ)
Even with clear instructions, baking bread can sometimes bring up questions. Here are some common queries about making simple sandwich bread and how to troubleshoot them.
What if my yeast didn’t foam?
If your milk, yeast, and sugar mixture doesn’t become foamy and bubbly after 5-10 minutes, your yeast is likely inactive. This could be because the milk was too hot (killing the yeast) or too cold (yeast is dormant), or the yeast itself is old and no longer viable. Discard the mixture, get fresh yeast, check your milk temperature, and try again.
Why is my dough tough after kneading?
This usually happens if you’ve added too much flour during mixing or kneading. Resist the urge to add more and more flour if the dough feels sticky. As you knead, the stickiness should decrease. Refer to the windowpane test to know when kneading is sufficient – focusing on texture and elasticity rather than just adding flour until it’s no longer sticky will help.
My bread turned out dense. What went wrong?
Several factors can lead to dense bread. Insufficient kneading (not developing enough gluten), inactive yeast (dough didn’t rise properly), or not letting the dough complete both rises can all contribute. Ensure your yeast is active, knead until the dough passes the windowpane test, and allow the dough to fully double in size during both proofing stages.
Can I use whole wheat flour?
While this recipe is designed for all-purpose flour to guarantee that specific fluffy texture, you can experiment with substituting a portion of the all-purpose flour with whole wheat flour (start with replacing about 1/4 to 1/2 cup). Keep in mind that whole wheat flour absorbs more liquid and the resulting bread might be slightly denser. You may need to add a tiny bit more milk.
Can I make this simple sandwich bread by hand?
Absolutely! The recipe as written is perfect for hand-kneading. Just be prepared to put in the full 8-10 minutes of energetic kneading to develop the gluten properly. It’s a great workout!
How do I store homemade sandwich bread?
Once the bread is completely cool, store it at room temperature. A linen bread bag, a plastic bread keeper, or even a large zip-top bag works well. Avoid refrigerating bread, as it tends to make it stale faster. It should last 2-3 days on the counter.
Can I make the dough ahead of time?
Yes! After the first rise, you can punch down the dough gently, place it back in the greased bowl, cover it tightly with plastic wrap, and refrigerate it for up to 24 hours. The cold slows down the yeast activity. When you’re ready to bake, take the dough out of the fridge and let it sit at room temperature for about 30-60 minutes before shaping and proceeding with the second rise and baking.
Enjoy Your Homemade Simple Sandwich Bread!
There’s immense satisfaction in pulling a warm loaf of fluffy simple sandwich bread from your oven. The effort is minimal compared to the delicious rewards. This recipe is designed to take the guesswork out of homemade bread, giving you reliable, wonderfully soft results every time.
Whether you’re using it for a classic sandwich, buttering a warm slice for breakfast, or pairing it with a cozy soup, this simple sandwich bread is sure to become a staple in your kitchen. Don’t be intimidated – give it a try!
If you bake this simple sandwich bread, I’d love to hear about it! Leave a comment below and let me know how it turned out and how you enjoyed it. Happy baking!
Simple Sandwich Bread

Ingredients
- 1 1/2 cups warm milk (105-115F)
- 2 1/4 teaspoons active dry yeast
- 1 tablespoon sugar
- 1 teaspoon salt
- 3 cups all-purpose flour, plus more for kneading
- 2 tablespoons melted butter
- 1 egg, beaten (for egg wash)
Directions
- In a large bowl, combine the warm milk, yeast, and sugar. Stir gently and let stand for 5-10 minutes until foamy. This confirms your yeast is active and ready.
- Stir in the salt and melted butter. Add the flour gradually, mixing until a shaggy dough forms.
- Turn the dough out onto a lightly floured surface. Knead the dough for 8-10 minutes until it is smooth and elastic. A good way to check for sufficient kneading is the windowpane test: pinch off a small piece of dough and gently stretch it. If it can stretch thin enough to see light through it without tearing, the gluten is well developed, which is crucial for a fluffy loaf. If it tears easily, keep kneading.
- Lightly grease the bowl. Place the dough in the bowl, turning to coat. Cover with plastic wrap or a clean kitchen towel and let rise in a warm place until doubled in size, about 1 to 1.5 hours. You can check if it’s ready using the poke test: gently press two fingers into the dough. If the indentation remains and springs back very slowly, it’s ready for shaping.
- Punch down the dough gently and turn it out onto a lightly floured surface. Shape it into a loaf that fits your bread pan. Avoid handling it too roughly; be gentle to keep the air pockets you worked to create.
- Place the shaped loaf into a greased 9×5 inch loaf pan. Cover and let rise again in a warm place until almost doubled in size and the dough rises just above the rim of the pan, about 30-45 minutes. The poke test should leave an indentation that springs back very slowly or not at all.
- Preheat your oven to 375F. In a small bowl, whisk the beaten egg with 1 tablespoon of water. Gently brush the top of the loaf with the egg wash for a golden crust.
- Bake for 30-35 minutes, or until the crust is golden brown and the internal temperature reaches 190-200F.
- Let the loaf cool in the pan for 10 minutes before turning it out onto a wire rack to cool completely before slicing.