

Most home cooks have experienced the disappointment of a homemade herb spread that looks great for ten minutes before turning into a watery, weeping mess. You want that airy, cloud-like texture found in high-end New York bagel shops, but instead, you get a thin sauce that slides right off your toasted sourdough. The culprit isn’t your skill level; it’s the chemistry of moisture and fat.
The secret to a professional-grade schmear lies in a specific moisture-lock method that protects the structural integrity of the dairy. By understanding how to manipulate the fats and proteins in cream cheese, you can create a spread that stays fluffy and stable for days. This isn’t just about mixing ingredients; it’s about building a structural web that traps air and resists the thinning effects of citrus and herbs.
I’ve found that the biggest mistake people make is adding everything to the bowl at once. If you want that perfect, stiff-peak consistency, you must aerate the cheese alone before any moisture touches it. This simple change in the order of operations creates a barrier of fat molecules that prevents the lemon juice from breaking down the emulsion.
Why Most Herb Spreads Turn Watery
When you mix acid, like lemon juice, directly into dairy, it begins to tighten the proteins and expel liquid, a process known as syneresis. In a standard “dump-and-stir” recipe, the lemon juice immediately attacks the cream cheese structure, leading to that dreaded puddle at the bottom of your container. However, by using a specific whipping sequence, we can coat those proteins in fat first, making them much more resilient.
Fresh herbs are the second major cause of a runny spread. Even after a quick rinse, dill fronds hold onto a surprising amount of surface water in their delicate, needle-like leaves. When that water meets the salt in your recipe, it’s drawn out into the cheese, thinning it out over time. This recipe solves that by focusing on “bone-dry” herb preparation and manual folding techniques.
Furthermore, the fat content of your base is your best friend. Full-fat cream cheese contains the necessary lipids to hold air bubbles in place. When you use lower-fat versions, there isn’t enough structural “glue” to maintain the aeration, which is why those versions often feel gummy or wet rather than light and crisp.

Essential Components for Whipped Lemon Dill Cream Cheese
To achieve the best results, you must start with 16 ounces of full-fat block cream cheese. Avoid the varieties sold in plastic tubs, as these have already been processed with nitrogen or stabilizers to make them spreadable, which means they won’t hold a second whipping nearly as well. The block form gives you a blank canvas of dense fat that is perfect for building volume.
Fresh dill is non-negotiable here because dried dill lacks the bright, grassy volatile oils that make this spread sing. However, those oils are trapped in delicate cell walls. If you chop the dill while it’s even slightly damp, you’ll bruise the herb and end up with a muddy flavor rather than a clean, aromatic punch. Garlic and onion powder provide the savory backbone without the moisture of fresh aromatics.
Selecting the Right Cream Cheese Base
Temperature is the most critical factor when you begin. Your cream cheese should be between 65°F and 70°F, which feels soft to the touch but still holds its shape. If the cheese is too cold, it will break into tiny, stubborn lumps that no amount of whipping can smooth out.
Whatever you do, don’t use the microwave to soften your cheese. Microwaving melts the fat unevenly, which permanently breaks the emulsion. If the fat turns to oil, it can never again trap the air bubbles needed for a whipped texture. Simply leave the blocks on the counter for about an hour before you plan to start.
The Role of Citrus Zest vs. Juice
Lemon zest is the powerhouse of this recipe because it contains the essential oils of the fruit without the liquid volume. It provides that “bright” citrus flavor that cuts through the heavy fat of the cheese. By finely grating the zest, you distribute those flavor molecules evenly throughout the entire batch.
We use only one teaspoon of fresh lemon juice, and we add it at the very end. This small amount provides the necessary tang to balance the salt and fat. Because it’s added after the cheese is fully aerated, the juice is suspended within the fat-coated air pockets rather than dissolving the cheese itself.
The Moisture-Lock Technique for Fresh Herbs
The most important step in this entire process happens before you even touch the mixer. After washing your dill, you must ensure it is completely dry. I recommend the “paper towel roll” method: lay the dill on a layer of paper towels, roll it up tightly like a sleeping bag, and squeeze firmly. This wicks away the hidden droplets between the fronds.
Once the dill is dry to the touch, use a very sharp knife to chop it. A dull blade will crush the herb, releasing internal cell water and turning your spread green. You want clean cuts that keep the moisture inside the herb until it’s eaten. This attention to detail is what separates a watery home-made spread from a professional one.
Step-by-Step: Aerating the Cream Cheese Base
Start by placing your softened cream cheese in a large bowl. Use a hand mixer on medium-high speed and whip it alone for at least two to three minutes. You’ll notice a physical transformation as the cheese changes from a dense, yellowish block to a bright white, voluminous cloud.
At a molecular level, you are forcing air into the fat, creating a structural web. This aeration is what gives the spread its “melt-in-your-mouth” quality. If you stop too early, the spread will feel heavy and greasy on the palate. You are looking for a texture that resembles stiff-peak whipped cream.
Integrating Dry Seasonings and Aromatics
Once the cheese is fluffy, it’s time to add the garlic powder, onion powder, salt, and pepper. Adding these dry ingredients now ensures they are perfectly distributed before the mixture gets too heavy with herbs. Whip for just another 30 seconds to incorporate them.
Using powders instead of fresh garlic or onion is a deliberate choice for stability. Fresh aromatics contain high water content and enzymes that can break down dairy over time. The powders provide a consistent, savory depth that allows the fresh dill and lemon to be the stars of the show.
The Final Emulsion: Adding Lemon Juice
Now, add that single teaspoon of lemon juice. This is the “acid-last” rule in action. Because the cream cheese is already aerated and the proteins are coated in fat, the acid can’t easily penetrate and thin the mixture. Give it one final, quick whip to incorporate the juice.
You’ll see the mixture tighten up slightly as the acid reacts with the remaining proteins. This is exactly what you want. The spread should look glossy and hold its shape perfectly on the beaters. If it looks like it’s starting to soften too much, stop mixing immediately.
Manual Folding: Preserving Herb Integrity
This is where many people go wrong: put the hand mixer away. You must fold in the chopped dill by hand using a flexible spatula. Mechanical blades are too violent for fresh herbs; they will shear the dill and release all that internal moisture we’ve been trying to protect.
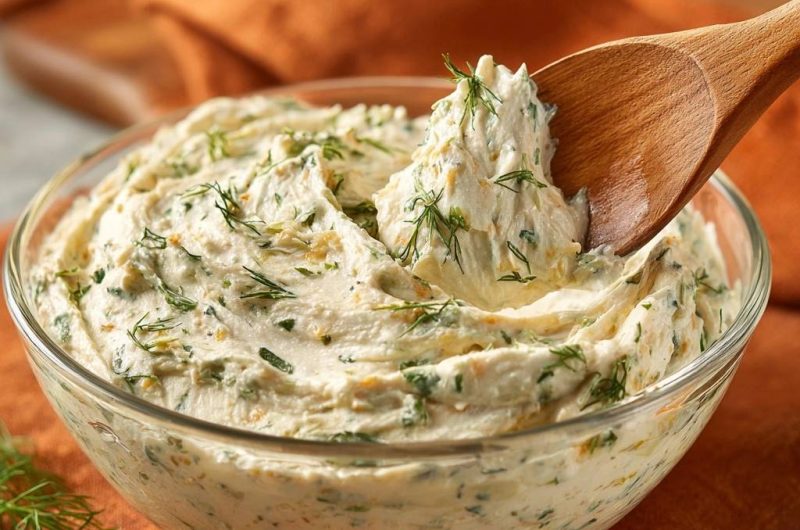
Use a gentle “over and under” motion with your spatula. This preserves the air bubbles you worked so hard to create while evenly speckling the spread with green dill. The result should be a white, fluffy base with distinct, bright green flecks throughout, rather than a uniform light-green tint.
Optimal Equipment for High-Volume Whipping
A hand mixer is actually the superior tool for this recipe because it allows you to feel the resistance of the cheese as it aerates. While a stand mixer with a whisk attachment works well for double batches, it’s easy to over-whip and “break” the fat if you aren’t watching closely.
Avoid using a food processor at all costs. The high-speed blades of a processor create friction and heat, which will melt the fats in the cream cheese. Instead of a whipped, airy texture, a food processor will give you a dense, gummy paste that lacks the premium mouthfeel of a true whipped schmear.
Flavor Variations and Savory Swaps
Once you master this stable base, you can experiment with other dry additions. For an “Everything Bagel” twist, fold in two tablespoons of dried toasted sesame seeds, poppy seeds, and dried minced onion. Just ensure any vegetable additions are dehydrated to maintain the moisture-lock.
If you want a “Garden Veggie” version, use dehydrated bell pepper flakes and dried chives. For a smoky, salty companion to fish, you can add finely chopped capers, but you must pat them extremely dry with paper towels first. The rule is simple: if it’s wet, it will ruin the fluff.
What to Serve with Lemon Dill Spread
While this is the ultimate bagel companion, its stability makes it versatile for entertaining. It’s thick enough to be piped onto cucumber rounds for elegant finger sandwiches that won’t get soggy. The bright acidity of the lemon makes it a perfect match for the richness of smoked salmon or trout.
You can also use a dollop of this spread on top of hot, roasted root vegetables like carrots or beets. As the cream cheese slowly melts, it creates a rich, herby sauce that clings to the vegetables. It also serves as a fantastic dip for crisp radishes or snap peas at a spring brunch.
Storage and Make-Ahead Stability Guide
After mixing, transfer the spread to a glass bowl and let it chill in the refrigerator for at least 30 minutes. This “setting” period allows the fats to re-solidify around the air bubbles, locking the structure in place. It also gives the dry spices time to hydrate and release their full flavor into the cheese.
This spread will stay fresh and fluffy in an airtight container for 5 to 7 days. Unlike standard recipes, you won’t see a pool of water at the bottom of the container the next morning. If it does firm up too much in the fridge, let it sit on the counter for 10 minutes before serving to regain its airy texture.
Troubleshooting Common Texture Issues
If your spread feels heavy or greasy, you likely didn’t whip the cheese long enough in the first step. You can’t really fix this once the herbs are in, so make sure you see that color change to bright white early on. If the mixture looks lumpy, your cheese was likely too cold when you started.
If you accidentally over-mix and the spread loses its volume, don’t panic. You can “rescue” it by folding in a few tablespoons of plain, full-fat Greek yogurt that has been strained of all liquid. It won’t be as fluffy as the original, but it will restore a creamy, spreadable consistency.
Correcting Salt and Acid Balance
Always taste your spread after the 30-minute chill. Saltiness tends to intensify as the flavors meld, so it’s better to start with a light hand. If it tastes too flat, add a tiny pinch more sea salt. If it feels too heavy, a tiny bit more lemon zest can brighten it up without adding moisture.
Remember that the flavors will continue to develop overnight. The garlic and onion notes will become more pronounced by day two. If you are making this for a big event, I actually recommend making it 24 hours in advance to let the dill oils fully permeate the cream cheese.
Expert Tips for Professional Presentation
For a high-end look, use a piping bag with a large star tip to swirl the cream cheese onto crackers or bagel halves. Because this recipe is so stable, the ridges from the piping tip will stay sharp and defined even at room temperature for an hour or two.
Finish the dish with a final crack of black pepper and a very small sprig of fresh dill right before serving. This provides a visual cue of the flavors inside and adds a pop of fresh color. A light dusting of lemon zest over the top right at the table adds a beautiful aromatic hit as guests lean in.
How long does this whipped cream cheese stay fresh?
You can store this spread in an airtight container in the refrigerator for 5 to 7 days. Because of the moisture-lock technique, it won’t separate or become watery like typical homemade spreads. Always use a clean knife when scooping to prevent cross-contamination and extend its shelf life.
Why did my cream cheese turn green?
Your spread likely turned green because the dill was either wet when chopped or you used a hand mixer after adding the herbs. When dill is bruised or over-processed, the chlorophyll leaks out into the white cheese. To keep it white with green flecks, ensure the dill is bone-dry and fold it in gently by hand.
Can I use low-fat or whipped cream cheese from a tub?
It is not recommended to use low-fat or pre-whipped tub varieties for this recipe. Low-fat cream cheese has a higher water content and fewer structural fats, meaning it will likely collapse and become runny. Tub varieties are already aerated with different methods and won’t hold the additional air from this specific whipping process.
Can I freeze this lemon dill cream cheese?
No, you should not freeze this spread. Freezing breaks the emulsion of the cream cheese, causing the fat and moisture to separate. When thawed, the texture will be grainy and crumbly rather than smooth and fluffy. This recipe is best enjoyed fresh from the refrigerator.
What can I use if I don’t have fresh dill?
If you absolutely cannot find fresh dill, you can use fresh chives or flat-leaf parsley as a substitute. However, do not use dried dill weed as a 1:1 replacement, as the flavor is significantly different and much more muted. If using other fresh herbs, follow the same drying and folding rules to maintain stability.
My spread is too stiff to spread easily, what happened?
If the spread is too firm, it’s likely just very cold from the refrigerator. Since it’s made with real butterfat, it firms up when chilled. Let it sit at room temperature for about 10 to 15 minutes before serving, and it will return to its perfectly light and airy “whipped” state.
Whipped Lemon Dill Cream Cheese
Course: Appetizer and SpreadCuisine: AmericanDifficulty: easy8
servings10
minutes10
Minutes115
kcalAmerican
Ingredients
16 ounces full-fat cream cheese, softened to room temperature
1/4 cup fresh dill, finely chopped and patted completely dry
1 tablespoon lemon zest (finely grated)
1 teaspoon fresh lemon juice
1/2 teaspoon garlic powder
1/2 teaspoon onion powder
1/4 teaspoon sea salt
1/4 teaspoon cracked black pepper
Directions
- The secret to preventing a soggy spread is the drying phase. After washing your fresh dill, roll it in a paper towel and squeeze firmly to remove every drop of surface moisture before chopping.
- Place the softened cream cheese in a large mixing bowl. Use a hand mixer on medium-high speed to whip the cheese alone for 2 to 3 full minutes. This aerates the fats and creates a structural web that prevents weeping later.
- Add the lemon zest, garlic powder, onion powder, salt, and pepper. Whip for another 30 seconds to distribute the dry flavors.
- Add the lemon juice last. By adding the acid only after the cheese is fully aerated, the fat molecules coat the proteins, preventing the lemon juice from thinning out the mixture.
- Fold in the bone-dry chopped dill by hand using a spatula. Do not use the mixer for this step, as over-processing the herbs releases their internal cell water, which causes the spread to lose its fluffiness and turn green.
- Transfer to a glass bowl and chill for at least 30 minutes before serving to allow the moisture-lock to set and the flavors to meld.
Notes
- Ensure the dill is patted completely dry and add the lemon juice last to maintain the structural integrity of the whipped cheese.


