
Macaroni and cheese is more than just a side dish in American culture; it’s the ultimate culinary hug. Whether it’s the centerpiece of a holiday spread or a Tuesday night comfort meal, we all chase that perfect balance of a crispy, charred top and a pool of liquid gold underneath. However, many home cooks find themselves frustrated when their masterpiece turns out oily, broken, or—worst of all—gritty.
The secret to a world-class mac isn’t just buying expensive cheese. It’s about understanding the delicate chemistry of emulsification and temperature control. This guide dives deep into the mechanics of the perfect Mornay sauce, ensuring you never have to deal with a grainy texture again. We’re moving beyond the box and into the realm of professional-grade comfort food.
I’ve found that the biggest mistake happens before the pan even hits the oven. Most people treat cheese like a heat-proof ingredient, but it’s actually quite temperamental. By mastering the “off-heat” stir-in method, you’ll create a sauce so smooth it looks like it came from a high-end bistro. Let’s get into the science of why this works and how you can replicate it every single time.
The Science of Smooth: Why Most Macaroni Fails
Have you ever noticed a layer of oil sitting on top of your baked mac? That’s a broken emulsion. Cheese is a complex mixture of water, protein, and fat held together by a delicate internal structure. When you subject cheese to extreme, direct heat—like a boiling sauce—those proteins tighten up and squeeze out the fat.
Once the proteins seize, they clump together, creating that unpleasant “sandpaper” mouthfeel. To prevent this, we focus on creating a stable base using a roux and high-fat dairy. This creates a protective buffer for the cheese. By prioritizing a slow melt over a fast boil, we keep the fats and solids happily married in a glossy, velvety sauce.
Essential Components for the Ultimate Triple Cheese Baked Mac
The flavor profile of this dish relies on a specific trio of cheeses. Sharp Cheddar provides that classic, tangy punch that defines American mac. Mozzarella is our “structural” cheese; it doesn’t have a huge flavor, but it provides the epic, stretchy cheese pull that makes the dish so satisfying. Finally, Gruyere adds a sophisticated, nutty depth that elevates the entire flavor profile.
Whatever you do, please step away from the pre-shredded bags at the grocery store. Those bags are packed with potato starch or cellulose to keep the shreds from sticking together. While convenient, those anti-caking agents prevent the cheese from melting into a cohesive sauce. Grating your own cheese from the block takes five extra minutes, but the difference in creaminess is night and day.
The Liquid Gold: Milk and Heavy Cream Ratios
We use a combination of whole milk and heavy cream to ensure the sauce is rich enough to coat the noodles without being heavy. The fat in the cream acts as a stabilizer. If you use skim milk, the sauce will likely turn out watery and thin. Always bring your dairy to room temperature before adding it to the pot; cold milk hitting a hot roux can cause stubborn lumps that are impossible to whisk out.
Pantry Aromatics: Beyond Just Salt and Pepper
To make the cheese flavor really pop, we use a few “secret” aromatics. Ground mustard is the MVP here. It contains a natural emulsifier that helps keep the sauce stable, and its slight acidity cuts through the heavy fats. Smoked paprika adds a hint of woodsy depth, while onion and garlic powder provide a savory backbone that makes the cheddar taste even sharper.
The Critical Role of Pasta Geometry and Texture
The shape of your pasta matters just as much as the sauce. Elbow macaroni is the classic choice because its hollow center acts like a tiny straw, sucking up the cheese sauce. Cavatappi is another fantastic option; its corkscrew shape and outer ridges provide more surface area for the sauce to cling to. You want a noodle that can “trap” the liquid gold.
The most important rule for the pasta is to undercook it during the initial boil. You must par-boil the noodles for about 3 minutes less than the package’s “al dente” instructions. The pasta should still have a firm, almost crunchy snap in the middle. Don’t worry—it will soak up the moisture from the sauce and finish softening in the oven. If you cook it fully in the water, it will turn into mush during the bake.
Step-by-Step: Mastering the Mornay Sauce Base
Everything starts with the roux. Melt your butter over medium heat and whisk in the flour. You’re looking for a “blonde roux,” which means you cook it just long enough to remove the raw flour taste—about two minutes. It should smell slightly nutty and look like wet sand. If it starts to turn brown, you’ve gone too far and the sauce will have a toasted flavor that competes with the cheese.
Once the roux is ready, start pouring in your milk and cream. Do this in a slow, steady stream while whisking like your life depends on it. At first, it will look like a thick paste, but keep whisking. As the liquid incorporates, it will transform into a smooth, thick sauce. Cook it until it’s thick enough to coat the back of a wooden spoon. If you can run your finger through the sauce on the spoon and the line stays clear, you’ve nailed it.
The Anti-Grainy Method: Temperature Control Secrets
This is the most critical step in the entire recipe. Once your white sauce is thick and bubbly, turn the heat off completely. Move the pot to a cool burner and wait at least 90 seconds. You want the temperature to drop just below the boiling point. If you add the cheese while the sauce is still bubbling, the proteins will seize instantly, and you’ll end up with a gritty mess.
Now, add your cheese one handful at a time. Stir gently and wait for each batch to melt completely before adding the next. This gradual introduction allows the cheese to emulsify into the sauce without shocking the proteins. By the time you’re done, the sauce should look like liquid silk—glossy, thick, and perfectly smooth. This is the hallmark of a professional-grade mac and cheese.
Assembling the Layers for Maximum Cheese Pull
Don’t just dump everything into the pan and call it a day. Layering is the key to a multi-dimensional texture. Pour half of your saucy noodles into the greased baking dish, then add a generous layer of shredded mozzarella right in the middle. This creates a “molten core” of cheese that stays extra stretchy even after the dish is served.
Top with the remaining noodles and make sure they are well-submerged. Any noodles poking out too far will dry out and become hard in the oven. Finally, cover the top with the remaining cheddar. This top layer will eventually become that iconic, crispy crust we’re looking for. The contrast between the gooey interior and the crunchy top is what makes this dish a winner.
The High-Heat Finish: Achieving the Charred Crust
We start the bake at 375°F to ensure the pasta finishes cooking and the sauce gets bubbly throughout. However, the real magic happens at the very end. After 20 minutes, switch your oven to the Broil setting. This direct overhead heat mimics a professional broiler, creating those beautiful deep golden-brown spots and charred edges.
Stay right by the oven during this stage! The window between “perfectly charred” and “burnt” is about 30 seconds. You want to see the cheese bubbling vigorously and developing a dark, lacy crust. This adds a smoky, toasted flavor that balances the richness of the three-cheese blend. Once it looks like a photo from a gourmet magazine, pull it out immediately.
Why the 10-Minute Rest is Non-Negotiable
I know it’s tempting to dive in the second the pan leaves the oven, but you must wait. A 10-minute rest is essential for the sauce to set. When the dish is piping hot, the sauce is at its thinnest. As it cools slightly, the starches from the pasta and the fats in the cheese bind together, creating a thick, creamy coating that actually sticks to the noodles.
If you cut into it too early, the sauce will just run to the bottom of the dish, leaving the top noodles dry. After ten minutes, the cheese proteins relax, and the sauce reaches its peak “stretchiness.” When you finally lift that first spoonful, you’ll be rewarded with long, beautiful strands of cheese and a sauce that stays exactly where it belongs.
Troubleshooting Your Cheese Sauce Consistency
If your sauce seems too thick before you even add the pasta, don’t panic. Simply whisk in a splash of warm milk until it reaches your desired consistency. It should be slightly thinner than you think it needs to be, as the pasta will absorb some of that moisture. If the sauce looks oily, it means it got too hot; try whisking in a tablespoon of cold heavy cream to help bring the emulsion back together.
If the flavor feels a bit flat, it usually needs more salt or a tiny splash of acid. While we don’t use vinegar here, a tiny pinch more of the ground mustard can brighten the whole dish. Remember that the pasta will soak up a lot of the seasoning, so the sauce itself should taste quite bold before you mix it with the noodles.
Make-Ahead Strategies and Storage Solutions
You can easily prep this dish 24 hours in advance. Follow the instructions up until the baking step, cover the dish tightly with foil, and refrigerate. When you’re ready to eat, let it sit on the counter for 30 minutes to take the chill off before putting it in the oven. You may need to add an extra 5-10 minutes to the baking time since the center will be cold.
Leftovers should be stored in an airtight container in the fridge for up to 3 days. To reheat, avoid the microwave if possible, as it tends to make the cheese oily. Instead, put a portion in a small oven-safe dish, add a splash of milk to loosen the sauce, and bake at 350°F until bubbly. This restores the creamy texture without breaking the sauce.
Expert Tips for Customizing Your Mac
Once you’ve mastered the base, feel free to get creative. A drizzle of truffle oil just before serving adds a luxurious aroma. If you love a crunchier top, mix some melted butter with panko breadcrumbs and sprinkle them over the final layer of cheese. It adds a shattered-glass texture that contrasts beautifully with the soft pasta.
Avoid adding raw vegetables like broccoli or mushrooms directly into the mix, as they release water while they cook. This extra moisture will thin out your sauce and might cause it to break. If you want to add veggies, sauté or steam them first to remove the excess water, then fold them in with the pasta. This keeps your “liquid gold” perfectly intact.
Frequently Asked Questions
Can I use skim milk for a lighter version?
I don’t recommend using skim or 1% milk for this recipe. The fat content in whole milk and heavy cream is what provides the structural integrity for the Mornay sauce. Low-fat milks lack the proteins and fats needed to create a stable emulsion, which often results in a watery, thin sauce that separates in the oven. For the best results, stick to the higher fat options.
Why did my cheese sauce turn out gritty?
Grittiness is almost always caused by heat. If you add the shredded cheese to the sauce while it is still boiling or simmering, the proteins in the cheese will “seize” and clump together. This creates a sandy texture. To fix this, always remove the pot from the heat and let it cool for about 90 seconds before gradually stirring in your cheese handful by handful.
What are the best substitutes for Gruyere?
If you can’t find Gruyere, Fontina is an excellent substitute because it has a similar melting point and a mild, nutty flavor. Swiss cheese or even a high-quality Gouda can also work well. The goal is to use a cheese that melts smoothly and adds a different flavor profile than the sharp cheddar to give the dish more complexity.
How do I prevent the top from getting too hard?
The key to a perfect crust is the balance of fat. Ensure the top layer of cheese is spread evenly so it protects the pasta underneath. If your oven has particularly aggressive hot spots, you can tent the dish with foil for the first 15 minutes of baking, then remove it for the final 5 minutes and the broil stage to get that golden color without drying out the noodles.
Is it possible to freeze this dish before baking?
Yes, you can freeze this mac and cheese, but it requires a little care. Assemble the dish completely but do not bake it. Wrap it tightly in two layers of plastic wrap and one layer of aluminum foil to prevent freezer burn. It will stay fresh for up to 2 months. For the best texture, thaw it completely in the refrigerator for 24 hours before baking as directed. Freezing it while solid can lead to uneven heating and a broken sauce.
Ultimate Triple Cheese Baked Mac
Course: Main CourseCuisine: AmericanDifficulty: easy8
servings15
minutes30
minutes45
MinutesAmerican
Ingredients
1 pound elbow macaroni or cavatappi
4 cups sharp cheddar cheese, freshly shredded (do not use pre-shredded)
2 cups mozzarella cheese, freshly shredded
1 cup gruyere cheese, freshly shredded
1/2 cup unsalted butter
1/2 cup all-purpose flour
4 cups whole milk, room temperature
1 cup heavy cream
1 teaspoon garlic powder
1 teaspoon onion powder
1/2 teaspoon smoked paprika
1/2 teaspoon ground mustard (optional, for depth)
Salt and black pepper to taste
Directions
- Preheat your oven to 375°F (190°C). Grease a deep 9×13 inch baking dish.
- Boil the pasta in heavily salted water for 3 minutes less than the package directions for al dente. The pasta should still have a firm “snap” in the center; it will finish cooking in the sauce. Drain and set aside.
- In a large heavy-bottomed pot, melt the butter over medium heat. Whisk in the flour and cook for 2 minutes, whisking constantly, until the roux smells slightly nutty but hasn’t browned.
- Slowly pour in the room temperature milk and heavy cream in a steady stream while whisking vigorously. Continue cooking over medium heat, whisking frequently, until the sauce thickens enough to coat the back of a spoon (about 5-8 minutes).
- The Anti-Grainy Method: Turn the heat off entirely and move the pot to a cool burner. Wait 90 seconds for the sauce to stop simmering. Adding cheese to boiling liquid causes the proteins to seize and the fats to separate, creating a gritty texture.
- Gradually add 3 cups of the cheddar, 1 cup of mozzarella, and all of the gruyere one handful at a time. Stir gently until completely melted and glossy before adding the next handful. Season with garlic powder, onion powder, paprika, mustard, salt, and pepper.
- Fold the cooked pasta into the cheese sauce until every noodle is thoroughly submerged and the holes are filled with sauce.
- Pour half of the mixture into the baking dish. Sprinkle with the remaining 1 cup of mozzarella. Top with the rest of the pasta mixture and the remaining 1 cup of cheddar cheese.
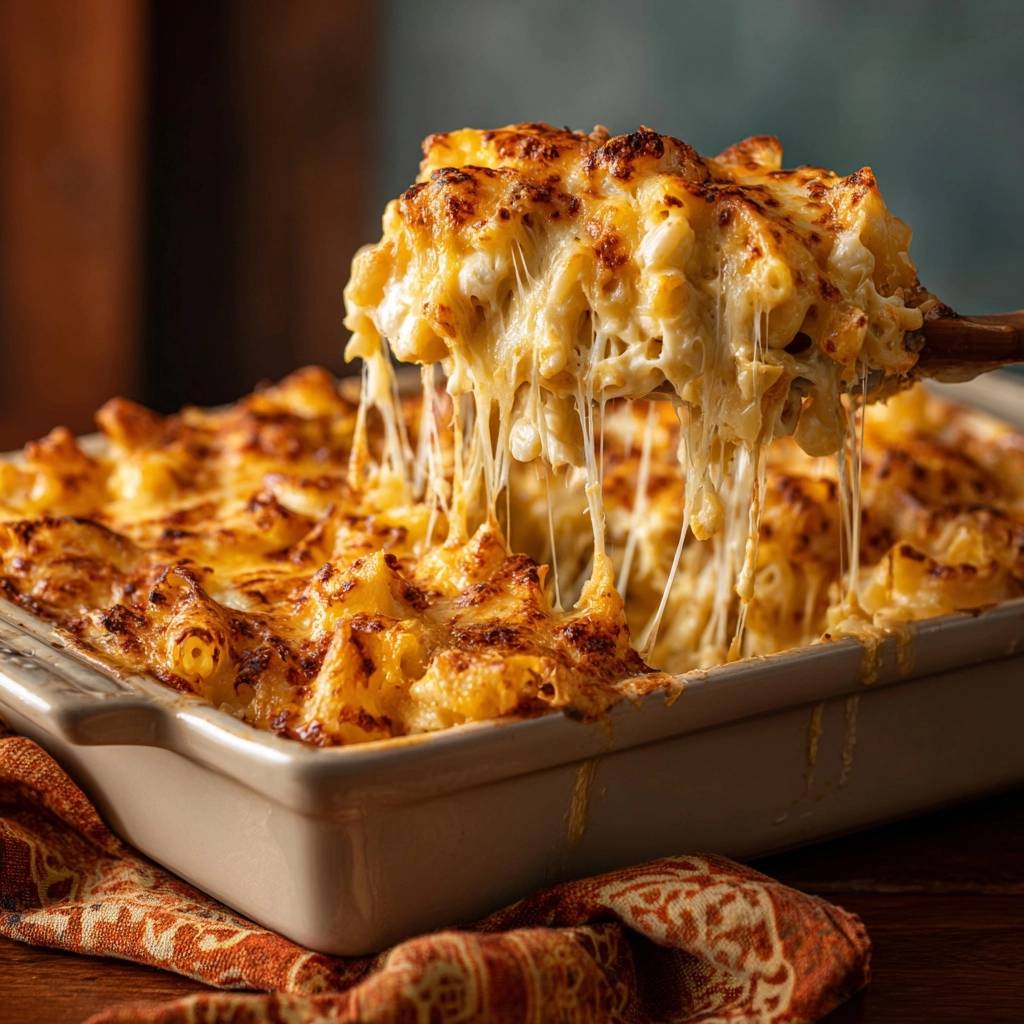
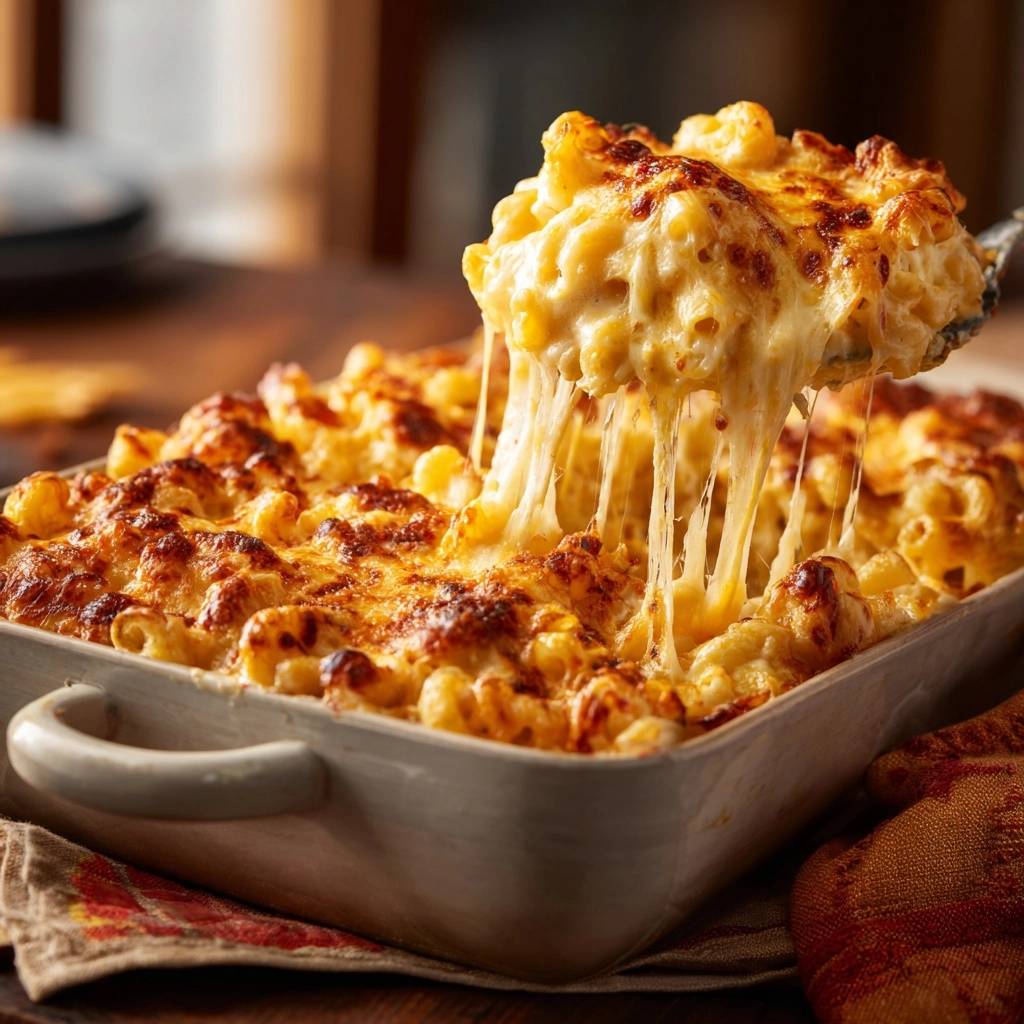
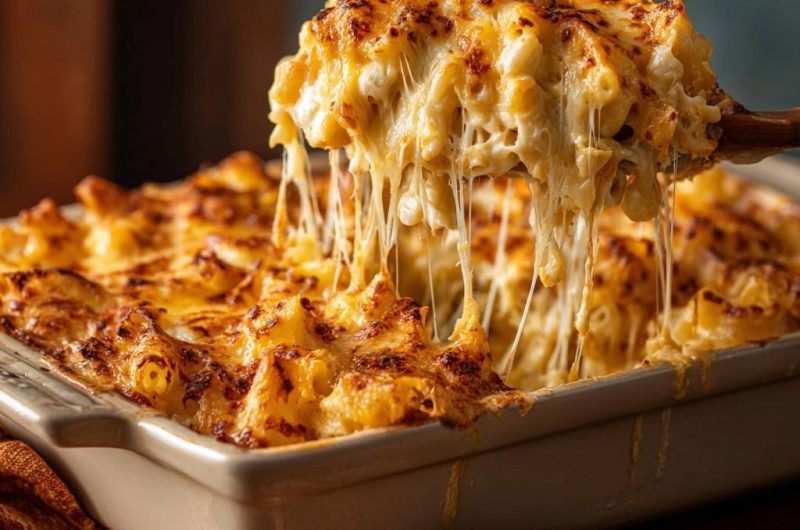
- Bake for 20 minutes. Then, turn the oven to Broil for 3-5 minutes, watching closely, until the cheese develops the deep golden-brown charred spots and bubbling crust seen in the photo.
- Let it rest for 10 minutes before serving. This allows the sauce to thicken and the cheese proteins to relax, ensuring a perfect, stretchy cheese pull.
Notes
- The secret to the smooth finish is the Anti-Grainy Method: turn off the heat and wait 90 seconds before adding freshly shredded cheese. Do not use pre-shredded cheese as the anti-caking agents prevent a smooth melt.


