There’s nothing quite like the satisfying crunch of a perfectly crispy chip. But if you’ve ever tried making homemade vegetable chips, you know the struggle is real. So many attempts result in sad, greasy, and frankly, soggy disks that are a far cry from crispy. Frustrating, right? I’ve been there! I experimented endlessly with yellow squash, determined to unlock the secret to chips that are truly golden, crunchy, and irresistible.
Guess what? I finally cracked the code! It all comes down to one simple, yet absolutely crucial, step. Forget those disappointing batches of mushy slices – this recipe for Crispy Yellow Squash Chips is guaranteed to deliver that satisfying shatter with every bite. Prepare yourself for snack perfection!
Reasons These Crispy Yellow Squash Chips Are a Keeper
Why should these fried yellow squash chips become your new favorite snack? Let me count the ways:
-
Guaranteed Crispiness: Seriously, the secret method works wonders. No more soggy centers!
-
Delicious Flavor: Lightly seasoned and perfectly fried, they let the subtle sweetness of the squash shine through.
-
Addictive Texture: That satisfying crunch is simply unbeatable.
-
Versatile Snack: Perfect for dipping, alongside sandwiches, or just munching straight from the platter.
-
Simple Ingredients: You likely have most of what you need in your pantry right now.
-
Quick to Make: From prep to plate, they’re ready in about 35 minutes.

Gathering Your Ingredients for Crispy Yellow Squash Chips
Making delicious, crispy snacks starts with good ingredients and knowing their role. This recipe uses a straightforward list, but each component contributes to that perfect crunch and flavor. Here’s what you’ll need:
-
Yellow Squash: We’re using 2 medium squash here. Look for ones that are firm and vibrant in color. Avoid any with soft spots or blemishes. Yellow squash has a slightly sweeter, milder flavor than zucchini, which works beautifully for chips.
-
All-Purpose Flour: This forms the initial coating, helping the egg adhere and providing a base for the breadcrumbs. It helps create a solid barrier.
-
Salt & Black Pepper: Essential for seasoning the flour mixture and, crucially, for drawing out moisture from the squash before frying. You’ll want extra salt for seasoning right after they come out of the hot oil – don’t skip this step!
-
Plain Breadcrumbs: The key to that golden exterior crunch! Use plain breadcrumbs for a classic texture. If you want an even crispier result, consider using panko breadcrumbs.
-
Grated Parmesan Cheese (Optional, but Recommended): Adding Parmesan to the breadcrumbs brings a fantastic savory, nutty depth and helps achieve a beautiful golden-brown color. Trust me, it’s worth it if you’re not dairy-free.
-
Large Eggs: Beaten eggs act as the binder, helping the breadcrumb mixture stick to the floured squash slices. Two large eggs should be plenty for this quantity of squash.
-
Vegetable Oil: You’ll need enough for frying – about 1 inch depth in your pan. Choose a neutral oil with a high smoke point, like vegetable, canola, or sunflower oil. This ensures the oil gets hot enough without burning.
-
Fresh Parsley: Optional, but a sprinkle of fresh chopped parsley adds a lovely pop of color and fresh flavor as a garnish.
And don’t forget the super simple, creamy dipping sauce! It requires just three pantry staples:
-
Mayonnaise: The creamy base for our dip. Use your favorite brand.
-
Hot Sauce (or Paprika): For a little kick! Adjust the amount to your spice preference. If you prefer a mild dip, a pinch of paprika adds color and a subtle warmth without the heat.
-
Garlic Powder: Adds that essential savory aroma and flavor to the dip.
Crafting Your Crispy Yellow Squash Chips: Step-by-Step
Ready to make magic happen? Follow these steps carefully, paying close attention to the tips for maximum crispiness. This isn’t just a list of actions; it’s a guide to understanding why each step is important.
-
Prepare the Squash (The Secret Step!): Start by slicing your yellow squash into thin rounds, aiming for about 1/8 inch thick. Uniform thickness is key for even cooking. Now for the most important part: arrange these slices in a single layer on a baking sheet lined with paper towels. Sprinkle them lightly with salt. Let them sit there for about 15 minutes. Why do we do this? The salt works through osmosis to draw excess moisture out of the squash. This significantly reduces the water content, which is the enemy of crispiness in frying! After 15 minutes, you’ll see little beads of moisture on the surface. Gently pat the slices dry with more paper towels until they feel quite dry. This pre-drying step is truly the game-changer for guaranteed crispy yellow squash chips!
-
Set Up Your Breading Station: A well-organized breading station makes the process smooth and keeps your hands cleaner (well, relatively!). Get three shallow dishes ready. In the first dish, combine the all-purpose flour with 1 teaspoon of salt and 1/2 teaspoon of black pepper. Give it a whisk to distribute the seasonings. In the second dish, pour your two beaten eggs. In the third dish, mix the plain breadcrumbs and the grated Parmesan cheese (if you’re using it). Having everything lined up makes the dredging process efficient.
-
Dredge the Squash: Now, it’s time to coat those prepped squash slices. Take one slice at a time. First, place it in the flour mixture, ensuring both sides are coated, and gently shake off any excess flour. Next, dip the floured slice into the beaten egg, letting any excess egg drip back into the dish. Finally, transfer the egg-dipped slice to the breadcrumb mixture. Coat it generously, pressing gently with your fingers to help the breadcrumbs adhere firmly to the entire surface. Place the breaded slices on a clean plate or tray as you go, making sure they aren’t overlapping.
-
Heat the Frying Oil: Pour about 1 inch of vegetable oil into a large skillet or a Dutch oven. Set it over medium-high heat. You want the oil to reach a temperature of 350 degrees Fahrenheit (175 degrees Celsius). Using a thermometer is the most accurate way to check, but if you don’t have one, you can test the oil readiness by dropping a tiny piece of breading into it. If it sizzles immediately and the breading turns golden brown within 30 seconds, the oil is ready. Don’t let it smoke, though – that means it’s too hot.
-
Fry the Chips: Carefully, using tongs, add the breaded squash slices to the hot oil. It’s critical to fry them in a single layer and avoid overcrowding the pan. Overcrowding drops the oil temperature significantly, leading to greasy, soggy results (the opposite of what we want!). Work in small batches. Fry for 2 to 3 minutes per side. You’re looking for a beautiful golden-brown color and a visibly crispy coating. Keep a close eye on them as they can brown quickly.
-
Drain for Maximum Crispiness: As each batch finishes frying, use a slotted spoon or a spider (a wire mesh scoop) to lift the crispy chips out of the oil. Transfer them immediately to a wire rack set over a baking sheet. This is another key step! Letting them drain on a wire rack allows air to circulate around the chips, preventing steam from getting trapped underneath, which can make them soggy. Do NOT drain them on paper towels, which can trap steam. For best flavor, sprinkle a pinch more salt over the chips as soon as they come out of the oil, while the surface is still slightly greasy and the salt will stick.
-
Make the Dipping Sauce: While your crispy chips are frying and draining in batches, quickly whip up the simple dipping sauce. In a small bowl, whisk together the mayonnaise, hot sauce (or paprika for a milder version), and garlic powder until smooth and well combined. Taste and adjust the hot sauce or garlic powder if needed.
-
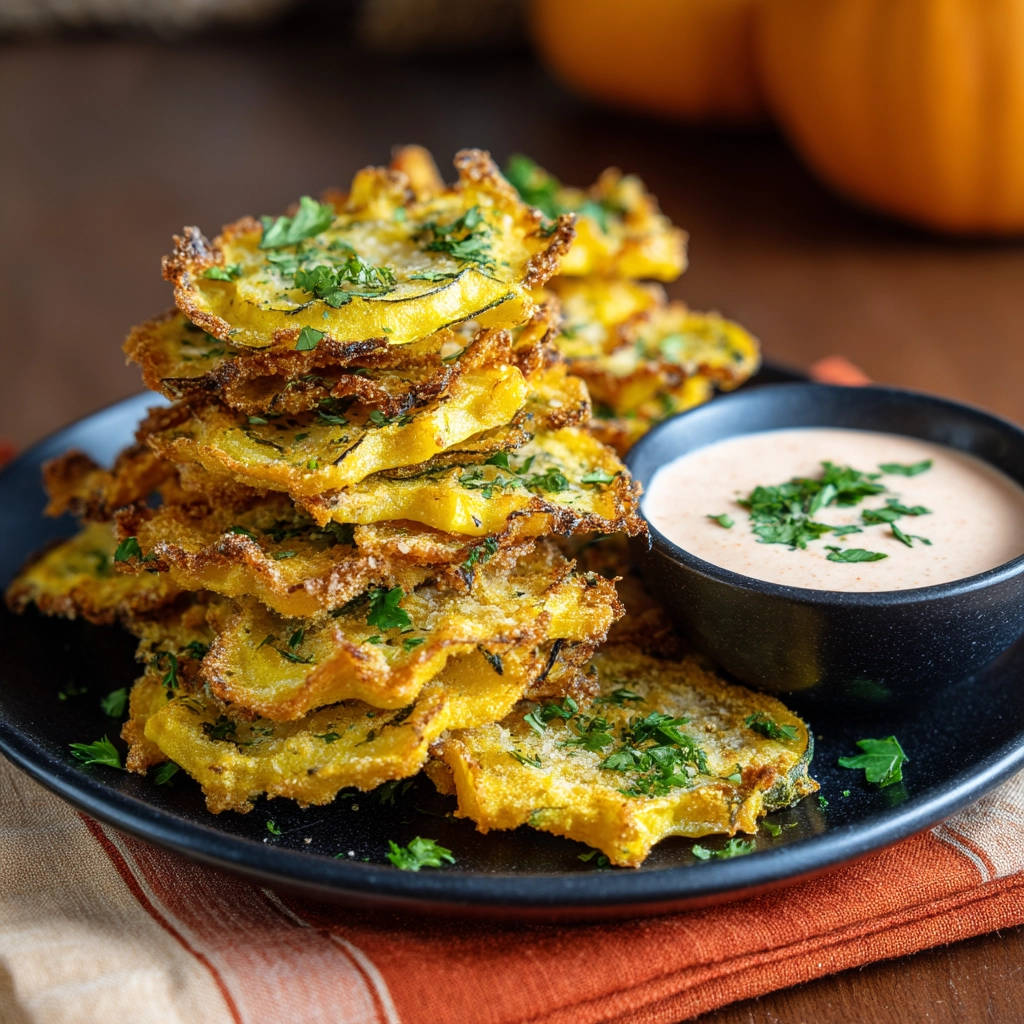
Serve Immediately: Arrange the beautiful, golden-brown crispy yellow squash chips on a platter. Garnish with fresh chopped parsley for a touch of color and freshness. Serve them piping hot alongside the creamy dipping sauce. These are best enjoyed right away for peak crispiness!
Tips for Perfect Crispy Yellow Squash Chips Every Time
Beyond the crucial salting step, here are a few extra pointers to ensure your yellow squash chips turn out perfectly crispy:
-
Slice Uniformly: Using a mandoline slicer (with a guard!) can help you achieve consistent 1/8-inch slices, which ensures they all cook at the same rate. If slicing by hand, take your time to make them as uniform as possible.
-
Don’t Skip the Drying: I know I’ve said it, but it bears repeating. The salting and patting dry is non-negotiable for crispiness. Give it the full 15 minutes!
-
Monitor Oil Temperature: If the oil isn’t hot enough, the chips will absorb too much oil and become greasy. If it’s too hot, they’ll burn before they crisp up inside. Aim for that sweet spot around 350°F (175°C).
-
Fry in Batches: Resist the urge to crowd the pan. Smaller batches maintain the oil temperature and give the chips space to fry properly rather than steam.
-
Proper Draining is Key: Always use a wire rack. Paper towels might absorb some grease, but they trap steam, ruining the texture.
-
Season Hot: Salt adheres best when the chips are still warm and slightly oily from frying.
-
Consider Variations: While this recipe focuses on frying, you can adapt similar principles for other methods. For instance, try making crispy oven-roasted vegetables or even air fryer versions of squash or zucchini, although the texture will differ slightly from deep-frying.
What to Serve With Your Crispy Squash Chips
These crispy chips are fantastic on their own, but they also make a great accompaniment to various meals. Think of them as a fun alternative to fries or potato chips. They pair wonderfully with burgers, sandwiches, or as a side dish for chicken or fish. Consider serving them alongside grilled dishes, like our Juicy Grilled Meat Skewers or Grilled Lemon Herb Chicken. They’re also a fantastic appetizer for a casual gathering.
Your Crispy Yellow Squash Chip Questions Answered (FAQ)
Can I bake or air fry these instead of deep frying?
While this specific recipe is tailored for deep frying to achieve a particular texture, you can certainly adapt the concept for baking or air frying. The crucial first step of salting and drying the squash is still essential! For baking or air frying, you’d typically toss the breaded slices with a bit of oil spray or a light drizzle before cooking. The texture will be crunchier than soggy, but generally less uniformly crisp and golden than deep-frying.
Can I use zucchini instead of yellow squash?
Absolutely! Zucchini works just as well. Since zucchini tends to have even higher moisture content, the salting and drying step is perhaps even more important when using zucchini to make sure they turn out crispy.
Can I make these ahead of time?
For optimal crispiness, these chips are best enjoyed immediately after frying. Like most fried foods, they tend to soften as they sit. If you absolutely must make them slightly ahead, fry them fully and let them cool completely on the wire rack before storing them in an airtight container at room temperature. Reheating will be necessary to regain some crispness.
How do I reheat leftover squash chips?
The best way to bring some life back to leftover chips is in a hot oven or an air fryer. Spread them in a single layer on a baking sheet or in the air fryer basket. Heat at around 350°F (175°C) for just a few minutes until they are hot and have crisped up again. Microwaving is not recommended as it will make them soggy.
Can I add different seasonings to the breadcrumbs?
Definitely! Feel free to get creative. Garlic powder, onion powder, smoked paprika, dried herbs like oregano or thyme, or a pinch of cayenne for heat would all be delicious additions to the breadcrumb mixture.
Enjoy Your Homemade Crispy Yellow Squash Chips!
Gone are the days of settling for disappointing, soggy homemade vegetable chips. With this simple secret, you can enjoy perfectly crispy, flavorful yellow squash chips right in your own kitchen. They’re the ideal snack, side dish, or appetizer that will disappear quickly! Give this recipe a try and let me know how much you love that crunch in the comments below. Happy frying!
Crispy Yellow Squash Chips

Ingredients
- 2 medium yellow squash
- 1/2 cup all-purpose flour
- 1 teaspoon salt, plus more for seasoning
- 1/2 teaspoon black pepper
- 1 cup plain breadcrumbs
- 1/4 cup grated Parmesan cheese (optional, but recommended)
- 2 large eggs, beaten
- Vegetable oil, for frying
- Fresh parsley, chopped, for garnish
- For the dipping sauce:
- 1/2 cup mayonnaise
- 1 tablespoon hot sauce (or paprika for mild)
- 1 teaspoon garlic powder
Directions
- Slice the yellow squash into thin rounds, about 1/8 inch thick. Lay the slices on a paper towel lined baking sheet and sprinkle lightly with salt. Let sit for 15 minutes. This is the most important step to draw out moisture and prevent sogginess! Gently pat the slices dry with more paper towels.
- Set up a breading station. In one shallow dish, combine the flour, 1 teaspoon salt, and 1/2 teaspoon pepper. In a second shallow dish, put the beaten eggs. In a third shallow dish, mix the breadcrumbs and grated Parmesan cheese if using.
- Dredge each squash slice first in the flour mixture, shaking off excess. Then dip in the beaten egg, letting excess drip off. Finally, coat generously in the breadcrumb mixture, pressing gently to help the breadcrumbs adhere.
- Heat about 1 inch of vegetable oil in a large skillet or Dutch oven over medium high heat until it reaches 350 degrees Fahrenheit. You can test the oil by dropping a tiny piece of breading; it should sizzle immediately.
- Carefully add the breaded squash slices to the hot oil in a single layer, making sure not to overcrowd the pan. Fry for 2 to 3 minutes per side, or until golden brown and crispy. Frying in small batches is key to keeping the oil temperature up for maximum crispiness.
- Using a slotted spoon or spider, transfer the fried squash chips to a wire rack set over a baking sheet to drain. Do not drain them on paper towels, as this can trap steam and make them soggy. Season with a pinch more salt immediately after frying if desired.
- While the chips are frying, whisk together the mayonnaise, hot sauce (or paprika), and garlic powder in a small bowl for the dipping sauce.
- Arrange the crispy squash chips on a platter, garnish with fresh chopped parsley, and serve immediately with the dipping sauce.