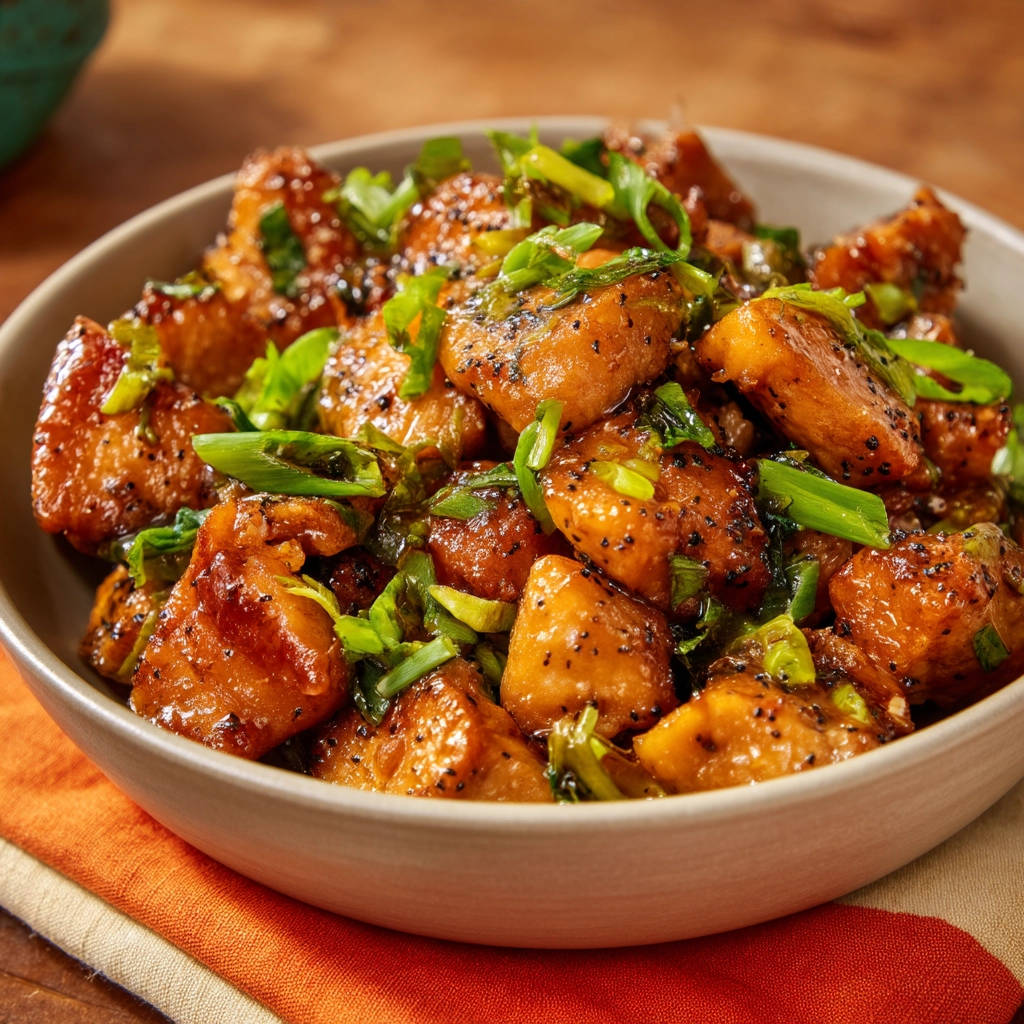
Craving restaurant-quality glazed chicken, but tired of the soggy disappointment that often comes with homemade versions? I get it! There’s nothing worse than anticipating that perfect, crisp bite only to find a mushy, sauce-soaked exterior. That’s why I’m thrilled to share my black pepper glazed chicken recipe – a guaranteed way to achieve that coveted crispy coating every single time. This recipe uses a simple, but brilliant, technique that ensures the chicken remains delightfully crisp even after being coated in a luscious black pepper glaze. Prepare to be amazed!
Why You’ll Love This Black Pepper Chicken
This isn’t your average glazed chicken recipe. Here’s why you’ll be making this again and again:
- Unbelievably Crispy: The secret’s in the technique! The cornstarch coating and proper frying method ensures maximum crispness that lasts.
- Flavor-Packed Glaze: The black pepper glaze is a symphony of sweet, savory, and subtly spicy flavors that perfectly complements the crispy chicken.
- Quick and Easy: Ready in under 30 minutes, this recipe is perfect for busy weeknights.
- Versatile: Serve it over rice, noodles, or even in lettuce wraps for a customizable meal.
- Crowd-Pleasing: Everyone loves crispy, flavorful chicken! This recipe is always a hit.
Gathering Your Ingredients for Black Pepper Glazed Chicken
Let’s talk ingredients. The key to this recipe lies in the balance of textures and flavors. We’re aiming for a delightful contrast between the crispy chicken and the rich, aromatic glaze. Freshness and quality always make a difference, so choose your ingredients wisely. Now, let’s break down what you’ll need:
First, you’ll need the star of the show – about 1.5 pounds of boneless, skinless chicken. You can use either chicken thighs or breasts, depending on your preference. Thighs will be more tender and juicy, while breasts will be leaner. Make sure to cut the chicken into roughly 1-inch pieces for even cooking.
- 1.5 pounds boneless, skinless chicken thighs or breasts, cut into 1-inch pieces
Next comes the secret to the ultimate crispness: the coating. For this, we need cornstarch or potato starch. Both work well, creating a light, airy coating that fries up beautifully. We season the starch simply with salt and freshly ground black pepper, providing the first layer of flavor. Don’t skimp on the pepper – it’s what gives the dish its signature kick!
- 1/4 cup cornstarch or potato starch
- 1/4 teaspoon salt
- 1/4 teaspoon black pepper, plus more for finishing
To cook the chicken, you’ll need a neutral oil like vegetable or canola oil. These oils have a high smoke point, perfect for achieving that crispy exterior. As for the sauce, the base of the flavor profile stems from the mix of high-quality low-sodium soy sauce or tamari. Honey or sugar, alongside rice vinegar is also required. We’ll also need a touch more cornstarch to thicken the sauce and give it that beautiful glossy sheen.
- 2 tablespoons neutral oil (like vegetable or canola)
- 1/4 cup low-sodium soy sauce or tamari
- 2 tablespoons honey or sugar
- 1 tablespoon rice vinegar
- 1 tablespoon water
- 1 teaspoon cornstarch
Finally, we’ll be adding a touch of aromatics and a beautiful garnish. Freshly minced garlic and grated ginger provide that classic Asian-inspired flavor, while sliced green onions and poppy seeds (optional) add a pop of color and visual appeal.
- 2 cloves garlic, minced
- 1 teaspoon fresh ginger, grated
- 2 green onions, thinly sliced
- 1 teaspoon poppy seeds (optional, for garnish)
Crafting Your Black Pepper Glazed Chicken: Step-by-Step
Ready to get cooking? Don’t be intimidated! This recipe is surprisingly simple, and I’ll guide you through each step. The most important thing to remember is to work quickly and efficiently, especially when it comes to coating the chicken in the sauce. The quicker you toss the chicken, the less time it has to absorb the sauce and lose its crispiness. Let’s get started!
- Coat the Chicken: In a medium bowl, combine the chicken pieces with the 1/4 cup of cornstarch, 1/4 teaspoon of salt, and 1/4 teaspoon of black pepper. Make sure each piece is evenly coated. This cornstarch coating is absolutely crucial for achieving that perfect, long-lasting crispiness. Think of it as a protective barrier against the sauce.
- Prepare the Sauce: In a separate small bowl, whisk together the soy sauce, honey, rice vinegar, water, and 1 teaspoon of cornstarch. Whisk until smooth and set aside. This sauce is a flavor bomb waiting to happen! The honey and rice vinegar perfectly balance the savory soy sauce and spicy black pepper.
- Heat the Oil: Heat the 2 tablespoons of neutral oil in a large skillet or wok over medium-high heat. The oil is ready when it shimmers slightly. A wok is great for this because of its sloped sides and ability to evenly distribute heat, but a large skillet will work just fine.
- Fry the Chicken: Add the coated chicken pieces to the skillet in a single layer, working in batches if necessary. Do not overcrowd the pan! Overcrowding will lower the oil temperature and prevent the chicken from crisping properly. Let the chicken cook undisturbed for 3-4 minutes per side, until golden brown and crispy. Use tongs to carefully turn each piece. The cornstarch coating should be firm and a beautiful golden color. This step is where the magic happens, so be patient and let the chicken crisp up!
- Drain Excess Oil: Remove the cooked chicken from the skillet and place it on a plate lined with paper towels to drain any excess oil. This step is important to prevent the final dish from being too greasy.
- Sauté Aromatics: If there is excess oil in the pan (more than about 1 teaspoon), carefully drain it off. Reduce the heat to medium. Add the minced garlic and grated ginger to the skillet and cook for 30 seconds, stirring constantly, until fragrant. Be careful not to burn the garlic, as it will become bitter.
- Thicken the Sauce: Give the prepared sauce mixture a quick whisk to ensure the cornstarch hasn’t settled, then pour it into the skillet. Cook, stirring constantly, until the sauce thickens and becomes glossy, about 1-2 minutes. The sauce should be thick enough to coat the back of a spoon.
- Glaze the Chicken: Return the crispy chicken pieces to the skillet with the thickened sauce. Toss gently but quickly to coat all the chicken pieces evenly. The goal is to coat the chicken as quickly as possible before it has a chance to absorb too much liquid and lose its crispness.
- Garnish and Serve: Remove from heat immediately. Garnish with sliced green onions and poppy seeds, if using. Serve hot and enjoy your crispy, flavorful black pepper glazed chicken!
Tips for Perfect Black Pepper Glazed Chicken Every Time
Want to make sure your black pepper glazed chicken is a guaranteed success? Here are a few extra tips to keep in mind:
- Don’t Overcrowd the Pan: This is the golden rule for achieving crispy chicken. Working in batches ensures that the oil temperature stays high and the chicken fries properly.
- Use Freshly Ground Black Pepper: Freshly ground pepper has a much more intense flavor than pre-ground pepper, making a big difference in the final dish.
- Adjust the Sweetness to Your Liking: Feel free to adjust the amount of honey or sugar in the glaze to suit your taste preferences.
- Spice it Up: For an extra kick, add a pinch of red pepper flakes to the glaze.
- Make it Gluten-Free: Use tamari instead of soy sauce to make this recipe gluten-free.
- Storage: Leftovers can be stored in the refrigerator for up to 3 days. Reheat in a skillet or oven to maintain crispness.
What to Serve With Black Pepper Glazed Chicken
This black pepper glazed chicken is incredibly versatile and pairs well with a variety of sides. For a classic Asian-inspired meal, serve it over steamed rice or noodles. It’s also delicious with stir-fried vegetables or a simple salad. For a complete and balanced meal, consider pairing it with our golden vegetable rice pilaf. You could even try serving it in lettuce wraps for a lighter, healthier option.
Your Black Pepper Glazed Chicken Questions Answered (FAQ)
Can I use chicken tenders instead of chicken thighs or breasts?
Yes, you can use chicken tenders. Just be aware that they will cook much faster, so reduce the cooking time accordingly.
Can I make this recipe ahead of time?
While the chicken is best served immediately for maximum crispness, you can prepare the sauce ahead of time and store it in the refrigerator for up to 3 days. Just whisk it well before using.
My sauce is too thick/thin. What should I do?
If the sauce is too thick, add a tablespoon of water at a time until it reaches your desired consistency. If it’s too thin, whisk in a teaspoon of cornstarch mixed with a tablespoon of cold water and cook for another minute or two until it thickens.
Can I use a different type of sweetener?
Yes, you can substitute the honey or sugar with other sweeteners like maple syrup or agave nectar. Keep in mind that the flavor profile will be slightly different.
How do I prevent the chicken from sticking to the pan?
Make sure the pan is hot enough and the oil is shimmering before adding the chicken. Also, don’t overcrowd the pan, as this will lower the oil temperature and cause the chicken to steam instead of fry.
Enjoy Your Homemade Black Pepper Glazed Chicken!
There you have it – my secret to perfectly crispy black pepper glazed chicken! This recipe is a guaranteed crowd-pleaser, and I’m confident you’ll love it as much as I do. So, ditch the soggy chicken disappointment and give this recipe a try. You won’t regret it! Now, I’d love to hear from you. Leave a comment below and let me know how your black pepper glazed chicken turned out. And don’t forget to share this recipe with your friends and family. Happy cooking!
Black Pepper Glazed Chicken (Keeps Chicken Crispy!)
Ingredients
- 1.5 pounds boneless, skinless chicken thighs or breasts, cut into 1-inch pieces
- 1/4 cup cornstarch or potato starch
- 1/4 teaspoon salt
- 1/4 teaspoon black pepper, plus more for finishing
- 2 tablespoons neutral oil (like vegetable or canola)
- 2 cloves garlic, minced
- 1 teaspoon fresh ginger, grated
- 1/4 cup low-sodium soy sauce or tamari
- 2 tablespoons honey or sugar
- 1 tablespoon rice vinegar
- 1 tablespoon water
- 1 teaspoon cornstarch
- 2 green onions, thinly sliced
- 1 teaspoon poppy seeds (optional, for garnish)
Directions
- In a medium bowl, toss the chicken pieces with the 1/4 cup cornstarch, 1/4 teaspoon salt, and 1/4 teaspoon black pepper. Ensure each piece is fully coated. This coating is key to the crispy texture that lasts.
- In a small bowl, whisk together the soy sauce, honey, rice vinegar, 1 tablespoon water, and 1 teaspoon cornstarch for the sauce. Set aside.
- Heat the 2 tablespoons of neutral oil in a large skillet or wok over medium-high heat until shimmering.
- Add the coated chicken pieces in a single layer, working in batches if necessary to avoid crowding the pan. Do not overcrowd, as this lowers the oil temperature and prevents crisping. Let the chicken cook undisturbed for 3-4 minutes per side until golden brown and crispy. Use tongs to turn carefully. The cornstarch coating should be firm and golden. This cooking step locks in the crispness.
- Remove the cooked chicken from the skillet and place on a plate lined with paper towels to drain any excess oil.
- If there is excess oil in the pan (more than about 1 teaspoon), carefully drain it off. Reduce heat to medium. Add the minced garlic and grated ginger and cook for 30 seconds until fragrant, stirring constantly.
- Give the prepared sauce mixture a quick whisk, then pour it into the skillet. Cook, stirring constantly, until the sauce thickens and becomes glossy, about 1-2 minutes.
- Return the crispy chicken pieces to the skillet with the thickened sauce. Toss gently but quickly to coat all the chicken pieces evenly. The goal is to coat fast before the chicken absorbs too much liquid and loses crispness.
- Remove from heat immediately. Garnish with sliced green onions and poppy seeds, if using. Serve hot. The quick toss at the end ensures the sauce clings without making the chicken soggy.

