I used to dread making homemade Chocolate-Filled Doughnuts, often ending up with oily, dense results that were far from the airy perfection I craved. After much experimentation, I’ve finally perfected a method to create incredibly fluffy, golden doughnuts that are absolutely never greasy.
This recipe ensures delightful, bakery-quality treats every single time, ready to impress family and friends with their irresistible chocolatey centers.
Why This Doughnut Recipe Stands Apart
The Secret to Absolutely Non-Greasy Doughnuts
The key to non-greasy doughnuts lies in precise oil temperature control. Maintaining the oil consistently between 350-360°F prevents the dough from absorbing excess oil, resulting in a perfectly crisp exterior and tender interior.
Additionally, immediately transferring fried doughnuts to a wire rack allows residual oil to drain away, ensuring they stay light and not heavy.
Achieving Unrivaled Fluffiness and Lightness
Our recipe prioritizes a well-hydrated dough and two crucial proofing stages. Proper yeast activation ensures a lively dough, while gentle kneading develops the perfect amount of gluten without making it tough.
The second rise is particularly vital, allowing the shaped doughnuts to become visibly puffy and aerated before frying, guaranteeing that signature airy crumb.
Why Homemade Doughnuts Always Win
Beyond the superior taste and texture, homemade doughnuts offer unparalleled freshness. You control the quality of ingredients, avoiding artificial flavors and preservatives often found in store-bought options.
There’s also immense satisfaction in creating these delightful treats from scratch, filling your home with an irresistible aroma that store-bought simply cannot replicate.
Assembling Your Doughnut Ingredients
For the Perfect Dough Foundation
Active Dry Yeast: This is the leavening agent responsible for the doughnut’s airy structure. Ensure it’s active and fresh for optimal rise.
Warm Milk (105-115°F): The ideal temperature to awaken the yeast without killing it. Milk also adds richness and tenderness to the dough.
Granulated Sugar (Dough): Feeds the yeast, aids in browning, and contributes to the overall sweetness of the doughnut.
Salt: Essential for balancing flavors and controlling the yeast’s activity, preventing an overly yeasty taste.
Large Egg: Adds richness, helps bind the ingredients, and contributes to the dough’s color and structure.
Unsalted Butter, melted: Incorporates tenderness and a lovely buttery flavor. Unsalted allows for better control of the overall saltiness.
All-Purpose Flour: Provides the necessary structure for the dough. Avoid over-measuring, which can lead to a dense doughnut.
Crafting the Decadent Chocolate Core
Semi-Sweet Chocolate Chips or Chopped Chocolate: High-quality chocolate is paramount for a rich, satisfying filling. Semi-sweet offers a balanced sweetness that complements the doughnut.
Heavy Cream or Whole Milk: When heated and combined with chocolate, it creates a luscious, silky smooth ganache. Heavy cream yields a richer, thicker filling, while whole milk results in a slightly lighter consistency.
The Final Touches: Frying Oil & Sweet Dusting
Vegetable Oil or Canola Oil: These neutral-flavored oils are excellent for frying due to their high smoke points, ensuring your doughnuts don’t absorb off-flavors.
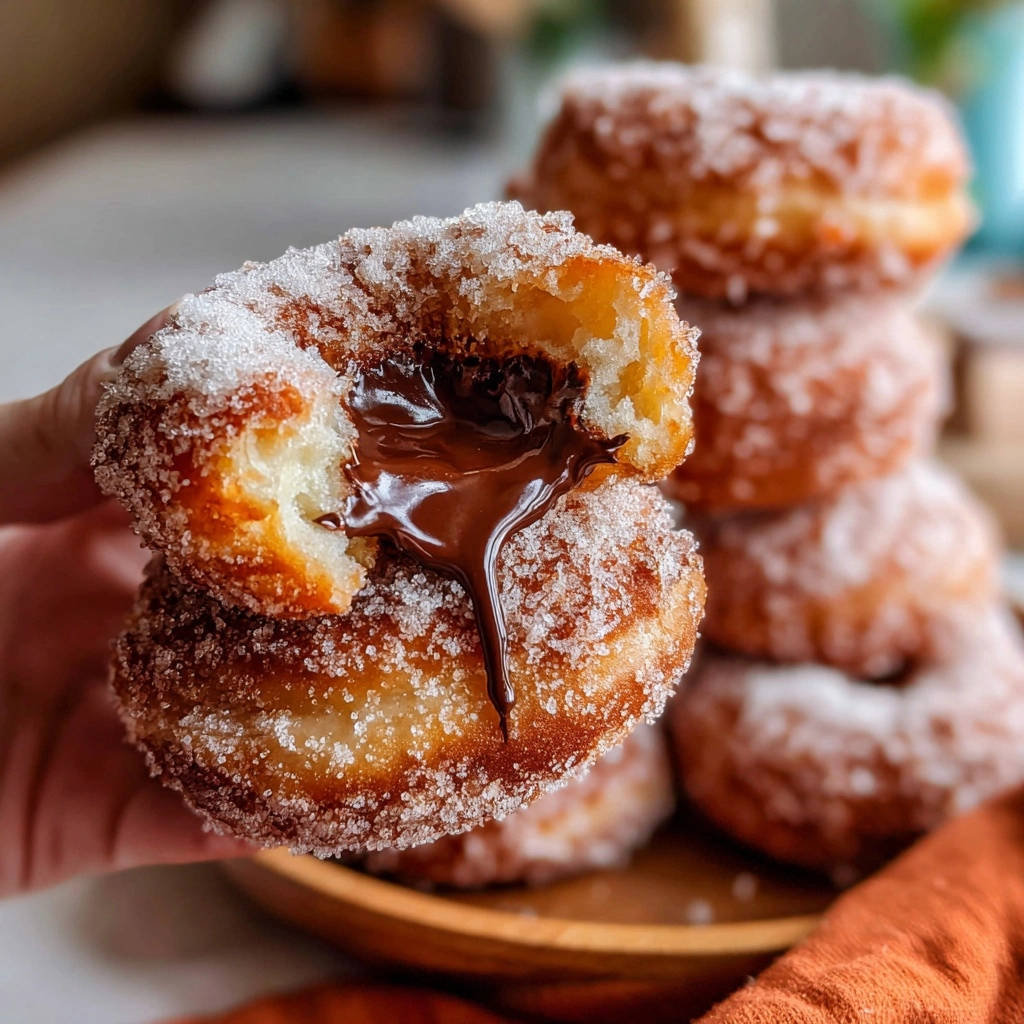
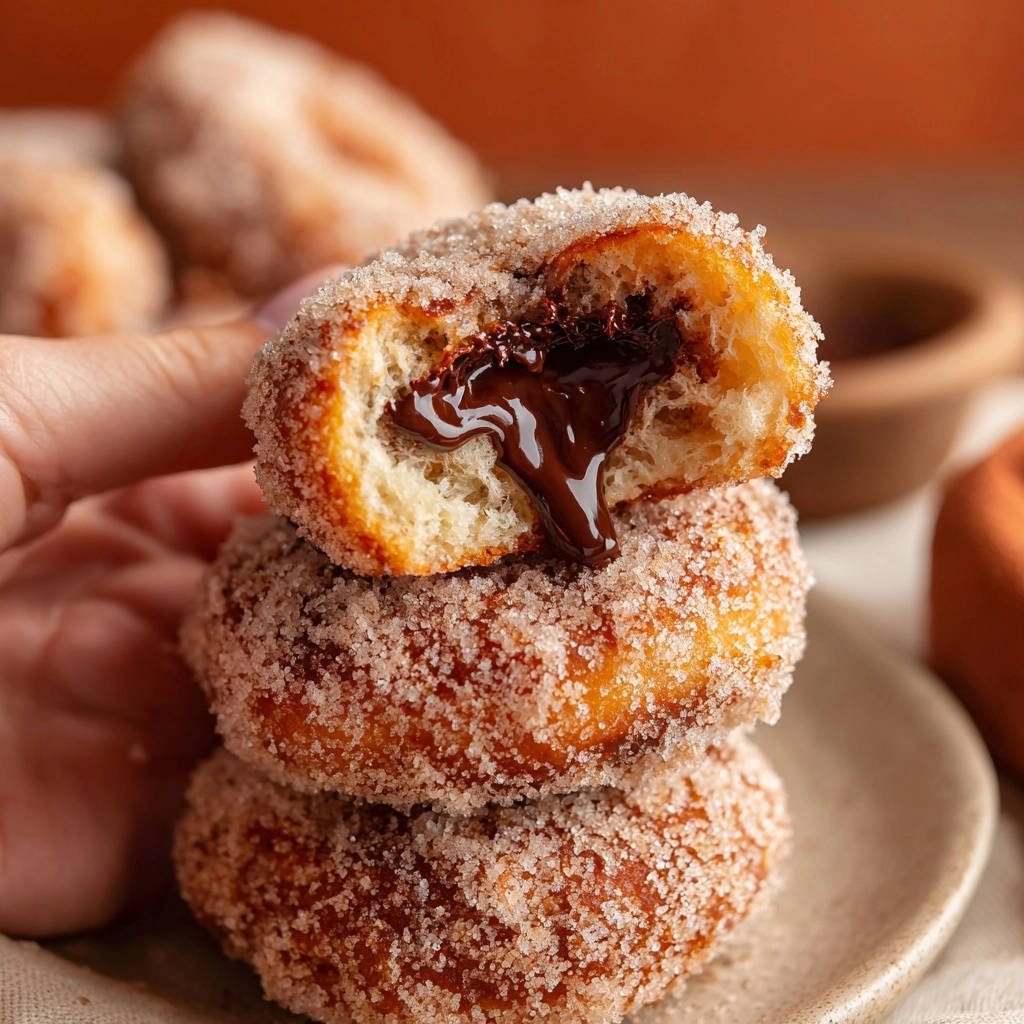
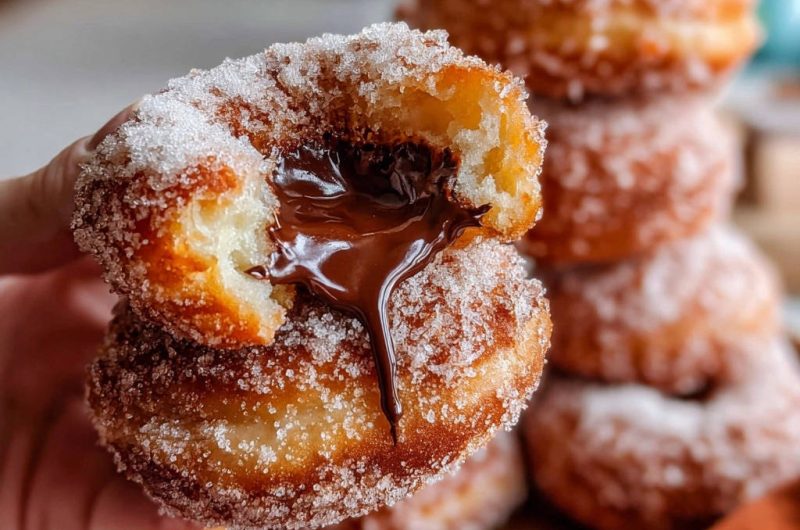
Granulated Sugar (Coating): Provides that classic, sparkling sweet exterior. It adheres best when the doughnuts are still warm from frying.
Essential Tools for Doughnut Success
Basic Kitchen Gear You’ll Need
Large Bowl & Whisk: For activating yeast and thoroughly combining wet ingredients.
Wooden Spoon or Stand Mixer: To mix the dough until it comes together, ensuring even distribution of ingredients.
Rolling Pin: Essential for achieving uniform dough thickness, leading to evenly cooked doughnuts.
3-inch Round Cookie Cutter or Glass: For precise and consistent doughnut shapes.
Baking Sheet & Plastic Wrap/Kitchen Towel: For the crucial proofing stages, allowing the dough to rise undisturbed.
Specialized Equipment for Optimal Frying
Large, Heavy-Bottomed Pot or Dutch Oven: Provides stable, even heat distribution, crucial for maintaining a consistent oil temperature.
Deep-Fry Thermometer: Absolutely vital for monitoring oil temperature, which is the ultimate secret to preventing greasy doughnuts and ensuring even cooking.
Slotted Spoon or Spider: For safely handling and flipping the doughnuts in hot oil, and for easy removal.
Wire Rack & Baking Sheet: Essential for proper draining immediately after frying, allowing excess oil to drip away for a lighter result.
Your Step-by-Step Guide to Fluffy Chocolate Doughnuts
Activating Yeast: The First Spark of Life
In a spacious bowl, combine warm milk, ensuring it’s between 105-115°F, with 1 teaspoon of granulated sugar. This temperature range is perfect for awakening the yeast without hindering its activity.
Sprinkle the active dry yeast over the surface. Allow it to rest for 5-10 minutes until a noticeable foamy layer appears on top, indicating your yeast is thriving and ready to work its magic for a light dough.
Mixing & Kneading for Optimal Texture
Introduce the remaining 1/4 cup granulated sugar, salt, large egg, and slightly cooled melted butter to the activated yeast mixture. Whisk everything thoroughly until well combined.
Gradually incorporate the all-purpose flour, mixing with a sturdy wooden spoon or stand mixer until a shaggy, cohesive dough forms. Turn the dough out onto a lightly floured surface.
Knead for 5-7 minutes, focusing on developing the gluten until the dough feels smooth and elastic. It should be slightly tacky but manageable, indicating proper hydration and readiness for its first rise.
The First Rise: Patience for Puffiness
Lightly grease a clean bowl, then place your kneaded dough inside, turning it once to ensure it’s coated. This prevents the dough from sticking as it expands.
Cover the bowl securely with plastic wrap or a clean kitchen towel. Allow the dough to rise in a warm, draft-free place for 1 to 1 1/2 hours, or until it has visibly doubled in size.
This initial rise is crucial for developing flavor and creating the initial aeration that contributes to the doughnut’s overall fluffiness.
Shaping Doughnut Perfection
Once doubled, gently punch down the dough to release the accumulated air. This step is important for an even texture in your final doughnuts.
On a lightly floured surface, roll the dough evenly to about 1/2-inch thickness. Using a 3-inch round cookie cutter or a glass, cut out perfect circles.
Collect any dough scraps, gently re-roll them, and cut more circles until all the dough is utilized. Avoid overworking these re-rolled pieces to maintain tenderness.
The Crucial Second Rise
Carefully transfer the cut dough circles onto a lightly floured baking sheet, ensuring adequate space between each for expansion. This prevents them from sticking together as they proof.
Cover the baking sheet loosely with plastic wrap or a towel. Allow the doughnuts to rise for another 30-45 minutes, or until they appear visibly puffy and light, nearly doubled in size again.
This second rise is paramount for achieving that incredibly airy, melt-in-your-mouth texture, ensuring the Chocolate-Filled Doughnuts are exceptionally light.
The Non-Greasy Frying Technique
Set up your frying station: a large, heavy-bottomed pot or Dutch oven filled with about 3 inches of vegetable or canola oil. Attach a deep-fry thermometer to the side of the pot.
Slowly heat the oil over medium heat, watching the thermometer diligently, until it reaches a precise 350-360°F (175-180°C). This specific temperature window is critical; too low, and the doughnuts will absorb oil and become greasy; too high, and they’ll burn outside before cooking through.
Carefully place only 2-3 doughnuts into the hot oil at a time. Overcrowding dramatically lowers the oil temperature, leading to heavy, oily results. Fry for 1-2 minutes per side, or until they achieve a beautiful golden brown.
Use a slotted spoon or spider to gently flip them and maintain the oil temperature consistently throughout the entire frying process for uniform cooking.
Draining & Coating for a Sweet Finish
As each batch of golden-brown doughnuts finishes frying, immediately transfer them to a wire rack set over a baking sheet lined with paper towels. This crucial step allows excess oil to drip away efficiently, preventing the doughnuts from becoming soggy or greasy.
While the doughnuts are still warm-not hot, but warm enough for adherence-roll them generously in granulated sugar placed in a shallow dish. The residual warmth helps the sugar stick perfectly, creating that irresistible sweet coating.
Whipping Up the Silky Chocolate Filling
In a small saucepan, gently heat 1/2 cup of heavy cream or milk until it just begins to simmer, then immediately remove it from the heat.
Pour the hot cream over 1 cup of semi-sweet chocolate chips (or chopped chocolate) in a heatproof bowl. Let the mixture sit undisturbed for 5 minutes; this allows the chocolate to melt thoroughly from the residual heat.
After five minutes, whisk the mixture until it transforms into a smooth, glossy, and utterly decadent chocolate ganache, ready to fill your fluffy doughnuts.
Expertly Filling Each Doughnut
Once the doughnuts have cooled slightly-they can still be warm for a delightful contrast-use a sharp paring knife or a piping bag fitted with a long, narrow tip to make a small hole in the side of each doughnut. This creates an entry point for the filling.
Gently pipe the prepared chocolate filling into each doughnut. Continue filling until each feels adequately heavy and plump, indicating a generous and satisfying chocolate core.
Unlocking Doughnut Mastery: Pro Tips & Tricks
The Golden Rule of Oil Temperature
Consistently monitoring your oil temperature with a deep-fry thermometer is non-negotiable. Oil that’s too cool results in greasy, oil-logged doughnuts, while oil that’s too hot will burn the exterior before the inside cooks through, leaving a raw center.
Avoiding Overcrowding Your Fryer
Resist the urge to fry too many doughnuts at once. Crowding the pot drastically lowers the oil’s temperature, leading to inconsistent cooking and, inevitably, greasy doughnuts. Fry in small batches to maintain optimal temperature and perfect results.
Handling Dough Like a Pro
When working with the dough, a light touch is best. Avoid over-kneading or over-flouring your surface, which can make the doughnuts tough and dense. A slightly sticky, soft dough is what you’re aiming for.
Keeping Your Doughnuts Fresh
Homemade doughnuts are best enjoyed fresh, but if you have leftovers, store them in an airtight container at room temperature for up to 1-2 days. Gently warming them in the microwave for a few seconds can help restore some softness.
Beyond Sugar: Alternative Coatings
While classic granulated sugar is wonderful, don’t hesitate to experiment! Try a delicate dusting of powdered sugar, a mix of cinnamon sugar, or even a simple vanilla or chocolate glaze for different flavor profiles. For more creative sweet treats, consider these easy fluffy glazed fried dough bites.
Common Doughnut Dilemmas & Quick Fixes
“My Doughnuts Are Greasy!”
This is almost always a temperature issue. Ensure your oil is consistently within the 350-360°F range; use a thermometer! Also, avoid overcrowding the pot, as this drops the temperature significantly.
Finally, proper draining on a wire rack immediately after frying is crucial to let excess oil drip off.
“They’re Dense, Not Fluffy!”
Check your yeast! Ensure it’s active and your milk temperature was correct for activation. Over-kneading can also develop too much gluten, making doughnuts tough, so knead only until smooth and elastic.
Most importantly, allow sufficient time for both the first and second rises; insufficient proofing is a common culprit for dense textures.
“Chocolate Filling Is Too Runny/Thick.”
If your ganache is too runny, it likely needs more chocolate; add a few more chocolate chips and let them melt before whisking again. If it’s too thick, gently warm it slightly and whisk in a teaspoon of warm cream or milk at a time until the desired silky consistency is achieved.
Your Doughnut FAQs Answered
Can I prepare the dough in advance?
Yes, you can prepare the dough and let it have its first rise in the refrigerator overnight. This slow, cold proof can actually enhance the flavor of the doughnuts. Simply bring it to room temperature before punching down and shaping.
What’s the best oil choice for frying?
Vegetable oil or canola oil are highly recommended for frying doughnuts. They have a neutral flavor profile that won’t interfere with your delicious Chocolate-Filled Doughnuts, and their high smoke points make them suitable for deep frying without burning.
Are there non-fried options for this recipe?
While the classic fluffy texture is best achieved through frying, you can technically bake or air fry these. However, expect a significantly different texture-they will be more like soft rolls than traditional doughnuts. For other delicious chocolate desserts that are baked, try this decadent chocolate cake.
How long do homemade doughnuts last?
Homemade doughnuts are truly best enjoyed the day they are made, ideally within hours of frying. They will remain fresh in an airtight container at room temperature for up to 1-2 days, though their texture will soften over time.
Savoring Your Homemade Chocolate Doughnuts
Perfect Pairings and Serving Suggestions
These delightful Chocolate-Filled Doughnuts are perfect on their own, but they truly shine when paired. Enjoy them with a steaming cup of coffee for a morning treat, a tall glass of cold milk, or as a decadent dessert after any meal.
They make an exceptional addition to brunches, parties, or simply as a special homemade indulgence.
Share Your Sweet Creations!
There’s nothing quite like the joy of sharing homemade treats. Whip up a batch of these perfectly fluffy, never-greasy Chocolate-Filled Doughnuts and watch them disappear! Share your creations with friends, family, or even on social media-everyone deserves to experience this delicious perfection.
Chocolate-Filled Doughnuts
Course: DessertCuisine: American CuisineDifficulty: easy12
donuts2
hours15
minutes120
minutesAmerican Cuisine
Ingredients
For the Dough:
2 1/4 teaspoons active dry yeast (one packet)
1/2 cup warm milk (105-115 degrees F)
1/4 cup granulated sugar, plus 1 teaspoon
1/2 teaspoon salt
1 large egg
2 tablespoons unsalted butter, melted and cooled slightly
2 1/2 cups all-purpose flour, plus more for dusting
For the Chocolate Filling:
1 cup semi-sweet chocolate chips or chopped chocolate
1/2 cup heavy cream or whole milk
For Frying and Coating:
6-8 cups vegetable oil or canola oil, for frying
1 1/2 cups granulated sugar, for coating
Directions
- Activate Yeast: In a large bowl, combine the warm milk and 1 teaspoon of granulated sugar. Sprinkle the yeast over the top and let it sit for 5-10 minutes, until foamy.
- Mix Dough: Add the remaining 1/4 cup granulated sugar, salt, egg, and melted butter to the yeast mixture. Whisk until well combined. Gradually add the flour, mixing with a wooden spoon or stand mixer until a shaggy dough forms.
- Knead Dough: Turn the dough out onto a lightly floured surface and knead for 5-7 minutes, until smooth and elastic. The dough should be slightly sticky but manageable.
- First Rise: Lightly grease a clean bowl. Place the dough in the bowl, turning once to coat. Cover with plastic wrap or a clean kitchen towel and let rise in a warm place for 1 to 1 1/2 hours, or until doubled in size.
- Shape Dough: Gently punch down the dough to release the air. On a lightly floured surface, roll the dough to about 1/2-inch thickness. Using a 3-inch round cookie cutter or glass, cut out circles. Re-roll scraps as needed until all dough is used.
- Second Rise: Place the cut dough circles on a lightly floured baking sheet, leaving some space between them. Cover loosely with plastic wrap or a towel and let rise for another 30-45 minutes, or until visibly puffy and light. They should look almost doubled again.
- Prepare for Frying (This is Key to No Greasy Donut!): Set up your frying station. In a large, heavy-bottomed pot or Dutch oven, pour enough vegetable oil to reach about 3 inches deep. Attach a deep-fry thermometer to the side of the pot. Heat the oil slowly over medium heat until it reaches a consistent temperature of 350-360 degrees F (175-180 degrees C). This precise temperature control is vital to prevent oil absorption.
- Fry the Donuts (The Non-Greasy Method): Once the oil is at the correct temperature, carefully place 2-3 donuts into the hot oil. Do not overcrowd the pot; frying too many at once will drastically lower the oil temperature and lead to greasy donuts. Fry for 1-2 minutes per side, or until golden brown. Use a slotted spoon or spider to carefully flip them. Maintain the oil temperature between 350-360 degrees F throughout the frying process.
- Drain Properly: As each batch is done, immediately transfer the golden-brown donuts to a wire rack set over a baking sheet lined with paper towels. This allows excess oil to drip off instead of soaking back into the donut.
- Coat with Sugar: While the donuts are still warm, but not hot, roll them generously in the granulated sugar placed in a shallow dish. The warmth helps the sugar stick.
- Make the Chocolate Filling: In a small saucepan, gently heat the heavy cream or milk until it just begins to simmer. Remove from heat and pour over the chocolate chips in a heatproof bowl. Let sit for 5 minutes, then whisk until smooth and glossy.
- Fill the Donuts: Once the donuts have cooled slightly (they can still be warm), use a sharp paring knife or a piping bag fitted with a long, narrow tip to make a small hole in the side of each donut. Gently pipe the chocolate filling into each donut until it feels adequately filled and slightly heavy.
- Serve: Serve your perfectly fluffy, non-greasy, chocolate-filled doughnuts immediately and enjoy!
Notes
- Includes a key trick for making light, non-greasy doughnuts.