There is nothing more frustrating than spending time rolling perfect little centers, only for the chocolate coating on your Classic Peanut Butter Buckeyes to turn out dull, streaky, or unevenly thick.
As a recipe expert, I’ve perfected a method using one simple ingredient-vegetable shortening-that guarantees a beautiful, thin, and glossy snap every single time, making these treats look professionally dipped without complicated tempering.
The Ultimate Peanut Butter Treat: Why This Classic Recipe Wins
The Chocolatier’s Secret: Guaranteeing a Mirror-Like Finish
The biggest challenge in making chocolate candies is achieving that high-gloss, thin shell without the precise heating and cooling steps of tempering chocolate.
We solve this problem by adding a small amount of vegetable shortening (or refined coconut oil) to the melted chocolate chips. This key additive lowers the chocolate’s viscosity, allowing it to flow smoothly and set into a shiny, thin coating.
The result is a delicate snap that beautifully contrasts with the soft, rich peanut butter filling, eliminating chalky or thick layers.
Effortless Elegance: Ideal for Holiday Platters and Gifting
These no-bake peanut butter truffles are incredibly stable, making them ideal make-ahead treats for holiday entertaining or gifting.
Because they are freezer-friendly, you can easily prepare large batches weeks in advance, ensuring you have perfect Classic Peanut Butter Buckeyes ready when you need them.
Perfect Prep: Key Timings for Success
While the active prep and “cooking” (melting chocolate) time are minimal, the chilling phase is critical for success.
- Prep Time: 20 minutes
- Cook Time (Melting): 5 minutes
- Total Time (Includes Chilling): 2 hours 30 minutes
- Crucial Chilling Time: At least 2 hours in the freezer. Do not skip this step.
Essential Building Blocks for Buckeye Bliss: A Deep Dive into Ingredients
The Importance of Creamy Peanut Butter Selection
For the best structural stability in this no-bake recipe, conventional processed creamy peanut butter (like Jif or Skippy) is highly recommended.
These commercial butters contain stabilizers that prevent oil separation, resulting in a consistently firm, easy-to-handle dough.
While natural peanut butter can be used, its higher oil content means you must drain off any separated oil completely before measuring and likely need extra powdered sugar to reach the desired firmness.
The Role of Softened Butter and Vanilla Extract
Using fully softened (room temperature) unsalted butter is non-negotiable for the filling base. When creamed with peanut butter, softened butter incorporates air, creating that signature fluffy texture.
Vanilla extract deepens the overall flavor profile, providing a subtle aromatic warmth that complements the richness of the peanut butter and chocolate.
Powdered Sugar vs. Granulated: Achieving the Signature Dough Texture
Only powdered sugar (confectioners’ sugar) works for this truffle dough.
Powdered sugar is ground exceptionally fine and contains a small amount of cornstarch, which prevents caking and helps bind the fats in the butter and peanut butter into a solid, moldable dough.
The Thinning Agent: Vegetable Shortening or Refined Coconut Oil
This is the essential ingredient for achieving the professional finish on your Classic Peanut Butter Buckeyes.
The shortening slightly lowers the melting point of the chocolate and, most importantly, dramatically reduces its viscosity, making the coating thin, drip cleanly, and set smoothly.
It acts as a stabilizing agent for the cocoa solids, preventing the streaking (blooming) that often occurs when chocolate is melted without proper tempering.
Preparation Station: Tools and Tips for Uniform Rolling
Essential Equipment for Consistent Shapes
Using the right tools ensures your buckeyes look uniform and professional, which is especially important for gifting.
- Stand mixer or powerful hand mixer for creaming.
- Parchment paper-lined baking sheet (prevents sticking).
- Small cookie scoop (e.g., a 1-tablespoon scoop) for perfectly uniform dough balls.
- Deep, narrow microwave-safe bowl for melting and dipping.
The Power of Precision: Weighing vs. Measuring
The ratio of powdered sugar to fat (butter/peanut butter) is critical for dough firmness.
If you scoop powdered sugar instead of sifting or weighing, you might incorporate too much air, requiring a slight adjustment. Precision is key; if your dough is too sticky after following the recipe, add powdered sugar one tablespoon at a time until it’s firm but pliable.
Crafting Classic Peanut Butter Buckeyes: Step-by-Step Mastery
-
Step 1: Creaming for Maximum Fluffiness
In a large bowl, combine the softened butter, creamy peanut butter, vanilla extract, and fine salt. Use an electric mixer to cream these ingredients until the mixture is visibly light and airy, usually about 2-3 minutes on medium speed.
Thorough creaming incorporates air, which is vital for preventing the finished filling from becoming dense or oily.
-
Step 2: Incorporating Sugar and Testing Consistency
Gradually add the 3 cups of powdered sugar, mixing on low speed until the mixture pulls away from the sides of the bowl and forms a thick, firm dough. The final dough must be cohesive and firm enough to hold a clean ball shape when rolled.
If the mixture remains excessively sticky, increase the powdered sugar one tablespoon at a time until the dough is easily manageable by hand.
-
Step 3: Shape and Execute the Crucial Freeze
Using a small cookie scoop or your hands, roll the peanut butter dough into uniform 1-inch balls. Arrange them on a parchment paper-lined baking sheet.
Place the tray in the freezer for a minimum of two hours, or until the balls are completely solid. This intense cold is essential: it prevents the warm chocolate from melting the center, ensures a quick set, and maintains the perfect spherical shape during dipping.
-
Step 4: The Glossy Chocolate Solution Melt Technique
Place the chocolate chips (or chopped melting chocolate) and the 1 tablespoon of vegetable shortening into a deep, narrow bowl. A narrow bowl minimizes the amount of chocolate needed to fully immerse the truffles.
Microwave the mixture in 30-second intervals, stirring thoroughly after each one, until the chocolate is fully melted and flawlessly smooth. The added shortening is now providing the perfect low-viscosity, high-gloss dipping medium.
-
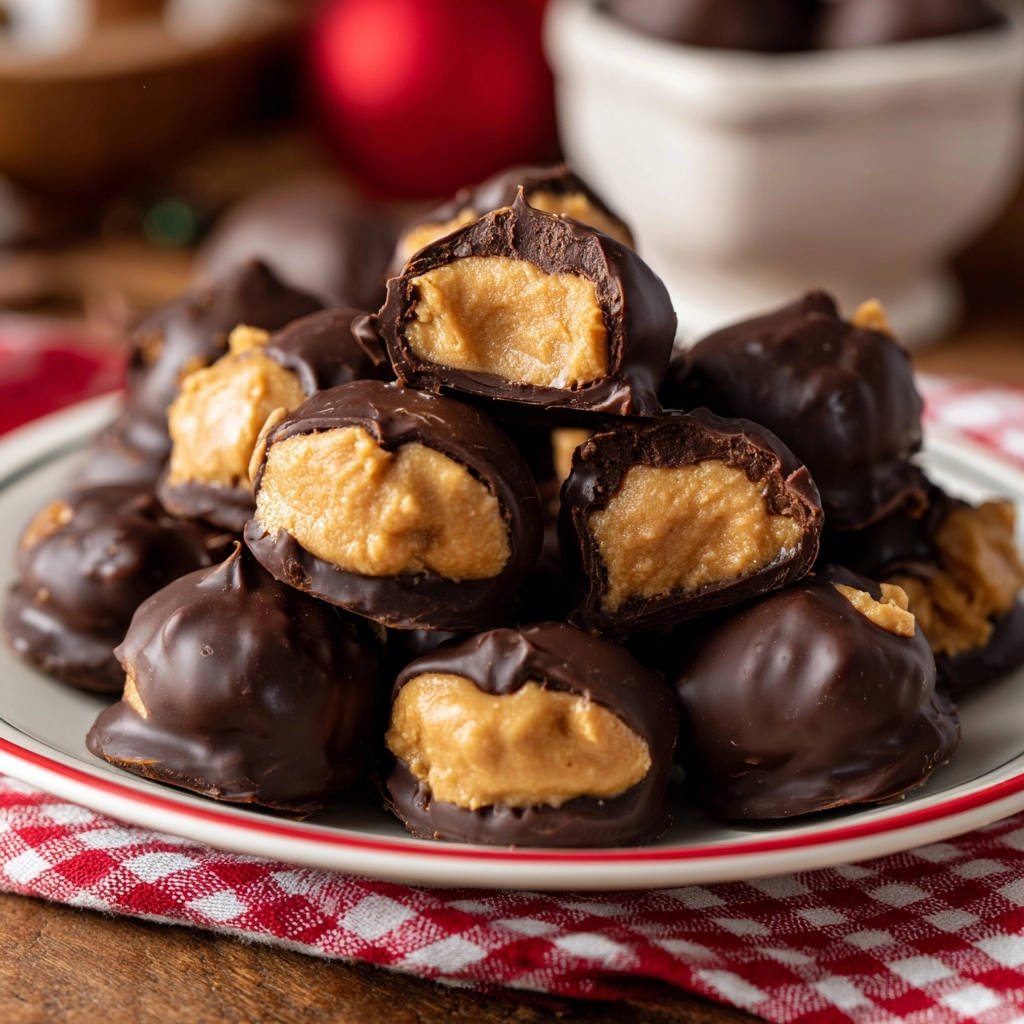
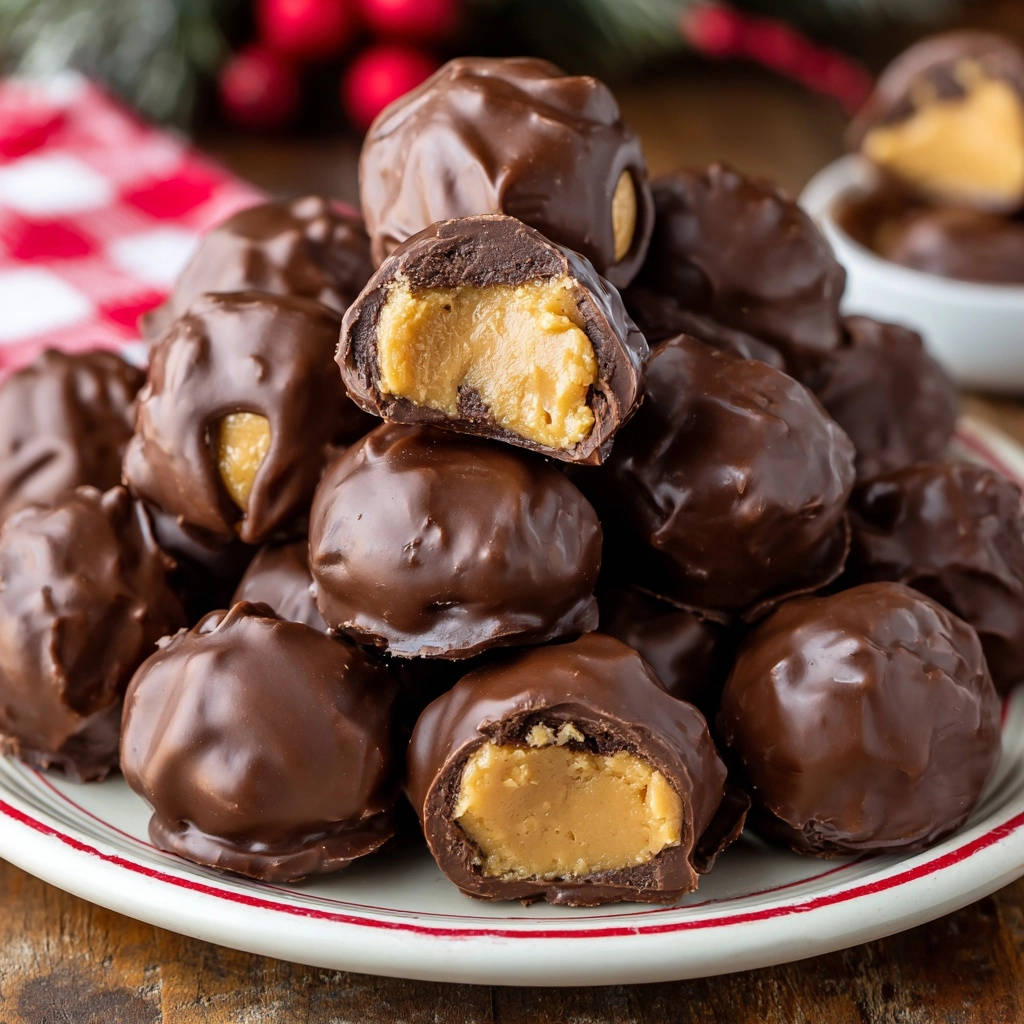
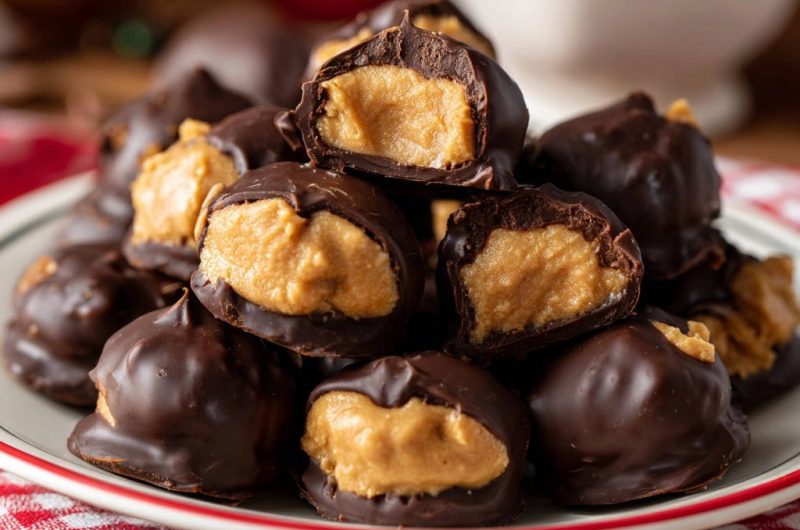
Step 5: Dipping and Achieving the Signature “Eye”
Remove only a few peanut butter balls from the freezer at a time to keep the others cold. Insert a sturdy toothpick into the top of a frozen ball and quickly dip it into the melted chocolate.
If creating traditional Classic Peanut Butter Buckeyes, ensure a small circle of peanut butter is left exposed at the top, mimicking the eye of the Ohio buckeye nut. Allow the excess chocolate to drip off fully before placing the candy back on the parchment paper.
-
Step 6: Setting the Coating and Finishing Touches
Because the filling is frozen, the smooth chocolate coating will set almost instantly upon contact. The cooling process will happen quickly.
If you need to remove the toothpick mark, smooth it over immediately with a second, clean toothpick or a knife tip while the chocolate is still slightly wet. Allow the buckeyes to set completely at room temperature or in the refrigerator for 30 minutes before serving or storing.
Troubleshooting & Chef’s Secrets for Seamless Buckeye Making
My Dough is Too Sticky or Won’t Hold Its Shape
The stickiness is usually a result of varying humidity levels or slightly imprecise sugar measurement. Simply add powdered sugar, one tablespoon at a time, mixing until the dough feels firm and no longer leaves residue on your hands when rolled.
Do not add flour or liquid; only powdered sugar will correct the texture without altering the flavor profile significantly.
Preventing Chocolate Streaking, Dullness, or Seizing
To avoid a dull finish, never skip the shortening. To prevent seizing (chocolate thickening into a clumpy mass), ensure your melting bowl is perfectly dry and no water or steam comes into contact with the chocolate.
Always melt chocolate slowly in short bursts (30 seconds maximum) and rely on stirring to finish melting the last few lumps using residual heat.
Handling Soft or Warmer Filling During Dipping
If your kitchen is warm or if you are dipping a very large batch, the frozen centers can start to soften, making them difficult to handle and prone to slumping.
If you notice the centers softening, stop dipping immediately and return the entire tray to the freezer for 10-15 minutes to firm them up before continuing.
Dipping Without Leaving Noticeable Toothpick Marks
The most professional method is the two-toothpick technique: Use one toothpick to hold the buckeye during dipping, and use a second toothpick to gently hold the buckeye steady as you slide it off the first toothpick onto the parchment paper.
If a slight hole remains, gently smooth the area over with the clean tip of a toothpick or a knife while the chocolate is still wet, before it hardens.
Beyond the Classic: Variations, Storage, and Make-Ahead
Creative Coating Ideas and Flavor Swaps
Feel free to experiment with the coating: use dark chocolate chips for a richer, more intense flavor, or white chocolate for a striking contrast.
For extra flair, immediately after dipping, sprinkle the wet chocolate with flaky sea salt, crushed nuts, or holiday sprinkles before it sets.
Can I Make These Gluten-Free or Vegan?
This recipe is naturally gluten-free, provided you verify that your brand of powdered sugar is certified gluten-free, as some may contain trace amounts of wheat starch.
To make these vegan peanut butter treats, substitute the dairy butter with a high-quality vegan butter substitute (like Miyoko’s or Earth Balance sticks) and ensure your chocolate chips/shortening are confirmed vegan.
Proper Storage for Optimal Freshness and Shelf Life
Store Classic Peanut Butter Buckeyes in an airtight container layered with parchment paper to prevent sticking.
They are stable at cool room temperature (below 70°F) for up to 5 days, but refrigeration extends their freshness up to two weeks. For long-term storage, they freeze exceptionally well for up to three months.
Frequently Asked Questions About Classic Peanut Butter Buckeyes
Why are they called Buckeyes?
The name comes from the shape and appearance of the final candy, which is meant to resemble the inedible nut that grows on the Ohio buckeye tree.
The signature look requires the peanut butter center to peek through the chocolate coating, creating the ‘eye’ effect.
Do Classic Peanut Butter Buckeyes need to be refrigerated?
While they are stable due to the high sugar and fat content, refrigeration is strongly recommended, especially in warmer environments or if storing them for more than a few days, as it helps maintain the firm shape of the filling.
Can I use natural peanut butter in this recipe?
It is best to use conventional, processed peanut butter for predictable results. If you must use natural peanut butter, you must first drain off all the separated oil completely and may need to significantly increase the amount of powdered sugar to achieve the correct, stiff dough consistency.
Ready to Impress? Share Your Classic Peanut Butter Buckeyes Masterpiece!
This recipe guarantees the flawless, glossy coating that often eludes home bakers, transforming a simple no-bake treat into an elegant confection.
By using the shortening secret and executing the crucial freezer step, you will achieve the perfect texture and snap every single time. Get ready to watch these delicious treats disappear from your holiday platter!
Try this trusted method today and share your results! We love seeing your perfect, mirror-finish Classic Peanut Butter Buckeyes.
Classic Peanut Butter Buckeyes
Course: DessertCuisine: American CuisineDifficulty: easy4
36 truffles20
minutes5
minutes120
minutesAmerican Cuisine
Ingredients
For the Filling:
1 cup creamy peanut butter
1/2 cup (1 stick) unsalted butter, softened
1 teaspoon vanilla extract
3 cups powdered sugar
1/4 teaspoon fine salt
For the Glossy Chocolate Coating:
2 cups semi-sweet chocolate chips or chopped melting chocolate
1 tablespoon vegetable shortening (or refined coconut oil)
Directions
- Prepare the Filling Base: In a large bowl, use a hand mixer or stand mixer to cream together the softened butter, peanut butter, vanilla extract, and salt until light and fluffy.
- Incorporate Sugar: Gradually add the powdered sugar, mixing on low speed until a thick, firm dough forms. If the mixture is too sticky, add powdered sugar one tablespoon at a time until it is manageable and holds its shape easily.
- Shape and Chill: Roll the peanut butter dough into small, uniform balls (about 1 inch in diameter). Place the balls on a baking sheet lined with parchment paper. This step is crucial for an easy dip: Place the tray in the freezer for at least 2 hours, or until the balls are completely firm. The cold temperature prevents the filling from melting into the warm chocolate.
- The Glossy Chocolate Solution: Place the chocolate chips in a deep, microwave-safe bowl. Add the 1 tablespoon of shortening (this is the key to achieving that smooth, glossy finish and thin coating). Microwave the mixture in 30 second intervals, stirring well between each interval, until the chocolate is fully melted and perfectly smooth. The added shortening lowers the viscosity of the melted chocolate, preventing that dull, thick, or chalky finish.
- Dip the Truffles: Remove the peanut butter balls from the freezer. Using a toothpick or small fork, quickly dip each ball into the melted chocolate, leaving a small circle of the peanut butter exposed at the top (if making traditional Buckeyes) or fully coating them if making truffles. Allow the excess chocolate to drip off fully.
- Set the Chocolate: Return the dipped truffles to the parchment-lined baking sheet. The cold filling will quickly set the smooth chocolate coating. If you need to remove the toothpick marks, smooth them over with a clean toothpick while the chocolate is still wet.
- Finish: Allow the chocolate to fully set at room temperature or in the refrigerator for 30 minutes before serving or storing in an airtight container.
Notes
- The key to a glossy finish is mixing 1 Tbsp shortening into the melting chocolate. Ensure the filling is completely frozen before dipping.