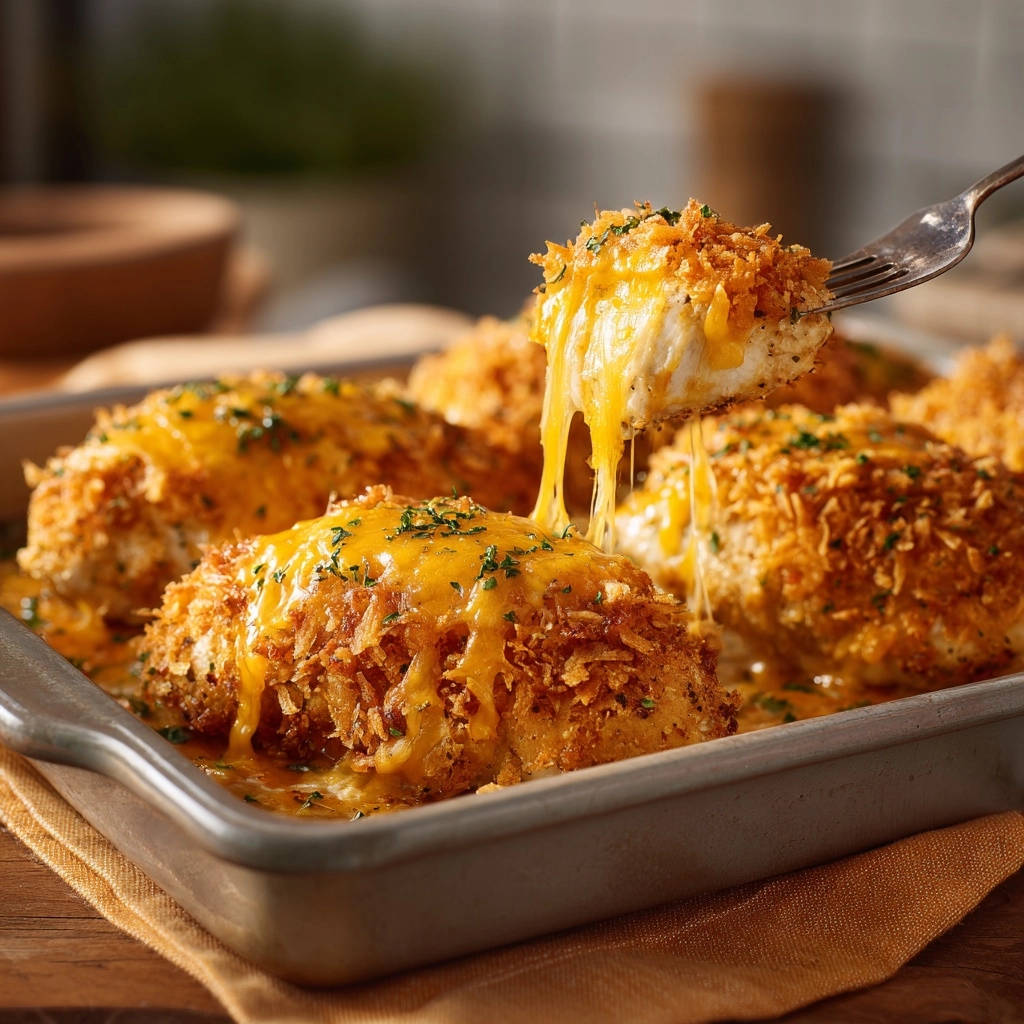
I used to wrestle with the common kitchen dilemma of achieving perfectly juicy chicken that also boasts a genuinely crispy, cheesy crust.
That quest often felt like a mystery, but through experimentation, I unlocked a simple technique that transforms this Crispy Cheesy Baked Chicken into an unbelievably moist, tender, and flavor-packed experience every single time.
This recipe isn’t just easy; it’s a guaranteed winner, perfect for weeknight dinners or impressing guests.
Why This Baked Chicken Recipe Will Become Your Family’s Favorite
The Secret to Unrivaled Juiciness: Our Pounding Trick
Forget dry, rubbery chicken! Our secret pounding trick ensures each chicken breast cooks evenly, staying incredibly moist and tender from edge to edge.
This simple technique eliminates hot spots, guaranteeing a succulent bite in every single piece.
Guaranteed Crispy, Golden Perfection Every Time
Thanks to the double-dredging method and the magic of Panko breadcrumbs, you’ll achieve an irresistibly golden and satisfyingly crisp exterior.
A final drizzle of butter further enhances that coveted crunch, making every bite a delight.
Effortless Prep, Impressive Dinner Results
Despite its gourmet taste and texture, this Crispy Cheesy Baked Chicken comes together with surprisingly minimal effort.
It’s an ideal solution for busy weeknights when you crave a homemade meal without spending hours in the kitchen.
A Versatile Weeknight Winner for Any Occasion
This dish is incredibly versatile, pairing beautifully with a wide range of side dishes from simple salads to hearty mashed potatoes.
Whether it’s a casual family dinner or a more formal gathering, this chicken always fits the bill and earns rave reviews.
Essential Ingredients for Your Golden Chicken Masterpiece
The Chicken Base: Boneless, Skinless Breasts
Boneless, skinless chicken breasts are chosen for their lean profile and quick cooking time.
Aim for breasts of similar size to ensure uniform cooking, preventing some pieces from drying out while others finish.
The Crispy Coating: Panko & Flavor Boosters
Panko breadcrumbs are non-negotiable here; their coarser texture creates an unmatched crispiness compared to regular breadcrumbs.
A simple blend of salt, black pepper, garlic powder, and onion powder provides the foundational savory notes, enhancing the chicken’s natural taste.
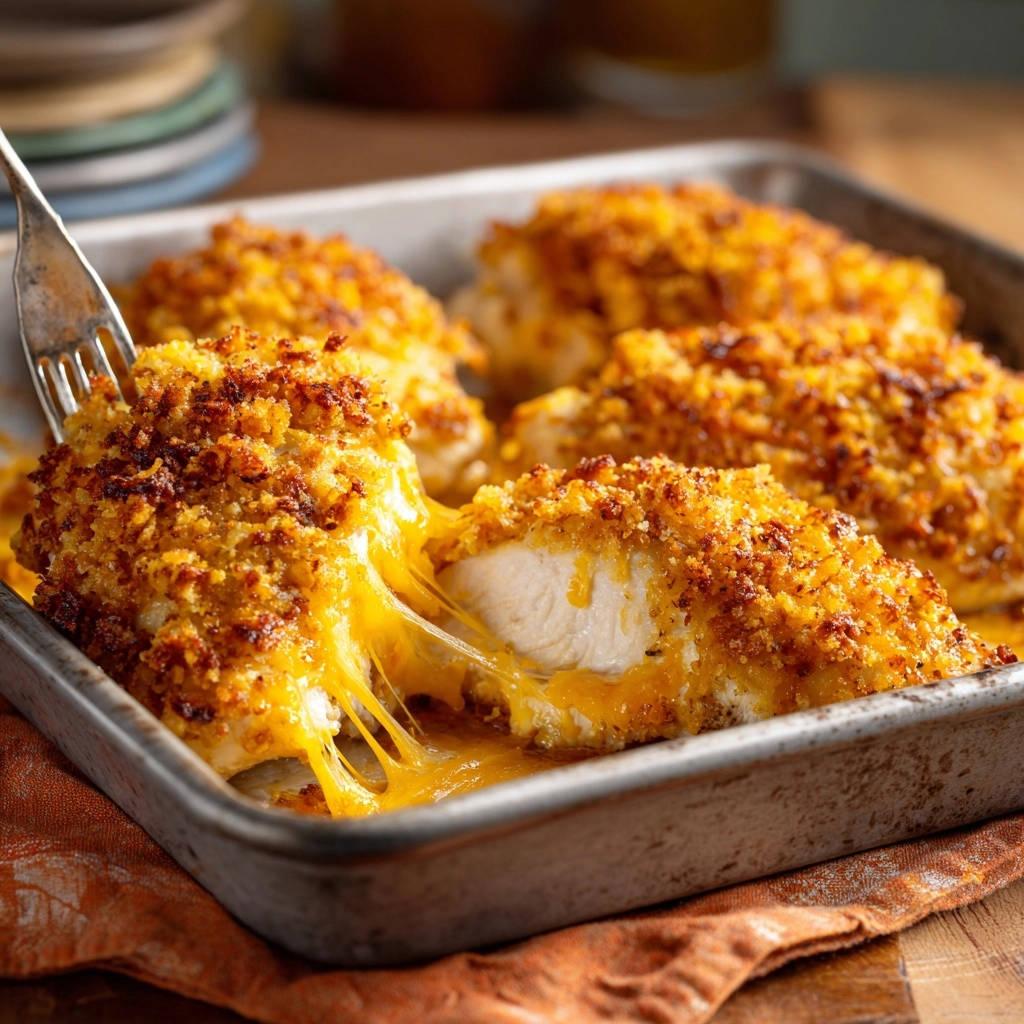
The Cheesy Finish: Sharp Cheddar Goodness
Sharp cheddar cheese melts beautifully, forming a gooey, flavorful crust that perfectly complements the crispy chicken.
Its robust flavor stands out, adding that essential cheesy indulgence to every bite.
Binding & Baking Aids: Eggs, Flour, & Butter
All-purpose flour creates a crucial first layer for the breading to adhere to, while beaten eggs act as the binder for the Panko.
Melted unsalted butter, drizzled over the top, not only adds richness but is key for achieving that golden, crispy crust in the oven.
Tools for Crispy Cheesy Baked Chicken Success
Basic Kitchen Essentials
You’ll need a standard 9×13 inch baking dish, along with a few shallow dishes for your dredging station.
Basic measuring cups and spoons are also essential for accurate ingredient portions.
Specialty Tools for Optimal Results
A meat mallet or heavy rolling pin is invaluable for pounding the chicken to an even thickness, ensuring consistent cooking.
For absolute certainty, a meat thermometer is highly recommended to guarantee perfectly cooked, juicy chicken every single time.
Crafting Your Crispy Cheesy Baked Chicken: Step-by-Step
- Step 1: Prep the Oven & Dish
Preheat your oven to 400°F (200°C) to ensure it reaches the correct temperature before the chicken goes in, promoting even cooking.
Lightly grease a 9×13 inch baking dish to prevent sticking and make cleanup a breeze.
- Step 2: The Pounding Perfection Secret for Juicy Chicken
Place each chicken breast between two sheets of plastic wrap or parchment paper.
Using a meat mallet or a heavy rolling pin, gently pound each chicken breast to an even 1/2-inch thickness; this crucial step guarantees uniform cooking, ensuring every part stays incredibly juicy and tender.
- Step 3: Set Up Your Dredging Stations
Arrange three shallow dishes on your counter for an efficient dredging assembly line.
Place the all-purpose flour in the first dish, the beaten eggs in the second, and the Panko breadcrumbs mixed with salt, pepper, garlic powder, and onion powder in the third.
- Step 4: The Triple Coat Process for Maximum Crispiness
Take one pounded chicken breast and dip it first into the flour, shaking off any excess to prevent a gummy coating.
Next, move it to the beaten eggs, letting any excess drip off, which acts as the perfect adhesive for the breadcrumbs.
Finally, thoroughly coat the chicken in the seasoned Panko breadcrumbs, pressing firmly on all sides to ensure a thick, even layer that will become wonderfully crispy.
- Step 5: Arrange & Drizzle with Melted Butter
Arrange the breaded chicken breasts in a single layer in your prepared baking dish, ensuring they don’t overlap for optimal crisping.
Evenly drizzle the melted unsalted butter over the top of each chicken breast; this fat is key for a golden-brown and extra-crispy exterior.
- Step 6: First Bake & Internal Temperature Check (The Undercook Key!)
Bake the chicken for 15-20 minutes, or until its internal temperature reaches 160°F (71°C) when measured with a meat thermometer.
This slight undercook is deliberate and crucial; it prevents the chicken from overcooking during the second bake, ensuring maximum juiciness.
- Step 7: The Cheesy Transformation
Carefully remove the baking dish from the oven.
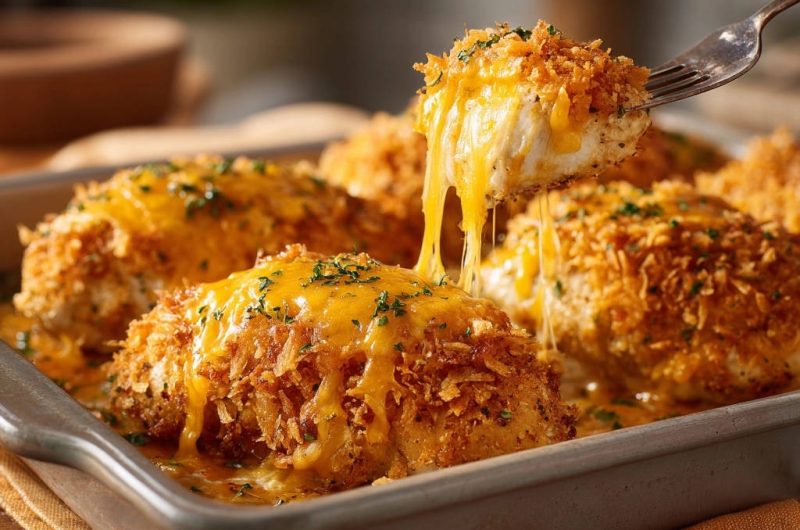
Generously and evenly sprinkle the shredded sharp cheddar cheese over each chicken breast, preparing it for its glorious melty finish.
- Step 8: Final Bake for Golden Crispiness & Perfect Melt
Return the dish to the oven and continue baking for another 5-7 minutes.
During this final stage, the cheese will melt into a bubbly, golden blanket, and the breading will achieve its ultimate crispness, while the chicken reaches its safe internal temperature of 165°F (74°C).
- Step 9: Garnish & Serve Immediately
Remove the finished Crispy Cheesy Baked Chicken from the oven.
A sprinkle of fresh chopped parsley not only adds a pop of color but also a fresh herbaceous note. Serve immediately to enjoy the chicken at its peak crispness and juiciness.
Chef’s Notes: Tips for Unforgettable Crispy Cheesy Chicken
Achieving Max Crispiness and Breading Adhesion
Always pat your chicken breasts completely dry before dredging; moisture is the enemy of crispiness and proper breading adhesion.
When coating with Panko, press firmly to ensure a thick, even layer that won’t fall off during baking. Don’t skip the melted butter drizzle – it’s a game-changer for golden crunch!
Ensuring Ultimate Juiciness Every Time
The pounding step is non-negotiable for even cooking and maximum tenderness.
Invest in a reliable meat thermometer to avoid guesswork; cooking to 165°F (74°C) precisely guarantees juicy results without overcooking.
Flavor Boosters & Creative Variations
Elevate the flavor by adding a tablespoon of grated Parmesan cheese to your Panko mixture for extra savory depth.
Experiment with other spice blends like smoked paprika, a pinch of cayenne for heat, or dried Italian herbs to customize the taste profile.
The Perfect Cheese Pull: Timing is Everything
Adding the cheese in the last few minutes of baking allows it to melt into a bubbly, golden layer without burning.
For that coveted, stretchy cheese pull, serve your Crispy Cheesy Baked Chicken immediately from the oven.
What to Serve With Your Cheesy Baked Chicken
Classic Comfort Pairings
This Crispy Cheesy Baked Chicken pairs wonderfully with classic comfort sides. Creamy fluffy mashed potatoes or a generous scoop of mac and cheese provide a hearty complement.
For a complete meal, consider adding a side of creamy stovetop mac and cheese.
Fresh & Light Side Dishes
Balance the richness with a crisp green salad tossed with a light vinaigrette, or a refreshing creamy cucumber salad.
A vibrant tomato and cucumber salad also offers a refreshing contrast to the savory chicken.
Vegetable Complements for a Balanced Meal
Roasted asparagus, steamed green beans, or tender-crisp perfectly roasted carrots and crispy chickpeas make excellent vegetable sides.
Their natural sweetness and vibrant colors enhance the meal beautifully, making it more wholesome.
Meal Prep & Storage Solutions
Can You Prep This Chicken Ahead of Time?
You can certainly prep the chicken breasts by pounding them and setting up your dredging station ahead of time.
For best results, dredge the chicken just before baking to ensure the Panko remains crisp; otherwise, it can become soggy in the fridge.
Storing Leftovers Safely for Best Quality
Store any leftover Crispy Cheesy Baked Chicken in an airtight container in the refrigerator for up to 3-4 days.
Separating the chicken with parchment paper can help prevent sticking and maintain quality.
Reheating for Optimal Crispy & Cheesy Results
For the best reheating results that revive the crispiness, use an oven or air fryer.
Preheat to 350°F (175°C) and bake for 10-15 minutes, or until heated through and the cheese is re-melted and bubbly.
Avoid the microwave, as it will make the breading soggy.
Troubleshooting Common Crispy Cheesy Chicken Challenges
Why Is My Chicken Dry or Tough?
This usually indicates overcooking. Always use a meat thermometer and pull the chicken from the oven once it reaches 165°F (74°C).
Uneven chicken thickness can also lead to dryness in thinner parts; ensure you pound breasts to a uniform 1/2-inch.
My Breading Isn’t Crispy Enough!
Ensure your chicken is thoroughly patted dry before dredging; excess moisture prevents crisping.
Don’t skimp on the melted butter drizzle, as it’s crucial for a golden, crunchy crust. Also, verify your oven is preheated to the correct temperature.
Cheese Didn’t Melt Right or Burned
If the cheese burned, it was likely added too early or baked for too long.
Adding the cheese only for the final 5-7 minutes ensures it melts beautifully and bubbles without scorching.
Breading Fell Off While Cooking
This often happens if the chicken wasn’t patted dry enough or if the Panko wasn’t pressed firmly onto the chicken.
Ensure a good, solid coating by pressing the breadcrumbs firmly into every surface of the chicken before baking.
Your Crispy Cheesy Baked Chicken Questions Answered
Can I use boneless, skinless chicken thighs instead of breasts?
Yes, boneless, skinless chicken thighs work wonderfully for this recipe and often remain even juicier.
Their cook time might be slightly longer, so always rely on an internal temperature of 165°F (74°C) for doneness.
What if I don’t have Panko breadcrumbs?
While Panko offers superior crispiness, regular fine breadcrumbs can be used as a substitute.
Be aware that the resulting texture may not be as light and crunchy, but the flavor will still be delicious.
Can I make this Crispy Cheesy Baked Chicken recipe gluten-free?
Absolutely! Simply substitute the all-purpose flour with a gluten-free all-purpose flour blend and use gluten-free Panko breadcrumbs.
The cooking process and fantastic results will remain the same.
Is it possible to air fry this recipe for an even crispier coating?
An air fryer is a fantastic option for achieving an incredibly crispy coating!
Preheat your air fryer to 375°F (190°C) and cook for about 12-18 minutes, flipping halfway, and adding cheese for the last few minutes, until cooked through and golden.
How do I know when the chicken is perfectly cooked through?
The most reliable way is to use a digital meat thermometer. Insert it into the thickest part of the chicken breast, avoiding bone.
The chicken is perfectly cooked when it reaches an internal temperature of 165°F (74°C) and the juices run clear.
Embrace Your Inner Chef: Share Your Crispy Cheesy Chicken Triumph!
Now that you’re armed with the secrets to truly juicy and crispy chicken, it’s time to bring this incredible Crispy Cheesy Baked Chicken to your own table!
I’m confident it will become a cherished family favorite, bringing smiles and satisfaction with every bite. Don’t hesitate to share your culinary triumphs in the comments below!
Crispy Cheesy Baked Chicken
Course: Main CourseCuisine: American CuisineDifficulty: easy4
servings15
minutes20
minutes35
minutesAmerican Cuisine
Ingredients
4-6 boneless, skinless chicken breasts (about 1.5 to 2 pounds total)
1 cup all purpose flour
2 large eggs, beaten
2 cups Panko breadcrumbs
1 teaspoon salt
1/2 teaspoon black pepper
1 teaspoon garlic powder
1/2 teaspoon onion powder
1/4 cup unsalted butter, melted (or olive oil)
2 cups shredded sharp cheddar cheese
2 tablespoons fresh parsley, chopped, for garnish
Directions
- Preheat your oven to 400°F (200°C). Lightly grease a 9×13 inch baking dish.
- The Secret to Juicy Chicken: Place each chicken breast between two sheets of plastic wrap or parchment paper. Using a meat mallet or a heavy rolling pin, gently pound each chicken breast to an even 1/2-inch thickness. This ensures uniform cooking and prevents parts from drying out.
- Set up your dredging stations: Place flour in one shallow dish, beaten eggs in a second shallow dish, and Panko breadcrumbs mixed with salt, pepper, garlic powder, and onion powder in a third shallow dish.
- Dip each pounded chicken breast first into the flour, shaking off any excess. Then, dip it into the beaten eggs, letting any excess drip off. Finally, thoroughly coat it in the seasoned Panko breadcrumbs, pressing firmly so the breadcrumbs adhere well.
- Arrange the breaded chicken breasts in a single layer in the prepared baking dish. Drizzle the melted butter evenly over the top of each chicken breast.
- Bake for 15-20 minutes, or until the internal temperature of the chicken reaches 160°F (71°C). This slight undercook is key before adding cheese.
- Remove the dish from the oven. Evenly sprinkle the shredded cheddar cheese over each chicken breast.
- Return the dish to the oven and continue baking for another 5-7 minutes, or until the cheese is melted and bubbly and the internal temperature of the chicken reaches 165°F (74°C) and the breading is golden and crispy.
- Remove from oven, sprinkle with fresh chopped parsley, and serve immediately.