

Ah, couscous salad. It sounds so simple, doesn’t it? Light, healthy, and endlessly versatile. Yet, if you’ve ever attempted to whip up a batch, you might have encountered the dreaded gummy couscous. Instead of the beautifully separated, fluffy grains you envisioned, you end up with a sticky, clumpy mess. Frustrating, right? I’ve been there more times than I care to admit!
For years, I struggled to achieve that perfect, airy texture with my couscous salads. It seemed like a culinary mystery. But after much trial and error, I finally discovered the simple, yet crucial, steps that guarantee perfectly fluffy couscous every single time. And let me tell you, mastering this technique changed my couscous salad game completely. This Easy Couscous Salad recipe, built on that perfected method, has become a absolute go-to in my kitchen!
Why You’ll Absolutely Love This Couscous Salad
Beyond just conquering the gummy couscous dilemma, this salad offers so much to love. It’s incredibly quick to make, bursting with fresh flavors and satisfying textures, and versatile enough to serve as a light lunch, a side dish, or even bulked up into a main meal.
- Guaranteed Fluffy Texture: This is the star! Say goodbye to gummy, sticky couscous forever with my simple trick.
- Speedy Prep: Ready in under 30 minutes from start to finish, it’s perfect for busy weeknights or last-minute gatherings.
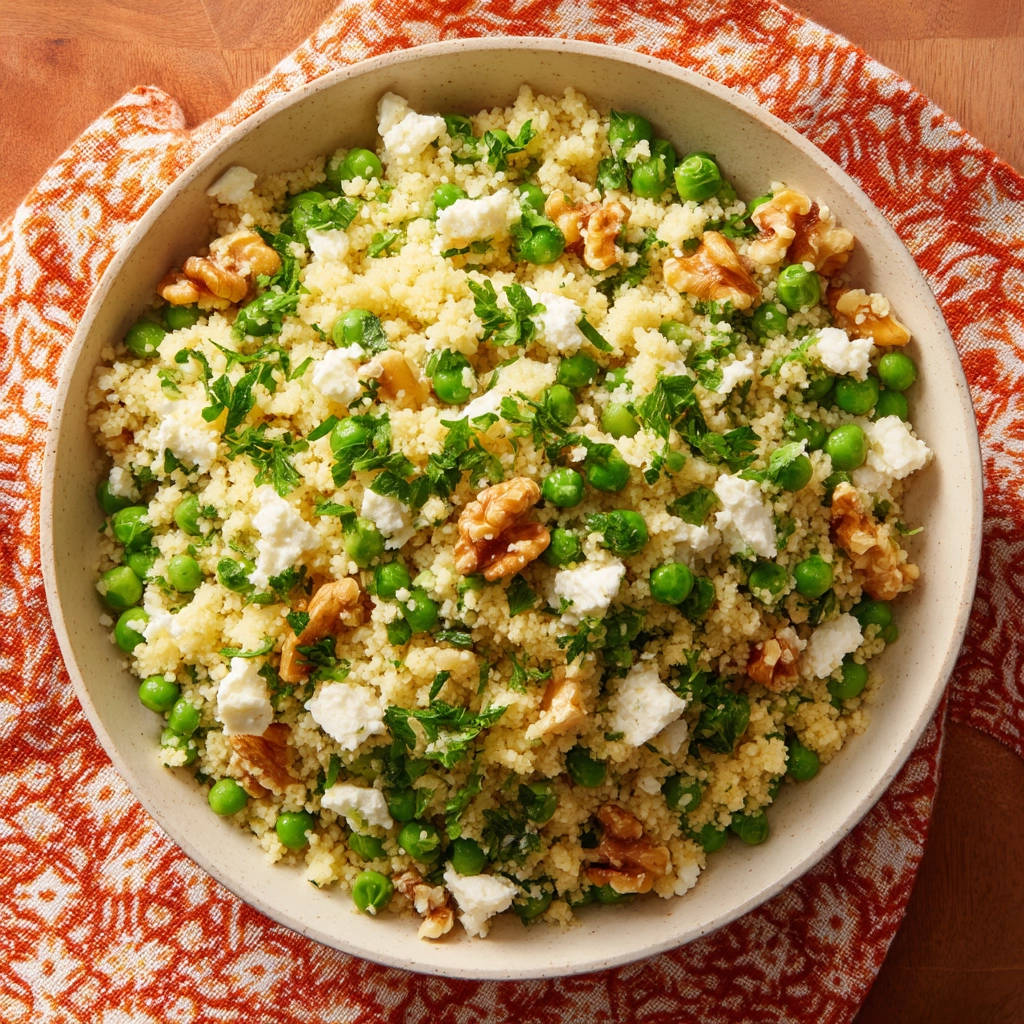
- Fresh & Flavorful: The combination of vibrant peas, crunchy walnuts, salty feta, and bright parsley creates a delicious medley of tastes and textures.
- Nutritious and Filling: Couscous provides a great base, while the peas add fiber and protein, and walnuts bring healthy fats.
- Highly Adaptable: This recipe is a fantastic starting point for adding your favorite vegetables, proteins, or different dressings.
Gathering Your Delicious Ingredients for This Couscous Creation
Creating a truly memorable Easy Couscous Salad starts with selecting the right components. The beauty of this recipe lies in its simplicity, letting the quality of each ingredient shine. Here’s what you’ll need to bring this bright, flavorful dish to life, along with a little insight into why each part plays its role.
At the heart of our salad is the couscous itself. For this recipe, we specifically use pearl or Israeli couscous. These aren’t the tiny, quick-cooking granules often found in boxes; pearl couscous is larger, more pasta-like spheres, which hold their shape beautifully in a salad and have a wonderful chewiness when cooked correctly. This structure is far less prone to clumping compared to its smaller counterpart.
The cooking method relies on a touch of olive oil right at the beginning. Using olive oil not only adds a subtle richness and classic Mediterranean flavor but, more importantly for texture, it helps to lightly toast the couscous grains before liquid is added. This toasting step is one of the secrets to preventing that dreaded gumminess, creating a slight barrier that helps the grains remain distinct.
For cooking the couscous, you’ll need liquid. Water is perfectly fine, but using vegetable broth infuses the couscous with an extra layer of savory flavor right from the start. A pinch of salt is also essential in the cooking liquid, just like when cooking pasta, to season the couscous itself as it absorbs the liquid.
Now, let’s talk about the lovely additions that make this salad pop! Frozen green peas are a fantastic choice because they are harvested and flash-frozen at peak freshness, preserving their vibrant color and sweet, slightly crisp texture. Simply thawing them means they are ready to go and add a wonderful burst of green.
For crunch and a touch of earthy richness, we add chopped walnuts. Lightly toasting them before adding brings out their full flavor and enhances their crispness, providing a lovely contrast to the soft couscous and peas. If you’re not a fan of walnuts, other toasted nuts like almonds or pecans would work beautifully too, or even toasted seeds.
Feta cheese crumbles introduce a delightful tang and creamy saltiness that balances the other ingredients. The briny notes of feta are classic in Mediterranean-inspired dishes and really elevate the flavor profile of the salad. If feta isn’t your preference, a different crumbly cheese like goat cheese or even small cubes of fresh mozzarella could be interesting variations.
Fresh herbs are non-negotiable in bright, fresh salads, and parsley is perfect here. Its clean, slightly peppery taste adds freshness and a pop of color. Chopping it just before adding ensures maximum flavor and aroma.
Finally, the simple dressing is key. More good quality olive oil provides richness and helps the ingredients meld together. Fresh lemon juice is optional but highly recommended! Its bright acidity cuts through the richness and adds a wonderful zing that makes the salad feel incredibly fresh and light. Don’t underestimate the power of a little lemon!
And of course, finish it all off with freshly ground black pepper to taste, adding a subtle warmth and aroma.
Here is a handy list of everything you’ll need:
- 1 cup pearl or Israeli couscous
- 1 tablespoon olive oil, plus more for dressing
- 1 1/2 cups water or vegetable broth
- 1/2 teaspoon salt, plus more to taste
- 1 cup frozen green peas, thawed
- 1/2 cup chopped walnuts, lightly toasted
- 1/4 cup crumbled feta cheese
- 1/4 cup chopped fresh parsley
- 2 tablespoons fresh lemon juice (optional, for dressing)
- Freshly ground black pepper to taste
Crafting Your Perfect Couscous Salad: Step-by-Step Mastery
Now for the part where we transform these simple ingredients into a fluffy, flavorful Easy Couscous Salad. The magic truly happens in how we cook the couscous, so pay close attention to the first few steps. Once you master this method, you’ll never go back to gummy couscous again!
- The Toasting Secret: Begin by heating just one tablespoon of olive oil in a medium saucepan over medium heat on your stovetop. Once the oil is shimmering slightly, add the dry, uncooked pearl or Israeli couscous directly into the pan. This might feel counter-intuitive if you’re used to just boiling couscous, but it’s the absolute game-changer! Stir the couscous continuously for about 3 to 5 minutes. You’ll notice the grains start to turn a very light golden brown in spots, and you’ll smell a wonderfully nutty, toasted aroma. This brief toasting step does two crucial things: it adds depth of flavor, and more importantly, it helps seal the exterior of the couscous grains, preventing them from absorbing too much water too quickly and becoming sticky and gummy. Don’t rush this part; it’s essential for that perfect texture.
- Add the Liquid and Season: Carefully pour in 1 and a half cups of water or, for extra flavor, vegetable broth. Add half a teaspoon of salt to the liquid at this stage. Stir everything together to combine the couscous with the liquid and salt. Increase the heat slightly if needed and bring the mixture up to a gentle boil. You’ll see small bubbles breaking the surface.
- Simmer & Resist the Urge to Peek: As soon as the liquid reaches a boil, immediately reduce the heat to the absolute lowest setting. This gentle heat is important for even cooking. Now, here’s another critical step for fluffy couscous: cover the pot tightly with a lid. You want a good seal to trap the steam. Let the couscous simmer undisturbed for 10 to 12 minutes. The goal is for the couscous to absorb all of the liquid and become tender. It’s SO tempting to lift the lid and check, but resist! Lifting the lid releases the steam, which is vital for the couscous to cook properly and fluff up. Trust the process and the timing.
- The Resting Period: Once the 10 to 12 minutes of simmering are up, remove the pot completely from the heat. Keep the lid on TIGHTLY. Let the pot stand, still covered, for a minimum of 5 minutes. This resting period allows the couscous to steam in its own heat and finish cooking gently. It’s like letting a steak rest after searing – it redistributes moisture and perfects the texture. Again, absolutely do not lift the lid during these 5 minutes!
- Fluff and Separate: After the resting time is complete (and only then!), you can finally uncover the pot. Use a fork to gently fluff the couscous. Glide the fork through the grains, lifting and separating them. You should see beautifully distinct, tender spheres, not a sticky mass. Take a moment to admire your perfectly cooked, non-gummy couscous!
- Assemble the Salad Base: Transfer your fluffy couscous to a large mixing bowl. Add the thawed green peas, the lightly toasted chopped walnuts, the crumbled feta cheese, and the fresh chopped parsley. These ingredients bring color, texture, and flavor to the base.
- Dress and Toss: Drizzle the salad generously with additional olive oil. Now is also the time to add the fresh lemon juice if you’re using it – its bright acidity is a wonderful counterpoint to the richness of the oil and feta. Season the salad with more salt and freshly ground black pepper to taste. Remember that feta is salty, so taste before adding too much extra salt. Use a spoon or tongs to gently toss all the ingredients together until they are well combined and coated in the dressing. Be gentle so you don’t mash the delicate couscous grains.
Your Easy Couscous Salad is now ready! This salad is delicious served warm, right after you’ve assembled it, or at room temperature, which makes it ideal for picnics, potlucks, or make-ahead lunches. The flavors really meld together as it sits.
Tips for Perfect Couscous Salad Every Time
While the cooking method is the most critical part of avoiding gummy couscous, here are a few extra tips to ensure your Easy Couscous Salad is always a resounding success:
- Quality Couscous Matters: Ensure you are using pearl or Israeli couscous for this recipe. Instant or fine couscous cooks differently and won’t give you the same result or texture.
- Don’t Skip the Toasting: Seriously, this is the secret weapon! Toasting the dry couscous in oil before adding liquid makes a huge difference in preventing stickiness.
- Measure Accurately: Using the correct ratio of liquid to couscous is crucial for proper absorption. Stick to the 1 cup couscous to 1.5 cups liquid measurement.
- Avoid Over-Stirring: Once the liquid is added and simmering begins, avoid stirring the couscous while it’s cooking. Let it absorb the liquid undisturbed.
- Resting is Key: The 5-minute covered rest off the heat allows the steam to finish cooking the couscous gently, preventing it from becoming waterlogged. Don’t skip this or lift the lid early!
- Gently Fluff: When fluffing with a fork, be gentle. Aggressive stirring can break the grains.
Delicious Variations to Try
This Easy Couscous Salad is a fantastic canvas for customization! Once you have the perfect fluffy couscous base, feel free to experiment with other ingredients. Here are a few ideas:
- Add More Veggies: Stir in finely diced red onion, bell peppers, cucumber, cherry tomatoes, or roasted vegetables like our crispy roasted Brussels sprouts or roasted butternut squash wedges once the couscous is cooked and cooled slightly.
- Protein Boost: Add cooked chickpeas for a vegetarian protein boost, or stir in grilled chicken breast, shrimp, or crumbled cooked sausage.
- Herb Swap: Swap parsley for other fresh herbs like mint, dill, cilantro, or a combination. Each will lend a different character to the salad.
- Different Cheese: Try cubed fresh mozzarella, goat cheese, or even shaved Parmesan instead of feta.
- Citrus Twist: Instead of or in addition to lemon, try a splash of lime juice or orange juice in the dressing for a different citrus note.
- Make it Spicy: Add a pinch of red pepper flakes to the dressing or finely chop a mild chili pepper to toss in.
- Add Grains/Legumes: You could even combine this fluffy couscous with other cooked grains like our perfectly cooked fluffy quinoa or creamy chickpeas for a heartier bowl.
What to Serve With Your Fluffy Couscous Salad
This versatile salad pairs wonderfully with a variety of main courses. Its fresh, light profile makes it an excellent side dish. Consider serving it alongside grilled meats like our grilled lemon herb chicken or fish, roasted vegetables, or simple pan-seared dishes. It’s also hearty enough to be a light main course on its own, perhaps with some added protein.
Your Easy Couscous Salad Questions Answered (FAQ)
Got questions about making the best couscous salad? Here are some common ones I get asked, and my best tips to help you out.
Why does my couscous turn out gummy?
The most common culprits for gummy couscous are over-hydration and not preventing the grains from clumping early on. Using too much liquid, cooking at too high a heat, stirring too much during cooking, not allowing it to rest, or skipping the initial toasting step can all lead to a sticky texture. This recipe addresses these points directly to ensure a fluffy result!
Can I use fine or instant couscous for this recipe?
This recipe is specifically designed for pearl or Israeli couscous, which are larger grains. Instant or fine couscous cooks much faster (often just by soaking in hot water) and has a different texture that is more prone to clumping. While you can make salads with fine couscous, you would need a different cooking method. Stick to pearl for this particular recipe’s guaranteed fluffiness!
Can I make this couscous salad ahead of time?
Yes, absolutely! Couscous salad is great for making ahead. Prepare the couscous and allow it to cool completely. You can then mix in the other ingredients. If making it more than a few hours ahead, you might want to add the nuts and dressing just before serving to keep the nuts crunchy and the salad from getting soggy. Store it in an airtight container in the refrigerator for up to 3-4 days.
How long does leftover couscous salad last?
Properly stored in an airtight container in the refrigerator, this couscous salad will keep for 3 to 4 days. The flavors often deepen slightly over time.
Can I add other vegetables or protein?
Definitely! This salad is very flexible. As mentioned in the variations section, feel free to add finely chopped raw vegetables like cucumber or bell peppers, cooked vegetables, or cooked proteins like grilled chicken, chickpeas, or lentils to make it more substantial.
Is this recipe vegetarian or vegan?
As written with feta cheese, this recipe is vegetarian. To make it vegan, simply omit the feta cheese. It will still be incredibly flavorful with the peas, walnuts, parsley, and lemon dressing. You could add nutritional yeast for a cheesy flavor or extra nuts and seeds for richness.
What’s the difference between pearl and Israeli couscous?
Pearl couscous and Israeli couscous (sometimes called Ptitim) are essentially the same thing – small, toasted pasta spheres. The name “Israeli couscous” originated when it was developed in Israel in the 1950s. “Pearl couscous” is a more general term for this size and shape. So, you can use either for this recipe!
Enjoy Your Fluffy Homemade Couscous Salad!
I hope this guide helps you conquer the fear of gummy couscous forever and makes this Easy Couscous Salad a regular part of your rotation. It’s proof that simple ingredients, prepared with the right technique, can yield truly delicious results. Whether you’re packing it for lunch, bringing it to a potluck, or serving it alongside your dinner, you’ll love its fresh taste and, most importantly, its perfect, fluffy texture.
Give this recipe a try and let me know what you think in the comments below! Did the toasting trick work wonders for you? What variations did you try? I love hearing about your kitchen adventures!
Easy Couscous Salad

Ingredients
- 1 cup pearl or Israeli couscous
- 1 tablespoon olive oil, plus more for dressing
- 1 1/2 cups water or vegetable broth
- 1/2 teaspoon salt, plus more to taste
- 1 cup frozen green peas, thawed
- 1/2 cup chopped walnuts, lightly toasted
- 1/4 cup crumbled feta cheese
- 1/4 cup chopped fresh parsley
- 2 tablespoons fresh lemon juice (optional, for dressing)
- Freshly ground black pepper to taste
Directions
- Heat 1 tablespoon olive oil in a medium saucepan over medium heat. Add the dry couscous and cook, stirring, for 3 to 5 minutes, until the couscous is lightly toasted and fragrant. This step is key to preventing gumminess.
- Pour in the water or broth and add 1/2 teaspoon salt. Bring the mixture to a boil.
- Once boiling, reduce the heat to low, cover the pot tightly, and simmer for 10 to 12 minutes, or until the liquid is absorbed and the couscous is tender. Avoid lifting the lid during this time.
- Remove the pot from the heat and let it stand, covered, for 5 minutes. Do not lift the lid. This allows the couscous to steam and finish cooking without getting mushy.
- Uncover and use a fork to gently fluff the couscous. Make sure to separate the grains.
- In a large bowl, combine the fluffed couscous, thawed peas, toasted walnuts, crumbled feta, and chopped parsley.
- Drizzle with additional olive oil and lemon juice (if using), season with salt and pepper to taste, and toss gently to combine. Serve warm or at room temperature.


