
For years, I struggled to achieve truly fluffy biscuits, often pulling out dense, disappointing pucks from the oven. It felt like an elusive baking mystery, despite countless attempts.
But I finally cracked the code to making consistently light, impossibly tender biscuits, and trust me, this recipe is a game-changer.
It’s the reliable method for perfect results every time, delivering that warm, airy comfort ideal for any meal.
Beyond Basic: Why This Fluffy Biscuits Recipe Is Your New Go-To
Cracking the Code: No More Dense Biscuits!
This recipe directly addresses the most common frustration: dense or tough biscuits. We focus on specific techniques that actively prevent gluten overdevelopment, ensuring a delicate, tender crumb.
You’ll learn how to handle the dough just enough, but never too much, which is paramount for a light texture.
The “Simple Trick” for Irresistible Fluffiness
Our secret lies in a particular layering method – a gentle “pat and fold” technique – combined with the strategic use of extremely cold butter.

This creates dozens of thin layers that steam open in the oven, giving your fluffy biscuits their signature sky-high rise and airy interior.
Quick & Easy: Delicious Results in Under 30 Minutes
Despite its impressive results, this recipe is surprisingly efficient. With just 15 minutes of prep and 12-15 minutes in the oven, you can enjoy freshly baked, warm biscuits in roughly 30 minutes total.
It’s perfect for a spontaneous breakfast, a quick side dish, or an impromptu weekend treat.
The Essential Ingredients for Your Best Fluffy Biscuits
The Foundation: All-Purpose Flour & Leavening Power
All-purpose flour provides the necessary structure without being overly heavy, creating a delicate balance for these fluffy biscuits.
Baking powder and baking soda are the dynamic duo here: the powder gives an initial lift, while the soda reacts with the buttermilk to provide an extra boost and tenderizing effect.
The “Cold Butter” Secret: What It Does and Why It Matters
Very cold butter, cut into small cubes or grated, is the absolute cornerstone of flaky biscuits.
As the butter melts in the hot oven, it releases steam, creating tiny air pockets and separating the layers of dough, which results in that incredible flakiness and signature height.
Buttermilk’s Role: Tang, Tenderness, and Texture
Cold buttermilk is essential. Its acidity reacts with the baking soda to produce carbon dioxide, enhancing the biscuit’s rise.
Beyond leavening, buttermilk also tenderizes the dough, yielding a softer crumb and imparting a subtle, pleasant tang.
Optional Sweetness: A Touch of Sugar
Adding a tablespoon of granulated sugar is entirely optional, but it does contribute a hint of sweetness that rounds out the flavor.
It also aids in achieving a beautiful golden-brown crust, making your biscuits even more appealing.
A Pinch of Salt: Balancing Flavors
Salt is a flavor enhancer, crucial for balancing the richness of the butter and the tang of the buttermilk.
Even a small amount brightens all the other flavors, ensuring your fluffy biscuits aren’t bland.
Gather Your Gear: Essential Tools for Biscuit Success
Mixing Bowls and Whisk
A large mixing bowl gives you ample space to combine your dry ingredients thoroughly and later incorporate the butter and buttermilk without making a mess.
A whisk ensures that your flour, leavening agents, and salt are evenly distributed, preventing pockets of unactivated baking powder or soda.
The Butter Cutter: Pastry Blender, Forks, or Grater?
To incorporate the cold butter efficiently, a pastry blender is ideal, quickly cutting the butter into the flour.
Alternatively, two knives or even your fingertips can work, but for best results and to keep the butter as cold as possible, a box grater is also excellent for quickly creating small, even butter pieces.
The Perfect Cut: Biscuit Cutters (and Smart Alternatives)
A 2 to 2 1/2-inch biscuit cutter creates uniform, professional-looking biscuits that bake evenly.
If you don’t have one, a drinking glass with a similar diameter, dipped in flour, can serve as a functional alternative; just ensure it has a sharp edge.
Baking Sheet Prep: Parchment Paper vs. Flour
Lining your baking sheet with parchment paper is the easiest way to ensure non-stick baking and effortless cleanup, while also promoting even heat distribution.
Alternatively, a light dusting of flour on the baking sheet will also prevent sticking and can contribute to a slightly crispier bottom crust.
Step-by-Step: Crafting Your Perfect Fluffy Biscuits
- Preheat Oven and Prep Baking Sheet:
Set your oven to 425°F (220°C) to ensure it’s piping hot when the biscuits go in, promoting an immediate, vigorous rise.
Lightly dust a baking sheet with flour or line it with parchment paper to prevent sticking and aid in even baking and easy removal.
- Combine Dry Ingredients:
In a spacious bowl, thoroughly whisk together the flour, baking powder, baking soda, salt, and optional sugar.
This crucial step ensures even distribution of leavening agents, vital for a consistent, airy texture and uniform rise in every fluffy biscuit.
- Incorporate the Cold Butter:
Add the very cold, cubed or grated unsalted butter to your dry mixture.
Using your fingertips, a pastry blender, or two knives, quickly work the butter into the flour until it resembles coarse crumbs with some pea-sized butter pieces still visible.
The key here is to work efficiently and keep the butter as cold as possible to prevent it from melting, which is essential for creating those flaky layers and ultimately, fluffy biscuits.
- Add Cold Buttermilk (Gently!):
Pour in the cold buttermilk. Stir gently with a fork until the ingredients are just combined and a shaggy, somewhat sticky dough forms.
Do not overmix! Overmixing develops gluten, leading to tough, dense biscuits instead of light, fluffy ones. Resist the urge to keep stirring once barely combined, even if a few dry spots remain.
- The “Pat and Fold” Technique for Layers:
Turn the shaggy dough out onto a lightly floured surface.
Gently pat the dough into a roughly 1-inch thick rectangle. Fold one-third of the dough over the middle, then fold the other third over that, much like folding a letter.
Rotate the dough 90 degrees and repeat this patting and folding process 2-3 more times.
This methodical layering creates dozens of thin layers that will puff up dramatically in the oven, resulting in incredible fluffiness and tenderness without overworking the dough, which is the magic behind truly fluffy biscuits.
- Cut Your Biscuits (No Twisting!):
Gently pat the dough into a final 1-inch thick rectangle.
Using a 2 to 2 1/2-inch biscuit cutter, press straight down into the dough. Do not twist the cutter, as this can seal the edges of the biscuit and inhibit a good, even rise.
Gather dough scraps and gently re-roll only once or twice; overworking scraps will yield tougher, less fluffy biscuits.
- Arrange on Baking Sheet:
Place the cut biscuits onto your prepared baking sheet.
For softer-sided biscuits, arrange them so they are just touching, which helps them steam each other and rise taller. For crispier edges, space them slightly apart.
- Bake to Golden Perfection:
Bake in your preheated oven for 12-15 minutes, or until the tops are beautifully golden brown and the biscuits have risen significantly.
Keep an eye on them; ovens vary. The internal temperature should reach about 200-210°F (93-99°C) for perfectly cooked, fluffy biscuits.
- Serve Warm and Enjoy:
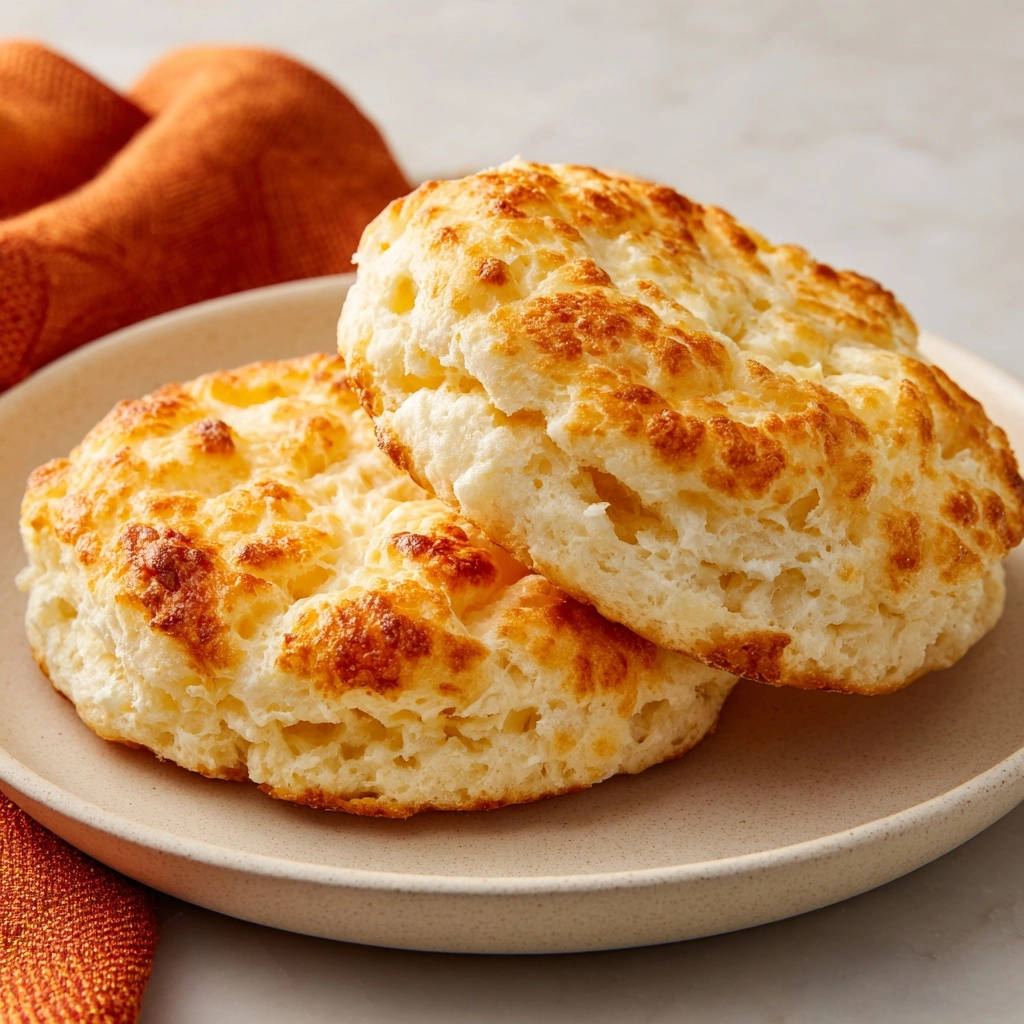
Remove from the oven and serve your delicious Fluffy Biscuits warm.
They are heavenly with classic toppings like butter, jam, honey, or a rich savory gravy, offering ultimate comfort in every bite.
Unlock Biscuit Brilliance: Advanced Tips & Expert Secrets
The Art of “Light Hand”: Preventing Toughness
The cardinal rule of biscuit making is minimal handling. Overmixing or excessive kneading develops gluten strands, leading to a tough, chewy texture rather than the desired tenderness.
Think of it as simply bringing the ingredients together; once a shaggy dough forms, stop. Your delicate touch ensures maximum tenderness.
Mastering the Fold: Creating Those Signature Layers
The “pat and fold” technique isn’t just for fun; it’s engineered for flakiness. Each fold creates new layers of butter-laced dough.
When these layers steam in the oven, they separate, giving your fluffy biscuits their distinct, airy structure and incredible height.
The “No Twist” Rule: Why It Matters for Rise
Pressing your biscuit cutter straight down, without twisting, is crucial. Twisting seals the delicate edges of the dough, preventing the layers from expanding freely.
A clean, straight cut allows your biscuits to rise tall and evenly, showcasing those beautiful, flaky layers we’re aiming for in truly tall and tender biscuits.
Chilling the Dough: An Extra Step for Perfection
For an even more pronounced rise and flakiness, consider chilling your cut biscuits for 10-15 minutes in the refrigerator before baking.
This keeps the butter very firm, ensuring it melts slowly and creates maximum steam, resulting in superior fluffy biscuits.
Baking to Golden Perfection: Signs of Doneness
Look for deeply golden tops and bottoms. A pale biscuit is often an undercooked biscuit, leading to a doughy interior.
They should also sound hollow when tapped, indicating they’re cooked through and airy inside, not dense.
Brushing for Shine: An Optional Finish
For an extra-golden top and a subtle boost in flavor, brush the tops of your unbaked biscuits with a little extra buttermilk or melted unsalted butter.
This simple step adds a beautiful bakery-worthy sheen to your finished fluffy biscuits.
Biscuit Blues? Common Problems & Quick Fixes
Why Are My Fluffy Biscuits Dense and Hard?
This is typically a sign of overmixing the dough, which develops too much gluten, or using butter that wasn’t cold enough, failing to create those steam pockets.
Ensure your butter is icy cold, handle the dough minimally, and check your baking powder and soda for freshness; expired leavening can also contribute to a lack of rise and dense texture.
My Biscuits Didn’t Rise Enough!
Common culprits include twisting the biscuit cutter, which seals the edges and prevents expansion, or using old, ineffective leavening agents.
Dough that has been overworked or kept at room temperature for too long can also hinder rise, as the butter melts prematurely.
The Biscuits are Dry and Crumbly
This often happens when too much flour is incorporated, either during mixing or excessive dusting on the work surface, or if the dough lacked sufficient buttermilk.
Overbaking can also dry out biscuits significantly, so watch them closely and remove them once golden brown.
My Biscuits are Unevenly Cooked
Uneven oven temperature is a frequent cause; consider rotating your baking sheet halfway through baking for uniform results.
Improper spacing on the baking sheet can also be a factor; if some biscuits are too close, they might steam instead of brown evenly.
Serving Suggestions: Enjoying Your Warm, Fluffy Creation
Classic Pairings: Butter, Jam, Honey, and Gravy
There’s nothing quite like a warm, fluffy biscuit slathered with softened butter, a dollop of homemade berry jam, or a drizzle of golden honey.
For a savory treat, serve them alongside a rich sausage gravy for the ultimate comfort food experience.
Sweet or Savory? Creative Topping and Filling Ideas
Beyond the classics, consider fruit compotes like warm apple cinnamon or peach, or a decadent chocolate hazelnut spread for a sweet indulgence.
For savory variations, try them with shredded cheddar cheese baked in, or filled with herbs like chives and rosemary.
Beyond Breakfast: Biscuit Sandwiches and More
Fluffy biscuits make an excellent base for mini breakfast sandwiches with scrambled eggs and crispy bacon, or even fried chicken.
They can also transform into quick, individual pot pies, topped with a creamy vegetable and chicken filling, making them versatile for any meal.
Freshness & Convenience: Storing and Preparing Biscuits Ahead
Best Way to Store Baked Fluffy Biscuits
Once baked, allow your fluffy biscuits to cool completely before storing them in an airtight container at room temperature for up to 2-3 days.
For longer storage, freeze cooled biscuits in a freezer-safe bag for up to 2 months.
Freezing Unbaked Dough for Future Enjoyment
You can prepare the dough, cut out your biscuits, and freeze them raw on a baking sheet until solid. Then transfer them to a freezer bag.
When ready to bake, place frozen biscuits directly onto a prepared baking sheet and bake as directed, adding a few extra minutes to the baking time.
Reheating for that “Just Baked” Taste
To revive leftover baked biscuits, wrap them in foil and warm them in a 300°F (150°C) oven for about 10-15 minutes, or until heated through.
This method helps restore their tender interior without drying them out, making them almost as good as fresh from the oven.
Your Fluffy Biscuit Questions Answered
Can I Use Different Kinds of Flour for Fluffy Biscuits?
While all-purpose flour is recommended for its balance, you can use self-rising flour, omitting the baking powder and soda, but results may vary slightly in texture.
Pastry flour can also be used for an even more tender crumb, though it might reduce the overall rise. For more general advice on homemade baked goods, check out our guide on achieving fluffy homemade biscuits.
What if I Don’t Have Buttermilk?
No buttermilk? No problem! You can easily make a substitute by adding 1 tablespoon of lemon juice or white vinegar to a liquid measuring cup, then filling the rest of the way to 3/4 cup with regular milk.
Let it sit for 5-10 minutes until it slightly curdles; this acidity will activate the baking soda just like real buttermilk.
Can I Make These Fluffy Biscuits Gluten-Free?
Yes, you can adapt this recipe using a high-quality gluten-free all-purpose flour blend, especially one designed for baking.
You might need to add a touch more buttermilk if the dough feels too dry, as gluten-free flours absorb liquids differently, but the technique remains largely the same.
Is it Possible to Make These Fluffy Biscuits Vegan?
Absolutely! Substitute the unsalted butter with a good quality plant-based butter alternative that comes in sticks and is designed for baking.
For the buttermilk, use a plant-based milk (like almond or soy) with a tablespoon of lemon juice or apple cider vinegar, allowing it to curdle before mixing.
Why is My Biscuit Dough Too Sticky or Too Dry?
Dough that’s too sticky may need a tiny bit more flour, added gradually, until it’s just manageable without adhering excessively to your hands or surface.
If it’s too dry and crumbly, slowly add an additional tablespoon of cold buttermilk until the dough comes together in a shaggy mass, being careful not to overmix.
Ready to Bake? Your Fluffy Biscuit Journey Begins Now!
Now that you’re equipped with all the secrets, tips, and precise instructions, you’re ready to master the art of making perfect fluffy biscuits.
Say goodbye to dense, tough results and hello to a basket full of warm, tender, and incredibly satisfying biscuits that will impress everyone at your table.
Get ready to enjoy the simple pleasure of homemade goodness!

Fluffy Biscuits
Course: BreadCuisine: American CuisineDifficulty: easy6
servings15
minutes12
minutes30
minutesAmerican Cuisine
Ingredients
2 cups all-purpose flour, plus more for dusting
1 tablespoon baking powder
1/2 teaspoon baking soda
1/2 teaspoon salt
1 tablespoon granulated sugar (optional)
1/2 cup (1 stick) unsalted butter, very cold and cut into small cubes or grated
3/4 cup cold buttermilk, plus more if needed
Directions
- Preheat your oven to 425°F (220°C). Lightly dust a baking sheet with flour or line with parchment paper.
- In a large bowl, whisk together the flour, baking powder, baking soda, salt, and sugar (if using).
- Add the very cold butter pieces to the dry ingredients. Using your fingertips, a pastry blender, or two knives, quickly cut the butter into the flour until the mixture resembles coarse crumbs with some pea-sized pieces of butter remaining. The key here is to keep the butter as cold as possible and work quickly to prevent it from melting.
- Pour in the cold buttermilk. Stir gently with a fork until just combined and a shaggy dough forms. Do not overmix! Overmixing develops gluten, leading to tough biscuits, so resist the urge.
- Turn the dough out onto a lightly floured surface. To ensure maximum fluffiness and layers without overworking, gently pat the dough into a roughly 1-inch thick rectangle. Fold one-third of the dough over the middle, then fold the other third over that (like folding a letter). Rotate the dough 90 degrees and repeat this patting and folding process 2-3 more times. This creates layers that will puff up in the oven.
- Gently pat the dough into a final 1-inch thick rectangle. Using a 2 to 2 1/2-inch biscuit cutter, press straight down into the dough. Do not twist the cutter, as this can seal the edges and prevent a good rise. Re-roll scraps only once or twice, as dough worked too much will yield tougher biscuits.
- Place the cut biscuits onto your prepared baking sheet, allowing them to touch slightly for a softer side, or spacing them for crispier edges.
- Bake for 12-15 minutes, or until the tops are golden brown and the biscuits have risen significantly.
- Serve warm with your favorite toppings like butter, jam, or gravy.
Notes
- Serve warm with your favorite toppings like butter, jam, or gravy.


