Let’s be honest. Layered dessert bars are pure joy. That perfect combination of textures and flavors in one bite – whether it’s a chewy base, a creamy filling, or a snappy chocolate topping – is just unbeatable. But if you’ve ever tried to cut into a beautiful batch of layered bars, only to have them crumble, smear, or stick horribly to your knife, you know the frustration. It’s like your dessert dreams turn into a messy, shapeless pile!
I used to struggle with this all the time, especially with rich, soft layers like these incredible peanut butter chocolate fudge bars. I craved those neat, bakery-worthy squares but often ended up with something that looked… well, let’s just say “rustic.” After much trial and error (and a few ugly batches of bars), I finally cracked the code. There’s a simple, almost magical trick to cutting these layered beauties cleanly every single time. It’s all about a little patience and one clever step right before you slice.
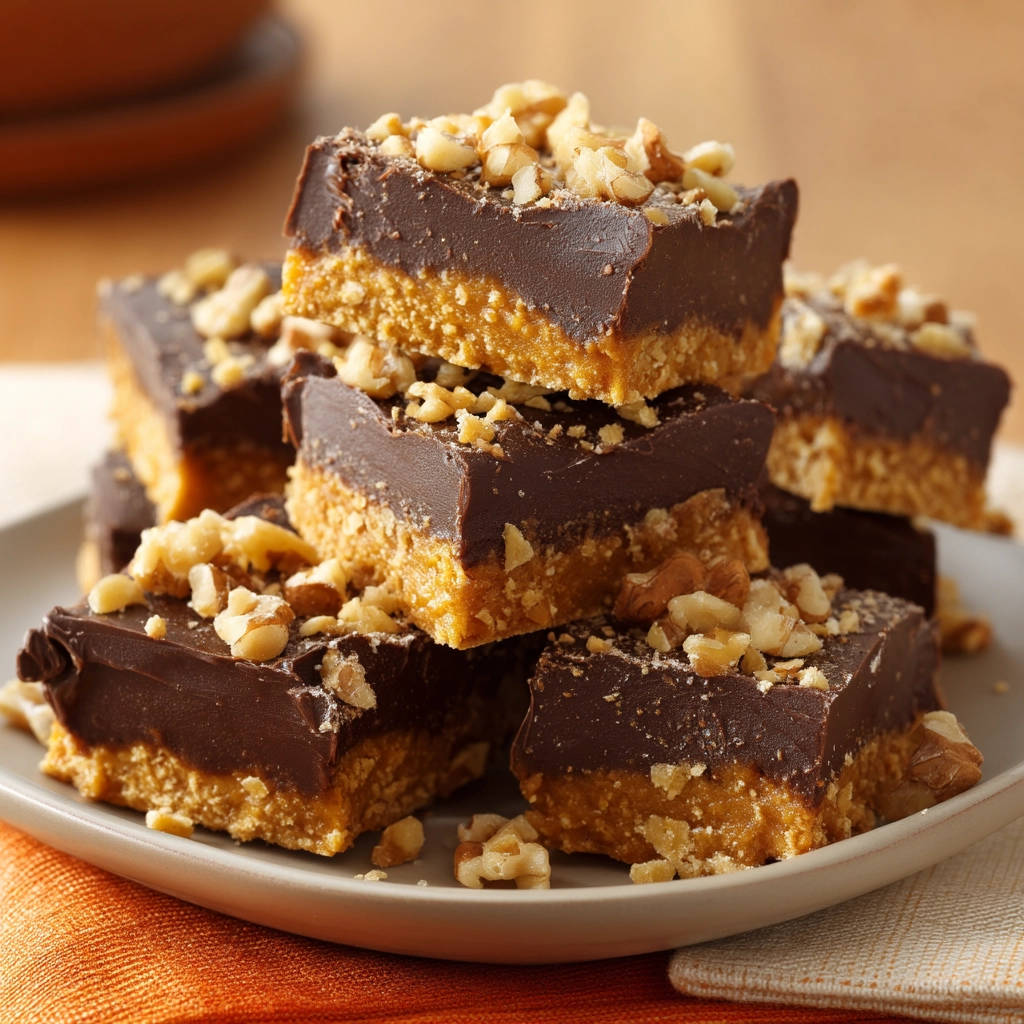
These aren’t just any peanut butter chocolate bars. They’re the kind that deliver on flavor, texture, and presentation. Get ready to impress everyone (including yourself!) with perfectly portioned squares of peanut butter and chocolate heaven. Forget the mess; let’s make some beautiful, sliceable Peanut Butter Chocolate Fudge Bars!
Why These Peanut Butter Chocolate Fudge Bars Are a Must-Make
Beyond the promise of clean cuts, these bars have so much to offer. They hit all the right notes for anyone who adores the classic combination of peanut butter and chocolate.
- No-Bake Bliss: Perfect for when you don’t want to turn on the oven, making them ideal for warmer weather or just a simple afternoon project. If you’re a fan of easy, oven-free desserts, you might also enjoy making another fantastic no-bake dessert.
- Irresistible Flavor Combo: The salty sweetness of peanut butter meets rich, melt-in-your-mouth chocolate. It’s a pairing that never gets old.
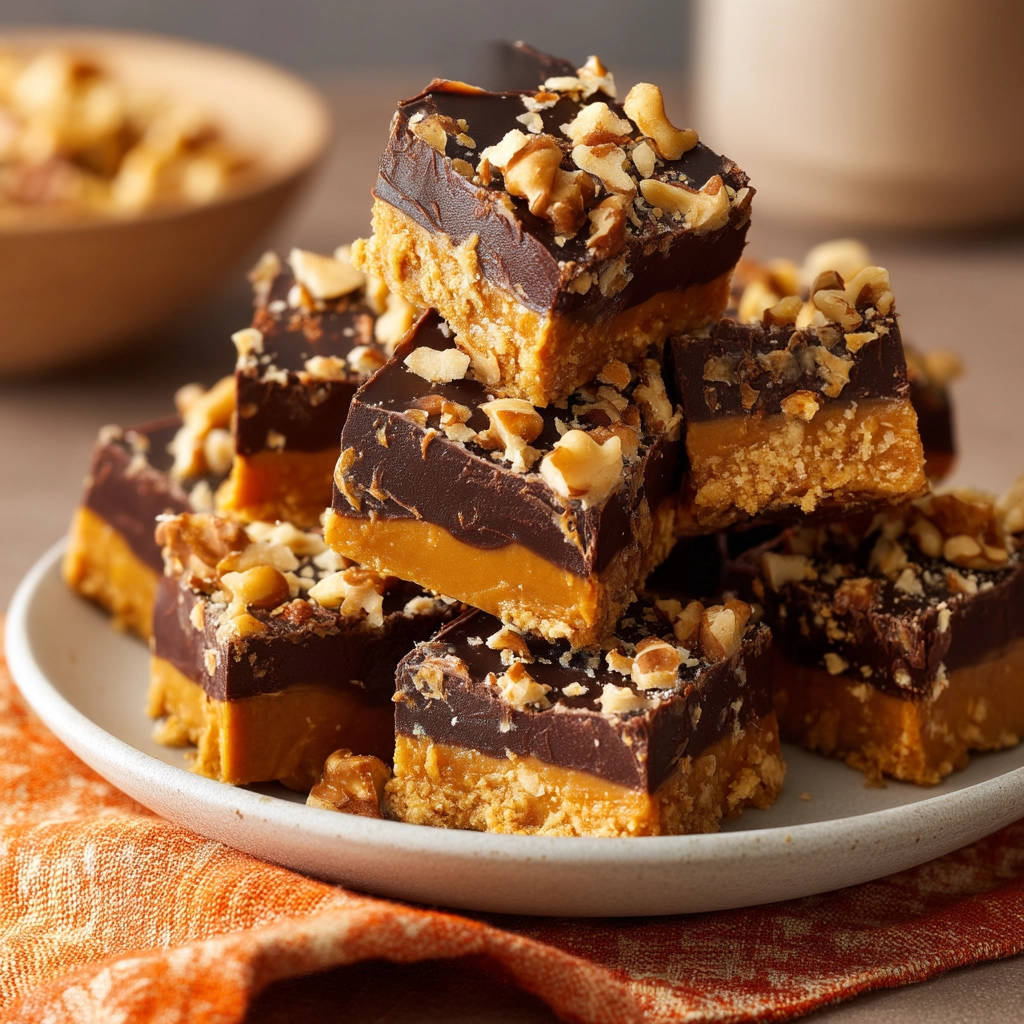
- Multiple Textures: You get the satisfying crunch of the graham cracker base, the smooth, creamy peanut butter layer, and the slightly firm chocolate topping, often studded with crunchy walnuts.
- Surprisingly Easy: With just a few simple steps and minimal fuss, these bars are very approachable for bakers of all skill levels.
- That Perfect Slice: Of course, the star feature! Once you learn the trick, cutting them becomes a joy, not a chore.
Gathering Your Sweet Ingredients
Creating these delectable layered bars requires just a handful of pantry staples. Each ingredient plays a specific role in building the flavor and structure of the bar, from the sturdy base to the luscious layers above.
Let’s break down what you’ll need:
- Graham Cracker Crumbs: These form the essential crunchy base. You can buy pre-crushed crumbs for convenience or crush your own graham crackers in a food processor or by placing them in a bag and rolling with a pin. About 10-12 full sheets of graham crackers will yield 1 and 1/2 cups of crumbs.
- Unsalted Butter (Melted): This is the binder for our graham cracker base, holding it all together once chilled. Using unsalted butter gives you control over the saltiness, allowing the peanut butter flavor to shine. You’ll need 1/2 cup melted for the crust.
- Creamy Peanut Butter: The star of the middle layer! Opt for a standard creamy peanut butter (like Jif or Skippy) rather than natural or organic types where the oil separates easily. The consistency of standard creamy peanut butter is key to getting the right texture for the filling. You’ll need 1 and 1/2 cups.
- Unsalted Butter (Softened): This butter is combined with the peanut butter and sugar to create the smooth, fudgy middle layer. Ensure it’s properly softened at room temperature, not melted, for easy blending and a smooth texture. You’ll need 1/2 cup softened.
- Confectioners Sugar (Powdered Sugar): This very fine sugar dissolves easily into the softened butter and peanut butter, creating a wonderfully smooth, sweet, and slightly dense fudge-like consistency for the middle layer. You’ll need a full 2 cups.
- Semi-Sweet Chocolate Chips: These melt down to form the beautiful chocolate topping. Semi-sweet chocolate provides a nice contrast to the sweetness of the peanut butter layer without being overly bitter. 12 ounces is the perfect amount for a generous top layer.
- Shortening or Coconut Oil: This is the secret weapon for a smooth, crack-free chocolate topping that cuts beautifully. Adding just a couple of tablespoons helps the chocolate set with a little give, preventing that brittle snap that can cause cracking when slicing. You’ll need 2 tablespoons.
- Chopped Walnuts (Optional but Recommended): Sprinkled over the chocolate layer, they add a delightful crunch and nutty flavor that complements the peanut butter and chocolate wonderfully. If you have a nut allergy or prefer a smooth top, you can simply omit these. You’ll need 1 cup if using.
Crafting Layers of Decadence: Step-by-Step Guide
Putting these bars together is a straightforward process, involving layering and chilling. Follow these steps carefully, paying special attention to the chilling times, which are crucial for success.
-
Prepare Your Pan: Grab an 8×8 inch baking pan. The best way to ensure your bars come out easily later is to line it completely with parchment paper. Leave a generous overhang on two opposite sides. This overhang acts like handles, allowing you to lift the entire block of chilled bars out of the pan before cutting, which makes slicing so much easier.
-
Build the Crumb Crust: In a medium-sized bowl, combine your graham cracker crumbs and the 1/2 cup of melted unsalted butter. Stir them together until the crumbs are evenly moistened. Pour this mixture into the bottom of your prepared pan. Use the bottom of a glass, a flat measuring cup, or your clean hands to press the crumbs down firmly and evenly into the pan. You want a compact, sturdy layer. Place the pan in the refrigerator to chill for at least 15 minutes. This allows the butter to firm up, setting the base while you prepare the next layer.
-
Create the Creamy Peanut Butter Layer: While the crust chills, work on the delightful peanut butter filling. In a large bowl, use an electric mixer or a sturdy whisk to beat together the 1 and 1/2 cups of creamy peanut butter and the 1/2 cup of softened unsalted butter until the mixture is smooth and well combined. Gradually add the 2 cups of confectioners sugar, mixing on low speed at first to avoid a sugar cloud, then increasing the speed until everything is fully incorporated and the mixture is smooth and creamy. It should resemble a thick, spreadable dough or very thick frosting. Carefully spread this peanut butter mixture in an even layer over the chilled graham cracker crust. Take your time to get it smooth right to the edges. Return the pan to the refrigerator once more.
-
Melt the Chocolate Topping: Now for the grand finale – the chocolate layer. Place the 12 ounces of semi-sweet chocolate chips and the 2 tablespoons of shortening or coconut oil in a microwave-safe bowl. Microwave in 30-second bursts, stirring thoroughly after each interval. Chocolate can hold its shape even when melted, so stirring is key to gauge consistency and prevent burning. Continue until the mixture is completely smooth and glossy with no lumps. Once melted, let the chocolate sit for about 5 minutes to cool slightly. This step is important; pouring piping hot chocolate onto the peanut butter layer could cause it to melt too much.
-
Top with Chocolate and Walnuts: Pour the slightly cooled melted chocolate evenly over the chilled peanut butter layer. Gently spread it with a spatula to cover the surface smoothly. If you’re using them, sprinkle the chopped walnuts over the warm chocolate layer right away. The warmth of the chocolate will help them stick nicely as it sets.
-
The Crucial Chill Time: This is perhaps the most critical step, even more so than the initial chills. Return the pan with all three layers to the refrigerator. Chill for at least 4 hours, but ideally, let them set overnight. This long chilling period ensures all the layers, especially the peanut butter and chocolate, are completely firm. This firmness is what will allow you to achieve those clean, distinct slices later on. Patience here pays off!
-
Unlock the Clean Cut Secret: Ready for the baker’s trick? Once your bars are thoroughly chilled and firm, fill a tall glass or container with hot water. Take a sharp, non-serrated knife (chef’s knife or a large slicing knife works well). Dip the blade of the knife into the hot water for a few seconds. Immediately wipe the blade completely dry with a clean kitchen towel. Make a straight cut through the chilled bars. You’ll notice the warm, dry blade slices through the chocolate without cracking it and glides through the softer layers without dragging them. For each subsequent cut, repeat the process: dip the knife in hot water, wipe it dry, then slice. This keeps the blade clean and warm for every cut. Once you’ve made all your cuts (typically into 16 squares for an 8×8 inch pan), use the parchment paper overhang to gently lift the entire block of cut bars out of the pan. Separate the squares and arrange them as desired. This technique is also fantastic for getting that perfect bite in bar recipes that sometimes struggle with clean edges.
-
Storage: Store the cut peanut butter chocolate fudge bars in an airtight container in the refrigerator. They stack well once cut.
Pro Tips for Perfect Peanut Butter Chocolate Bars
Here are a few extra pointers to make sure your bars turn out absolutely perfect:
- Measuring Graham Crumbs: If crushing your own, measure the crumbs after they’ve been crushed, not before. This ensures you have the correct amount for the crust.
- Softened Butter is Key: For the peanut butter layer, make sure your butter is truly softened to room temperature. If it’s too cold, it won’t cream smoothly with the peanut butter and sugar, resulting in a grainy texture.
- Don’t Rush the Chill: Seriously, the chilling time in step 6 is non-negotiable for that perfect slice. Four hours is the minimum, but overnight is even better for ultimate firmness.
- Choosing Peanut Butter: While creamy is recommended for the smoothest texture in the filling, if you prefer a slight crunch, you could use a natural creamy peanut butter or even a crunchy variety, but be aware the filling texture will be less uniformly smooth. Avoid oily, natural peanut butter that hasn’t been stirred well.
- Chocolate Quality: Using good quality semi-sweet chocolate chips will make a difference in the final taste of the topping.
- Nut Variations: If you’re not a fan of walnuts, feel free to omit them entirely. Or, substitute with chopped peanuts, pecans, or even a sprinkle of flaky sea salt over the chocolate for a sweet and salty twist.
Serving Suggestions
These peanut butter chocolate fudge bars are wonderfully rich and satisfying all on their own. Serve them chilled directly from the refrigerator for the best texture and cleanest bite.
They make a fantastic addition to a dessert table, are perfect for potlucks and parties, or simply enjoyed as a decadent treat with your afternoon warm beverage or a cool and creamy beverage.
Pairing them with a glass of cold milk is a classic choice that never disappoints!
Your Peanut Butter Chocolate Fudge Bar FAQs
Let’s tackle some common questions you might have about making these delicious bars.
How do I store Peanut Butter Chocolate Fudge Bars?
The best way to store these bars is in an airtight container in the refrigerator. Because of the creamy peanut butter layer and chocolate topping, they hold their shape and texture best when kept cold. They should last for up to a week in the fridge.
Can I use a different kind of chocolate?
Yes, you can! While semi-sweet is a popular choice for its balance, you could use milk chocolate for a sweeter, milder flavor or dark chocolate for a richer, more intense chocolate experience. Just ensure you’re using chocolate chips or chopped bar chocolate specifically designed for melting (like baking chocolate or couverture) and still include the shortening or coconut oil for the best slicing results.
What if I don’t have graham cracker crumbs?
No problem! You can substitute graham cracker crumbs with other types of cookie crumbs. Digestive biscuits, shortbread cookies, or even chocolate cookies (like Oreos, with the cream filling removed) would work well. The key is to use the same quantity of finely crushed crumbs and mix them with melted butter to create a pressable base.
How important is the chilling time?
The chilling time is absolutely crucial for the success of this recipe, particularly the final long chill (Step 6). The base needs to set initially so the peanut butter layer can be spread without mixing. The peanut butter layer needs to firm up so the warm chocolate doesn’t melt into it entirely. Most importantly, all layers need to be completely firm and cold before you attempt to cut. This firmness, combined with the hot knife trick, is what prevents crumbling and smearing, ensuring those beautiful, clean squares.
Can I freeze these bars?
Yes, these peanut butter chocolate fudge bars freeze beautifully! Once cut into squares, place them in a single layer on a baking sheet lined with parchment paper and freeze until solid. Then, transfer the frozen squares to an airtight freezer-safe container, separating layers with parchment or wax paper to prevent sticking. They can be frozen for up to 2-3 months. Thaw them in the refrigerator before serving.
Enjoy Your Homemade Peanut Butter Chocolate Fudge Bars!
There you have it! Delicious, easy-to-make, and now, thanks to that simple hot knife trick, perfectly sliceable Peanut Butter Chocolate Fudge Bars. They’re guaranteed to be a hit with anyone who tries them.
Give this recipe a try and taste the difference that a little patience and the right technique can make. I promise you won’t go back to messy, crumbled bars! Let me know in the comments below how yours turned out, or if you added any fun variations. Happy baking (well, no-baking)!
Peanut Butter Chocolate Fudge Bars

Ingredients
- 1 and 1/2 cups graham cracker crumbs
- 1/2 cup unsalted butter melted
- 1 and 1/2 cups creamy peanut butter
- 1/2 cup unsalted butter softened
- 2 cups confectioners sugar
- 12 ounces semi-sweet chocolate chips
- 2 tablespoons shortening or coconut oil
- 1 cup chopped walnuts
Directions
- Line an 8×8 inch baking pan with parchment paper, leaving an overhang on the sides for easy lifting.
- In a medium bowl, combine the graham cracker crumbs and melted butter. Press this mixture evenly into the bottom of the prepared pan to form the base layer. Chill in the refrigerator for at least 15 minutes while you prepare the next layer.
- In a large bowl, beat together the softened butter and peanut butter until smooth. Gradually add the confectioners sugar, mixing until well combined and smooth. Spread this peanut butter mixture evenly over the chilled graham cracker crust. Return the pan to the refrigerator.
- In a microwave-safe bowl, melt the chocolate chips and shortening or coconut oil in 30-second intervals, stirring after each, until completely smooth. Let it cool slightly, about 5 minutes.
- Pour the melted chocolate mixture evenly over the peanut butter layer. Sprinkle the chopped walnuts over the warm chocolate layer.
- Chill the bars in the refrigerator for at least 4 hours, or ideally until completely firm. This thorough chilling is key to getting clean cuts.
- To cut the bars cleanly: Fill a tall glass with hot water. Dip a sharp knife into the hot water, wipe it completely dry with a clean towel, and then make a straight cut through the chilled bars. Re-dip and wipe the knife clean and dry before each cut. This warms the blade just enough to slice through the chocolate layer without cracking it and prevents it from dragging the softer layers. Lift the entire block out of the pan using the parchment overhang and slice into squares. Store bars in an airtight container in the refrigerator.