
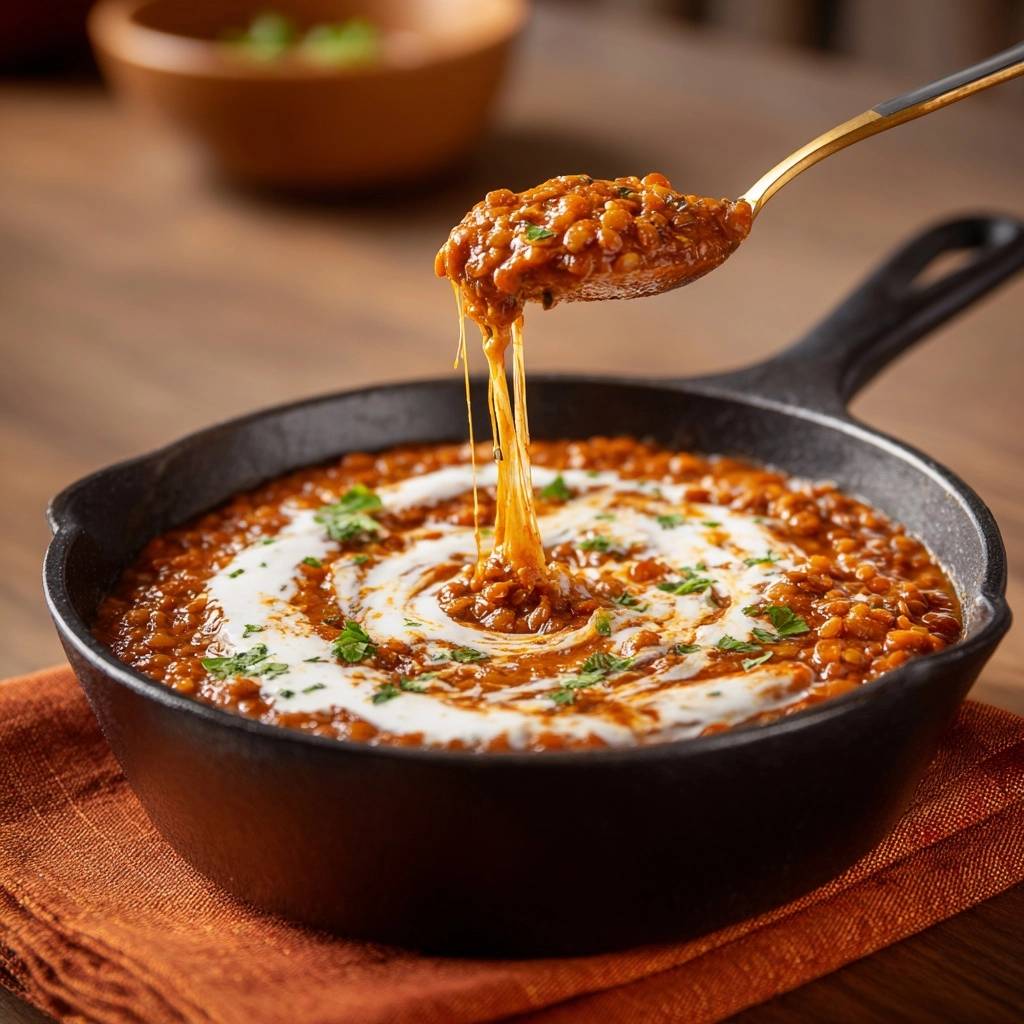
Ever end up with watery dal that refuses to thicken, no matter how long you simmer it? This Cast Iron Creamy Dal changes that. You’ll get a stretchy, scoopable texture that pulls like strings when you stir, all thanks to a vigorous evaporation step in cast iron’s even heat. Dinner’s ready in under an hour, and it beats any soupy version hands down.
Cast iron makes the difference because it holds heat steadily, letting you crank up the simmer without scorching the bottom. Therefore, excess water evaporates fast, leaving behind that luxurious creaminess. In addition, the skillet infuses subtle depth into every bite.
Here’s the pro tip that seals it: after the initial simmer, uncover and stir every two minutes on medium-high. The cast iron prevents hot spots, so your Cast Iron Creamy Dal thickens perfectly every time. Oh man, that stringy pull is pure satisfaction.
Why Cast Iron Elevates Creamy Dal
Cast iron’s superior heat retention transforms Cast Iron Creamy Dal from watery mess to thick perfection. Unlike stainless steel, which has hot spots that burn the base during evaporation, cast iron spreads heat evenly. So, you can simmer vigorously without worry.
However, stainless often leaves dal soupy because it doesn’t hold steady temps. In addition, cast iron’s thermal mass locks in that scoopable consistency. You’ll never go back to uneven pans.
Cast Iron Skillet Heat Dynamics
Cast iron’s high thermal mass absorbs heat slowly and releases it evenly. Therefore, during the high-heat evaporation, no hot spots form to scorch your dal. Compare that to thin aluminum pans, which spike and burn unevenly.
In addition, this steady heat gelatinizes lentil starches perfectly for creamy Cast Iron Creamy Dal. It’s science you can taste.
Seasoning Impact on Dal Flavor
A well-seasoned cast iron skillet adds subtle richness to Creamy Dal without any metallic tang. The polymerized oil layer infuses faint nutty depth into the lentils. Keep it seasoned by wiping with oil after each use and avoiding soap.
However, a poorly seasoned pan might impart off flavors. Quick fix: bake on a thin oil layer at 450°F for an hour.
Core Ingredients for Creamy Dal Success
Red lentils form the backbone of Cast Iron Creamy Dal because they break down into a creamy base without turning mushy. Rinse them thoroughly to remove excess starch, which prevents gumminess. One cup yields four hearty servings.
Onions, garlic, and ginger build the aromatic paste that flavors every spoonful. Tomatoes add acidity and body, breaking down into a thick masala. In addition, yogurt swirled in at the end brings tangy creaminess that stabilizes the texture.
Spices like cumin seeds and turmeric provide balance: cumin releases volatile oils when sizzled, while turmeric lends earthiness and golden hue. Use fresh ginger for max punch; grated releases more oils than chopped. No yogurt? Sub thick coconut cream, but adjust tang with lemon.
For another way to bring out subtle spices, explore the gentle steam method for creamy coconut curry mussels.
Red Lentils: Texture Foundation
Red lentils cook fast and split open, creating the stretchy creaminess in Cast Iron Creamy Dal. They beat green lentils, which stay firm. Rinse under cold water until clear to ditch starchy water that causes soupiness.
Aromatics: Onion, Garlic, Ginger Trio
Finely chop onions for quick softening and sweet moisture release. Mince garlic and grate ginger to maximize flavor oils in the paste. Sliced versions take longer and yield less integrated taste.
Spices: Cumin Seeds to Garam Masala
Sizzle cumin seeds first to bloom their oils, adding smoky warmth. Turmeric brings color and grounding earthiness; one teaspoon prevents blandness. Garam masala at the tomato stage layers complexity without overpowering.
Building the Flavor Base in Cast Iron
Start by heating two tablespoons oil in your cast iron skillet over medium. Add cumin seeds; they’ll sizzle and pop in 30 seconds, filling your kitchen with that irresistible aroma. Stir in onion, garlic, and ginger next.
Saute five minutes until golden and fragrant; the onions soften and release sweetness. Then, add chopped tomatoes, turmeric, garam masala, and salt. Cook another five minutes as tomatoes break down into a jammy paste. This base is key for flavorful Cast Iron Creamy Dal.
Watch for sticking; a splash of water loosens it if needed. The paste should glisten and smell rich, not raw.
Tempering Cumin Seeds Precisely
Heat oil to shimmering, then drop in cumin. Listen for the 30-second sizzle and watch them darken slightly. Overdo it, and they turn bitter; pull early for nutty perfection.
Sauteing to Golden Paste Perfection
Stir aromatics constantly for five minutes. Onions go translucent, then golden, releasing moisture for a thick base. Frequent stirring prevents browning too fast.
Tomato Breakdown Technique
Chopped tomatoes integrate fully in five minutes, turning jammy and oil-slicked. Mash any chunks with your spoon. This creates the saucy foundation without excess liquid.
Simmering Lentils to Creamy Dal Consistency
Add rinsed lentils and four cups water to the paste. Bring to a boil, then drop to low, cover, and simmer 20 minutes. Lentils soften and absorb flavors beautifully.
Test doneness: they should smash easily between fingers. This covered phase builds the base for Cast Iron Creamy Dal’s creaminess. Transition next to the magic evaporation.
Initial Covered Boil Phase
The lid traps steam for even cooking over 20 minutes on low. Lentils plump and tenderize without drying out. Poke one; it should yield softly before uncovering.
Evaporation Secret: No Watery Cast Iron Dal
Here’s the game-changer for Cast Iron Creamy Dal: uncover, crank to medium-high, and simmer vigorously 10 to 15 minutes. Stir every two minutes as steam escapes fast, thickening the dal to a rich, stringy pull. Cast iron’s even heat prevents burning while evaporating excess water.
The lentils’ starch gelatinizes, creating that stretchy, scoopable texture. You’ll see it thicken before your eyes; the sauce clings to the spoon. No more watery dal disasters.
Pro tip: if it thickens too fast, lower heat slightly. This step nails Cast Iron Creamy Dal every time.
Why Evaporation Thickens Dal
High heat drives off water as steam, concentrating lentil starches into a gel-like mass. It pulls in strings when stirred, unlike slow simmers that stay soupy. Cast iron excels here with no scorching.
Stirring Rhythm for Even Reduction
Stir every two minutes to redistribute heat and prevent crust. Cast iron’s distribution keeps the bottom safe during vigor. Miss a stir, and edges might stick.
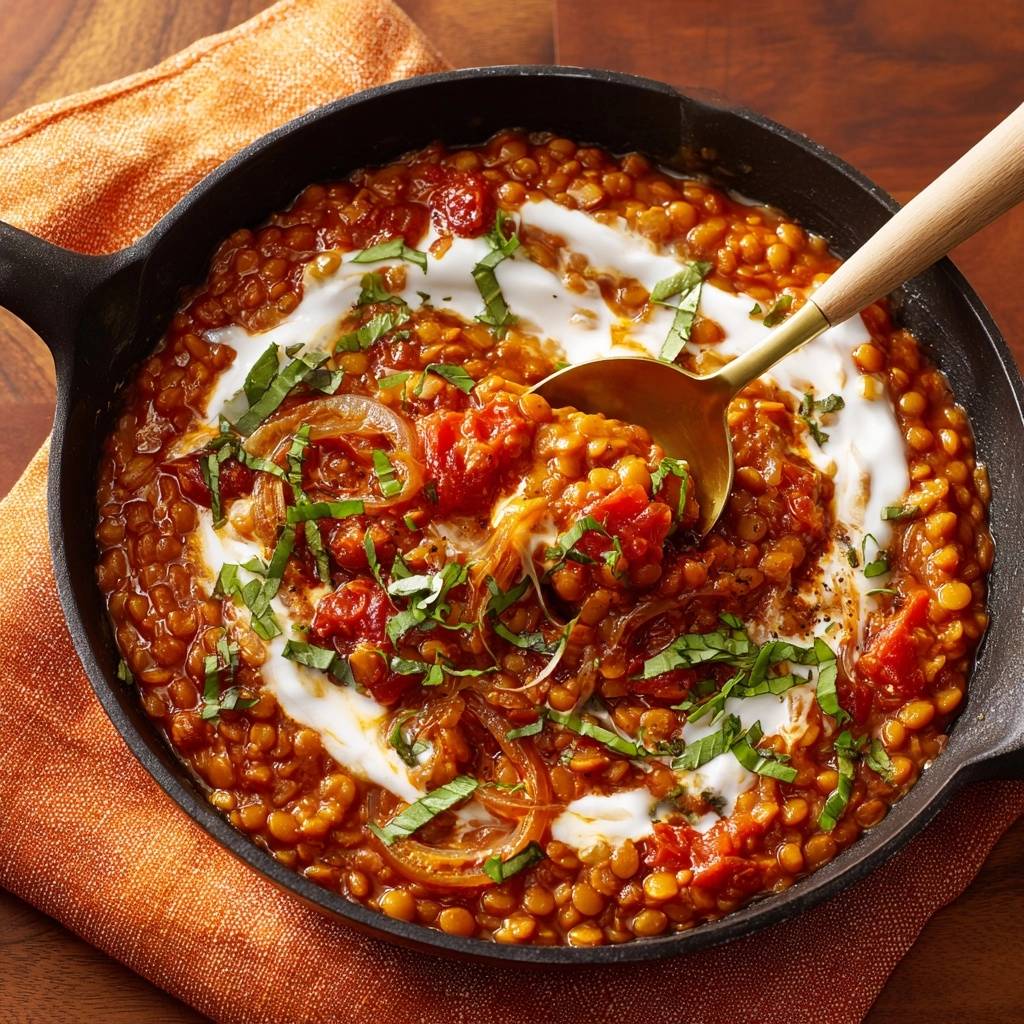
Yogurt Swirl for Luxurious Creamy Finish
Lower heat to low, dollop half cup plain yogurt over the surface, and swirl gently into patterns. The low temp prevents curdling, adding silky tang to Cast Iron Creamy Dal. Remove from heat right after.
This finish contrasts the spices perfectly, with yogurt’s acids brightening the richness. Garnish with chopped cilantro for fresh pop. Serve hot; the swirl holds its shape beautifully.
Preventing Yogurt Separation
Dollop on surface at low heat; swirling incorporates without shocking the proteins. Plain yogurt works best; Greek is thicker but less tangy. High heat splits it every time.
Cilantro Garnish Layering
Chop fresh cilantro finely for even scatter. It adds bright, citrusy lift right before serving. Wilted herbs dull the contrast.
Cast Iron Dal Flavor Variations
Swap red lentils for yellow, but simmer 10 minutes longer for breakdown in Cast Iron Creamy Dal. For dairy-free, use coconut cream instead of yogurt; it matches thickness perfectly. Add spinach after evaporation to wilt without watering down.
Boost with grated carrots in the paste for subtle sweetness. Keep spice levels balanced; extra chili for heat. These tweaks maintain that creamy texture you crave.
Dairy-Free Creamy Dal Adaptations
Coconut cream mimics yogurt’s body; stir in post-evaporation on low. It thickens similarly without curdling risk. Full-fat cans yield the best luxe feel.
For a similar approach to achieving a rich result, explore this creamy spinach chickpea curry.
Vegetable Boosts Without Wateriness
Add low-water veggies like spinach or kale after evaporation; they wilt fast. Chop fine to integrate. Avoid watery ones like zucchini pre-simmer.
Avoiding Watery Dal Pitfalls
Common issue: too much water makes Cast Iron Creamy Dal soupy. Stick to four cups per cup lentils; adjust by evaporating longer if needed. Under-rinsed lentils release starch that thins it out.
High heat without stirring burns the base. Always use cast iron for control. Mushy? Extra evaporation revives it to creamy glory.
Ratio Mistakes and Fixes
Four-to-one water-to-lentil ratio is ideal. Too soupy? Extend evaporation five minutes. Signs: doesn’t pull strings yet.
Overcooking Texture Rescue
Mush from over-sim? Uncover and evaporate extra on medium. Stir vigorously; it rebounds to thick Cast Iron Creamy Dal.
What to Pair With Your Creamy Dal
To round out your meal, consider these complementary dishes that bring their own appeal to the table.
- For a fluffy bread to soak up every bit of your creamy dal, try this recipe for Garlic Naan.
- Adding a bit of sweetness and crunch, these roasted carrots and crispy chickpeas offer a nice contrast to the thick texture of your dal.
Pairing Cast Iron Creamy Dal
Pair with basmati rice that soaks up the rich sauce perfectly. Naan scoops it up, its chew contrasting the creaminess. Simple sides balance the depth.
Cucumber raita cools spice, while lime wedges add zing. These contrasts make Cast Iron Creamy Dal shine at any meal.
Staple Sides: Rice and Flatbreads
Basmati’s fluff absorbs best; jasmine works too. Warm naan in foil for soft scooping. Both elevate the dal’s texture.
Fresh Contrasts and Pickles
Cucumber raita and lime cut richness. Quick pickle onions for tang. They brighten every bite.
Make-Ahead Creamy Dal Storage Guide
Cool Cast Iron Creamy Dal fully before storing in airtight containers. Fridge keeps it good four days; flavors deepen overnight. Freeze in portions up to three months.
Reheat on low stove with a splash of water, stirring to revive creaminess. Avoid microwave; it toughens texture. Pro tip: portion flats for quick thaws.
Freezing Without Texture Loss
Freeze flat in bags, thaw overnight in fridge, then simmer low. Starch holds up well in cast iron batches.
Reheating to Original Creaminess
Low stove heat with stirs restores stringy pull. Add water drop by drop. Perfection returns fast.
Creamy Dal FAQ
Other Lentils for Cast Iron Dal?
Yellow lentils work but need 30-minute initial simmer for breakdown. Green stay firmer; not ideal for creamy Cast Iron Creamy Dal texture. Stick to red for foolproof results.
Fixing Watery Dal Texture?
Uncover and simmer medium-high 10 more minutes, stirring every two. Evaporation thickens it to stringy perfection. Cast iron prevents burning during rescue.
Best Cast Iron Skillet Size?
10- to 12-inch handles this yield perfectly, with room for stirring. Larger suits crowds; smaller crowds ingredients too much.
Vegan Swaps for Yogurt?
Blend soaked cashews with water into cream; one-half cup matches tang and thickness. Coconut cream alternative thickens similarly post-evaporation.
How Long Does It Last?
Fridge: four days airtight. Freezer: three months in portions. Reheat low to retain Cast Iron Creamy Dal’s creamy pull.

Creamy Dal
Course: Main CourseCuisine: IndianDifficulty: medium4
servings15
minutes45
minutes320
kcal60
MinutesTired of soupy dal? This cast iron recipe delivers thick, stretchy creaminess using evaporation simmer for perfect texture. Simple spices, yogurt finish, and foolproof method.
Ingredients
1 cup red lentils, rinsed
1 large onion, finely chopped
2 medium tomatoes, chopped
3 garlic cloves, minced
1-inch ginger, grated
1 teaspoon cumin seeds
1 teaspoon turmeric powder
1 teaspoon garam masala
1 teaspoon salt
4 cups water
1/2 cup plain yogurt
2 tablespoons oil or ghee
Fresh cilantro leaves, chopped for garnish
Directions
- Heat oil in a cast iron skillet over medium heat. Add cumin seeds and let them sizzle for 30 seconds.
- Stir in onion, garlic, and ginger. Saute 5 minutes until golden.
- Add tomatoes, turmeric, garam masala, and salt. Cook 5 minutes until tomatoes break down into a thick paste.
- Add rinsed lentils and water. Bring to a boil, then reduce to low, cover, and simmer 20 minutes until lentils are soft.
- No More Watery Dal Secret: Uncover and raise heat to medium-high. Simmer vigorously 10-15 minutes, stirring every 2 minutes. This evaporates excess water fast, thickening the dal to a rich, scoopable consistency without burning thanks to cast iron’s even heat. Sauce will pull like strings when stirred.
- Lower heat to low. Dollop yogurt over the surface and gently swirl into a decorative pattern for creamy finish and visual appeal. Remove from heat.
- Garnish with cilantro. Serve hot with rice or naan.
Notes
- Use cast iron for even heat distribution to prevent burning during evaporation. Stir frequently in step 5 for scoopable consistency. Yogurt adds creamy finish without curdling.


