
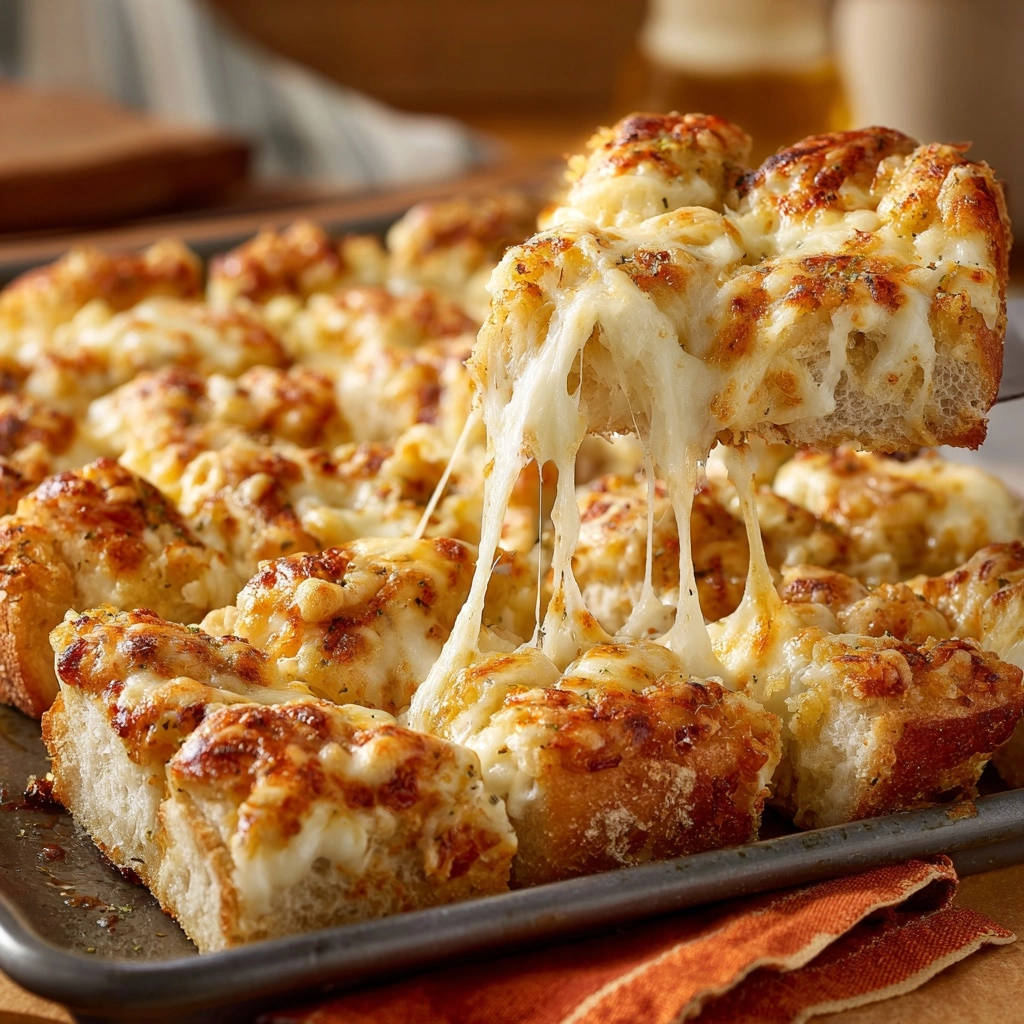
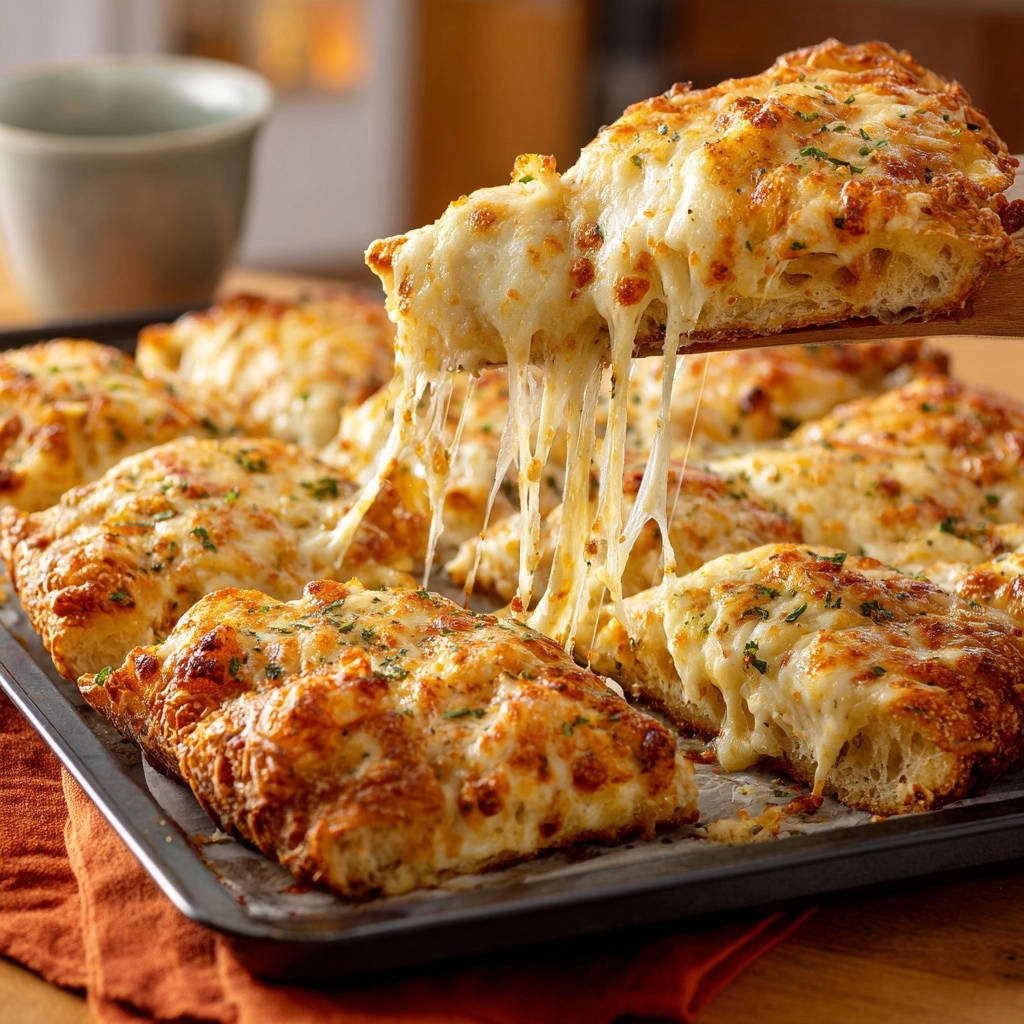
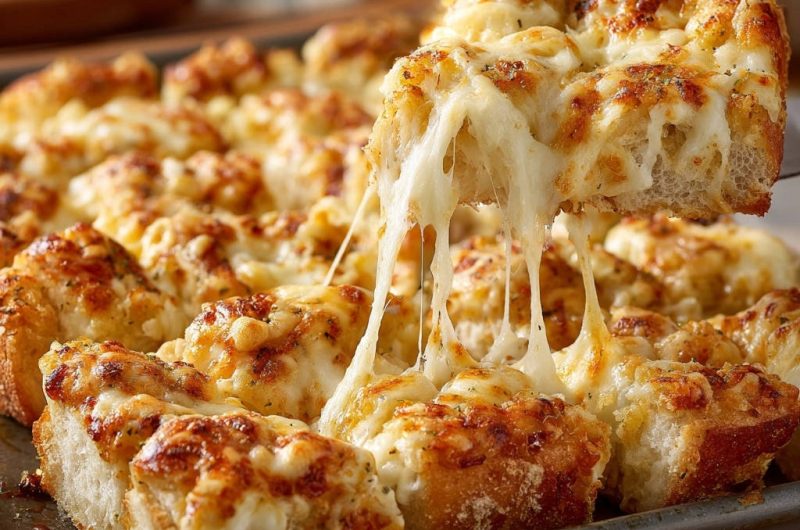
There’s nothing more frustrating than craving that warm, soft, and unbelievably cheesy bread, only to end up with dry, tough pieces or cheese that refuses to get gooey. This recipe for Cheesy Garlic Pull-Apart Bread is my go-to solution, ensuring every bite is tender, infused with garlic-herb goodness, and delivers that irresistible, stretchy cheese pull we all dream of. Once you try this method, you’ll never settle for less again.
Why This Cheesy Garlic Pull-Apart Bread Will Be Your New Obsession
The Secret to Never-Dry, Always-Tender Bread Bites
The key to exceptionally tender bread lies in a strategic two-stage baking process and thorough coating. An initial bake allows the bread cubes to fully absorb the rich garlic-herb butter, setting them up for a perfectly moist interior.
This method prevents the bread from drying out even as the cheese melts to gooey perfection in the second stage. It’s a game-changer for homemade garlic bread.
For even crispier results, consider our cheesy garlic breadsticks with the anti-soggy technique.
Achieving That Legendary Stretchy, Gooey Cheese Pull
Our method ensures maximum cheese stretch and melt. By sprinkling the cheese over warm, partially baked bread, the residual heat immediately begins to soften it.
This primes the mozzarella and Parmesan for the final bake, creating an incredibly bubbly, molten layer that forms epic cheese pulls with every separation.
Effortless Elegance: Impressive Results, Minimal Stress
Despite its show-stopping appearance and incredible flavor, this Cheesy Garlic Pull-Apart Bread is surprisingly simple and quick to prepare. With just 10 minutes of prep and 15-20 minutes of cook time, it’s an ideal appetizer or side.
It’s perfect for last-minute gatherings or a special weeknight treat, delivering impressive results without any culinary fuss.
Unpacking the Flavor: Key Ingredients for Success
Choosing Your Loaf: The Foundation of Flavor
The bread forms the backbone of this dish. Opt for a crusty baguette or a sturdy Italian loaf, cut into 1-inch cubes.
Their robust structure holds up well to the butter and cheese, offering a satisfying texture and excellent absorbency for the garlic-herb infusion.
Crafting the Aromatic Garlic-Herb Infusion
Melted unsalted butter acts as the perfect flavor carrier, ensuring every crevice of the bread is coated. Garlic powder provides a consistent, mellow garlic flavor that spreads evenly.
Dried parsley and oregano infuse classic Italian aromatics, balancing the richness with earthy notes. A touch of salt and black pepper enhances all these flavors harmoniously.
The Perfect Cheese Blend for Ultimate Melt
Low-moisture mozzarella cheese is essential for that signature stretchy, gooey pull without making the bread soggy or greasy. It melts beautifully and consistently.
Grated Parmesan cheese adds a distinct salty, nutty depth of flavor that complements the garlic and herbs. For variations, consider provolone for a sharper tang or a blend with a touch of fontina for extra creaminess.
Essential Tools for Pull-Apart Bread Perfection
Standard Kitchen Gear You’ll Need
A large mixing bowl is crucial for tossing the bread cubes generously with the butter mixture, ensuring even coating.
Measuring cups and spoons guarantee precise quantities for the perfect flavor balance in your garlic-herb butter.
A whisk helps combine the melted butter and seasonings smoothly, creating a uniform mixture that adheres well to the bread.
The Unsung Hero: Your Trusty Baking Sheet
A good quality baking sheet provides a wide, even surface for the bread cubes to spread out. This promotes consistent baking and prevents overcrowding, which can lead to soggy bread.
Lining your baking sheet with parchment paper or lightly greasing it is key. This prevents sticking, ensures easy cleanup, and allows the bread to crisp slightly without adhering to the pan.
Your Step-by-Step Guide to Irresistible Pull-Apart Bread
- Getting Started: Preheat & Prepare
Preheat your oven to 375°F (190°C) and lightly grease a baking sheet or line it with parchment paper. This ensures even cooking and prevents sticking.
- Mixing the Golden Garlic-Herb Butter
In a large bowl, combine the melted unsalted butter with garlic powder (or minced fresh garlic), dried parsley, dried oregano, salt, and black pepper. Stir thoroughly until all ingredients are well-integrated.
- The Critical Coating: Ensuring Every Bite is Flavorful
Add the 1-inch bread cubes to the butter mixture. Toss gently but thoroughly, making sure each piece is evenly coated. This step is crucial for infusing flavor and preventing the bread from drying out.
- The Two-Stage Bake Secret: Building Tenderness
Spread the coated bread cubes in an even layer on your prepared baking sheet. Bake for 8 minutes. This initial bake allows the bread to absorb the butter mixture, ensuring a soft and tender interior later.
- Melting Magic: Adding the Cheese Layers
Remove the baking sheet from the oven. Evenly sprinkle the shredded low-moisture mozzarella and grated Parmesan cheese over the warm bread cubes. The residual heat will immediately begin to soften the cheese, setting it up for ultimate gooeyness.
- Golden & Bubbly: The Final Bake
Return the baking sheet to the oven and bake for another 7-10 minutes, or until the cheese is completely melted, bubbly, and the edges of the bread are golden brown. Watch closely to prevent over-browning.
- Optional Finish: A Touch of Broiled Perfection
For an extra golden-brown top and slightly crispy cheese bits, you can broil for 1-2 minutes. Keep a very close eye on it, as broiling can quickly lead to burning.
- The Grand Reveal: Serve Hot & Pull Apart!
Serve immediately, allowing everyone to pull apart the cheesy pieces. Enjoy the incredible stretch and robust flavor while it’s warm.
For even more cheesy goodness with a satisfying crunch, check out these cheesy garlic herb rolls.
Elevate Your Bake: Expert Tips & Tricks
Don’t Rush the Coating: Flavor Infusion is Key. Take your time to ensure every single bread cube is well-coated with the butter mixture. This guarantees consistent flavor and a moist texture throughout.
Mastering Bake Times for Softness & Melt. The two-stage baking process is critical. The initial bake prevents dryness, while the second bake melts the cheese. Adjust the final baking time based on your oven and desired crispness for perfect pull-apart bread.
Serving Warm: The Secret to the Best Experience. This bread is best served immediately after coming out of the oven when the cheese is at its peak gooeyness and the bread is tender. Have your serving platter ready!
Personalizing Your Herb & Spice Blend. While parsley and oregano are classics, consider adding a pinch of dried basil, a hint of onion powder, or a dash of red pepper flakes for a subtle kick to your garlic bread recipe.
Fresh Additions: Herbs, Chili Flakes, or Zest. A sprinkle of fresh chopped parsley, chives, or even a little lemon zest after baking can brighten the flavors significantly. A pinch of chili flakes adds a welcome warmth.
Beyond the Basics: Creative Twists & Pairings
Experimenting with Herbs, Spices, and Aromatics
Elevate the flavor by swapping dried herbs for fresh, finely chopped versions (use about 3x the amount of fresh herbs). A touch of smoked paprika can add a subtle, smoky depth, or a sprinkle of everything bagel seasoning before baking creates a unique savory crunch.
Unleash Your Inner Cheesemonger: New Blends
While mozzarella and Parmesan are stellar, feel free to experiment with other cheeses. Sharp cheddar offers a bolder, tangier profile, while provolone provides a milder, softer melt. For extra creaminess, try adding a small amount of softened cream cheese to the butter mixture before coating the bread.
The Perfect Companion: What to Serve With It
This versatile pull-apart bread makes an excellent accompaniment to a hearty pasta dish, a fresh green salad, or a comforting bowl of soup. Serve it as a crowd-plepleasing appetizer with a side of warm marinara sauce for dipping.
Complementary Dishes
Round out your meal with these satisfying main courses that pair well with cheesy bread.
- For a one-pan wonder, try these Skillet Cheesy Chicken Meatballs, featuring juicy chicken and a similar cheesy element.
- If you enjoy creamy textures, you’ll appreciate the Creamy Chicken and Broccoli Baked Pasta, offering a comforting, built-in partner to your pull-apart bread.
Turning it into a Heartier Dish: Add-ins
For a more substantial snack or side, consider incorporating savory add-ins. Small pieces of crispy bacon, finely chopped sun-dried tomatoes (drained well), or sautéed mushrooms can be mixed in with the bread cubes before the final bake.
Plan Ahead: Storing & Reheating for Maximum Enjoyment
Keeping Your Cheesy Bread Fresh
To keep any leftover Cheesy Garlic Pull-Apart Bread fresh, allow it to cool completely before storing. Place it in an airtight container or wrap it tightly in aluminum foil to prevent staleness and maintain its tender texture.
Best Ways to Reheat Pull-Apart Bread
For optimal results, reheat the bread in a preheated oven at 300°F (150°C) for 10-15 minutes, or until the cheese is melted and bubbly again. An air fryer can also work wonders, making it crispy and warm in about 5-7 minutes. Avoid the microwave, as it can make the bread tough.
Prepping Components for Future Bakes
You can prepare certain components ahead of time to streamline the process. Cut your bread cubes and store them in an airtight bag. The seasoned butter mixture can also be made a day in advance and stored in the refrigerator; simply melt it gently before tossing with the bread.
Conquering Common Challenges: Troubleshooting Guide
“Why is My Pull-Apart Bread Dry or Tough?”
This often happens if the bread isn’t coated thoroughly enough with the butter mixture, or if it’s overbaked. Ensure every bread cube is glistening before baking.
Using a crusty bread variety and adhering to the recommended baking times, especially the initial 8-minute bake, will help retain moisture and tenderness.
“My Cheese Isn’t Melty or Stretchy!”
The type of cheese is crucial; ensure you are using low-moisture mozzarella for the best stretch. Also, confirm your oven temperature is accurate and that the cheese is spread evenly over the warm bread.
Returning it to the oven for the full 7-10 minutes (or until bubbly) is key to achieving that perfect gooey cheese pull.
“It Lacks Flavor – How Can I Fix It?”
If your garlic bread recipe tastes bland, check your seasoning. Don’t be shy with the garlic powder, and ensure your salt and pepper are balanced. Using fresh minced garlic instead of powder can also intensify the flavor.
Additionally, ensure your herbs are fresh and potent; old, stale dried herbs lose their aroma quickly.
Your Most Asked Questions About Cheesy Garlic Pull-Apart Bread
What’s the best type of bread to use?
A crusty baguette or a sturdy Italian loaf is ideal. These breads hold their shape well, absorb the garlic butter beautifully, and provide a satisfying texture for a true pull-apart bread experience.
Can I substitute fresh garlic for garlic powder?
Absolutely! Use about 2-3 cloves of finely minced fresh garlic for every teaspoon of garlic powder. Gently sauté the fresh garlic in the melted butter for a minute before adding the herbs to mellow its raw bite and enhance its flavor.
Are there other cheese combinations I can try?
Yes, explore different blends! Provolone offers a mild, slightly nutty flavor and excellent melt. Sharp cheddar provides a robust taste, while a mix of Italian cheeses like fontina, provolone, and Parmesan can create a complex, savory profile.
Can this recipe be adapted for a gluten-free diet?
Certainly! Choose a sturdy, dense gluten-free bread that won’t crumble easily. You might need to adjust baking times slightly as gluten-free breads can behave differently, but the method remains largely the same for delicious results.
How long does this bread last, and can I freeze it?
This bread is best enjoyed fresh, but leftovers can be stored airtight for 2-3 days in the refrigerator. While you can technically freeze it after baking, the texture might be slightly compromised upon reheating. For best results, prepare and bake it fresh.
This Cheesy Garlic Pull-Apart Bread recipe is more than just a dish; it’s a celebration of tender bread, gooey cheese, and aromatic garlic, designed to bring joy to any table. Its simplicity and incredible flavor make it an absolute winner, proving that impressive results don’t require endless effort. Go ahead, try this extraordinary pull-apart bread tonight and share your irresistible creations!
Cheesy Garlic Bread
Course: AppetizerCuisine: AmericanDifficulty: easy6
servings10
minutes15
minutes450
kcal25
minutesCraving warm, soft, and unbelievably cheesy bread? This recipe uses a special trick to ensure your pull-apart bread stays tender with an irresistible, stretchy cheese pull every time. Say goodbye to dry bread and hello to ultimate cheesy perfection!
Ingredients
1 loaf crusty bread (like a baguette or Italian bread), cut into 1-inch cubes
1/2 cup unsalted butter, melted
2 teaspoons garlic powder (or 2 cloves fresh garlic, minced)
1 teaspoon dried parsley
1/2 teaspoon dried oregano
1/4 teaspoon salt
1/4 teaspoon black pepper
2 cups shredded low-moisture mozzarella cheese
1/4 cup grated Parmesan cheese
Directions
- Preheat your oven to 375°F (190°C). Lightly grease a baking sheet or line with parchment paper.
- In a large bowl, combine the melted butter, garlic powder (or minced garlic), dried parsley, dried oregano, salt, and black pepper. Mix until well combined.
- Add the bread cubes to the butter mixture. Toss gently but thoroughly, ensuring each piece of bread is coated evenly. This critical step infuses flavor and prevents dryness.
- Spread the coated bread cubes in an even layer on the prepared baking sheet.
- Bake for 8 minutes. This initial bake helps the bread absorb the butter mixture and prevents it from drying out later, ensuring a soft interior.
- Remove the baking sheet from the oven. Sprinkle the shredded mozzarella cheese and grated Parmesan cheese evenly over the warm bread cubes. The residual heat will start to melt the cheese immediately, setting it up for ultimate gooeyness.
- Return the baking sheet to the oven and bake for another 7-10 minutes, or until the cheese is completely melted, bubbly, and the edges of the bread are golden brown.
- For an extra golden top and slightly crispy cheese bits, you can broil for 1-2 minutes, watching carefully to prevent burning.
- Serve immediately, pulling apart the cheesy pieces and enjoying that incredible stretch!
Notes
- Broiling for 1-2 minutes at the end is optional for an extra golden top and crispy cheese.


