
Ever bitten into a baked oatmeal cup, expecting a tender, comforting bite, only to find it disappointingly dry or crumbly? I’ve certainly been there too many times!
But I finally cracked the code to making these Chocolate Chip Baked Oatmeal Cups taste incredible and stay perfectly moist, a true game-changer for busy mornings. Trust me, once you try this method, you’ll never go back to those sad, dry versions.
Why These Chocolate Chip Baked Oatmeal Cups Are Your New Morning Favorite
The “Never Dry” Secret: Unlocking Perfectly Moist Baked Oatmeal
The secret to the unparalleled moisture in these baked oatmeal cups lies in two simple but crucial elements: extremely ripe bananas and a dedicated soaking period for the oats. Ripe bananas infuse the cups with natural sweetness and essential moisture, while the soak allows the oats to fully hydrate, preventing them from drying out during baking.
This scientific approach ensures every bite is tender, chewy, and far from crumbly, setting this recipe apart.
Effortless Prep for Busy Lives (and Less Stress!)
With just 15 minutes of active preparation time, this recipe is a godsend for anyone with a packed schedule. You can whip up a batch on the weekend and enjoy a wholesome, delicious breakfast or snack for days.
It’s the ultimate grab-and-go solution, eliminating morning fuss and ensuring you start your day feeling nourished and satisfied.
Naturally Sweet & Wholesome Ingredients You’ll Love
These Chocolate Chip Baked Oatmeal Cups boast a profile of naturally sweet and wholesome ingredients. From the ripe bananas and pure maple syrup to fiber-rich rolled oats, every component contributes to a nutritious and genuinely guilt-free treat.
You can feel good about indulging in a breakfast that’s both delicious and beneficial for your body.
A Customizable Canvas for Every Palate
While chocolate chips are a classic, this recipe provides a fantastic base for endless customization. Easily adapt it with different spices, fruits, or nuts to suit any dietary preference or craving.
It’s a versatile foundation, inviting creativity and ensuring these baked oatmeal cups can be uniquely yours every time.
Gather Your Essentials: What You’ll Need for Delicious Cups
The Heart of the Recipe: Rolled Oats
Rolled oats (also known as old-fashioned oats) are essential for this recipe. They offer the ideal texture and absorbency, becoming wonderfully tender without turning mushy.
Avoid instant or quick-cooking oats, which can lead to a gummier texture, and steel-cut oats, which require a much longer cooking time.
Sweetness & Structure: Ripe Bananas & Maple Syrup
You’ll need two very ripe medium bananas; look for bananas with plenty of brown spots, as they are significantly sweeter and contribute maximum moisture. This natural sweetness reduces the need for added sugars.
Maple syrup provides a refined, natural sweetness and helps bind the ingredients. Ensure you use pure maple syrup, not pancake syrup, for the best flavor.
Liquid & Leavening: Milk, Egg, & Baking Powder
Unsweetened almond milk is specified, offering a light, dairy-free base. However, feel free to use any milk you prefer, such as dairy milk, oat milk, or soy milk.
One large egg acts as a binding agent, contributing to the structure and richness of the cups. Baking powder is crucial for a light and tender rise, ensuring your oatmeal cups aren’t too dense.
Flavor Foundations: Vanilla, Cinnamon, & Salt
Vanilla extract enhances the overall sweetness and aroma, adding a layer of comforting warmth. Ground cinnamon complements the banana and chocolate beautifully, adding a subtle spice that deepens the flavor profile.
A pinch of salt might seem counterintuitive for a sweet dish, but it’s vital for balancing the flavors and making the other ingredients truly pop.
The Irresistible Finish: Chocolate Chips
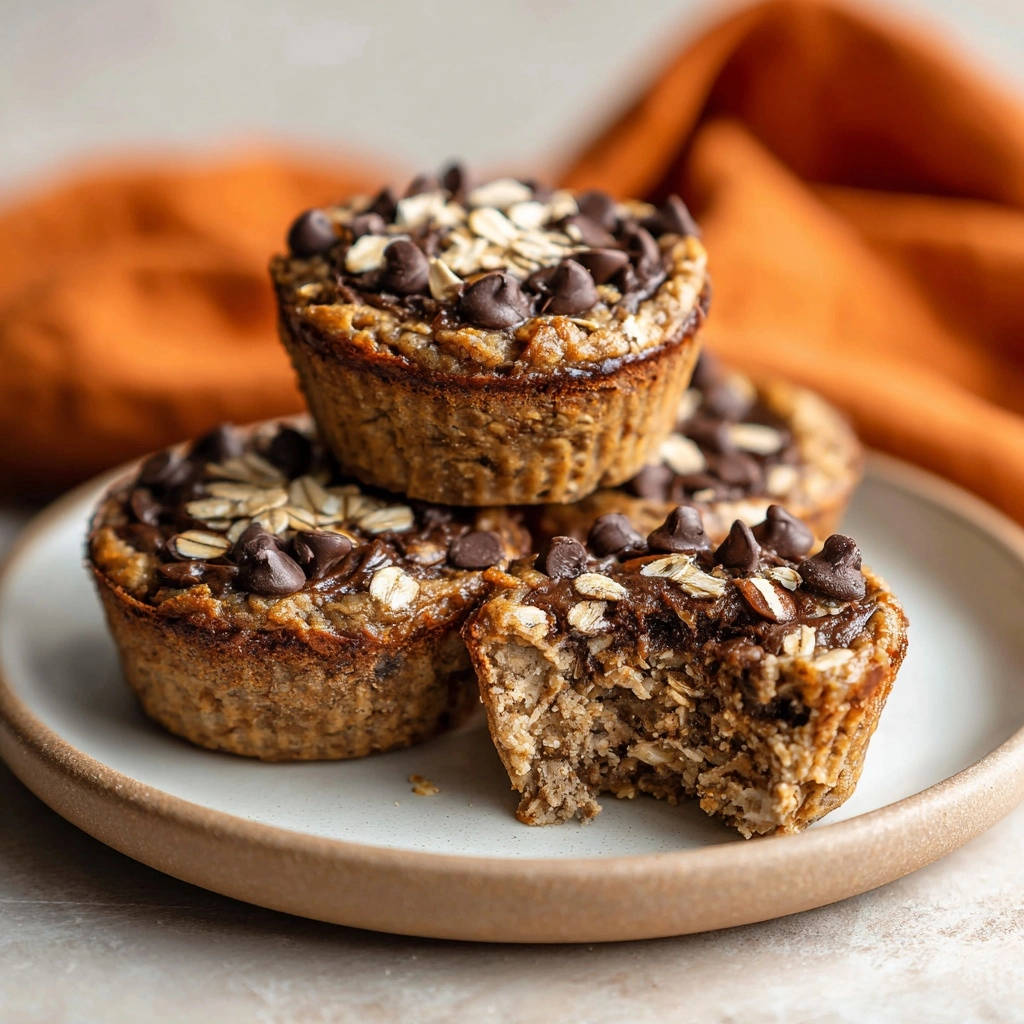
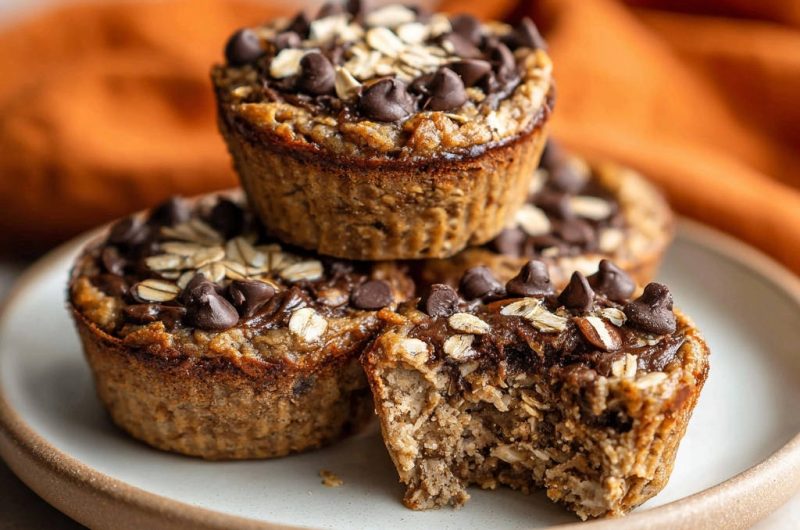
Chocolate chips are the star of these baked oatmeal cups, providing pockets of melted, sweet delight. Use good quality semi-sweet or dark chocolate chips for the best flavor. You’ll need 1/2 cup for the batter and a little extra for sprinkling on top.
Your Baking Arsenal: Essential Tools for Baked Oatmeal Perfection
A Trusty Muffin Tin & Preparation Tips
A good quality 12-cup muffin tin is indispensable for achieving perfectly shaped, individual baked oatmeal cups. Proper preparation of the tin is paramount.
Lightly greasing each cup with butter or cooking spray, or using paper liners, ensures your cups release effortlessly and maintain their beautiful form.
To explore more sweet baked delights, consider these assorted fruit and chocolate scones.
Mixing Bowls & Whisk: Your Primary Tools
You’ll need at least one large mixing bowl to comfortably combine all the wet and dry ingredients without spills. A sturdy whisk is ideal for blending everything smoothly, ensuring no pockets of dry ingredients remain.
Measuring Cups & Spoons for Precision
Accurate measurements are the backbone of consistent baking success. Make sure you have a full set of measuring cups and spoons on hand.
This precision guarantees the correct balance of ingredients for optimal texture and flavor in every batch.
The Humble Wire Cooling Rack
A wire cooling rack might seem like a minor detail, but it plays a crucial role in the final texture of your baked oatmeal cups. After a brief rest in the muffin tin, transferring the cups to a wire rack allows air to circulate around them.
This prevents sogginess on the bottom and ensures they cool completely and set properly, maintaining their delightful texture.
Crafting Your Chocolate Chip Baked Oatmeal Cups: A Detailed Guide
- Prepare Your Workspace & Oven:
Preheat your oven to 375 degrees F (190 degrees C) and lightly grease a 12-cup muffin tin. This crucial first step ensures your cups cook evenly and, most importantly, don’t stick, making for easy removal once baked.
- Mash the Bananas to Perfection:
In a large mixing bowl, thoroughly mash the very ripe bananas until they are smooth and creamy. The riper your bananas, the more natural moisture and sweetness they will impart, which is absolutely critical for the wonderfully tender and moist texture of these baked oatmeal cups.
- Combine Wet & Dry Ingredients (Almost!):
Add the rolled oats, almond milk, maple syrup, large egg, vanilla extract, baking powder, ground cinnamon, and salt to the bowl with the mashed bananas. Stir everything together well until all ingredients are thoroughly combined and there are no dry pockets of oats or baking powder remaining.
- The Golden Rule: Let the Oats Soak (Don’t Skip This!)
Here’s the secret for truly moist, never-crumbly baked oatmeal: let the entire mixture sit undisturbed for 10-15 minutes. This crucial resting period allows the rolled oats to fully absorb the liquid and the natural moisture from the bananas before baking.
This step is a game-changer, preventing your cups from drying out in the oven and guaranteeing a wonderfully tender, satisfying result.
- Fold in the Chocolate Chips:
Gently stir in the 1/2 cup of chocolate chips into the batter. Be careful not to overmix at this stage; just combine them enough so they are evenly distributed throughout the mixture.
- Fill & Top Your Muffin Tin:
Divide the mixture evenly among the 12 prepared muffin cups, filling each almost to the brim. For an extra touch of visual appeal and a slight textural contrast, sprinkle a few additional chocolate chips and a small pinch of rolled oats on top of each cup, if desired.
- Bake Until Golden Perfection:
Bake for 20-25 minutes, or until the edges are lightly golden brown and a toothpick inserted into the center of a cup comes out clean. Keep a close eye on them towards the end of the baking time, as overbaking is the quickest way to end up with a dry texture.
- Cool & Enjoy Your Creation:
Let the baked oatmeal cups cool in the muffin tin for 5 minutes before carefully removing them to a wire rack to cool completely. They can be enjoyed warm straight from the oven or equally delicious at room temperature as a grab-and-go snack.
Chef’s Secrets for Irresistible Chocolate Chip Baked Oatmeal Cups
Master the Soak: Why Patience Pays Off
The 10-15 minute soaking period is the absolute bedrock of this recipe’s success. It allows the oats to fully hydrate, mimicking a stovetop cook before they even hit the oven.
This pre-hydration is what prevents your oatmeal cups from becoming dry, ensuring they remain incredibly tender and moist throughout the baking process.
The Power of Perfectly Ripe Bananas
Do not underestimate the importance of using very ripe bananas with plenty of brown spots. These bananas are naturally sweeter, reducing the need for additional sugars, and their high moisture content is key to the cups’ tender texture.
Less ripe bananas will result in a drier, less flavorful baked oatmeal cup.
Avoid the Dreaded Overbake: Look for Cues
Overbaking is the quickest route to dry, crumbly baked oatmeal cups. Keep a close watch on them: the edges should be lightly golden, and a toothpick inserted into the center should come out clean, indicating they are cooked through but not overdone.
Remove them promptly to retain their beloved moistness.
For a similar tender texture, you will want to see this apple cinnamon baked oatmeal.
Don’t Fear Customization: Make Them Your Own!
This recipe is incredibly adaptable! Feel free to experiment with different spices like nutmeg or ginger for added warmth, or incorporate various add-ins.
Consider chopped nuts, seeds like chia or flax, or dried fruits such as cranberries or raisins. For another delightful twist on morning oats, you might enjoy our Apple Walnut Baked Oatmeal Cups.
Greasing Your Muffin Tin: A Small Step, Big Impact
Properly greasing your muffin tin is a non-negotiable step for easy removal and beautifully intact baked oatmeal cups. Use butter, coconut oil, or a non-stick cooking spray, ensuring every crevice is covered.
Alternatively, using paper liners can offer an even cleaner release, especially if you plan to pack them for lunches.
Beyond the Basics: Creative Twists & Dietary Swaps
Gluten-Free Chocolate Chip Baked Oatmeal Cups
Making these cups gluten-free is incredibly simple. Just ensure you use certified gluten-free rolled oats, as some oats can be cross-contaminated during processing.
All other ingredients in this recipe are naturally gluten-free, making it an easy swap for those with dietary restrictions.
Dairy-Free Alternatives for Every Preference
The recipe already calls for unsweetened almond milk, making it dairy-free by default. However, you can easily substitute with other plant-based milks like oat milk, soy milk, or even light coconut milk.
Note that richer milks might impart a slight flavor difference, but the texture will remain wonderfully moist.
Nut-Free Considerations and Safe Swaps
If you’re making these for a nut-free household or school lunchboxes, rest assured that the recipe is naturally nut-free. Always double-check your almond milk label for any cross-contamination warnings if allergies are severe.
You can use oat milk or soy milk as alternatives to be extra cautious.
Adjusting Sweetness: Less Sugar, More Flavor
For those who prefer less sweetness, the amount of maple syrup can be slightly reduced without compromising texture. Start by cutting it by a tablespoon and adjust in future batches.
Alternatively, adding more spices like a dash of nutmeg or a pinch of cardamom can enhance natural flavors, making the cups taste sweeter without added sugar.
Endless Mix-in & Topping Possibilities
Unleash your creativity with various mix-ins! Consider adding fresh berries (like blueberries or raspberries), chopped dried apricots, or a handful of shredded coconut to the batter. For toppings, sprinkle with chopped nuts (if not nut-free), a drizzle of nut butter, or a dollop of Greek yogurt after baking.
The possibilities are truly endless to make these cups uniquely yours.
Enjoying Your Creations: Serving, Storage & Make-Ahead Magic
Best Ways to Serve Your Baked Oatmeal Cups
These Chocolate Chip Baked Oatmeal Cups are incredibly versatile. Enjoy them warm, straight from the oven, for a truly comforting treat. They are also delicious at room temperature, making them perfect for on-the-go snacking.
For an elevated experience, serve them with a dollop of Greek yogurt, a drizzle of extra maple syrup, or a side of fresh berries.
Optimal Storage Solutions for Freshness
To maintain their freshness, store your baked oatmeal cups in an airtight container. At room temperature, they will stay fresh for up to 2-3 days.
For longer storage, refrigerate them for up to 5-7 days. Always ensure they are completely cooled before storing to prevent condensation and sogginess.
Make-Ahead Magic: Meal Prep Simplified
These baked oatmeal cups are a dream for meal prepping! Batch bake them on the weekend, and you’ll have effortless, wholesome breakfasts ready for the entire week.
To reheat, simply warm them in the microwave for 30-60 seconds or in a preheated oven at 300°F (150°C) for about 5-10 minutes until heated through.
What to Try Next
Since you’re enjoying these chocolate chip baked oatmeal cups, here are a couple of other sweet treats you might like.
- For more chocolate and banana goodness, check out this Chocolate Chip Banana Bread, perfect for a satisfying bake.
- If you’re in the mood for chewy, no-bake options, you’ll want to try these Chocolate Caramel Coconut Oat Bars.
Troubleshooting Common Chocolate Chip Baked Oatmeal Cup Challenges
“My oatmeal cups are dry and crumbly!”
This is often due to overbaking or skipping the crucial 10-15 minute oat-soaking step. Ensure you pull them from the oven as soon as the edges are golden and a toothpick comes out clean.
The oat-soaking step is non-negotiable for achieving that signature moist and tender texture.
“They stuck to the muffin tin!”
Sticking usually indicates insufficient greasing of the muffin tin or removing them too soon. Make sure to thoroughly grease each cup, or use paper liners.
Always let the cups cool in the tin for at least 5 minutes before attempting to remove them; this allows them to firm up slightly and release more easily.
“My cups didn’t rise enough.”
A lack of rise can be attributed to using old or expired baking powder, which loses its leavening power over time. Check your baking powder’s expiry date.
Overmixing the batter can also develop the gluten in the oats too much, leading to a denser texture, so mix until just combined.
“They’re too sweet (or not sweet enough)!”
Sweetness is a matter of personal preference. If they’re too sweet, reduce the maple syrup by 1-2 tablespoons in your next batch. If not sweet enough, add an extra tablespoon of maple syrup or enhance natural sweetness with more vanilla or cinnamon.
Remember that very ripe bananas contribute significantly to the overall sweetness.
Your Top Questions Answered: Chocolate Chip Baked Oatmeal Cups FAQ
Can I use steel-cut oats or instant oats instead of rolled oats?
No, rolled oats are specifically recommended for this recipe. Instant oats will become too mushy and gummy due to their thinner texture and quick cooking time.
Steel-cut oats, on the other hand, require a much longer cooking time and more liquid, and will likely remain too chewy and undercooked in this recipe.
How long do Chocolate Chip Baked Oatmeal Cups stay fresh?
When stored in an airtight container at room temperature, they will stay fresh for 2-3 days. If refrigerated, they will maintain their quality and moistness for up to 5-7 days.
Always ensure they are completely cool before storing to prevent sogginess.
Can these be frozen for longer storage?
Absolutely! These baked oatmeal cups freeze beautifully. Once completely cooled, wrap each cup individually in plastic wrap, then place them in a freezer-safe bag or container.
They can be frozen for up to 3 months. Thaw overnight in the refrigerator or reheat directly from frozen in the microwave or oven.
Are these suitable for meal prepping?
Yes, they are perfectly suited for meal prepping! Their grab-and-go nature, combined with their excellent shelf life (especially when refrigerated or frozen), makes them an ideal choice for busy mornings or healthy snacks throughout the week.
Prepare a double batch to stock up your fridge and freezer.
What if I don’t have very ripe bananas on hand?
While very ripe bananas are highly recommended for the best flavor and moisture, if you’re in a pinch, you can use slightly less ripe bananas. To compensate for the reduced sweetness, you might add an extra teaspoon of maple syrup.
Alternatively, you could substitute the mashed banana with an equal amount of unsweetened applesauce or pumpkin puree, though this will slightly alter the flavor profile.
Ready to Bake? Your New Favorite Morning Starts Here!
You now have all the knowledge and secret tips to create the most perfectly moist and flavorful Chocolate Chip Baked Oatmeal Cups that will truly revolutionize your mornings. Say goodbye to dry, crumbly breakfast woes and hello to tender, sweet, and satisfying bites!
We encourage you to try this recipe, share your delicious creations on social media with #BakedOatmealCups, and leave a comment below with your favorite customizations. Don’t forget to explore our other healthy breakfast recipes for more inspiring ideas!
Baked Oatmeal Cups
Course: BreakfastCuisine: AmericanDifficulty: easy12
servings15
minutes25
minutes240
kcal40
minutesSay goodbye to dry, crumbly baked oatmeal cups! This recipe ensures perfectly moist and tender chocolate chip baked oatmeal cups every time, thanks to a secret pre-baking soak. Ideal for busy mornings, they’re a delicious and convenient breakfast solution.
Ingredients
2 very ripe medium bananas, mashed
2 cups rolled oats
1 3/4 cups unsweetened almond milk (or any milk)
1/4 cup maple syrup
1 large egg
1 teaspoon vanilla extract
1 teaspoon baking powder
1/2 teaspoon ground cinnamon
1/4 teaspoon salt
1/2 cup chocolate chips, plus more for topping
1 tablespoon rolled oats, for topping
Directions
- Preheat your oven to 375 degrees F (190 degrees C). Lightly grease a 12-cup muffin tin.
- In a large bowl, mash the very ripe bananas until smooth. The riper the bananas, the more natural moisture and sweetness they add, which is key to a tender texture in your baked oatmeal cups.
- Add the rolled oats, almond milk, maple syrup, egg, vanilla extract, baking powder, cinnamon, and salt to the bowl with the mashed bananas. Stir well until all ingredients are thoroughly combined.
- Here’s the secret for truly moist baked oatmeal: let the mixture sit for 10-15 minutes. This crucial step allows the oats to fully absorb the liquid and banana moisture before baking, preventing them from drying out in the oven and ensuring a wonderfully tender, never crumbly, result.
- Stir in the 1/2 cup chocolate chips.
- Divide the mixture evenly among the 12 muffin cups. Sprinkle a few extra chocolate chips and a pinch of rolled oats on top of each cup, if desired.
- Bake for 20-25 minutes, or until the edges are lightly golden and a toothpick inserted into the center comes out clean. Be careful not to overbake, as this can quickly lead to a dry texture.
- Let the baked oatmeal cups cool in the muffin tin for 5 minutes before carefully removing them to a wire rack to cool completely. Enjoy warm or at room temperature!
Notes
- Allowing the mixture to sit for 10-15 minutes before baking is key for moist, tender oatmeal cups.


