

Have you ever spent precious time making scones, only to pull them from the oven feeling more like a dense biscuit than a light, airy treat? I’ve certainly been there, and it’s genuinely frustrating to miss that elusive flaky texture! But after years of trial and error, I’ve finally perfected the method for unbelievably light, perfectly risen Classic Buttermilk Scones that banish dense disappointments forever.
Beyond the Bakery: Why This Classic Buttermilk Scones Recipe Triumphs
This recipe isn’t just about ingredients; it’s about technique and understanding the ‘why’ behind each step. We focus on maximizing tenderness and rise, ensuring your homemade scones are superior to anything you’d find in a bakery.
Ditch the Dense Disappointments: A Scone Revolution
The common pitfalls of scone making-overmixing, warm butter, or incorrect cutting-often lead to heavy, brick-like results. Our method meticulously guides you through preventing these issues, guaranteeing a consistently light and tender crumb.
You’ll achieve that coveted fluffy interior with a delicate, crisp exterior, making every bite a pure delight.
The Magic Behind the Rise: Our Secret to Fluffiness
The secret lies in the precise handling of very cold butter and minimal dough manipulation. These techniques create steam pockets during baking, which are crucial for that beautiful, towering rise and an irresistibly flaky texture.
We’ll show you exactly how to achieve these results, ensuring your scones are never flat or heavy.
Quick & Rewarding: From Pantry to Plate in Just 30 Minutes
Who said exceptional baking has to take all day? This recipe for Classic Buttermilk Scones moves efficiently from prep to oven, delivering warm, fresh scones in under half an hour.
It’s the perfect solution for a last-minute breakfast, an impromptu brunch, or a quick, comforting afternoon tea.
The Essential Building Blocks: Ingredients for Exceptional Classic Buttermilk Scones
Every ingredient plays a vital role in the success of your scones. Choosing quality and understanding their function is key to achieving that perfect texture and flavor.
Flour Power: Choosing Your Foundation
All-purpose flour provides the essential structure for your scones. Using a standard, unbleached variety ensures a consistent texture without introducing unwanted flavors or additives.
Sweetness & Lift: Sugar, Baking Powder, and Salt
Granulated sugar adds a subtle sweetness and aids in browning for a lovely golden crust. Baking powder is your primary leavening agent, crucial for a high rise and airy texture.
Salt balances the flavors and enhances the overall taste, preventing your scones from tasting flat.
The “Cold Gold”: Unsalted Butter is Non-Negotiable
Very cold unsalted butter is the most critical ingredient for flaky scones. As cold butter melts in the hot oven, it releases steam, creating those distinct layers and a wonderfully tender crumb.
Unsalted butter allows you to control the exact amount of salt in the recipe.
Tangy Tenderness: The Indispensable Role of Buttermilk
Cold buttermilk contributes both moisture and a subtle tangy flavor that is characteristic of classic scones. Its acidity also reacts with the baking powder, boosting the leavening for an even fluffier result.
Golden Finish: The Optional Egg Wash for a Perfect Hue
A simple egg wash (one egg whisked with a touch of water) brushed over the tops before baking gives your scones a beautiful, glossy golden-brown finish.
It also adds a very slight crispness to the crust, enhancing the visual appeal and textural contrast.
Essential Tools for Your Classic Buttermilk Scones Adventure
Having the right tools simplifies the process and helps ensure consistent results. These few items will make your scone-making journey much smoother.
Grater or Cutter: Tackling Cold Butter
A box grater (the large holes) makes quick work of incorporating cold butter into flour, creating fine shreds that are easy to distribute. Alternatively, a sharp knife for small, pea-sized cubes works just as well.
Pastry Blender or Fingertips: Your Choice for Crumbly Bliss
A pastry blender efficiently cuts the butter into the flour mixture, minimizing direct hand contact and keeping the butter cold. Your fingertips, however, are an excellent tool for a gentle, tactile approach, allowing you to feel the texture as you work.
The Perfect Circle: A 2-Inch Biscuit Cutter
A 2-inch round biscuit cutter is ideal for uniform scones, ensuring even baking. Its sharp edge creates clean cuts, which are important for a good rise.
Baking Perfection: Crafting Your Classic Buttermilk Scones (Step-by-Step)
- Prepare Your Workspace and Oven:
Preheat the oven to 400°F (200°C) and line a baking sheet with parchment paper. This ensures a consistent baking environment and easy cleanup, preventing sticking.
- Whisk the Dry Foundation:
In a large bowl, thoroughly combine the flour, baking powder, granulated sugar, and salt using a whisk. Proper whisking ensures uniform distribution of leavening agents and flavorings, which is crucial for an even rise and consistent taste.
- The Critical Cold Butter Technique:
Take your very cold butter and either grate it directly into the flour mixture using a box grater, or cut it into very small, pea-sized cubes with a sharp knife. This technique creates tiny pockets of butter that will melt during baking, creating steam and those coveted flaky layers within your Classic Buttermilk Scones.
- Gently Incorporate the Butter:
Using your fingertips or a pastry blender, quickly work the butter into the flour mixture until it resembles coarse crumbs with some larger, flattened pieces of butter remaining. The key to tender scones is to avoid overmixing; visible butter bits are actually a good sign of success, so don’t be tempted to blend it completely.
- Create a Well and Add Buttermilk:
Make a well in the center of the dry ingredients and pour in the cold buttermilk. The cold temperature of the buttermilk helps maintain the butter’s solid state for as long as possible, contributing to the flakiness.
- Mix Just Until Combined:
Stir with a fork or rubber spatula only until the dry ingredients are moistened and a shaggy dough forms. Resist the urge to overmix; overworking develops gluten, which is the primary cause of tough, dense Classic Buttermilk Scones.
- Gentle Shaping on a Floured Surface:
Turn the dough out onto a lightly floured surface. Gently pat the dough into a 1-inch thick circle or rectangle. Avoid kneading or excessively handling the dough, as this can overdevelop the gluten and negatively impact the texture.
- Precision Cutting (No Twisting!):
Dip a 2-inch round biscuit cutter into flour between each cut to prevent sticking. Press straight down firmly through the dough, then lift the cutter straight up. Do not twist the cutter, as twisting seals the edges of the dough and prevents a good rise, resulting in lopsided scones.
- Arrange and Re-Cut Scraps:
Place the cut scones onto the prepared baking sheet, leaving about an inch between each for even heat circulation. Gather the scraps gently, pat them together once (avoiding kneading), and cut out any remaining scones, remembering not to overwork this second batch of dough.
- Optional Golden Egg Wash:
If desired, whisk one large egg with a tablespoon of water until well combined and brush lightly over the tops of the scones. This simple step provides a beautiful golden-brown and slightly shiny finish, enhancing their visual appeal.
- Bake Until Golden Perfection:
Bake for 12-15 minutes, or until the tops are golden brown and a scone sounds hollow when tapped on the bottom. Overbaking can lead to dry scones, so begin checking for doneness around the 12-minute mark.
- Cool Slightly Before Serving:
Let the Classic Buttermilk Scones cool slightly on the baking sheet for about 5 minutes before transferring them to a wire rack. Serving them warm is highly recommended, as their texture and aroma are at their peak.
Unlock the Secrets: Expert Tips for Irresistible Classic Buttermilk Scones
Maintain Maximum Chill: Keep all your ingredients, especially the butter and buttermilk, as cold as absolutely possible. Chilling your mixing bowl and even your flour for 15 minutes beforehand can significantly help in warm kitchens, ensuring the butter stays solid longer.
The Golden Rule: Don’t Overmix! Overworking the dough is the number one cause of tough scones. Mix only until just combined; a shaggy, slightly crumbly appearance is perfectly fine and desired for a tender crumb.
No Twisting the Cutter: Press straight down and lift straight up with your biscuit cutter. Twisting seals the dough edges, which prevents the scones from rising beautifully and creating those desirable, open flaky layers.
Gentle Handling is Key: When shaping the dough, always use a light touch. Pat it into shape rather than kneading, which develops gluten prematurely and can lead to an unpleasantly dense texture in your finished Classic Buttermilk Scones.
Pre-Bake Chill for Height: For an even taller, more dramatic rise, refrigerate the cut scones on their baking sheet for 15-20 minutes before baking. This re-chills the butter, delaying its melting and allowing the scones to puff up more significantly.
Listen for Doneness: The hollow sound test, achieved by gently tapping the bottom of a baked scone, is a reliable indicator that your Classic Buttermilk Scones are perfectly baked through and not overdone, ensuring a moist interior.
Solving Scone Snafus: Common Questions & Quick Fixes
Even with the best instructions, baking can sometimes present challenges. Here’s how to troubleshoot common scone problems.
Why Are My Classic Buttermilk Scones Dense and Hard?
This is almost always due to overmixing the dough, which develops too much gluten. Ensure you mix only until just combined and handle the dough as little as possible during shaping and cutting.
Another culprit can be warm butter that melted too quickly before baking, which fails to create those crucial steam pockets for lightness.
My Scones Didn’t Rise Properly. What Happened?
A poor rise can stem from several issues: old or inactive baking powder, not using very cold ingredients, or twisting the biscuit cutter. Always check your baking powder’s expiry date, keep butter and buttermilk icy, and press straight down when cutting.
Why Are My Classic Buttermilk Scones Dry and Crumbly?
Dry, crumbly scones often indicate too much flour or overbaking. Measure your flour precisely, preferably by weight if possible, and stick to the suggested baking time, watching for that golden-brown color without letting them get too dark.
Insufficient buttermilk can also lead to dryness, so ensure your liquid measurements are accurate.
Serving & Savouring Your Classic Buttermilk Scones Masterpiece
Once your Classic Buttermilk Scones emerge golden and fragrant from the oven, the real fun begins: enjoying them!
Perfect Pairings: Elevating Your Scone Experience
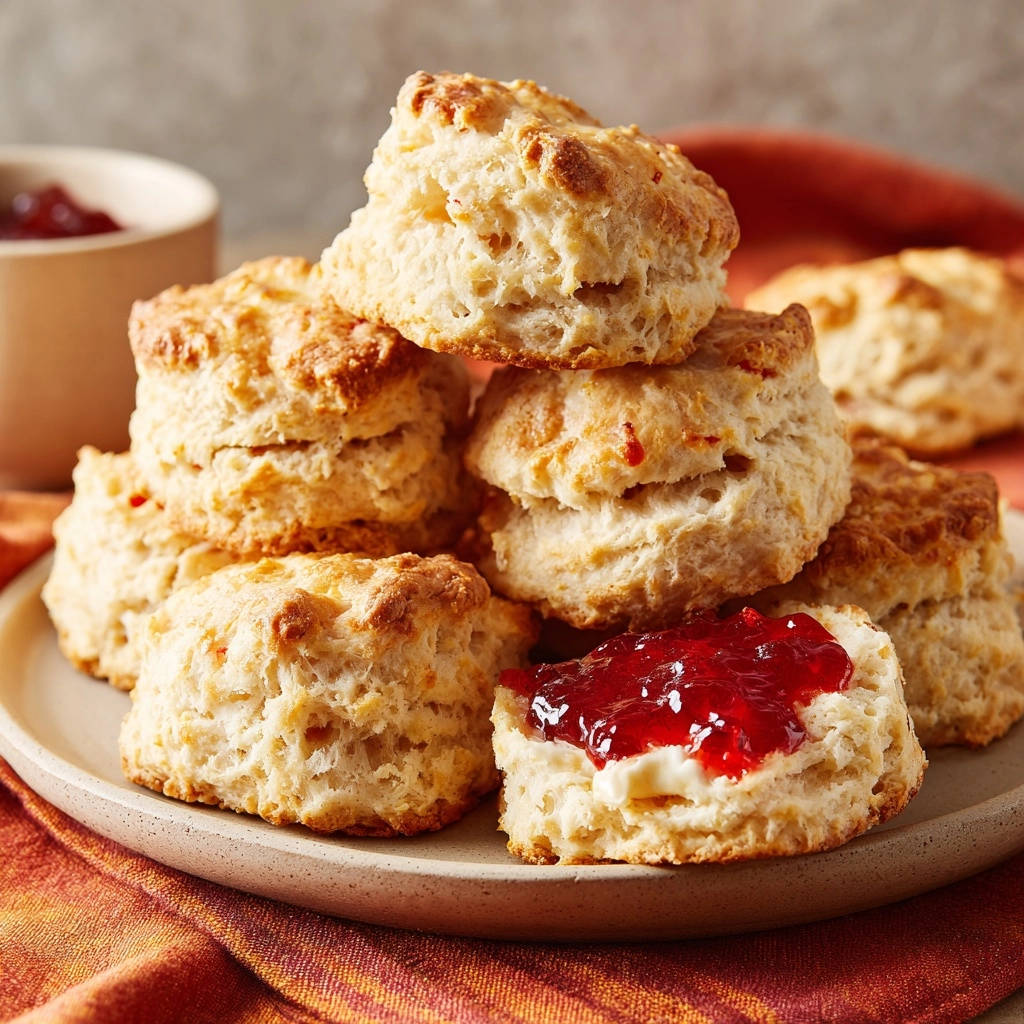
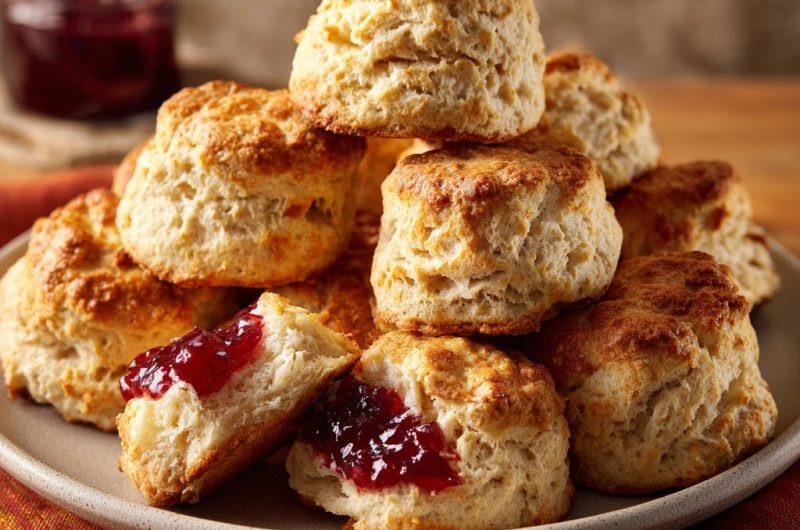
Serve your warm scones split with a generous dollop of clotted cream and your favorite fruit jam or preserves. Fresh berries, a drizzle of honey, or a smear of lemon curd also make exquisite accompaniments, transforming them into a true tea-time luxury.
Storing Leftover Classic Buttermilk Scones for Freshness
Store cooled scones in an airtight container at room temperature for up to 2-3 days. While best enjoyed fresh, a quick reheat in the oven or microwave will restore some of their tenderness.
Can You Make Classic Buttermilk Scones Ahead of Time?
Yes, you can! You can cut the scones and then freeze them raw on the baking sheet until solid. Transfer them to a freezer bag and bake from frozen, adding a few extra minutes to the baking time.
Alternatively, the baked scones can be frozen for up to 2 months and reheated in a low oven.
Your Top Classic Buttermilk Scones Questions, Answered!
What if I Don’t Have Buttermilk? Are There Substitutions?
Absolutely! You can easily make a substitute: for every 3/4 cup of buttermilk, use 3/4 cup of regular milk (whole or 2%) and stir in 1 tablespoon of lemon juice or white vinegar. Let it sit for 5-10 minutes until it slightly curdles before using.
Can I Add Fruit or Other Flavorings to My Scone Dough?
Yes, you can! Gently fold in 1/2 to 3/4 cup of dried fruit (like currants, raisins, or chopped apricots) or fresh berries (e.g., blueberries, raspberries) with the buttermilk. Ensure fresh fruit is patted dry to prevent excess moisture.
Citrus zest (lemon, orange) or a pinch of cinnamon also make lovely additions. For another delightful fruit scone experience, consider our recipe for classic blueberry scones that are always tender and moist.
For another simple treat that bakes beautifully, try this golden caramel bundt cake.
Is It Possible to Make Gluten-Free Classic Buttermilk Scones?
While this recipe is optimized for all-purpose flour, you can experiment with a 1:1 gluten-free baking flour blend that contains xanthan gum. You might need a tiny bit more liquid, so add it gradually until a shaggy dough forms.
How Do I Reheat Scones for the Best Fresh-Baked Taste?
To revive day-old scones, preheat your oven to 300°F (150°C) and warm them for 5-10 minutes, or until heated through. For a quicker option, wrap them in a damp paper towel and microwave for 20-30 seconds, though the oven yields a better texture.
Bake, Share, & Enjoy: Your Classic Buttermilk Scones Journey Begins!
You’ve successfully mastered the art of creating unbelievably light and fluffy Classic Buttermilk Scones, banishing dense disappointments forever!
We encourage you to share your delicious creations with friends and family, or tag us on social media with your baking triumphs. There’s nothing quite like the joy of a homemade scone, especially one that rises to perfection every time.
Ready for more delightful baking adventures and expert tips? Explore our other baking recipes and continue your journey to becoming a true kitchen legend!
Scones
Course: PastryCuisine: BritishDifficulty: easy8
servings15
minutes12
minutes240
kcal30
minutesTired of dense, hockey-puck scones? This simple method guarantees unbelievably light, fluffy scones that rise beautifully every single time. Say goodbye to dense disappointments and hello to delicate, flaky perfection.
Ingredients
2 cups all-purpose flour
1 tablespoon baking powder
1/4 cup granulated sugar
1/2 teaspoon salt
1/2 cup (1 stick) unsalted butter, very cold
3/4 cup cold buttermilk
1 large egg, for egg wash (optional)
Directions
- Preheat your oven to 400 degrees Fahrenheit (200 degrees Celsius). Line a baking sheet with parchment paper.
- In a large bowl, whisk together the flour, baking powder, granulated sugar, and salt.
- This is where the magic happens to prevent dense scones: Take your very cold butter and either grate it using a box grater directly into the flour mixture, or cut it into very small, pea-sized cubes.
- Using your fingertips or a pastry blender, quickly work the butter into the flour mixture until it resembles coarse crumbs with some larger, flattened pieces of butter remaining. Do not overmix; the key to tenderness is leaving the butter somewhat intact.
- Make a well in the center of the dry ingredients. Pour in the cold buttermilk.
- Mix just until combined: Stir with a fork or rubber spatula only until the dry ingredients are moistened and a shaggy dough forms. Again, resist the urge to overmix; overworking develops gluten, leading to tough scones.
- Turn the dough out onto a lightly floured surface. Gently pat the dough into a 1-inch thick circle or rectangle. Avoid kneading or excessively handling the dough.
- Dip a 2-inch round biscuit cutter into flour. Cut out scones by pressing straight down, then lifting the cutter straight up. Do not twist the cutter, as twisting seals the edges and prevents a good rise.
- Place the cut scones onto the prepared baking sheet, leaving about an inch between each. Gather the scraps, gently pat them together, and cut out any remaining scones.
- If desired, whisk the egg with a tablespoon of water and brush lightly over the tops of the scones for a golden finish.
- Bake for 12-15 minutes, or until the tops are golden brown and a scone sounds hollow when tapped on the bottom.
- Let cool slightly on the baking sheet before transferring to a wire rack. Serve warm with your favorite jam!
Notes
- Keep your butter and buttermilk as cold as possible to ensure flaky scones. Don’t overmix the dough; a shaggy texture is exactly what you want for tender results.


