
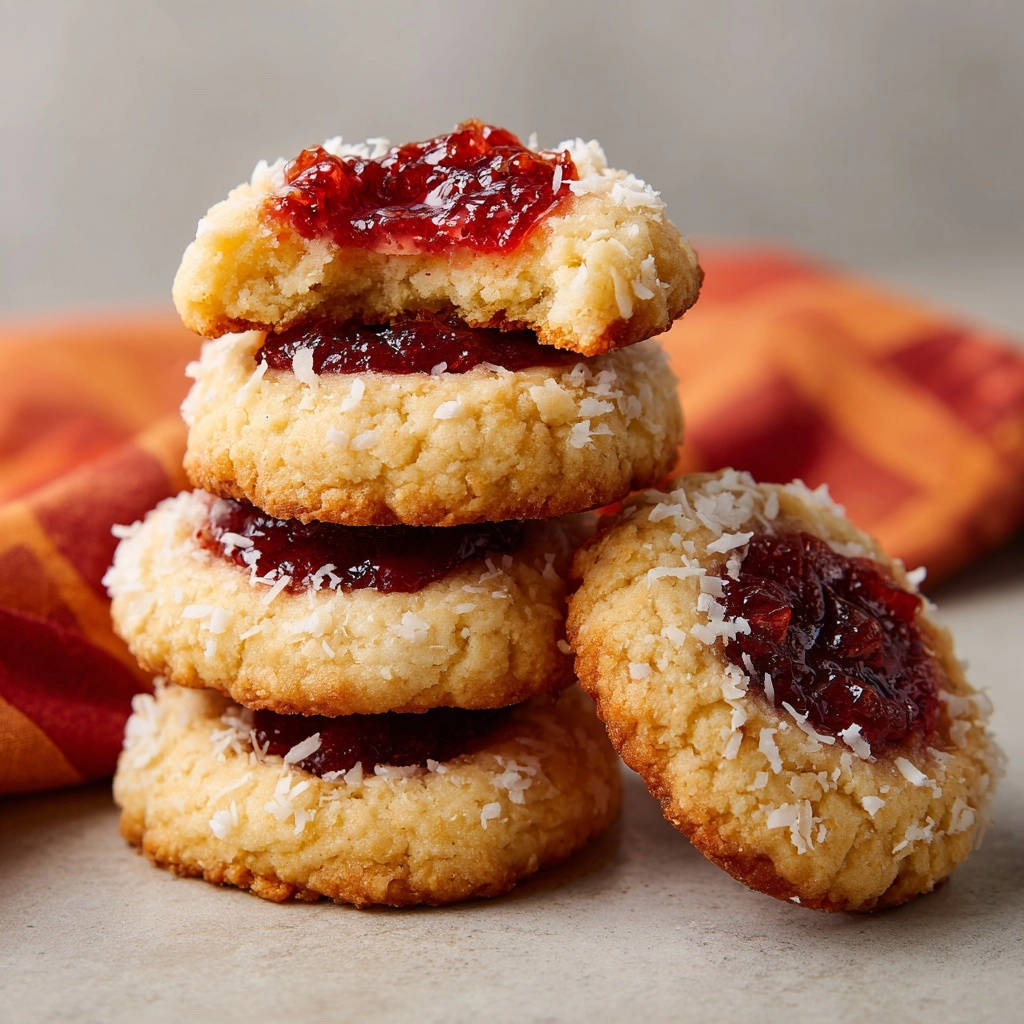
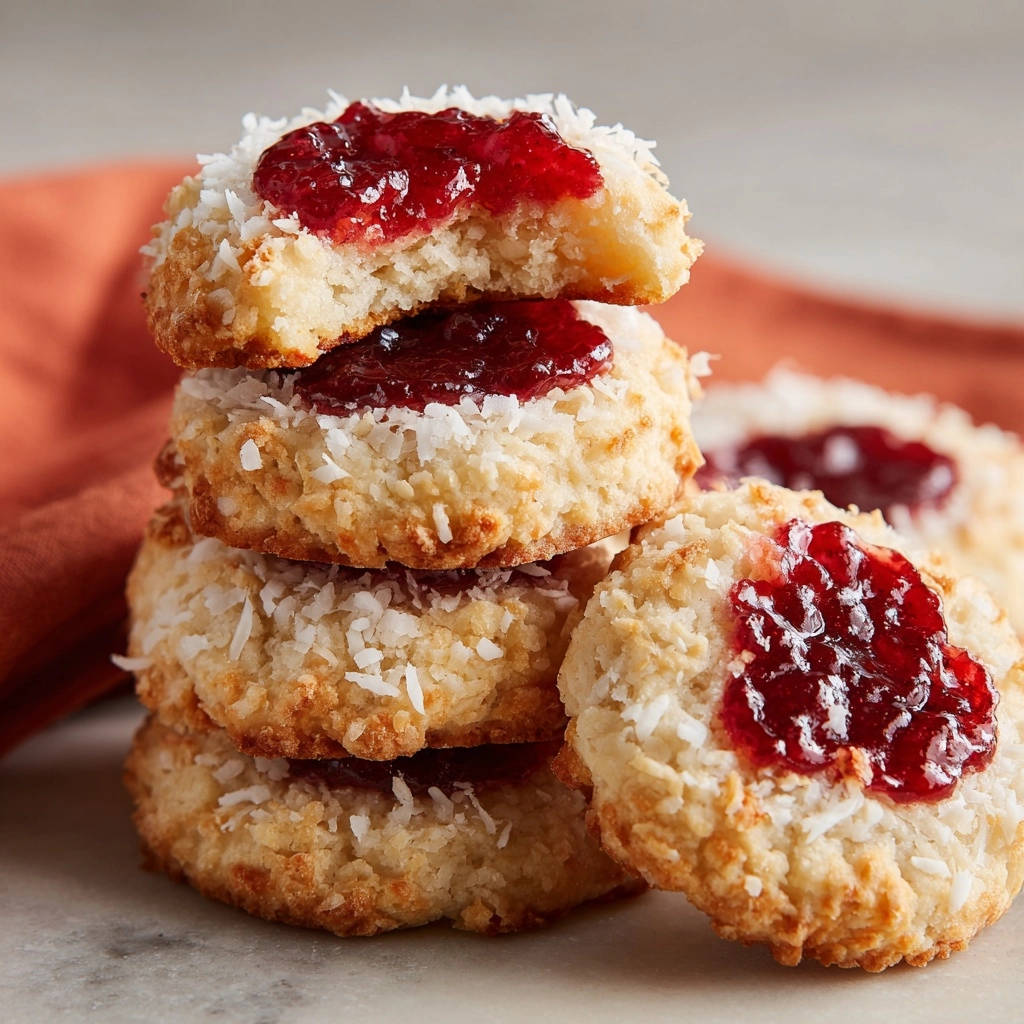
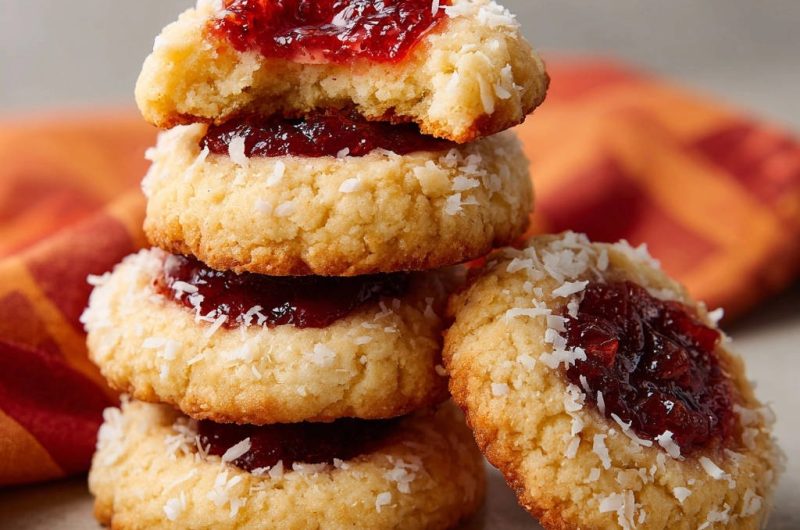
I know the frustration: you lovingly press those perfect indentations into your dough, only for them to flatten out in the oven, leaving jam everywhere. After years of perfecting, I’ve finally cracked the code to keeping those delicate cookie cups perfectly formed. This recipe ensures your Classic Jam Thumbprint Cookies emerge from the oven with tender crumbs and beautifully defined centers, every single time.
You’ll achieve approximately 24 delightful cookies with about 32 minutes of active time, plus a crucial chilling period that guarantees success.
Why This Recipe Is Your New Go-To for Classic Jam Thumbprint Cookies
This isn’t just another cookie recipe; it’s a blueprint for consistent perfection. We tackle the common pitfalls head-on, delivering results that look professionally baked yet are surprisingly simple to achieve at home.
Say goodbye to flat, misshapen treats. Our method, focusing on precise ingredient temperatures and a crucial chilling step, locks in that signature thumbprint shape.
Each cookie boasts a delightfully tender, buttery crumb that perfectly complements the sweet fruit jam. These are the showstopping treats you’ll be proud to share, making every bite a moment of pure joy.
The Essential Ingredients for Irresistible Thumbprints
The Dough’s Foundation: Butter, Sugar, & Flavor
Unsalted Butter, cold and cubed: Starting with cold butter is paramount. It prevents the dough from becoming too soft too quickly, allowing for easier handling and less spreading in the oven.
Granulated Sugar: Provides essential sweetness and contributes to the cookie’s delicate texture. It creams with the cold butter to create air pockets.
Large Egg Yolk: Adds richness and tenderness to the dough. The yolk’s fat enhances flavor and creates a more delicate crumb.
Vanilla Extract: A kitchen staple, vanilla brings a warm, aromatic depth that complements the buttery cookie base and sweet jam beautifully. Use a good quality pure vanilla for the best flavor.
Structure & Stability: Flour & Salt
All-Purpose Flour: Forms the structural backbone of our cookies. Proper measurement is key; too much can make them dry, too little can cause spreading.
Salt: Essential for balancing the sweetness and enhancing all the other flavors in the cookie. It brings out the nuanced notes of butter and vanilla.
The Signature Coating: Egg White & Coconut
Large Egg White, lightly beaten: Acts as the perfect adhesive for the coconut coating. It helps the coconut stick evenly to the dough balls, creating a beautiful, textured exterior.
Shredded Unsweetened Coconut: Adds a delightful chewiness and subtle tropical flavor that beautifully contrasts with the soft cookie and fruity jam. Ensure it’s unsweetened to control the overall sweetness.
Sweet Centers: Choosing Your Perfect Jam
Raspberry or Strawberry Jam: These are classic choices for their vibrant color and balanced sweetness. The tartness of raspberry or the familiar sweetness of strawberry truly shines here.
Opt for a high-quality jam or preserve with a slightly thicker consistency. This prevents it from bubbling over or becoming too runny during baking, keeping your thumbprints neat and tidy.
Your Baking Journey: Crafting Classic Jam Thumbprint Cookies, Step-by-Step
-
Cream Butter & Sugar:
In a large bowl, using an electric mixer, cream together the 1 cup (2 sticks) cold butter cubes and 1/2 cup granulated sugar on medium speed until just combined. The key here is not to overmix; the butter should still be cool and slightly chunky, which contributes to the tender texture.
-
Incorporate Wet Ingredients:
Beat in the 1 large egg yolk and 1 teaspoon vanilla extract until just incorporated into the butter mixture. Mix only until no streaks of egg yolk remain, ensuring even distribution of flavor and richness.
-
Add Dry Ingredients:
In a separate bowl, whisk together 2 cups all-purpose flour and 1/4 teaspoon salt. Gradually add these dry ingredients to the wet mixture, mixing on low speed until a soft dough forms. Again, be careful not to overmix the dough to maintain a tender crumb and prevent tough cookies.
-
Chill the Dough:
Divide the dough in half, flatten each half into a disc, and wrap tightly in plastic wrap. Refrigerate for at least 30 minutes. This chilling step is absolutely crucial for firming up the butter and allowing the gluten to relax, preventing the cookies from spreading too much in the oven and ensuring those perfectly formed thumbprints.
-
Preheat Oven & Prep Pans:
Preheat your oven to 350°F (175°C). Line baking sheets with parchment paper to prevent sticking and aid in easy cleanup, ensuring your beautiful cookies lift off effortlessly.
-
Roll & Coat Dough Balls:
While the oven preheats, unwrap one disc of chilled dough. Roll portions into 1-inch balls. In one shallow bowl, place the lightly beaten egg white; in another, the 1 cup shredded unsweetened coconut. Dip each dough ball first into the egg white (letting any excess drip off), then roll completely in coconut until evenly coated.
-
Create the Indentation:
Place coated dough balls about 2 inches apart on prepared baking sheets. Using your thumb or the back of a small round spoon, press a neat indentation into the center of each ball. Ensure it’s deep enough for the jam but doesn’t break through the bottom of the cookie, which could lead to leaks.
-
Fill with Jam:
Fill each indentation with about 1/2 teaspoon of your chosen raspberry or strawberry jam. Distribute the jam carefully, ensuring it fills the well without overflowing, ready for baking.
-
Bake & Cool:
Bake for 12 to 15 minutes, or until the edges are lightly golden. The key is to bake until just set, so the cookies hold their shape without getting too hard. Let them cool on the baking sheets for 5 minutes before carefully transferring them to a wire rack to cool completely, allowing the jam to fully set and prevent breakage.
Preparing the Perfect Dough
The Crucial Chill: Why Patience Pays Off
Forming and Coating Your Cookies
Filling and Baking to Golden Perfection
Tools of the Trade: Essential Kitchen Gadgets for Success
Electric Mixer: For creaming butter and sugar efficiently without overworking the dough. It ensures a consistently light and fluffy base.
Parchment Paper: Ensures even baking and prevents sticking, making cleanup a breeze. It also aids in easy transfer of delicate cookies.
Small Round Spoon or Thumb: The perfect tool for creating consistent indentations, crucial for holding the jam neatly. A 1/2 teaspoon measuring spoon works wonders for uniform wells.
Wire Cooling Rack: Essential for proper air circulation, preventing soggy bottoms and ensuring even cooling. This helps the cookies maintain their crisp edges.
Measuring Cups & Spoons: Accuracy is key for consistent results in baking. Precise measurements ensure the dough has the right texture and hydration.
Unlock Perfection: Expert Tips for Flawless Thumbprint Cookies
The Cold Butter Advantage
Start with Cold Butter: The recipe specifically calls for cold, cubed butter for a reason. It helps create a tender, flaky crumb and prevents overmixing, which can lead to tough cookies. Using softened butter risks a greasy dough that spreads excessively.
Mastering the Indentation
Deep, But Not Too Deep: When making the thumbprint, aim for an indentation that’s deep enough to generously hold the jam but not so deep it pierces the bottom. A slightly oiled 1/2 teaspoon measuring spoon can create a perfectly uniform well, superior to a thumb in consistency.
Avoiding Overmixing
Mix Just Until Combined: Overmixing develops gluten, which can result in tough, dense cookies rather than the desired tender crumb. Mix the butter and sugar just until combined, and the dry ingredients only until just incorporated, then stop.
Reading Your Oven: The Right Bake
Watch for Golden Edges: Bake these delightful Classic Jam Thumbprint Cookies until the edges are lightly golden, typically 12-15 minutes. The centers should still look soft. The cookies will continue to firm up as they cool, so overbaking can lead to dry, hard thumbprints.
Jam Selection Secrets
Thicker Jams Work Best: Opt for a good quality, slightly thicker jam or preserve. Runnier jams can bubble over and lose their shape, or even leak through the cookie. If your jam is very thick, you can gently warm it in the microwave for a few seconds to make it easier to spoon.
Troubleshooting Common Thumbprint Cookie Challenges
Why Did My Cookies Flatten?
The most common culprit for flat thumbprint cookies is insufficient chilling of the dough. Ensure your butter is cold to start, and always refrigerate the dough for at least 30 minutes, or even longer if your kitchen is warm. Additionally, overmixing can develop gluten, leading to cookies that spread too much in the oven.
My Jam Ran Out!
If your jam spreads or leaks out during baking, it could be due to an indentation that’s too shallow, causing overflow, or too deep, breaking the cookie’s base. It might also be a very thin or watery jam. Next time, ensure the indentation is just right, and consider using a slightly thicker preserve or one with more fruit content.
Cookies Are Too Crumbly or Hard
Overbaking is often the cause of crumbly or hard cookies. Bake just until the edges are lightly golden, keeping a close eye on them. The cookies will continue to set as they cool. Make sure to measure your flour accurately, preferably by weight, as too much flour can also lead to a dry, crumbly texture.
Serving Suggestions & Storage Solutions
Creative Serving Ideas
These Classic Jam Thumbprint Cookies are perfect on their own with a cup of tea or coffee, embodying a comforting elegance. They also make a delightful addition to any holiday cookie platter, a charming homemade gift, or a sweet treat for an afternoon gathering.
Consider dusting them with a light sprinkle of powdered sugar just before serving for an elegant finish, or pairing them with a scoop of vanilla bean ice cream for a decadent dessert. For another delicious and simple dessert idea, try these easy chocolate lava cakes.
Storing Your Delicious Batch
Once completely cooled, store your thumbprint cookies in an airtight container at room temperature for up to 5-7 days. To maintain their freshness and prevent sticking, you can place a piece of parchment paper between layers.
Can You Make Them Ahead?
Yes! The unbaked dough discs can be refrigerated for up to 3 days or frozen for up to 3 months, tightly wrapped. Thaw frozen dough in the refrigerator before rolling and baking. Baked cookies can also be frozen in an airtight container for up to 2-3 weeks; simply thaw at room temperature before serving.
Frequently Asked Questions About Classic Jam Thumbprint Cookies
Can I use different types of jam?
Absolutely! While raspberry and strawberry are classic choices, feel free to experiment with other fruit preserves like apricot, cherry, or blueberry. Just ensure the jam isn’t too runny, as this can cause it to bubble over during baking and affect the final appearance.
Is chilling the dough really necessary?
Yes, chilling the dough is a crucial step! It helps to firm up the butter, which prevents the cookies from spreading too much in the oven and ensures those perfectly defined thumbprint indentations. Skipping this step often leads to flat, misshapen cookies that lack their signature charm.
How do I make them gluten-free?
To make Classic Jam Thumbprint Cookies gluten-free, you can substitute the all-purpose flour with a 1:1 gluten-free baking flour blend that contains xanthan gum. Adjustments to the liquid might be needed depending on the blend, so follow package instructions for the specific brand you choose for best results.
Can I omit the coconut?
You can certainly omit the coconut if it’s not to your preference! For a classic, non-coconut version, you can roll the dough balls in granulated sugar before making the indentation, or simply bake them plain before filling. The egg white wash can still be used to help sugar adhere, or it can be skipped entirely. If you love cookies with coconut, you might also enjoy these guaranteed chewy coconut macaroons!
Share Your Classic Jam Thumbprint Cookies Creation!
Now that you’ve mastered the art of making perfectly formed, tender Classic Jam Thumbprint Cookies, it’s time to share your delicious creations! We encourage you to bake a batch, snap a photo, and share your experience with us.
Whether for a holiday gathering, a cozy afternoon snack, or just because, these cookies are sure to bring smiles. Don’t forget to explore our other delightful options, such as our perfect sugar cookies, for more baking inspiration!
Jam Thumbprint Cookies
Course: DessertCuisine: AmericanDifficulty: easy24
cookies20
minutes12
minutes240
kcal32
minutesDiscover the secret to perfectly formed jam thumbprint cookies that won’t flatten in the oven. This recipe ensures tender cookies with jam-filled indentations every time, making your baking efforts truly rewarding.
Ingredients
1 cup (2 sticks) unsalted butter, cold and cut into cubes
1/2 cup granulated sugar
1 large egg yolk
1 teaspoon vanilla extract
2 cups all-purpose flour
1/4 teaspoon salt
1 large egg white, lightly beaten
1 cup shredded unsweetened coconut
1/2 cup raspberry or strawberry jam
Directions
- In a large bowl, cream together the cold butter cubes and granulated sugar using an electric mixer on medium speed until just combined. Do not overmix; the butter should still be cool.
- Beat in the egg yolk and vanilla extract until just incorporated.
- In a separate bowl, whisk together the flour and salt. Gradually add the dry ingredients to the wet ingredients, mixing on low speed until a soft dough forms. Be careful not to overmix the dough.
- Divide the dough in half, flatten each half into a disc, and wrap tightly in plastic wrap. Refrigerate the dough for at least 30 minutes. This chilling step is crucial for preventing the cookies from spreading too much in the oven.
- Preheat your oven to 350°F (175°C). Line baking sheets with parchment paper.
- While the oven preheats, unwrap one disc of chilled dough. Roll portions of the dough into 1-inch balls.
- In a shallow bowl, place the lightly beaten egg white. In another shallow bowl, place the shredded coconut. Dip each dough ball first into the egg white, letting any excess drip off, then roll it in the coconut to coat completely.
- Place the coated dough balls about 2 inches apart on the prepared baking sheets. Using your thumb or the back of a small round spoon, press an indentation into the center of each dough ball. Make sure the indent is deep enough to hold the jam but not so deep it breaks through the bottom.
- Fill each indentation with about 1/2 teaspoon of your chosen jam.
- Bake for 12 to 15 minutes, or until the edges are lightly golden. The key here is to bake until just set, so the cookies hold their shape without getting too hard.
- Let the cookies cool on the baking sheets for 5 minutes before transferring them to a wire rack to cool completely. Enjoy these perfectly formed, tender cookies!
Notes
- Chilling the dough is crucial for preventing spread. Bake until just set to maintain shape and tenderness.


