
For years, I struggled to achieve that impossibly smooth, melt-in-your-mouth texture when making homemade candy. The secret to perfect, non-gritty Creamy Peanut Butter Fudge lies not just in the ingredients, but in mastering the precise temperature and controlling the formation of sugar crystals during the cook phase.
This recipe provides a simple, expert technique-the Crystal Control wash down-that guarantees an impeccably creamy result every single time, making it the definitive method for foolproof fudge.
The Ultimate Smoothness Secret: Why This Creamy Peanut Butter Fudge Never Turns Gritty
Understanding the Science of Grainy Fudge
Graininess occurs when sugar crystals, which are naturally present in the mixture, grow too large and separate from the butter and milk fats during the setting process.
When the sugar mixture is heated, any stray crystals clinging to the sides of the pot can fall back into the boiling liquid, acting as seeds that encourage large, uncontrolled crystallization.
The Magic of the Pastry Brush Wash Down
The core innovation of this recipe is the “Crystal Control” washing technique, which eliminates those stray sugar seeds before they can cause trouble.
By using a wet pastry brush to carefully wipe down the pot’s interior walls as the mixture heats up, you dissolve any undissolved sugar.
This ensures the cooking liquid is crystal-free before it reaches the boiling point, forcing the subsequent crystallization (when beating) to be controlled and microscopic, resulting in an exceptionally smooth texture.
Essential Pantry Checklist: Building Blocks for Rich Peanut Butter Flavor
The Sweetener Foundation: Granulated Sugar vs. Powdered Glaze
Granulated white sugar provides the necessary crystalline structure and mass needed to achieve the correct soft-ball stage when cooked to 234°F.
In contrast, powdered sugar (confectioners’ sugar) is used solely for the optional glaze because its fine texture and added cornstarch create a smooth, quick-setting icing that complements the rich fudge without affecting its core texture.
The Crucial Dairy Choice: Evaporated Milk vs. Whole Milk
Using evaporated milk is highly recommended as it contains a higher concentration of milk solids than standard whole milk.
These extra milk solids promote a slightly richer flavor and a denser, more luxurious fudge consistency, though whole milk can be used if evaporated is unavailable.
Achieving the Creamiest Base: Selecting the Right Peanut Butter
For this fudge, you must use standard, shelf-stable creamy peanut butter (like Jif or Skippy), not the natural or oil-separated variety.
The stabilizers and hydrogenated oils in traditional peanut butter ensure it emulsifies properly with the hot sugar syrup, guaranteeing the smooth texture the recipe promises.
Essential Equipment for Mastering Candy Making
Successful candy making relies on precision, which means having the right tools is non-negotiable for safety and texture control.
- Heavy-bottomed pot (3-4 quart)
- Sturdy wooden spoon or electric hand mixer
- Pastry brush and water for Crystal Control
- Candy thermometer (Clip-on is best)
- 8×8 inch square baking pan
Why the Heavy-Bottomed Pot Matters
A heavy-bottomed pot diffuses heat evenly and efficiently across the base, preventing hot spots that can cause the sugar mixture to scorch or caramelize prematurely.
Scorching introduces unwanted flavors and can quickly ruin the batch before it even reaches the correct temperature.
The Non-Negotiable Candy Thermometer
Achieving the soft-ball stage requires reaching exactly 234°F (or 112°C); a degree or two off can mean the difference between creamy perfection and rock-hard candy.
Visual cues alone are insufficient and unreliable for candy; the thermometer eliminates all guesswork and guarantees accurate crystallization.
Step-by-Step Perfection: Cooking Creamy Peanut Butter Fudge Like a Pro
-
Preparation and Pan Lining:
Line an 8×8 inch square pan with parchment paper or foil, ensuring the lining hangs over the sides like a sling.
The parchment overhang is absolutely necessary, allowing you to lift the set fudge out of the pan cleanly without damaging the edges or relying on scraping.
-
Combining and Heating the Boiler Ingredients:
In your large, heavy-bottomed pot, combine the granulated sugar, milk (evaporated or whole), and butter.
Place the pot over medium heat, stirring gently and continuously until the butter is fully melted and the sugar begins to dissolve.
-
The Crystal Control Technique (Washing the Sides):
As the sugar mixture heats but before it reaches a rapid boil, dip a pastry brush in plain water and carefully wipe down the sides of the pot just above the liquid line.
Repeat this several times until the mixture reaches a rolling boil, ensuring all stray sugar crystals are dissolved back into the liquid where they cannot interfere with the final texture.
-
Cooking to the Soft-Ball Stage (234°F):
Once the mixture is boiling rapidly and visibly across the entire surface, immediately stop stirring.
Clip your candy thermometer in place and cook undisturbed until the temperature reaches exactly 234°F.
-
The Critical Cooling and Flavor Addition Phase:
Remove the pot from the heat the moment it hits 234°F and let it stand, completely undisturbed, for five minutes.
This brief cooling period allows the temperature to drop slightly, which is essential because if you begin beating the mixture while it is too hot, it will instantly result in dry, grainy fudge.
After five minutes, add the peanut butter and vanilla extract, but still refrain from stirring.
-
Beating for Controlled Texture:
Begin beating vigorously with a wooden spoon, or use a low setting on an electric mixer.
The rapid beating forces thousands of microscopic sugar crystals to form, which is the key to creamy texture; continue for 2 to 3 minutes.
The fudge is ready to pour when it suddenly loses its bright glossy sheen, looks dull and opaque, and thickens substantially to the point where stirring is difficult.
For a similar silky consistency, check out this creamy caramel apple fudge.
-
Pouring, Setting, and Cooling:
Immediately and quickly pour the thickened fudge into your prepared 8×8 pan.
Smooth the top quickly, as the mixture will set very rapidly once removed from the heat and beaten.
Allow the Creamy Peanut Butter Fudge to cool completely and set up at room temperature for a minimum of two hours, or until fully firm.
-
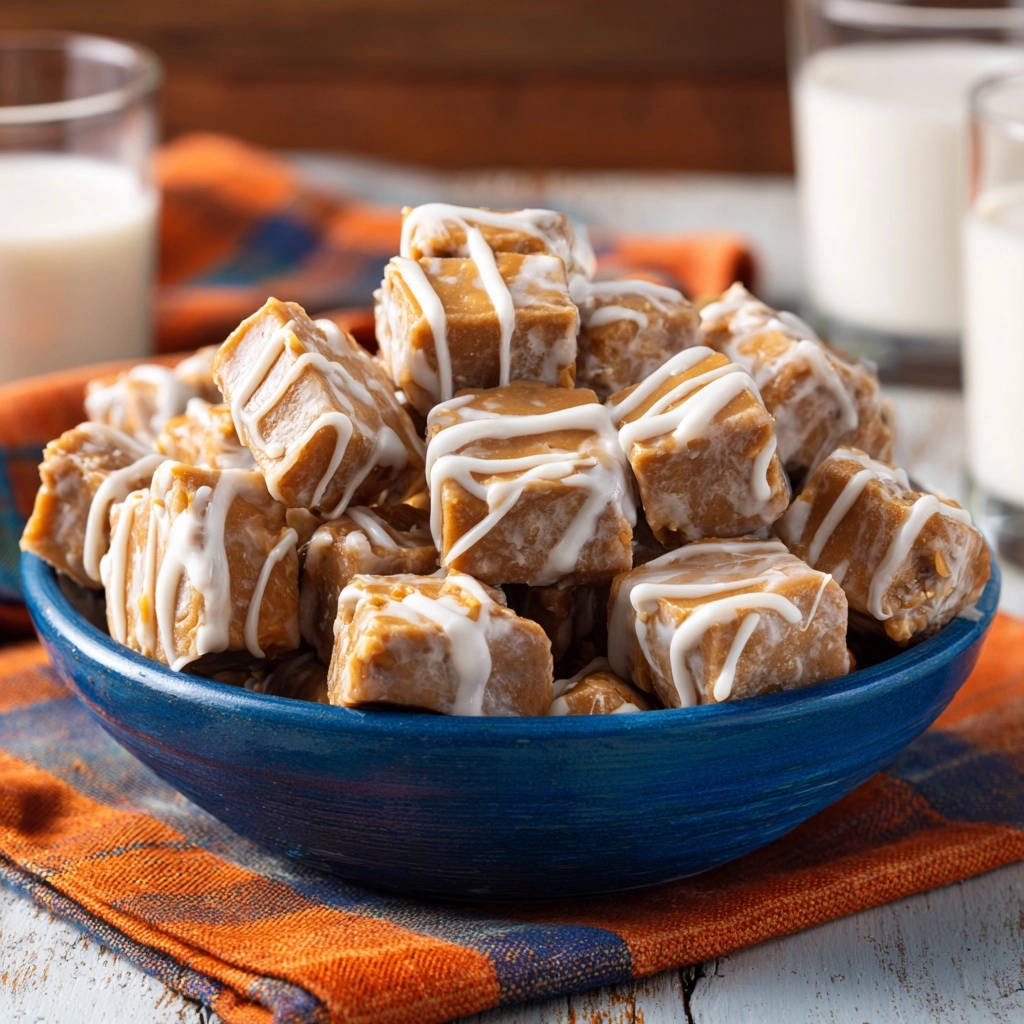
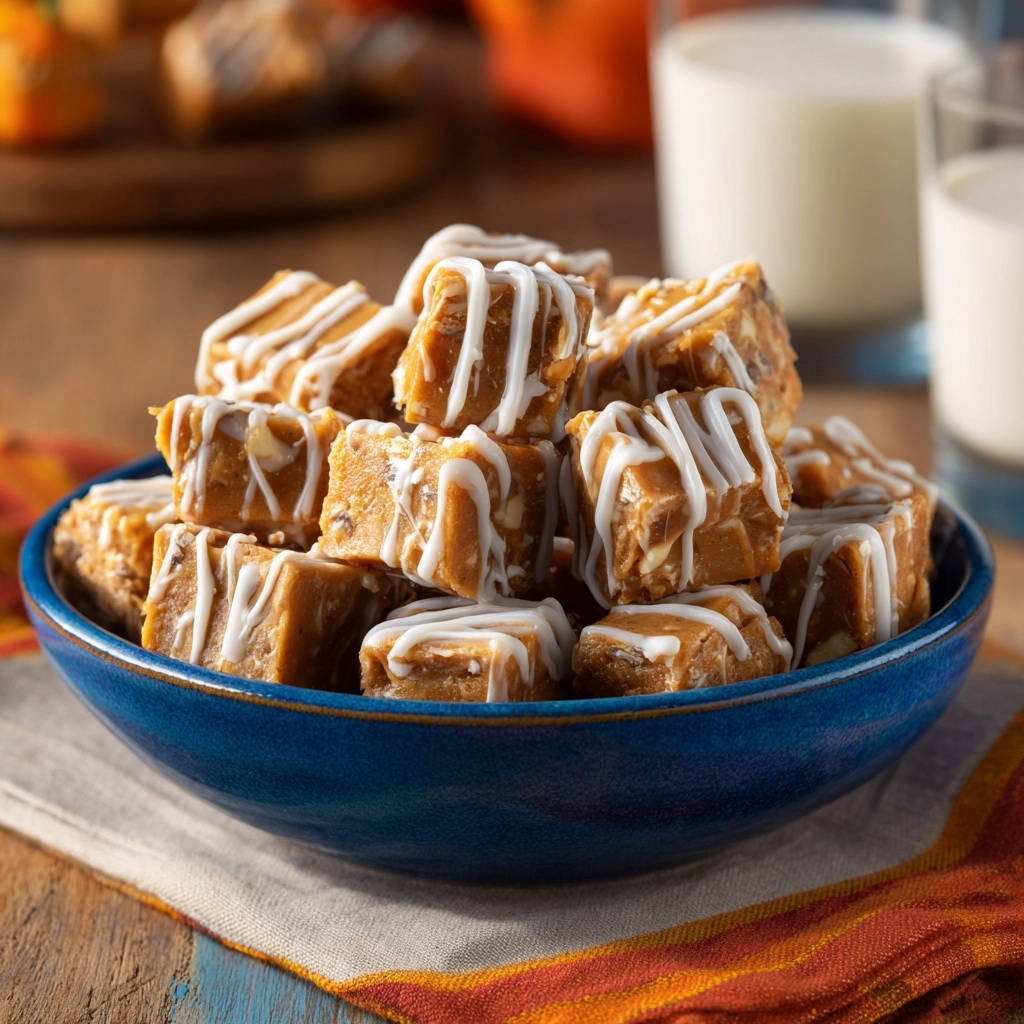
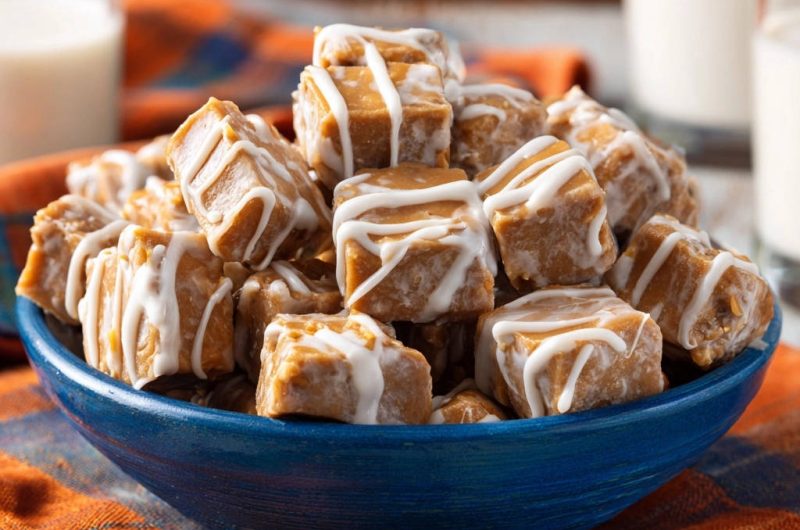
Final Glaze Application and Cutting:
Use the parchment overhangs to lift the set fudge block from the pan and cut it into small squares.
Whisk together the powdered sugar and 2 tablespoons of milk to create a smooth, thick glaze, then drizzle liberally over the squares.
Let the glaze set for about 15 minutes before serving these delicious treats.
Troubleshooting Fudge Failure: Solutions for Common Texture Problems
Help! My Fudge Is Grainy and Sugary
If your fudge is grainy, the sugar crystals grew too large, which almost always results from skipping the Crystal Control technique (washing the pot sides).
Alternatively, stirring the mixture after it reached a rolling boil can introduce crystals from the sides back into the syrup, so ensure all stirring stops when the boil begins.
My Fudge Didn’t Set Properly
A soft, unset fudge means the sugar concentration was too low, usually because the mixture did not reach the full 234°F soft-ball stage.
Always double-check your thermometer calibration and ensure it is submerged far enough to get an accurate reading without touching the pot bottom.
The Fudge is Too Hard and Dry
This occurs when the syrup was cooked past the 234°F target, or when the mixture was beaten for too long after the peanut butter was incorporated.
If the fudge becomes hard and dry, try placing the block back into a double boiler to melt gently, then add a tablespoon of milk and beat again briefly to re-emulsify before setting.
Advanced Tips for Maximum Creaminess and Customization
Optimize Your Beat Time: The moment the fudge loses its glossy shine-meaning it transitions from highly reflective to a matte, opaque surface-it is ready. Stopping the beating process 30 seconds before it becomes extremely difficult to stir often results in maximum residual creaminess.
Dealing with High Humidity: In very humid environments, the sugar syrup absorbs moisture from the air, making it harder to reach the correct concentration.
If you are cooking on a rainy or highly humid day, increase your target temperature by 1 or 2 degrees (aim for 235°F or 236°F) to compensate for the added moisture.
Flavor Variations: Chocolate Swirls and Nuts: For texture and complexity, fold in 1/2 cup of finely chopped peanuts or walnuts immediately after adding the peanut butter and vanilla.
For a chocolate swirl, melt 1/4 cup of semi-sweet chocolate chips and drizzle lines across the top of the fudge just after pouring it into the pan, then swirl gently with a knife tip.
Serving, Storage, and Make-Ahead Planning
Optimal Storage Techniques to Preserve Freshness
Fudge is best stored in an airtight container at cool room temperature (below 70°F) for up to two weeks.
Refrigerating fudge can sometimes cause condensation to form on the surface, which affects the texture, but if necessary, store in the fridge for up to three weeks.
Make-Ahead Mastery: Freezing Your Creamy Peanut Butter Fudge
Fudge freezes beautifully, making it an excellent make-ahead holiday treat.
Wrap the entire block of fudge (before cutting or glazing) tightly in plastic wrap, then place it inside a heavy-duty freezer bag or container.
It can be frozen for up to three months; thaw it slowly overnight in the refrigerator, then let it come to room temperature before cutting and glazing.
Frequently Asked Questions About Homemade Peanut Butter Fudge
Can I substitute natural or chunky peanut butter?
No, natural peanut butter that separates oil will not properly emulsify with the hot sugar syrup and will likely result in a greasy, failed batch.
Chunky peanut butter introduces large pieces that disrupt the fine crystal structure we are trying to achieve, making the final texture less creamy.
How do I know if I reached the “soft-ball” stage without a thermometer?
The traditional cold water test involves dropping a teaspoon of the boiling syrup into a glass of ice water.
If the syrup instantly solidifies and you can gather it with your fingers into a soft, malleable ball that holds its shape, you have hit the soft-ball stage, but a thermometer is vastly more reliable.
Is it possible to double or halve this recipe?
Halving the recipe is straightforward and requires no cook time adjustment, but doubling is risky because the increased volume changes the thermodynamics of the sugar syrup.
If you must double the batch, use an even larger pot and be aware that the cook time required to reach 234°F will be significantly longer.
Ready to Impress? Share Your Creamy Peanut Butter Fudge Masterpiece!
Armed with the crucial knowledge of Crystal Control and the exact temperature needed, you now have the definitive, no-fail method for creating incredibly smooth Creamy Peanut Butter Fudge.
This recipe transforms a notoriously tricky candy into a reliably rich, foolproof treat that’s perfect for gifting or indulging yourself. Try this method today and discover the secret to truly perfect fudge!
Peanut Butter Fudge
Course: DessertCuisine: AmericanDifficulty: medium36
small pieces10
minutes15
minutes240
kcal120
minutesSay goodbye to gritty, sugary fudge. This recipe reveals the secret technique—crystal control—to achieving an impossibly smooth, melt-in-mouth texture. It’s a rich, quick-setting dessert that beats store-bought every time.
Ingredients
3 cups Granulated White Sugar
3/4 cup Evaporated Milk or Whole Milk
1/2 cup Unsalted Butter (1 stick)
1 cup Creamy Peanut Butter
1 teaspoon Vanilla Extract
1 cup Powdered Sugar (for glaze)
2 tablespoons Whole Milk (for glaze)
Directions
- Prepare the Pan: Line an 8×8 inch square pan with parchment paper or foil, ensuring the lining hangs over the sides for easy removal later. Lightly grease the lining.
- Combine Boiling Ingredients: In a large, heavy-bottomed pot, combine the granulated sugar, 3/4 cup milk, and butter. Place over medium heat.
- The Smooth Fudge Solution (Crystal Control): As the sugar starts to dissolve and the mixture begins to heat up, use a pastry brush dipped in plain water to carefully wash down any sugar crystals clinging to the sides of the pot. This step is critical to prevent the formation of large sugar crystals later, which is what causes grainy fudge. Do this several times until the mixture reaches a rolling boil.
- Cook to Temperature: Once the mixture is boiling rapidly, stop stirring completely. Insert a candy thermometer and continue cooking until the temperature reaches exactly 234 degrees F (the soft-ball stage). This usually takes about 5 to 7 minutes of rolling boil.
- Cool and Add Flavor: Remove the pot immediately from the heat. Allow the mixture to stand, undisturbed, for five minutes to cool slightly. Do not stir it during this cooling period. Add the peanut butter and vanilla extract, but still do not stir.
- Beat for Texture: Once all ingredients are in the pot, begin beating vigorously with a wooden spoon or an electric mixer (use a low setting). This beating action forces small, controlled crystal formation. Continue beating for about 2 to 3 minutes, or until the fudge starts to lose its glossy sheen and thickens substantially. It should look dull and be hard to stir.
- Pour and Set: Quickly pour the thickened fudge into the prepared 8×8 pan. Smooth the top with a spatula if necessary, but work fast, as it will set rapidly. Let the fudge cool completely and set up at room temperature for at least 2 hours, or until firm.
- Cut and Glaze: Once set, lift the fudge out using the parchment paper overhangs. Cut into small squares. For the white glaze, whisk together the powdered sugar and 2 tablespoons of milk until smooth and thick. Drizzle the glaze over the fudge squares using a spoon or a piping bag. Allow the glaze to set for about 15 minutes before serving.
Notes
- The key to non-gritty texture is washing down sugar crystals on the pot sides before boiling and beating vigorously after cooling slightly.


