
I remember countless times attempting to achieve that perfect golden crust on cheese, only to end up with a sticky mess or unevenly cooked pieces. It was a culinary frustration I thought was inevitable until I perfected these Golden Pan-Seared Cheese Skewers. This recipe isn’t just about cooking cheese; it’s about unlocking a simple, reliable method that guarantees crispy, tender results every single time, making it an absolute game-changer for effortless entertaining or a quick, satisfying snack.
Why These Golden Pan-Seared Cheese Skewers Will Change Your Snack Game
Forget the days of sad, melted cheese or stubborn sticking. This recipe elevates a simple ingredient into an irresistible culinary delight.
It’s about mastering a technique that ensures maximum flavor and perfect texture.
The “Never Sticky, Always Crispy” Promise: Our Secret Unveiled
The common pitfalls of searing cheese often stem from moisture and incorrect pan temperature.
Our method directly addresses these challenges, focusing on crucial prep steps and heat management.
The result is a beautifully seared exterior that protects a warm, tender interior without ever adhering to your pan.
Quick, Easy, and Utterly Delicious: A Recipe for Any Occasion
From start to finish, these cheese skewers come together in under 20 minutes.
They are ideal for impromptu gatherings, a sophisticated appetizer, or even a delightful lunch.
The minimal effort belies the impressive taste and presentation, making them a true crowd-pleaser.
Essential Tools for Your Golden Pan-Seared Cheese Skewers Adventure
Having the right equipment makes all the difference in achieving that flawless sear.
You don’t need a professional kitchen, just a few key items.
Kitchen Must-Haves for a Perfect Sear
Heavy-Bottomed Skillet: A cast iron or high-quality non-stick pan is crucial.
It retains heat evenly, preventing temperature fluctuations that lead to sticking and uneven searing.
Tongs: Essential for safely flipping the cheese skewers.
They allow for precise handling without damaging the delicate crust.
Optional Helpers for Enhanced Experience
Paper Towels: Absolutely vital for thoroughly drying the cheese.
This is your first line of defense against sticking and promotes a crispy finish.
Small Wooden Skewers: These are perfect for individual portions and easy handling.
Ensure they are small enough to fit comfortably in your pan.
Mixing Bowl: For gently tossing your cheese with oil and seasonings.
The Building Blocks of Flavor: Inside Your Irresistible Cheese Skewers
The simplicity of this dish means each ingredient plays a critical role.
Choosing quality components ensures maximum flavor impact.
Choosing Your Star Cheese: Halloumi, Paneer, or Queso Blanco?
These firm, high-melting point cheeses are the heroes of our Golden Pan-Seared Cheese Skewers.
Halloumi: Originating from Cyprus, it has a salty, tangy flavor and a uniquely squeaky texture when cooked.
It holds its shape exceptionally well under high heat.
Paneer: A fresh cheese common in Indian cuisine, paneer has a mild, milky flavor.
It doesn’t melt, making it perfect for searing to a beautiful golden brown.
Queso Blanco: A popular Latin American cheese, it offers a fresh, mild taste.
Similar to paneer, it softens but does not melt when heated, allowing for a fantastic crust.
Aromatic Allies: Fresh Thyme, Salt, and Pepper
Fresh thyme adds an herbaceous, earthy note that perfectly complements the rich cheese.
Salt and black pepper enhance the natural flavors, creating a well-balanced profile.
The Role of Olive Oil: Flavor and Function
A good quality olive oil provides a luscious flavor foundation.
Crucially, it aids in heat transfer, ensuring an even golden sear and preventing sticking.
Skewers: Selecting the Right Size and Type
Small wooden skewers are ideal for appetizer-sized portions of these delightful cheese skewers.
While this recipe is pan-seared, if you ever plan to grill cheese skewers, remember to soak wooden skewers in water for at least 20 minutes to prevent burning.
Crafting Your Golden Pan-Seared Cheese Skewers: A Detailed, Step-by-Step Guide
Each step is designed for success, ensuring your Golden Pan-Seared Cheese Skewers turn out perfectly.
Preparation is Key: The Golden Rule for No-Stick Cheese
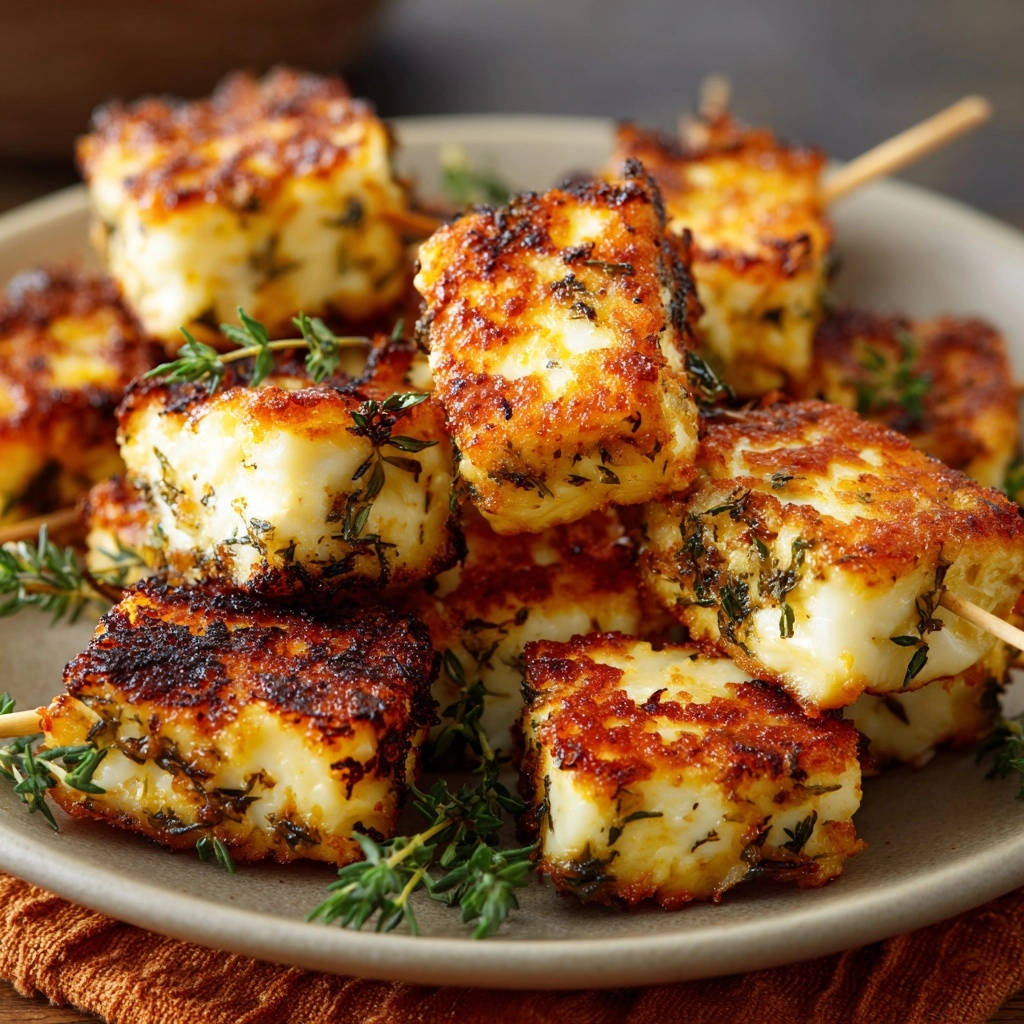
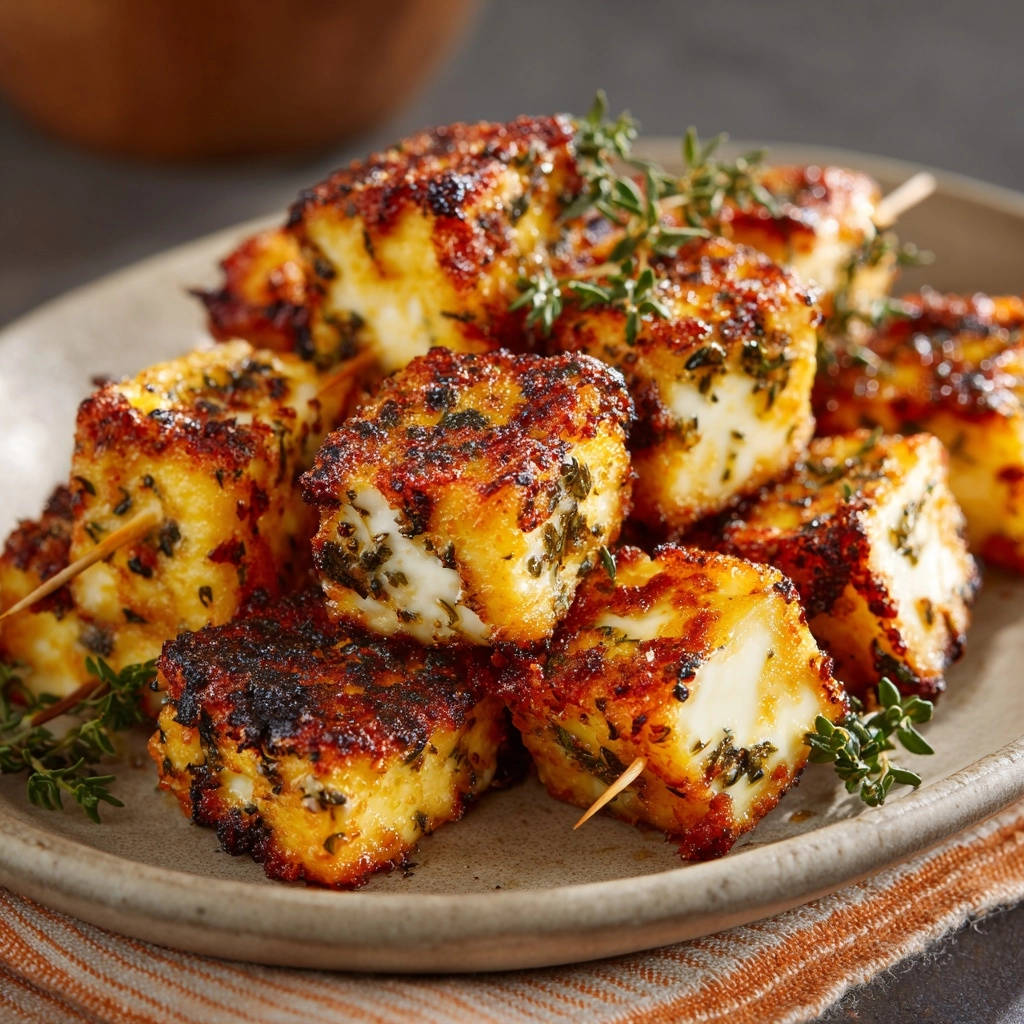
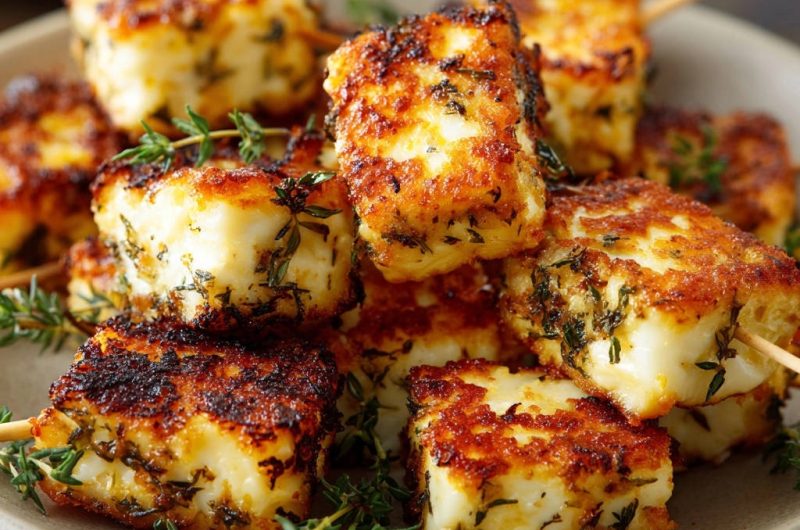
Begin by cutting your chosen cheese into 1-inch cubes. The consistent size ensures even cooking.
Next, and this is critical, thoroughly pat each cheese cube dry with paper towels on all sides.
Any residual moisture will create steam, preventing a crisp crust and making the cheese prone to sticking.
Infusing Flavor: Seasoning Your Cubes to Perfection
In a medium bowl, gently combine the dried cheese cubes with olive oil, chopped fresh thyme, salt, and black pepper.
Toss very carefully to ensure each cube is lightly and evenly coated.
This light coating helps the seasonings adhere and contributes to the golden crust.
The Art of Skewering: Avoiding Overcrowding for Even Cooking
Carefully thread 2-3 seasoned cheese cubes onto each small wooden skewer.
It’s important to leave a little space between each cube on the skewer.
This allows heat to circulate fully around each piece, ensuring uniform searing on all sides.
Mastering the Pan Heat: Your Non-Stick Guarantee
Place a large, heavy-bottomed skillet over medium-high heat.
Allow the pan to heat for 2-3 minutes until it’s quite hot but not smoking.
You should feel strong heat radiating when you hold your hand an inch above the surface; this proper temperature is crucial for an instant sear and preventing any sticking.
The Sear: Patience for That Irresistible Golden Crust
Carefully place the cheese skewers in the hot pan, ensuring they are in a single layer and not touching each other.
Working in batches is essential to avoid overcrowding, which drops the pan’s temperature and results in soggy, rather than crispy, cheese.
Let the cheese sear undisturbed for 2-3 minutes per side until each exposed surface is deeply golden brown and beautifully crispy.
Resist the urge to move or flip them too soon, as this is how that perfect, non-stick sear develops.
Once a side is golden, use tongs to carefully flip to the next side until all surfaces are perfectly browned.
Immediate Gratification: Serving Your Perfectly Seared Skewers
As soon as all sides are beautifully browned and crispy, remove the skewers from the pan.
Serve your Golden Pan-Seared Cheese Skewers warm immediately to enjoy their optimal texture and flavor.
Garnish with a few extra fresh thyme sprigs if desired for an elegant touch.
Chef’s Secrets: Elevate Your Golden Pan-Seared Cheese Skewers Game
Unlock even more potential from this already fantastic recipe with these expert tips.
Flavor Variations Beyond Thyme
Experiment with different herbs to match your mood or meal.
Fresh rosemary or oregano offer a distinct, savory twist.
For a subtle kick, a tiny pinch of chili flakes tossed with the cheese adds a delightful warmth.
Achieving Consistent Golden Crusts Every Time
Always ensure your pan is adequately heated before adding the cheese; a cold pan is the enemy of crispness.
Never overcrowd the skillet, as this drastically lowers the temperature and steams the cheese instead of searing it.
Patience is paramount: let each side develop its deep golden crust without interference.
Creative Garnish and Presentation Ideas
A fresh squeeze of lemon juice brightens the rich cheese flavor beautifully.
A sprinkle of smoked paprika or a drizzle of honey can add another layer of complexity.
For a vibrant presentation, serve alongside a small bowl of marinara sauce or a zesty pesto for dipping, or consider a fresh arugula and pomegranate salad.
Troubleshooting Common Cheese Skewer Challenges
Even with the best intentions, challenges can arise. Here’s how to tackle them.
“Why Did My Golden Pan-Seared Cheese Skewers Stick to the Pan?”
This is usually due to insufficient drying of the cheese; moisture causes sticking.
It can also be a sign of an inadequately heated pan or flipping the cheese too soon before a crust has fully formed.
Ensure your cheese is bone dry and your pan is properly hot before adding the skewers.
“My Cheese Isn’t Getting Crispy – It’s Just Softening!”
The pan temperature was likely too low, preventing a proper sear and causing the cheese to simply soften and melt internally.
Overcrowding the pan can also lower the temperature significantly.
Make sure you sear the cheese for the full recommended time on medium-high heat.
“My Cheese Melted Too Much Before Getting Golden”
This issue often points to selecting a cheese type that isn’t firm enough or has too low a melting point.
While the internal temperature might be too high, the outside isn’t getting hot enough quickly to sear.
Re-evaluate your cheese choice; stick to halloumi, paneer, or queso blanco for best results.
Serving Suggestions & Pairing Ideas for Your Golden Pan-Seared Cheese Skewers
These versatile cheese skewers are perfect for many dining occasions.
Perfect as an Appetizer or Party Snack
Serve them hot with a variety of dipping sauces like warm marinara, a tangy honey-mustard, or a vibrant pesto.
They pair wonderfully with a simple green salad dressed with a light vinaigrette.
Transforming Them into a Light Meal
For a more substantial meal, arrange the seared cheese skewers over a bed of fluffy quinoa or brown rice.
They also make a fantastic protein addition to roasted vegetables or nestled into a warm wrap with fresh greens.
Drink Pairings to Complement the Richness
A crisp, dry white wine like Sauvignon Blanc or Pinot Grigio beautifully cuts through the richness of the cheese.
For beer lovers, a light lager or a refreshing pilsner makes an excellent companion.
Non-alcoholic options include sparkling water with a hint of lemon or a crisp, unsweetened iced tea.
Storing Leftovers and Make-Ahead Magic
Plan ahead or save some for later with these practical tips.
How to Store and Reheat for Maximum Crispness
Store any leftover Golden Pan-Seared Cheese Skewers in an airtight container in the refrigerator for up to 2-3 days.
To reheat and maintain crispness, place them on a baking sheet in a preheated oven at 350°F (175°C) for 5-7 minutes, or until warmed through and re-crisped.
Avoid microwaving, as it will make the cheese rubbery.
Can You Prep Golden Pan-Seared Cheese Skewers Ahead of Time?
You can certainly cut and season the cheese cubes a few hours in advance, storing them in the refrigerator.
However, for the very best crispy texture, it’s always ideal to sear the cheese just before serving.
Skewering can also be done ahead, making assembly even quicker when it’s time to cook.
Your Burning Questions About Golden Pan-Seared Cheese Skewers, Answered!
We’ve got you covered with answers to common inquiries.
What types of cheese work best for searing besides halloumi or paneer?
Beyond our top recommendations, other firm, high-melting point cheeses that can work well include Provolone, Muenster, or even a very aged Cheddar, which develops a lovely crust.
The key is a cheese that resists immediate melting and holds its structure.
Can I bake or air fry these Golden Pan-Seared Cheese Skewers instead of pan-searing?
Yes, you can, but the texture will differ. Baking or air frying will yield a softer, slightly puffed cheese with a less intense, all-around crispness compared to the direct contact searing in a pan.
For an excellent oven-baked cheese option, you might enjoy our perfect savory cheese braids, which are designed for baking.
How do I make this Golden Pan-Seared Cheese Skewers recipe dairy-free?
Look for plant-based halloumi alternatives now available in many specialty stores, which are specifically designed to sear well.
Alternatively, firm tofu can be pressed, marinated in a salty brine, and then seared using a similar method for a delicious dairy-free option.
Are wooden skewers necessary, or can I use metal skewers?
Both wooden and metal skewers work. Wooden skewers are convenient for disposal and smaller portions.
Metal skewers are reusable and conduct heat, which means the cheese might cook slightly faster or retain heat longer.
Just be mindful that metal skewers will be hot to the touch.
The Golden Verdict: Why These Cheese Skewers Will Be Your New Favorite
These Golden Pan-Seared Cheese Skewers are more than just a recipe; they’re a testament to how simple techniques can transform everyday ingredients into something truly special.
With our “never sticky, always crispy” promise, you’re guaranteed a delicious, frustration-free experience every time.
Don’t wait to try these irresistible cheese skewers – they’re quick, easy, and utterly delicious, perfect for any occasion.
We invite you to make them, share your creations, and explore more fantastic appetizer ideas in our diverse collection of crispy bites and snacks!
Cheese Skewers
Course: AppetizerCuisine: InternationalDifficulty: easy4
servings10
minutes8
minutes240
kcal18
minutesCraving perfectly seared cheese? This recipe ensures crispy, golden cheese skewers that are tender inside and won’t stick. Discover simple steps for frustration-free, delicious results every time.
Ingredients
1 block (8 oz) firm cheese, such as halloumi, paneer, or queso blanco, cut into 1-inch cubes
2 tablespoons olive oil
1 tablespoon fresh thyme leaves, chopped
1/4 teaspoon salt
1/8 teaspoon black pepper
8 small wooden skewers (soaked in water for 20 minutes if grilling)
Directions
- Prepare the cheese for searing: Pat the cheese cubes thoroughly dry with paper towels. This step is crucial for preventing sticking and achieving a crisp crust. Ensure each side is as dry as possible.
- Season the cheese: In a medium bowl, gently toss the dried cheese cubes with olive oil, chopped fresh thyme, salt, and black pepper until evenly coated.
- Skewer the cheese: Carefully thread 2-3 cheese cubes onto each wooden skewer. Do not overcrowd them, leaving a little space between each cube.
- Heat the pan properly: Place a large, heavy-bottomed skillet (cast iron or non-stick works best) over medium-high heat. Let the pan heat for 2-3 minutes until it’s quite hot but not smoking. You should feel heat radiating strongly when you hold your hand an inch above the surface. A properly heated pan is key to preventing sticking.
- Sear the cheese without overcrowding: Carefully place the cheese skewers in the hot pan, ensuring they are in a single layer and not touching each other. Work in batches if necessary to avoid overcrowding, which can lower the pan’s temperature and lead to soggy cheese.
- Achieve the golden crust: Let the cheese sear undisturbed for 2-3 minutes per side until each exposed surface is deeply golden brown and crispy. Resist the urge to move or flip them too soon; this is how you develop that perfect sear and prevent sticking. Once a side is golden, use tongs to carefully flip to the next side.
- Serve immediately: Once all sides are beautifully browned, remove the skewers from the pan. Garnish with a few extra fresh thyme sprigs if desired, and serve warm.
Notes
- Ensure your pan is truly hot before adding the cheese; a good sizzle means a better crust. Don’t rush the searing process; letting each side develop a deep golden-brown color is key to that delicious flavor.


