
I remember the days of holding my breath, hoping that slicing into a seemingly perfect chicken breast wouldn’t reveal a dry, chalky interior. It’s a common kitchen disappointment, but what if I told you that consistently achieving a truly succulent, Golden Pan-Seared Chicken Breast is not only possible but surprisingly simple? This recipe unlocks the secret to tender, flavor-packed chicken that will become a staple in your weeknight rotation, delivering restaurant-quality results in your own kitchen.
Beyond Dry: Your New Go-To for Perfectly Juicy Chicken
The End of Dry Chicken: A Promise Delivered
The quest for truly juicy chicken can feel endless, but this recipe puts an end to dry, disappointing meals. We focus on specific techniques, like proper resting, that guarantee every bite is moist and flavorful.
You’ll learn how simple steps make all the difference, transforming ordinary chicken into an extraordinary culinary experience.
Effortless Elegance: Quick & Impressive Results
Despite its gourmet taste, this Golden Pan-Seared Chicken Breast recipe is designed for efficiency. It’s quick enough for a busy weeknight, yet sophisticated enough to impress dinner guests.
The minimal prep and cook time mean less fuss and more time enjoying your delicious creation.
A Symphony of Flavors: Savory with a Zesty Twist
Beyond texture, this recipe shines with its balanced flavor profile. A carefully selected blend of spices creates a savory foundation.
The finishing touch is a vibrant, zesty cream sauce, adding a bright counterpoint that truly elevates the dish.
Flavor Foundations: What You’ll Need for This Chicken Breast Recipe
The Star: Boneless, Skinless Chicken Breasts
Choose fresh, high-quality boneless, skinless chicken breasts, ideally of uniform thickness. This helps ensure even cooking.
Aim for pieces roughly 6-8 ounces each for best results in the pan.
Your Essential Spice Rack: Building the Flavor Profile
Salt and Black Pepper: These foundational seasonings enhance the natural taste of the chicken.
Garlic Powder & Onion Powder: They provide aromatic depth and a savory backbone, crucial for that classic, comforting flavor.
Paprika: A touch of paprika adds a subtle warmth and contributes to the beautiful golden-brown color of the chicken.
The Creamy, Zesty Sauce Ensemble
Unsalted Butter: It’s key for sautéing and building the rich, creamy sauce base.
Chicken Broth (Low Sodium): This deglazes the pan, capturing all the flavorful browned bits (fond) and forms the liquid base of the sauce.
Heavy Cream: Essential for a luxurious, velvety texture and richness in the sauce.
Dijon Mustard: Adds a sharp, tangy, and zesty kick that brightens the sauce and cuts through the richness, balancing the flavors.
Pantry Staples & Optional Garnishes
Olive Oil: Used for searing, ensuring the chicken browns beautifully without sticking.
Fresh Chopped Parsley: Provides a pop of fresh, herbaceous flavor and vibrant color for garnish.
Red Pepper Flakes (Optional): A pinch adds a very subtle warmth and visual appeal if you like a little heat.
Gear Up: Essential Tools for Golden Pan-Seared Chicken Breast
The Skillet Advantage: What Works Best
A heavy-bottomed skillet is your best friend here. Cast iron or stainless steel are ideal choices due to their excellent heat retention and even distribution.
A 10-12 inch skillet is usually perfect for 2-3 chicken breasts without overcrowding.
The Indispensable Meat Thermometer
An instant-read meat thermometer is critical for food safety and achieving perfect doneness. It’s the only way to truly guarantee your chicken is cooked to 165°F (74°C) without overcooking.
This tool eliminates guesswork, ensuring consistently juicy results.
Basic Kitchen Essentials for Success
Beyond your skillet and thermometer, have a sturdy cutting board, plenty of paper towels for drying the chicken, and tongs for easy flipping. A whisk will also be helpful for making your zesty cream sauce.
Your Journey to Perfection: Mastering Golden Pan-Seared Chicken Breast
- Prepare for Pan-Searing: Bring to Temperature & Dry Thoroughly
First, remove your chicken breasts from the refrigerator about 15-20 minutes before cooking. This allows them to come closer to room temperature, promoting more even cooking.
Crucially, pat the chicken very dry with paper towels. Any surface moisture will prevent a proper sear and crisp crust, causing the chicken to steam instead of brown.
- Seasoning for Maximum Impact
Season both sides of your chicken breasts generously. A blend of salt, black pepper, garlic powder, onion powder, and paprika creates a robust flavor base.
Don’t be shy with the seasoning; it forms a flavorful crust during searing.
- Achieving the Golden Crust: The Initial Sear
Heat olive oil in your large skillet over medium-high heat until it shimmers. This indicates it’s hot enough to create an immediate sear.
Carefully place the seasoned chicken breasts in the hot pan, ensuring you don’t overcrowd it. Sear undisturbed for 4-5 minutes per side until a beautiful, deep golden-brown crust forms. Resist the urge to move them too early!
- Cooking Through: Ensuring Perfect Internal Doneness
Reduce the heat to medium-low after searing. Continue cooking the chicken for another 5-8 minutes, flipping occasionally to ensure even cooking.
The most important step here is using an instant-read meat thermometer to check for an internal temperature of 165°F (74°C) at the thickest part. This guarantees doneness without overcooking.
- The Secret to Juiciness: The Essential Rest
This step is non-negotiable for juicy chicken. Once cooked, immediately transfer the chicken breasts to a cutting board.
Cover them loosely with foil and let them rest for at least 5-10 minutes. This allows the internal juices, which have gathered at the center during cooking, to redistribute evenly throughout the meat, ensuring every bite is moist and tender.
- Crafting the Zesty Cream Sauce: Flavor from the Fond
While the chicken rests, add butter to the same skillet-no need to clean it, as the browned bits (fond) in the pan are packed with flavor. Melt the butter over medium heat.
Pour in the chicken broth, making sure to scrape up all those flavorful browned bits from the bottom of the pan with a wooden spoon or whisk. Stir in the heavy cream and Dijon mustard, bringing the sauce to a gentle simmer for 2-3 minutes until it slightly thickens. Taste and adjust seasoning as needed.
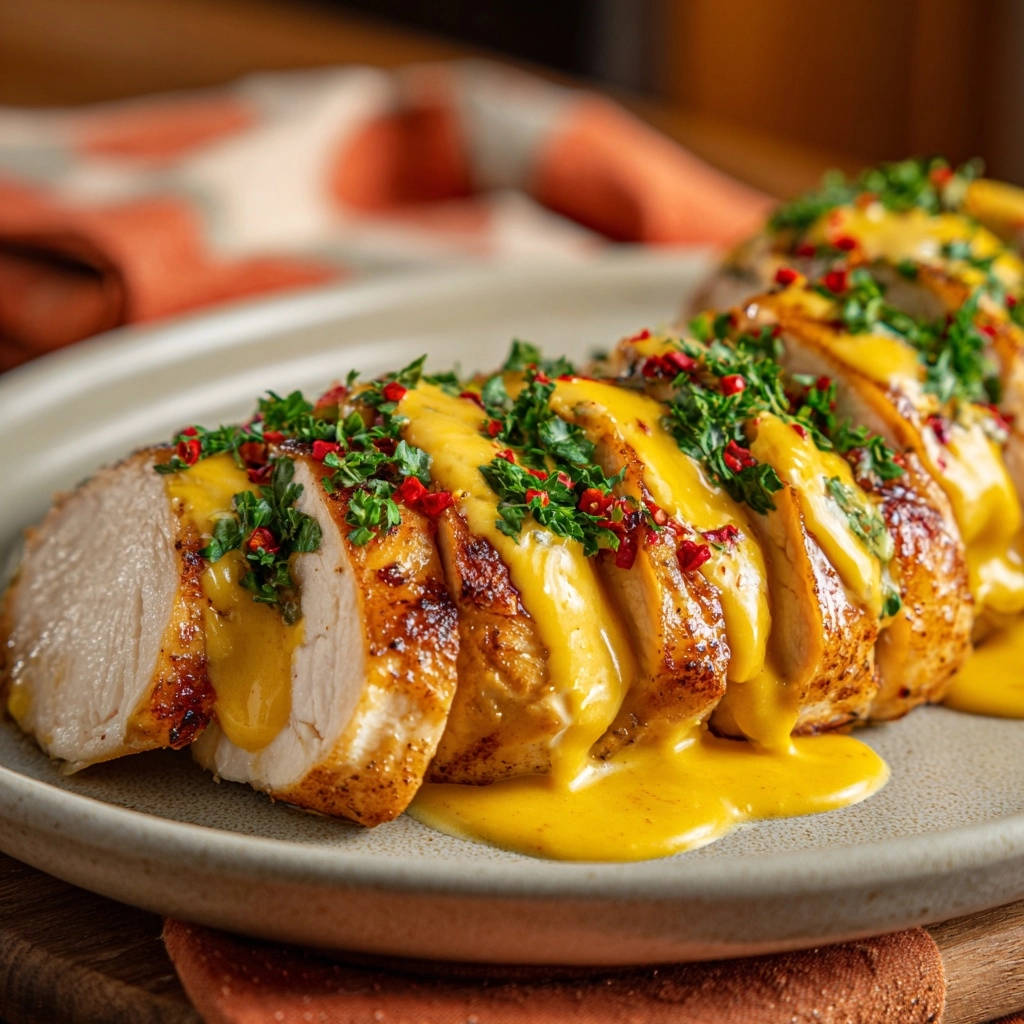
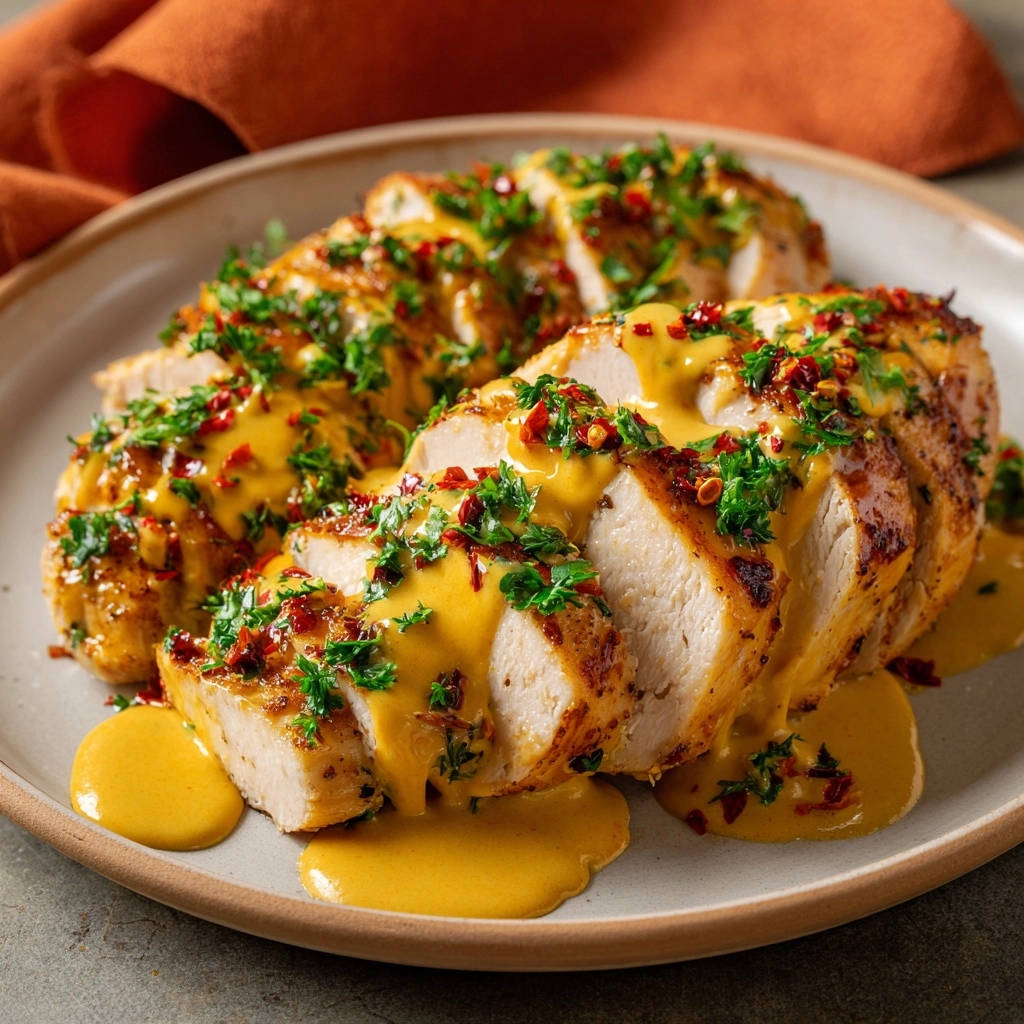
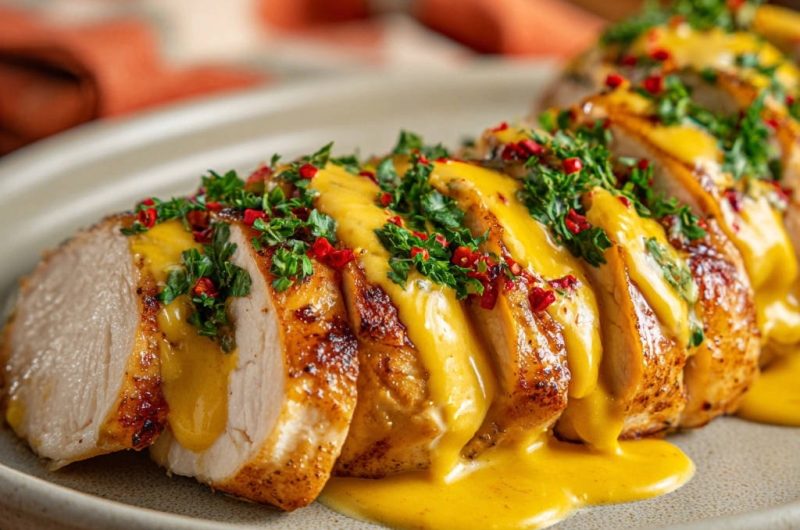
- Presenting Your Masterpiece: Slice, Sauce & Garnish
Slice the rested chicken breasts into thick, even pieces. Arrange them artfully on a serving plate.
Drizzle generously with the warm, zesty cream sauce. Garnish with fresh chopped parsley and a sprinkle of red pepper flakes if desired, adding freshness and a touch of visual appeal.
Unlock Next-Level Flavor: Expert Tips & Tricks
The Non-Negotiable Rest: Give It Time Don’t skip resting the chicken! This critical step allows the muscle fibers to relax and reabsorb moisture. Cutting too soon will release all those precious juices onto your board, leaving your chicken dry.
Bone-Dry for a Golden Sear: Pat, Pat, Pat! Moisture is the enemy of a good sear. Excessive water on the chicken’s surface will cause it to steam in the pan rather than brown, preventing that desirable crispy, golden crust.
Heat Management: Your Skillet’s Best Friend Start with medium-high heat to achieve a quick, intense sear for color. Then, reduce the heat to medium-low to finish cooking gently without burning the seasonings or drying out the interior. Proper heat control prevents a tough exterior and raw inside.
Don’t Overcrowd the Pan: Allow for Searing Space Cooking too many chicken breasts at once lowers the pan’s temperature. This leads to steaming instead of searing, resulting in pale, lackluster chicken. Cook in batches if necessary, allowing enough space for air circulation and even browning.
Embrace the Fond: Building Sauce Flavor Those browned bits stuck to the bottom of your skillet after cooking the chicken (the “fond”) are pure flavor gold. Deglazing the pan with chicken broth scrapes up these bits, infusing your sauce with incredible depth and richness that you can’t get any other way.
Thinly Slice for Even Cooking (Optional Prep) If your chicken breasts are very thick, consider butterflying them in half horizontally or pounding them to an even 1-inch thickness. This ensures more uniform cooking, preventing the thinner edges from drying out while the center cooks through.
Solved: Common Golden Pan-Seared Chicken Breast Challenges
“My Chicken is Dry!”
The most common culprits are overcooking and not resting the chicken. Always use a meat thermometer to pull chicken precisely at 165°F (74°C), and let it rest, covered, for at least 5-10 minutes before slicing. This allows juices to redistribute.
“Why Isn’t My Chicken Golden-Brown?”
This usually stems from too much moisture on the chicken, an overcrowded pan, or insufficient heat. Ensure chicken is bone-dry before it hits the hot, shimmering oil, and cook in batches if needed to maintain high pan temperature.
“My Sauce is Too Thin/Thick!”
If your sauce is too thin, simply simmer it for a few more minutes to allow it to reduce and thicken further. If it’s too thick, add a tablespoon or two of extra chicken broth or cream until it reaches your desired consistency.
“Is My Chicken Cooked Through?”
The only reliable way to know is by using an instant-read meat thermometer. Insert it into the thickest part of the breast, avoiding bone. The internal temperature should register 165°F (74°C) for safe consumption.
Serving Up Brilliance: Perfect Pairings
Classic Comfort: Sides That Shine
This versatile Golden Pan-Seared Chicken Breast pairs beautifully with comforting staples. Creamy fluffy mashed potatoes or a simple serving of perfectly roasted corn are always a hit.
The rich sauce beautifully complements these hearty sides, creating a satisfying meal.
Light & Fresh: Balancing the Richness
For a lighter touch, balance the richness of the cream sauce with fresh, vibrant options. A crisp green salad, steamed asparagus, or a bright easy kale salad makes an excellent counterpoint.
These fresh sides add texture and a refreshing contrast to the savory chicken.
Beyond the Plate: Creative Leftover Uses
Should you have any leftover Golden Pan-Seared Chicken Breast, it’s incredibly versatile. Slice it cold for quick sandwiches, chop it for a flavorful chicken salad, or shred it into a warm wrap.
It also makes a fantastic addition to pasta dishes or a simple grain bowl for lunch the next day.
Planning Ahead: Make-Ahead & Storage Solutions
Can You Prep Golden Pan-Seared Chicken Breasts in Advance?
You can season the chicken breasts up to an hour in advance and keep them covered in the refrigerator. The zesty cream sauce can also be made a day ahead and gently reheated, thinning with a splash of broth if necessary.
Refrigerating & Reheating Your Pan-Seared Chicken
Store cooked chicken and sauce separately in airtight containers in the refrigerator for up to 3-4 days. To reheat, gently warm the chicken in a skillet with a splash of broth over low heat to prevent drying, and gently warm the sauce separately.
Freezing for Future Feasts
Cooked Golden Pan-Seared Chicken Breast can be frozen for up to 2-3 months. Cool completely, then wrap individual breasts tightly in plastic wrap and foil before placing them in a freezer-safe bag.
Thaw overnight in the refrigerator and reheat gently. The sauce can also be frozen, though dairy-based sauces may separate slightly upon reheating; a quick whisk usually smooths it out.
Your Golden Pan-Seared Chicken Breast Questions Answered
Can I use bone-in chicken breasts?
While you can use bone-in, skin-on chicken breasts, the cooking time will be significantly longer (closer to 25-30 minutes total, or even more, depending on thickness). The skin will get wonderfully crispy, but be sure to monitor the internal temperature with a thermometer for doneness.
What if I don’t have Dijon mustard?
Dijon mustard provides a unique tang, but if you don’t have it, a small amount of whole grain mustard or even a tiny squeeze of fresh lemon juice can offer a similar bright, zesty note. Start with half the amount and taste before adding more.
Is this recipe gluten-free/dairy-free?
This recipe is naturally gluten-free. For a dairy-free version, you would need to substitute the butter with a dairy-free alternative and the heavy cream with a full-fat coconut milk or a plant-based heavy cream substitute, understanding the flavor and texture might be slightly different.
How long can I rest the chicken?
A minimum of 5 minutes is crucial, but 10 minutes is ideal for most chicken breasts. You can rest chicken for up to 15 minutes without it getting cold, especially if covered loosely. Beyond that, it might start to lose too much heat.
Can I skip patting the chicken dry?
Skipping this step is the fastest way to not achieve a beautiful golden crust. Any moisture on the surface will create steam, preventing proper browning and resulting in a less flavorful, less visually appealing piece of chicken.
Can I add other vegetables to the pan?
Absolutely! You can quickly sauté some thin-sliced mushrooms or a handful of spinach in the pan after the chicken has rested and before making the sauce. Alternatively, serve your chicken with perfectly roasted pan-seared summer squash for a complete meal.
Your New Favorite Chicken Recipe Awaits!
You now hold the keys to culinary success with this incredible Golden Pan-Seared Chicken Breast recipe. Say goodbye to dry, bland chicken and hello to consistently juicy, tender, and flavor-packed meals.
With these expert tips and a little practice, you’ll master the art of pan-searing and create a dish that’s both elegant and utterly delicious. Don’t wait-gather your ingredients and experience the magic for yourself!
Pan-Seared Chicken Breast
Course: Main CourseCuisine: AmericanDifficulty: easy2
servings15
minutes20
minutes650
kcal35
minutesWe’ve all been there: excitedly slicing into a beautiful chicken breast, only to find it dry and disappointing. This recipe shares a simple secret to consistently achieving perfectly tender, juicy chicken every single time, changing how you cook chicken forever.
Ingredients
2 boneless skinless chicken breasts
1 tablespoon olive oil
1/2 teaspoon salt
1/4 teaspoon black pepper
1/2 teaspoon garlic powder
1/2 teaspoon onion powder
1/4 teaspoon paprika
2 tablespoons unsalted butter
1/4 cup chicken broth (low sodium)
1/4 cup heavy cream
1 tablespoon Dijon mustard
1 tablespoon chopped fresh parsley
1/2 teaspoon red pepper flakes (optional, for garnish)
Directions
- Prepare the Chicken: Remove chicken breasts from the refrigerator about 15-20 minutes before cooking to bring them closer to room temperature. Pat them very dry with paper towels. This is crucial for a good sear. Season both sides generously with salt, black pepper, garlic powder, onion powder, and paprika.
- Sear for Color: Heat olive oil in a large skillet over medium-high heat until shimmering. Carefully place the chicken breasts in the hot skillet. Do not overcrowd the pan. Sear for 4-5 minutes per side, undisturbed, until a deep golden-brown crust forms.
- Cook to Perfection: Reduce the heat to medium-low. Continue to cook the chicken for another 5-8 minutes, flipping occasionally, until an internal temperature of 165°F (74°C) is reached. Use a meat thermometer for accuracy.
- Rest Your Chicken (The Juicy Secret!): This is the most important step for juicy chicken. Once cooked, immediately remove the chicken breasts from the skillet and transfer them to a cutting board. Cover them loosely with foil and let them rest for at least 5-10 minutes. This allows the juices to redistribute throughout the meat, keeping it moist and tender.
- Make the Zesty Cream Sauce: While the chicken rests, add butter to the same skillet (no need to clean it; the fond adds flavor). Melt over medium heat. Pour in the chicken broth, scraping up any browned bits from the bottom of the pan. Stir in the heavy cream and Dijon mustard. Bring to a gentle simmer and cook for 2-3 minutes, stirring occasionally, until the sauce slightly thickens. Taste and adjust seasoning if needed.
- Serve: Slice the rested chicken breasts into thick pieces. Arrange them on a serving plate. Drizzle generously with the warm zesty cream sauce. Garnish with fresh chopped parsley and red pepper flakes if desired. Enjoy your perfectly juicy chicken!
Notes
- Resting your chicken after cooking is the crucial step for juicy results!


