
If you have ever bitten into a coconut truffle only to have it shatter into a dry, gritty mess, you know how frustrating it is. Most recipes rely on a mountain of dry coconut that never quite bonds, leaving you with a dessert that feels more like sawdust than a treat. This recipe changes that by focusing on a specific moisture-to-fat ratio that creates a center so creamy it practically melts on your tongue.
If you’re looking for a recipe that reliably delivers firm chocolate coconut bites, this next one is a great option.
The secret to this velvety texture lies in how we treat the coconut before it ever hits the mixing bowl. By breaking down the fibers and introducing a stable fat source, we create a truffle that holds its shape perfectly while remaining incredibly soft. You are about to make a batch of sweets that look like they came from a high-end boutique but take less than twenty minutes of active work.
I have found that the real trick to professional results is pulsing a portion of your coconut in a food processor. This simple step increases the surface area, allowing the sweetened condensed milk to coat every single strand. It transforms the coconut from a loose pile of flakes into a cohesive, luscious dough that stays intact from the first bite to the last.
The Structural Science of Creamy Coconut Centers
Standard coconut balls often fail because large coconut shreds create tiny air pockets throughout the mixture. These gaps act as “fault lines,” causing the truffle to crumble the moment you apply pressure. When you pulse the coconut into a finer grit, you are essentially building a dense matrix that traps moisture and prevents those dry breaks.
Refined coconut oil plays a vital role in this structural integrity. Because it is a saturated fat, it remains liquid at room temperature during the mixing phase but turns into a solid “glue” once chilled. This thermal transition is what gives the truffles their satisfying snap when cold and their creamy, fudge-like consistency as they warm up in your mouth.
By combining the finely processed coconut with a smaller amount of whole shreds, you get the best of both worlds. You achieve a variegated mouthfeel that has the classic chew of coconut but the structural stability of a ganache. It is a simple bit of kitchen physics that ensures your truffles never fall apart on the serving platter.
Essential Components for Creamy Toasted Coconut Truffles
Quality ingredients are the backbone of this recipe, especially since there are so few of them. You must use unsweetened shredded coconut to maintain control over the sugar levels. Since the sweetened condensed milk provides plenty of sweetness, using sweetened coconut would make the truffles cloying and sticky rather than creamy.
The choice between refined and unrefined coconut oil depends on your flavor preference. Refined coconut oil has a neutral scent and taste, which allows the vanilla and the natural sweetness of the milk to take center stage. If you want an intense, tropical punch, you can use unrefined oil, but refined oil is the secret to that “clean” professional finish.
Do not skip the sea salt. It might seem like a small addition, but it is the primary tool for cutting through the richness of the condensed milk. A touch of high-quality vanilla extract adds a layer of floral warmth that rounds out the flavor profile, making these taste much more complex than a standard candy bar.
Selecting the Right Shredded Coconut
When shopping, look for “shredded” coconut rather than “desiccated” or “flour.” Desiccated coconut is often too dry and powdery, which can lead to a sandy texture. Shredded coconut retains just enough natural moisture to stay supple, which is exactly what we need for a creamy center.
We process the coconut ourselves to ensure the perfect size. Starting with a fine meal or flour would result in a heavy, dense ball that lacks the characteristic coconut texture. By processing it just until it looks like damp sand, you create the ideal foundation for the binder to work its magic.
The Role of Sweetened Condensed Milk
Sweetened condensed milk is more than just a sweetener; it is a powerful humectant. Its thick, syrupy viscosity allows it to wrap around the coconut fibers, creating a flexible bond. This is why you cannot easily swap it for evaporated milk or heavy cream, as those liquids lack the sugar density required to hold the coconut together.
As the mixture sits, the coconut fibers actually undergo a “hydration” process. They soak up the moisture from the milk, softening the strands so they aren’t prickly or tough. This interaction is what transforms a simple mixture into a sophisticated truffle filling.
Step-by-Step: Preparing the Coconut Base
Start by placing two cups of your shredded coconut into the food processor. Pulse it for about 30 to 45 seconds. You are looking for a specific visual cue: the coconut should look like damp sand and just start to clump together as the natural oils are released.
Be careful not to over-process it into a paste or coconut butter. You still want to see individual grains, not a liquid. Once you reach that sandy stage, stop immediately and transfer it to your mixing bowl along with the remaining cup of whole shreds.
This “Divided Method” is crucial for the texture. The fine pieces provide the structural “mortar,” while the whole shreds provide the “bricks” that give the truffle its traditional look and feel. It creates a sophisticated, multi-layered experience for anyone lucky enough to try one.
The Emulsification and Chilling Process
When you add your melted coconut oil, make sure it is warm but not piping hot. If the oil is too hot, it can cause the sweetened condensed milk to thin out too much, making the dough difficult to handle. Stir everything together until you see a thick, glossy, and very sticky dough form.
The one-hour chill time in the refrigerator is not optional. During this hour, the coconut oil begins to solidify, and the coconut fibers fully hydrate. If you try to roll them immediately, the dough will stick to your hands and the balls will flatten into discs under their own weight.
You will know the dough is ready when it feels firm to the touch and no longer leaves a sticky residue on your finger. This resting period allows the flavors to meld, ensuring the vanilla and salt are evenly distributed throughout every bite.
Hand-Rolling Techniques for Perfect Spheres
To get perfectly uniform truffles, use a small cookie scoop to portion the dough. This ensures every guest gets the same size treat and helps the batch look professional. Once portioned, roll the dough between your palms using light, even pressure to form a smooth sphere.
If the mixture starts to stick to your skin, use the “Damp Palm Technique.” Lightly moisten your hands with a bit of water. This creates a thin barrier that prevents the sugar in the milk from adhering to your skin, allowing the truffle to glide smoothly as you shape it.
Work quickly so the heat from your hands doesn’t melt the coconut oil. If the dough becomes too soft or starts to slump, pop the bowl back into the fridge for ten minutes. You want the dough to be pliable but firm enough to hold a crisp, round shape.
If you’re dealing with a softer mixture, you might also enjoy these moist coconut balls.
Achieving the Signature Toasted Coconut Garnish
The toasted garnish provides a beautiful golden contrast and a nutty depth of flavor. To toast your coconut, spread the flakes in a dry skillet over medium-low heat. Stir them constantly for about 3 to 5 minutes until they turn a deep golden brown and smell incredibly fragrant.
For another great way to enjoy toasted coconut, check out these toasted coconut lava balls.
You can also use an oven at 325°F for about 5 to 8 minutes, but keep a close eye on them. Coconut can go from perfectly toasted to burnt in a matter of seconds due to its high oil content. Once they are golden, immediately remove them from the hot pan to stop the cooking process.
To apply the garnish, use the “Press and Roll” method. Roll the damp truffle in the toasted flakes, then give it a very gentle squeeze in your palm. This presses the toasted bits into the surface of the truffle so they don’t fall off when someone picks them up.
Troubleshooting Common Coconut Truffle Issues
If your mixture feels too wet to roll even after chilling, you likely had a bit of extra moisture in your coconut. Simply stir in another tablespoon or two of very finely pulsed coconut and let it sit for ten minutes. It will act like a sponge and firm the dough right up.
On the flip side, if the dough is too hard and cracks when you try to roll it, it has likely stayed in the fridge too long. Let it sit on the counter for five minutes to take the chill off. The coconut oil will soften just enough to make the dough pliable again without losing its shape.
If the toasted garnish won’t stick because the surface of the truffle has dried out, don’t worry. You can lightly mist the truffles with a tiny bit of water or simply roll them between damp palms for a second. This creates just enough “tack” for the golden flakes to adhere perfectly.
Flavor Variations and Natural Enhancements
While these are stunning on their own, you can easily customize the flavor profile. For a “Tropical Citrus” version, fold in the fresh zest of two limes. The bright acidity of the lime cuts through the creamy milk and pairs beautifully with the toasted coconut exterior.
What to Try Next
To complement these sweet coconut treats, consider these satisfying chocolate and spiced drinks.
- For a rich dessert option, pair your truffles with this Ultimate Chocolate Layer Cake, offering a deeply satisfying chocolate experience.
- Warm up with a seasonal favorite by making this Homemade Pumpkin Spice Latte, a creamy drink that mirrors the comforting flavors of fall.
If you want a bit of crunch, try the “Crunchy Core” variation. Place a single roasted almond or a piece of toasted macadamia nut in the center of the dough before rolling it into a ball. It provides a delightful surprise and a texture contrast that mimics famous store-bought candies.
For a more decadent treat, you can skip the toasted coconut coating and dip the chilled balls into melted dark chocolate. The bitterness of the chocolate balances the sweet coconut center perfectly. Just make sure the truffles are very cold before dipping so they don’t melt into the chocolate.
Storage Logistics and Make-Ahead Instructions
Because these truffles rely on coconut oil for their structure, they must be stored in the refrigerator. In an airtight container, they will stay fresh and delicious for up to two weeks. This makes them an ideal make-ahead dessert for parties or holiday gifting.
These also freeze exceptionally well. To freeze, place the finished truffles on a parchment-lined tray in a single layer and freeze until solid. Once frozen, transfer them to a vacuum-sealed bag or a heavy-duty freezer bag. They will keep their quality for up to three months.
When you are ready to serve them from the freezer, let them thaw in the refrigerator overnight. Avoid thawing them at room temperature, as condensation can form on the surface, making the toasted coconut garnish soggy. Serving them slightly chilled ensures the best texture.
Expert Tips for Professional Presentation
To give these truffles a true boutique look, place each one in a small fluted paper candy liner. This not only looks elegant but also makes them easier for guests to pick up without getting their fingers sticky. It instantly elevates them from a home-cooked snack to a professional confection.
For an extra aromatic touch, use a microplane to lightly dust the finished truffles with a tiny hint of fresh nutmeg or cinnamon. The spice adds a sophisticated scent that hits you before you even take a bite. It is a small detail that makes a massive difference in the overall experience.
If you are gifting these, use a sturdy box and keep them chilled until the very last moment. You can even include a little note suggesting they be kept in the fridge. The contrast between the cold, creamy center and the crisp toasted exterior is what makes these truly special.
Frequently Asked Questions
Why are my truffles falling apart?
The most common reason for crumbling is skipping the food processor step. If the coconut pieces are too large, the sweetened condensed milk cannot create a strong enough bond. Additionally, ensure you didn’t leave out the coconut oil, as it acts as the primary hardening agent that “glues” the structure together once chilled.
Can I use honey instead of condensed milk?
I do not recommend substituting honey for the sweetened condensed milk in this specific recipe. Honey has a much higher water content and a different sugar structure, which will result in a sticky, gooey mess that won’t hold a spherical shape. The milk solids in the condensed milk are essential for that creamy, fudge-like bite.
How do I get a uniform size for every truffle?
The best tool for the job is a #100 disher or a small 1-tablespoon cookie scoop. This ensures that every truffle is exactly the same volume. If you want to be incredibly precise, you can weigh the portions on a kitchen scale; 15 to 18 grams per truffle is the “sweet spot” for a perfect one-inch diameter.
Is there a dairy-free alternative for the binder?
Yes, you can use sweetened condensed coconut milk as a direct 1:1 replacement for traditional dairy condensed milk. It actually enhances the coconut flavor even further. Just be aware that coconut-based condensed milk can sometimes be slightly thinner, so you may need to chill the dough for an extra thirty minutes before rolling.
Why use refined coconut oil instead of butter?
Refined coconut oil has a higher melting point than butter, which helps the truffles stay firm at room temperature for longer. More importantly, coconut oil provides a much cleaner flavor profile that allows the natural sweetness of the coconut to shine. Butter can sometimes add a savory note that distracts from the tropical theme of the dessert.
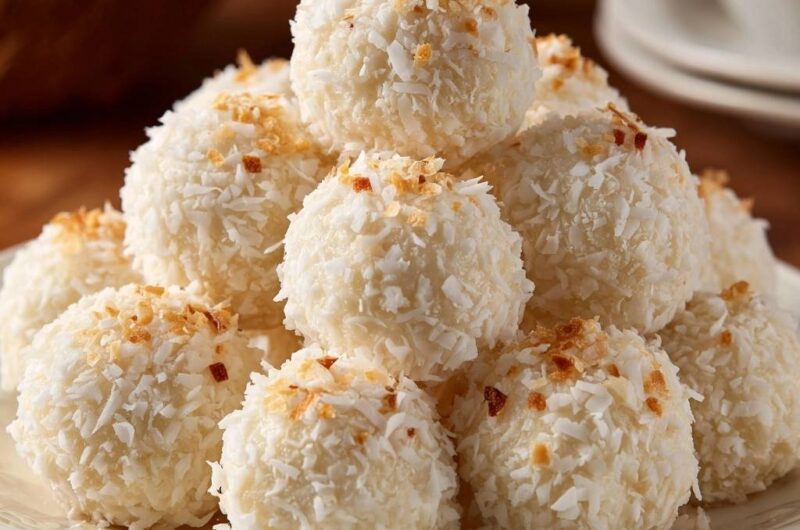
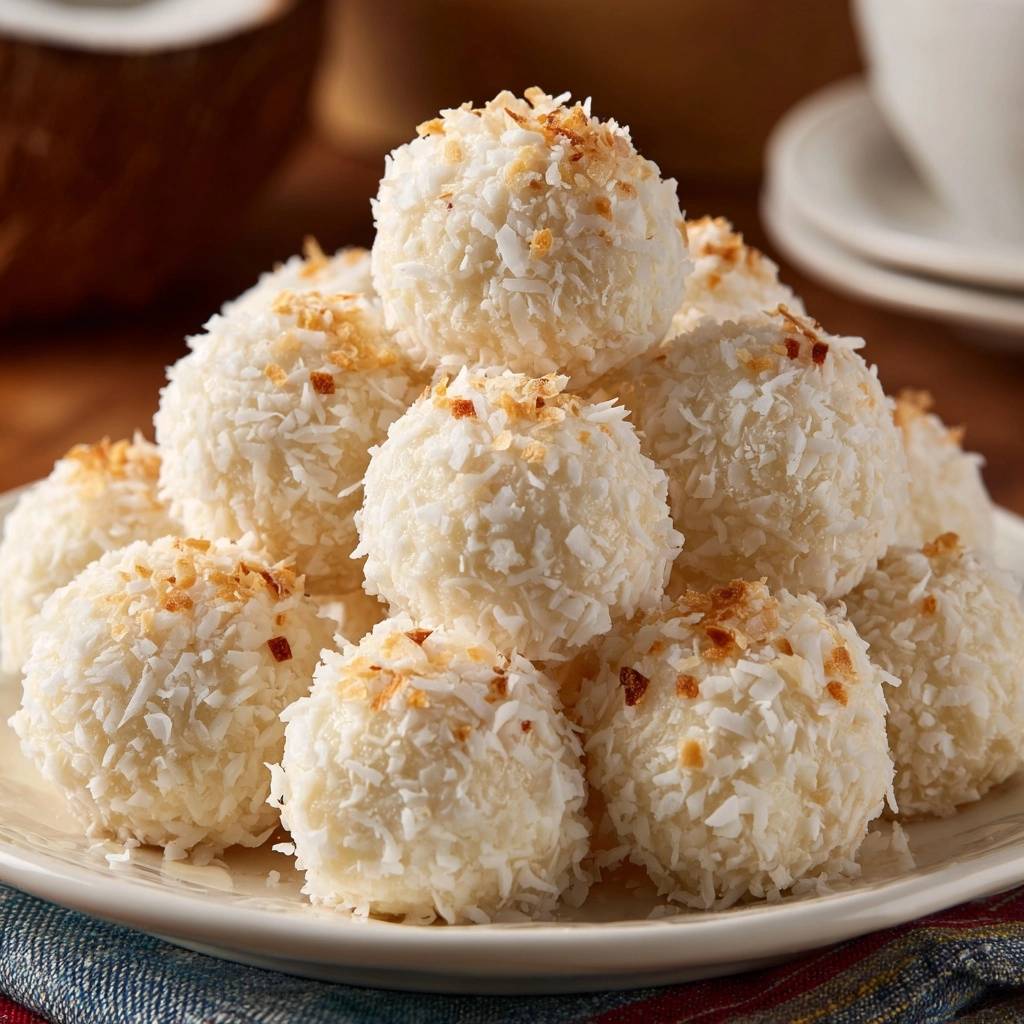
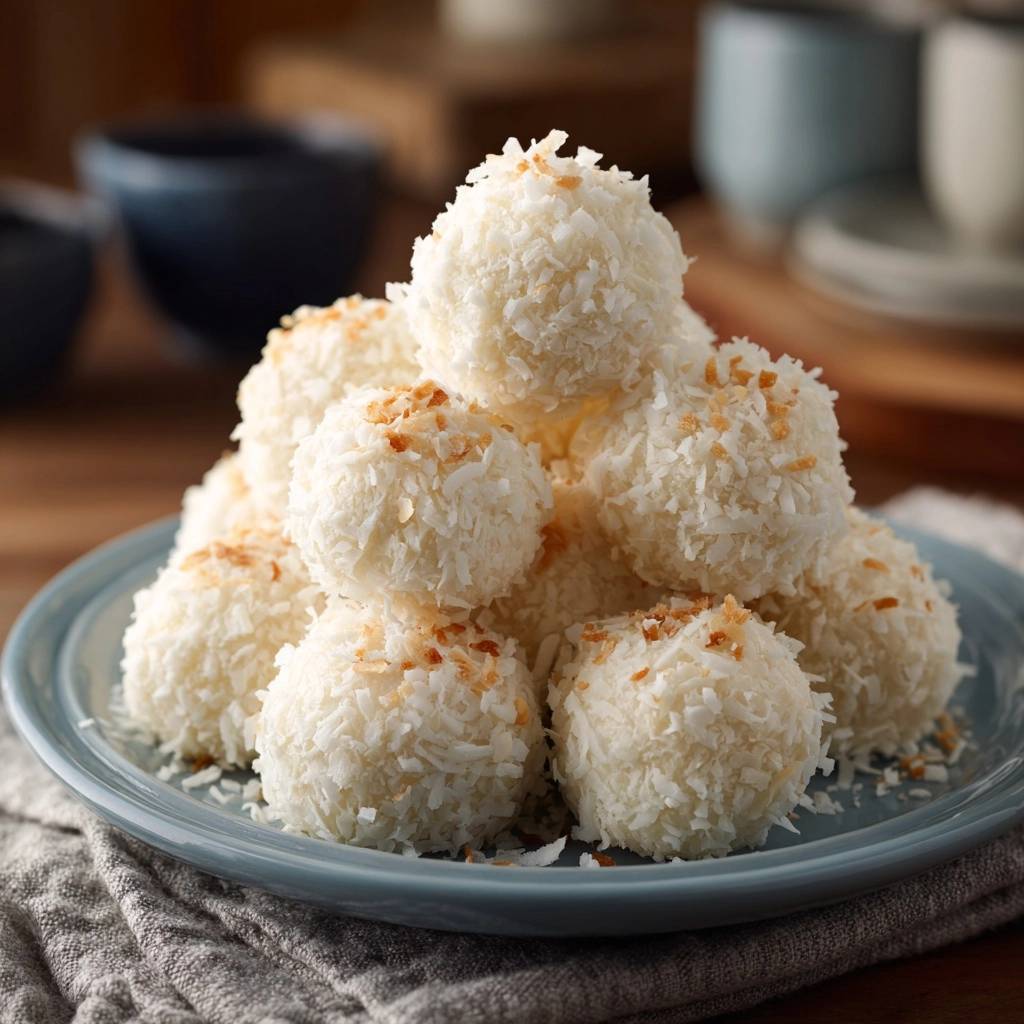
Creamy Toasted Coconut Truffles
Course: DessertCuisine: AmericanDifficulty: easy20
truffles15
minutes110
kcal60
MinutesThese truffles solve the common problem of dry and crumbly coconut balls by using a specific ratio of moisture to fat. By pulsing the coconut and adding coconut oil, these treats stay perfectly intact with a creamy center and a golden toasted exterior.
Ingredients
3 cups unsweetened shredded coconut, divided
1 can (14 ounces) sweetened condensed milk
1/4 cup refined coconut oil, melted (ensures a firm set without a heavy oil taste)
1 teaspoon vanilla extract
1/4 teaspoon sea salt
1/2 cup toasted coconut flakes (for the signature golden-speckled garnish)
Directions
- To solve the crumbling issue, start by placing 2 cups of the shredded coconut into a food processor. Pulse for 30-45 seconds until the pieces are very fine and starting to release their natural oils. This smaller surface area allows the binder to coat every single strand, preventing the truffles from breaking apart.
- In a large mixing bowl, combine the finely pulsed coconut with the remaining 1 cup of regular shredded coconut.
- Pour in the sweetened condensed milk, melted coconut oil, vanilla, and salt. The coconut oil is the key structural ingredient; it stays liquid while mixing but firms up beautifully in the fridge to act as a “glue” for the condensed milk.
- Stir the mixture until a thick, sticky dough forms. Cover and refrigerate for at least 1 hour. This chilling step is mandatory to allow the coconut to fully hydrate and the oil to solidify.
- Once chilled and firm, use a small cookie scoop to portion the dough. Roll into 1-inch balls between your palms. If the mixture sticks to your hands, lightly dampen your palms with water.
- Immediately roll each ball in the toasted coconut flakes. Press the flakes gently into the surface so the golden toasted bits adhere to the creamy white center, matching the visual texture of the image.
- Store in an airtight container in the refrigerator. Serve chilled for the best firm yet creamy texture.
Notes
- The chilling step is mandatory to allow the coconut to hydrate and the oil to solidify. If the mixture sticks to your hands while rolling, lightly dampen your palms with water.


