
Nothing ruins a promising dinner faster than biting into rubbery, pale chicken skin. We’ve all been there, expecting a satisfying crunch but getting a soggy, fatty mess instead. This recipe for Crispy Roasted Garlic Herb Chicken Thighs solves that frustration by focusing on a specific high-heat rendering technique that delivers a “shatter-crisp” texture every single time.
The flavor profile hits all the right notes without being overly complicated. You’ll get a deep, earthy punch from the garlic and onion powders, a subtle woodsy warmth from the smoked paprika, and a fresh finish from the dried oregano. It’s a robust, savory experience that feels like a high-end rotisserie meal made right in your own kitchen.
The secret to this success isn’t a fancy gadget or a secret ingredient. It’s all about moisture management and heat. By following a few specific steps to desiccate the skin and elevate the meat, you’ll achieve a mahogany-colored crust that crackles under your fork while the dark meat inside stays incredibly juicy and tender.
The Physics of Achieving Shatter-Crisp Chicken Skin
Achieving that perfect crunch is actually a matter of science rather than luck. When you roast chicken, the skin contains a significant amount of water and fat. If that water doesn’t evaporate quickly, it turns into steam, which effectively “boils” the skin from the inside out, leaving it soft and chewy. Therefore, we must eliminate surface moisture before the chicken even touches the oven.
Roasting at 425°F is the absolute “sweet spot” for this process. At this high temperature, the subcutaneous fat under the skin begins to render, or melt, rapidly. This rendered fat essentially fries the skin from the top down, creating that coveted crispy texture. However, because we are using bone-in thighs, the meat remains protected and won’t dry out like a lean chicken breast would at the same temperature.
This high heat also triggers the Maillard reaction, which is the chemical reaction between amino acids and reducing sugars that gives browned food its distinctive flavor. The garlic-herb rub acts as a catalyst here. The spices toast in the rendering fat, deepening the color to a rich mahogany and intensifying the savory aroma that fills your entire home.
Why Surface Moisture is the Enemy
Water molecules on the surface of the chicken act as a thermal barrier. As long as there is moisture on the skin, the temperature of that skin cannot rise above the boiling point of water (212°F). This prevents the skin from reaching the higher temperatures needed for the Maillard reaction and fat rendering.
The cellular structure of chicken skin is like a sponge for moisture. If you don’t pat it bone-dry with paper towels, you are essentially steaming your dinner. You want the skin to be as dry as parchment paper so the oil and spices can adhere directly to the surface and start the frying process immediately.
The Role of High-Heat Fat Rendering
Bone-in, skin-on thighs are the superior choice for high-heat roasting because they are marbled with enough fat to withstand 425°F. As the heat penetrates the thigh, the fat layer between the meat and the skin liquefies. This liquid fat needs a way to escape, which is why we don’t flip the chicken during the cooking process.
By leaving the chicken skin-side up, the fat renders and bubbles through the skin, crisping it up like a potato chip. If you were to use a boneless breast, the meat would likely overcook and become stringy before the skin ever reached the desired level of crunch. The bone acts as an insulator, keeping the interior succulent.
Essential Components for Garlic Herb Chicken Thighs
Quality ingredients make a massive difference when the preparation is this simple. For the seasoning, I always recommend using Kosher salt. Its larger, flaky crystals provide better surface area coverage than fine table salt, which can easily over-salt a dish if you aren’t careful. The salt also helps draw out any remaining deep-seated moisture from the skin.
When it comes to the fat, choose an oil with a high smoke point like avocado oil. While butter tastes great, its milk solids will burn at 425°F, leaving your chicken tasting bitter and looking charred in a bad way. Avocado oil or a high-quality olive oil allows the spices to toast perfectly without smoking out your kitchen.
Freshness matters for your spices too. If that jar of smoked paprika has been sitting in your pantry for three years, it’s time for a new one. You want that vibrant red color and potent aroma to really penetrate the meat. The goal is a thick paste that clings to the chicken rather than a thin liquid that runs off into the pan.
Selecting the Right Poultry Cuts
When you’re at the grocery store, look for chicken thighs that are relatively uniform in size. This ensures that all the pieces finish cooking at the same time, preventing a situation where the small thighs are dry while the large ones are still undercooked. Look for skin that is intact and not torn, as the skin is our primary texture vehicle.
Skin-on, bone-in thighs are non-negotiable for this recipe. The bone adds flavor and moisture during the roasting process, while the skin provides the protective layer that crisps up. If you try this with skinless thighs, you’ll miss out on the best part of the dish: that incredible, salty crunch.
The Dry Rub: Ratios and Flavor Profiles
We use smoked paprika instead of sweet paprika because it adds a layer of “outdoor grill” flavor without needing an actual flame. It provides that deep, dark red color that looks so professional. Garlic powder is used instead of fresh minced garlic because fresh garlic contains a lot of moisture and tends to burn and turn acrid at high temperatures.
The onion powder and dried oregano provide a savory, herbaceous backbone that complements the garlic. When you mix these with the oil, you create a thick paste. This consistency is vital because it stays exactly where you put it, ensuring every square inch of the skin is seasoned and ready to crisp.
For a similar herbaceous touch, try these garlic parsley rolls.
Required Tools for Maximum Air Circulation
The equipment you use is just as important as the ingredients. To get that 360-degree crunch, you need a rimmed baking sheet paired with a stainless steel wire cooling rack. This setup is the ultimate secret weapon for home cooks who want to avoid the dreaded “soggy bottom” on their roasted meats.
Without a rack, the bottom of the chicken sits in its own juices and rendered fat. While that might sound flavorful, it actually braises the bottom of the thigh, making it soft and greasy. Elevating the meat allows the hot air of the oven to circulate entirely around the chicken, drying out the bottom skin just as well as the top.
The Wire Rack Advantage
Think of the wire rack as a way to turn your standard oven into a convection-style environment. As the heat rises and moves, it can pass under the chicken. This constant airflow is what creates a uniform texture. It also allows the rendered fat to drip away from the meat, making the final dish feel lighter and less oily.
If you don’t have a wire rack, you can use thick slices of onion or potato as a “natural rack” to lift the chicken up. However, for the absolute best results, a metal rack is the way to go. Just make sure to spray it with a little oil first so the skin doesn’t stick when you try to remove the chicken.
Why an Instant-Read Thermometer is Mandatory
Visual cues can be very deceiving with this recipe. Because of the smoked paprika and the high heat, the chicken might look dark and “done” on the outside before the center has reached a safe temperature. Conversely, you don’t want to keep cooking it until it’s dry just because you’re waiting for a certain color.
An instant-read thermometer takes the guesswork out of the equation. For chicken thighs, you are looking for an internal temperature of 170°F to 175°F. While 165°F is the safety standard, thighs actually become more tender and the connective tissue breaks down better at a slightly higher temperature. This ensures the meat pulls away from the bone effortlessly.
Step-by-Step: Preparing the Perfect Roast
Now it’s time to put the technique into practice. This process is straightforward, but you must be diligent about the details. Start by preheating your oven to 425°F. While that’s heating up, prepare your baking sheet by lining it with foil for easy cleanup and placing your wire rack on top.
The preparation of the meat is where the magic happens. You aren’t just throwing spices on; you are building a flavor foundation. Take your time with the application of the paste. If you rush this part, you’ll end up with patchy seasoning and uneven browning, which defeats the purpose of the high-heat method.
Phase 1: The Desiccation Process
Take your chicken out of the package and immediately grab the paper towels. Pat every single thigh until it feels tacky to the touch, not slippery. Don’t forget the undersides! If you have an extra 30 minutes, you can leave the patted-dry chicken uncovered in the fridge. This “fridge-drying” hack uses the cold, dry air of the refrigerator to further dehydrate the skin.
The drier the skin, the faster it will crisp. If you see any visible moisture, the oven will spend the first 10 minutes of cooking just evaporating that water instead of browning the skin. You want to skip the “steaming phase” entirely and go straight to the “frying phase.”
Phase 2: Applying the Garlic Herb Paste
Mix your oil and spices in a small bowl until it forms a dark, thick paste. Now, here is a pro tip: gently lift the skin of the thigh with your fingers, being careful not to tear it. Rub a small amount of the paste directly onto the meat underneath. This ensures the meat itself is seasoned, not just the skin.
Once the meat is seasoned, pull the skin back over and coat the entire exterior with the remaining paste. Use your hands to massage it in so every nook and cranny is covered. This paste acts as a protective barrier that helps the skin crisp up while locking the juices into the meat below.
Phase 3: The High-Heat Roasting Cycle
Place the thighs on the wire rack, making sure they have at least an inch of space between them. If they are touching, they will trap steam between the pieces, leading to soft spots. Slide the tray into the middle rack of the oven. Around the 20-minute mark, you should start to hear a distinct sizzling sound and smell the toasted garlic.
Do not flip the chicken! I know it’s tempting, but flipping will ruin the crust you’ve worked so hard to build. The heat from the top of the oven is what we need to finish the rendering process. Let the chicken sit undisturbed for the full 35 to 40 minutes until the skin looks tight and deeply colored.
Phase 4: The Broiler Finish for Mahogany Color
If your chicken is at the right temperature but you want that extra “wow” factor, switch your oven to the broil setting for the last 2 minutes. You must stay right there and watch it through the oven window. The window between “perfectly charred” and “burnt” is only about 60 to 120 seconds.
The broiler will cause the fat on the surface to bubble vigorously, creating tiny blisters on the skin that add to the crunch. Once you see that beautiful mahogany color and a few dark edges, pull them out immediately. Let the chicken rest on the rack for 5 minutes before serving. This prevents the bottom from getting soggy while the juices settle.
Troubleshooting Common Texture Issues
If your skin isn’t as crispy as you’d like, the most common culprit is “crowding the pan.” When chicken thighs are packed too closely together, they create a micro-climate of steam that prevents the skin from drying out. Always use a large enough pan to give each piece its own “breathing room.”
Another issue could be oven calibration. Many ovens run 25 degrees cooler than the display says. If your chicken looks pale after 30 minutes, your oven might not be hot enough. You can also check if you used too much oil; the paste should be thick, not runny. Too much oil can sometimes weigh the skin down rather than helping it crisp.
Optimal Side Dish Pairings
Since your oven is already at 425°F, it’s the perfect opportunity to roast some side dishes at the same time. You want sides that can stand up to the bold garlic and herb flavors of the chicken without being overwhelmed. Starchy vegetables and bright, acidic greens are usually the best bets.
The beauty of this meal is its versatility. You can go for a hearty, comforting vibe or keep it light and fresh depending on what you have in the pantry. Just remember that the chicken is the star, so keep the sides relatively simple to let that shatter-crisp skin shine.
Roasted Root Vegetables and Tubers
Potatoes, carrots, and parsnips are fantastic because they thrive at high heat. You can toss them in a little oil and salt and place them on a separate baking sheet on the rack below the chicken. The garlic profile from the chicken rub carries over beautifully to roasted Yukon Gold potatoes or honey-glazed carrots.
By the time the chicken is done, the vegetables should be tender on the inside with caramelized edges. This makes for a complete, one-oven meal that requires very little active work. Plus, the earthy sweetness of roasted carrots balances the savory saltiness of the chicken skin perfectly.
Bright Greens to Balance the Fat
Because roasted chicken thighs are naturally rich and fatty, a bright, acidic side dish can help cleanse the palate. A simple arugula salad with a heavy squeeze of lemon juice and a drizzle of olive oil is a classic choice. The peppery greens cut right through the richness of the rendered chicken fat.
Alternatively, you could quickly blanch some green beans and toss them with a little lemon zest and garlic. The goal is to provide a “pop” of freshness that makes each bite of the crispy chicken feel just as exciting as the first. Avoid heavy, cream-based sides, which can make the meal feel too weighed down.
Storage and Reheating for Retained Crunch
If you have leftovers, do not put them in the microwave! The microwave will turn that beautiful crispy skin into a rubbery mess in seconds. Instead, store the chicken in an airtight container in the fridge for up to three days. When you’re ready to eat, use an air fryer or a toaster oven.
Reheat the thighs at 375°F for about 5 to 8 minutes. This will re-render the fat and bring that crunch back to life. If you use a standard oven, place them back on a wire rack to ensure the heat can circulate. This is the only way to enjoy the “shatter-crisp” texture on day two.
Expert Tips for Garlic Herb Poultry
Can I use fresh garlic instead of garlic powder?
It is generally better to stick with garlic powder for this specific high-heat roasting method. Fresh garlic has a high water content and contains tiny pieces that burn very quickly at 425°F. Burnt garlic tastes bitter and acrid, which can ruin the flavor of the skin. Garlic powder distributes more evenly and toasts into a savory crust without the risk of burning.
Can I use chicken breasts for this recipe?
You can, but you have to be very careful. Chicken breasts are much leaner and prone to drying out at high temperatures. If you use breasts, look for “split breasts” (bone-in, skin-on). You will likely need to reduce the cooking time to 25-30 minutes and use a meat thermometer to pull them out exactly at 165°F to avoid a woody, dry texture.
Why is my chicken skin too salty?
This usually happens if you substitute fine table salt for Kosher salt using a 1:1 ratio. Table salt is much denser, so a tablespoon of it contains nearly twice as much salt as a tablespoon of Kosher salt. If you only have table salt, reduce the amount by half. Also, ensure you aren’t using a pre-mixed garlic salt instead of plain garlic powder.
How do I scale this recipe for a large crowd?
The most important factor when scaling up is pan space. Do not try to cram 12 thighs onto one baking sheet. Use two separate sheets and two wire racks. If you have a convection setting on your oven, turn it on and rotate the pans halfway through. If the pans are too close together, the moisture release from 12 thighs will create too much steam for the skin to get crispy.
Can I use dried herbs instead of fresh parsley for the garnish?
While you can use dried herbs in the rub, the fresh parsley at the end is specifically for “brightness.” Dried herbs have a concentrated, muted flavor, whereas fresh parsley adds a pop of color and a clean, grassy finish that cuts through the heavy spices. If you don’t have parsley, a little fresh chive or even a squeeze of fresh lemon juice is a better substitute than more dried herbs.
Crispy Roasted Chicken Thighs
Course: Main CourseCuisine: AmericanDifficulty: easy4
servings10
minutes40
minutes410
kcal50
MinutesA foolproof method for achieving shatter-crisp, mahogany-colored chicken skin by using a wire rack and high heat. This recipe uses a savory blend of garlic, smoked paprika, and herbs to create a deep, caramelized crust without the need for sugar.
Ingredients
2 pounds bone-in, skin-on chicken thighs (approx. 4-6 thighs)
2 tablespoons avocado oil or olive oil
1 tablespoon smoked paprika (for that deep red color)
1 tablespoon garlic powder
1 teaspoon onion powder
1 teaspoon dried oregano
1.5 teaspoons kosher salt
1/2 teaspoon cracked black pepper
1/4 teaspoon cayenne pepper (optional, for depth)
2 tablespoons fresh chopped parsley for garnish
Directions
- The most critical step for crispy skin is to use paper towels to pat the chicken thighs completely dry on all sides. Any moisture left on the skin will create steam in the oven, leading to a soggy result.
- Preheat your oven to 425°F (218°C). Line a rimmed baking sheet with aluminum foil and place a wire cooling rack on top. Using a rack allows hot air to circulate under the chicken, preventing the bottoms from getting soggy.
- In a small bowl, whisk together the oil, paprika, garlic powder, onion powder, oregano, salt, and pepper to create a thick, dark paste.
- Rub the paste thoroughly over the chicken, ensuring you coat the entire surface of the skin. For maximum flavor, pull the skin back slightly and rub a small amount of the paste directly onto the meat, then pull the skin back over to “seal” it.
- Place the thighs on the wire rack, ensuring they are not touching. Crowding the pan traps steam, which is the enemy of crispiness.
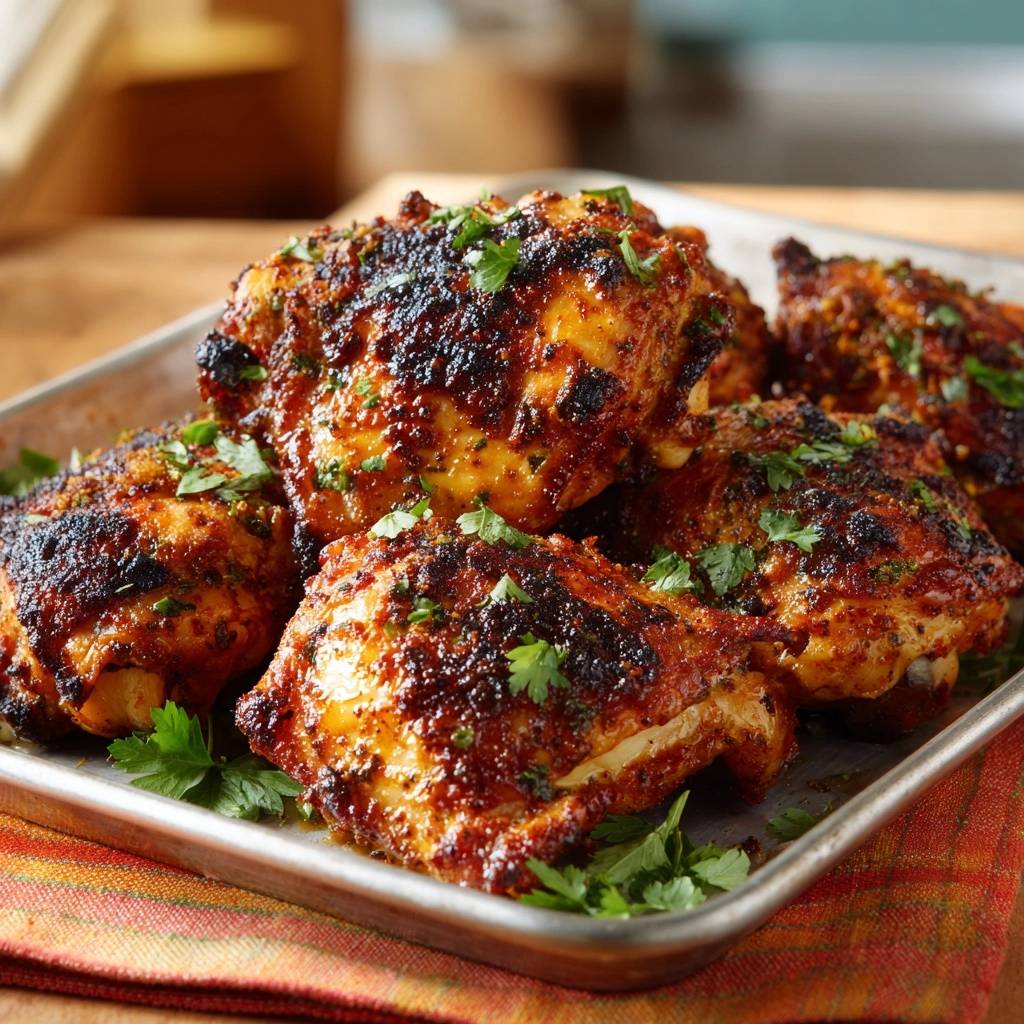
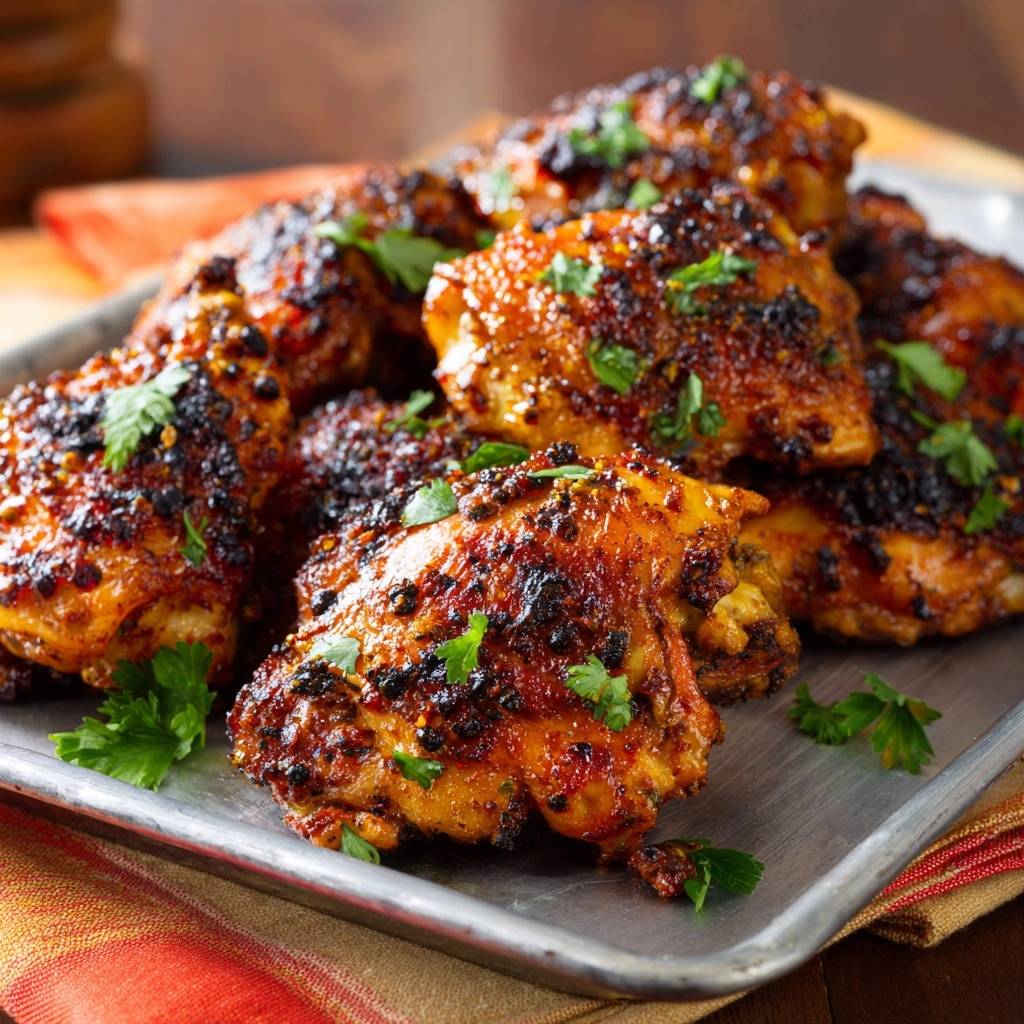
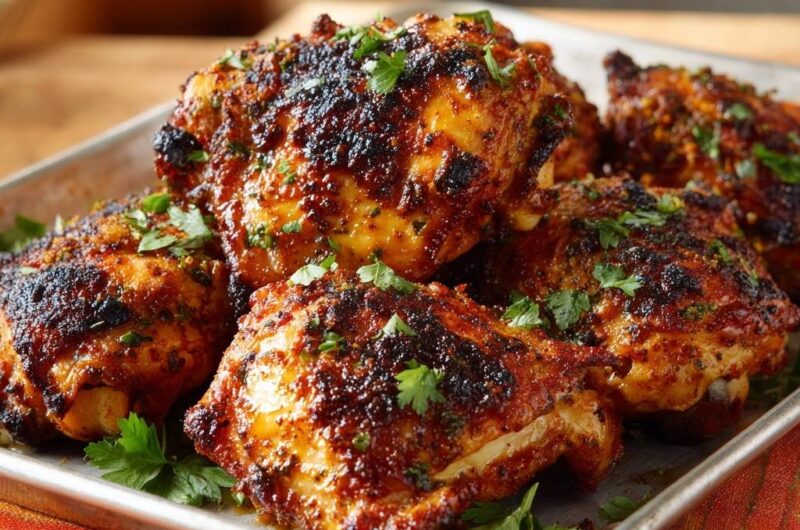
- Roast for 35 to 40 minutes. To achieve the dark, caramelized crust shown in the image, do not flip the chicken. The high heat will render the fat, essentially frying the skin from the top down.
- Check that the internal temperature has reached 170°F-175°F (thighs are more tender at a slightly higher temp than breasts). To match the charred look in the photo, switch the oven to Broil for the final 2-3 minutes, watching closely to ensure the spices darken without burning.
- Remove from the oven and let rest on the rack for 5 minutes. This allows the juices to redistribute while keeping the skin away from any pooling grease. Garnish generously with fresh parsley before serving.
Notes
- For the best results, ensure the chicken is patted completely dry with paper towels. Using a wire rack is essential for air circulation to prevent soggy bottoms. Thighs are best when cooked to an internal temperature of 170 to 175 degrees Fahrenheit for maximum tenderness.


