
We’ve all been there. You sit down for dinner, cut into a beautiful-looking chicken breast, and realize it has the texture of a dry sponge. It’s frustrating because chicken is a weeknight staple, yet it’s so easy to overcook. This Herb Grilled Chicken and Garlic Mash recipe is designed to end that struggle forever by using a professional basting technique that keeps the meat incredibly succulent.
For another comforting chicken dish with a beautiful crust, explore golden lattice chicken pot pie.
The secret lies in the contrast of textures and flavors. You get a deep, smoky char from the grill pan, which is immediately softened by a luxurious bath of garlic-infused butter. When you pair that with a velvety mash and a bright lemon-parsley glaze, you aren’t just making dinner; you’re creating a restaurant-quality experience in under 45 minutes. The flavor profile is a classic trio of pungent garlic, earthy oregano, and zesty lemon that wakes up your palate.
If you want to guarantee juicy results every single time, you have to master the “pull temp.” Most people wait until the chicken looks done, but by then, it’s already drying out. I always pull my chicken off the heat at 160°F. That five-degree gap between the pan and the USDA-recommended 165°F is filled by “carry-over cooking” while the meat rests, ensuring the fibers stay tender rather than tightening into rubber.
The Science of Succulent Herb Grilled Chicken
Achieving that perfect crust on a chicken breast involves the Maillard reaction. This is a chemical reaction between amino acids and reducing sugars that gives browned food its distinctive, savory flavor. When you press the seasoned chicken onto a hot cast-iron grill pan, you’re creating hundreds of tiny sear points. While many people claim searing “locks in juices,” science tells us otherwise; however, that crust creates a delicious barrier of flavor and provides a textural contrast to the soft meat inside.
Temperature control is your best friend here. Using a heavy cast-iron pan is essential because it holds heat better than thin stainless steel. This consistent heat allows the chicken to develop those iconic charred ribs without the pan’s temperature dropping the moment the meat hits the surface. If the pan isn’t hot enough, the chicken will steam in its own moisture rather than searing, leading to that dreaded gray, rubbery finish.
Finally, never underestimate the power of the rest. When chicken cooks, the muscle fibers contract and push moisture toward the center. If you slice it immediately, all that juice runs out onto your cutting board. By tenting the chicken with foil and letting it sit for eight minutes, you allow those fibers to relax and reabsorb the moisture. This simple step is the difference between a dry meal and a succulent one.
Why Yukon Golds Win for Garlic Mash
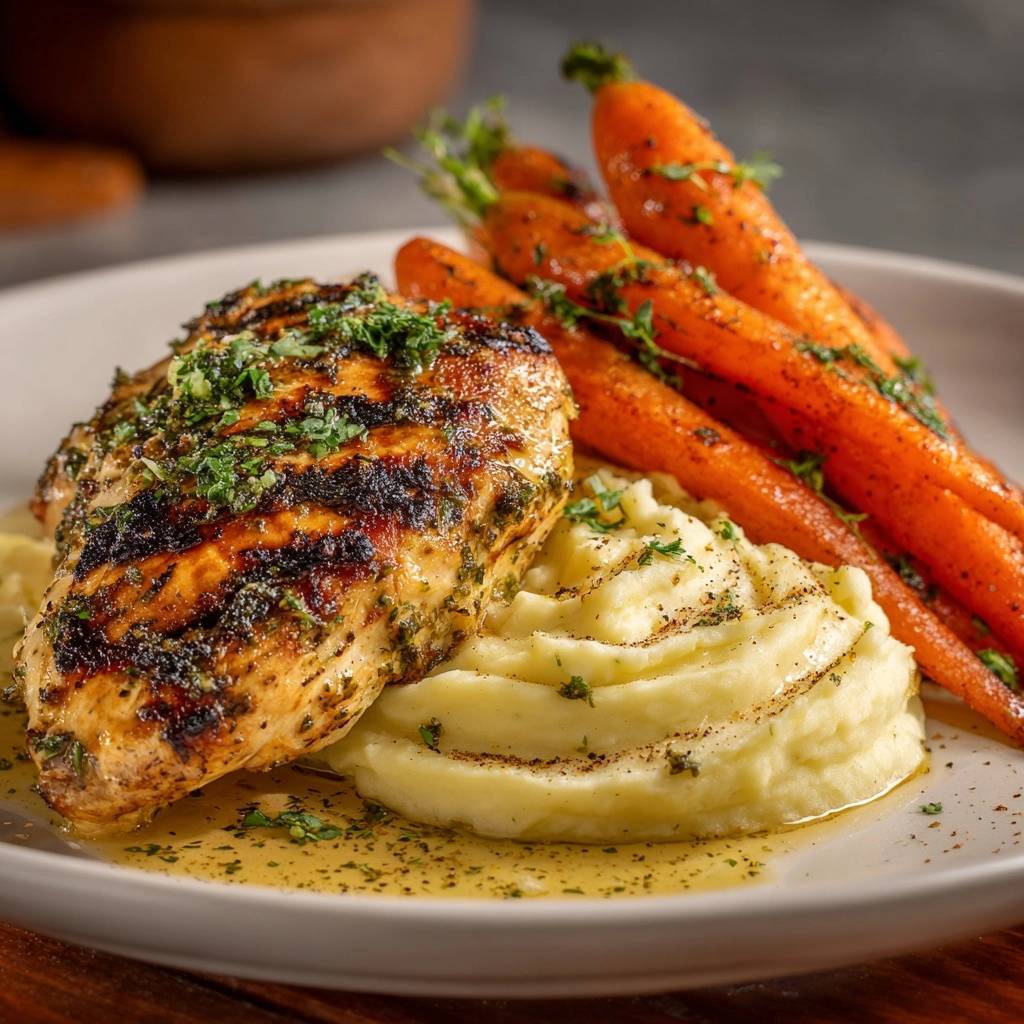
When it comes to mashing, not all potatoes are created equal. Russets are high in starch and make for a fluffy, airy mash, but they can sometimes feel a bit grainy. Red potatoes are waxy and hold their shape well, but they often turn gummy if you overwork them. Yukon Golds are the “Goldilocks” of the potato world. They have a naturally buttery flavor and a medium starch content that creates a dense, velvety texture that feels much more indulgent.
The way you start the cooking process matters just as much as the variety. Always start your potatoes in cold, salted water. If you drop them into boiling water, the outside will cook and disintegrate before the inside is even soft. Starting cold ensures the potato cubes heat up evenly from the core to the skin, resulting in a uniform texture that mashes into a smooth, lump-free puree.
Essential Components for Herb Grilled Chicken and Garlic Mash
Quality ingredients are the backbone of this dish. Since the ingredient list is relatively short, each item has to pull its weight. I always recommend using high-fat European-style butter if you can find it. The lower water content means it browns more beautifully in the pan and adds a richer mouthfeel to your garlic mash. Similarly, using a high-quality olive oil with a high smoke point ensures you can get the pan hot enough for a sear without filling your kitchen with smoke.
Freshness is non-negotiable for the aromatics. While dried oregano works perfectly for the chicken rub because it stands up well to high heat, the parsley must be fresh. Fresh parsley adds a grassy, bright finish that cuts through the richness of the butter and cream. Furthermore, stay away from the pre-minced garlic in jars. That garlic is often preserved in citric acid, which changes its flavor profile. Freshly minced cloves provide that sharp, spicy bite that mellows into sweetness as it hits the hot butter.
Selecting and Preparing the Poultry
When shopping, look for air-chilled chicken breasts. Most standard chicken is water-chilled, meaning the meat absorbs excess water during processing. This extra moisture leaks out in the pan, preventing a proper sear. Air-chilled poultry has a more concentrated flavor and a drier surface, which is exactly what you want for those perfect grill marks. If your chicken breasts are very thick on one end, I suggest lightly pounding them to an even thickness so the entire piece cooks at the same rate.
Step-by-Step: Achieving the Perfect Char and Mash
Cooking this meal is all about timing and managing three different components at once. It might feel like a lot, but if you follow the sequence, everything will finish at the exact same time. You’ll start with the potatoes, move to the chicken, and finish with the glazed carrots while the meat rests. This flow ensures that nothing sits around getting cold or soggy while you’re finishing another part of the plate.
If you’re intrigued by the chicken and potato combination, you’ll also enjoy the creamy chicken and potato chowder.
Phase 1: Developing the Velvety Garlic Mash
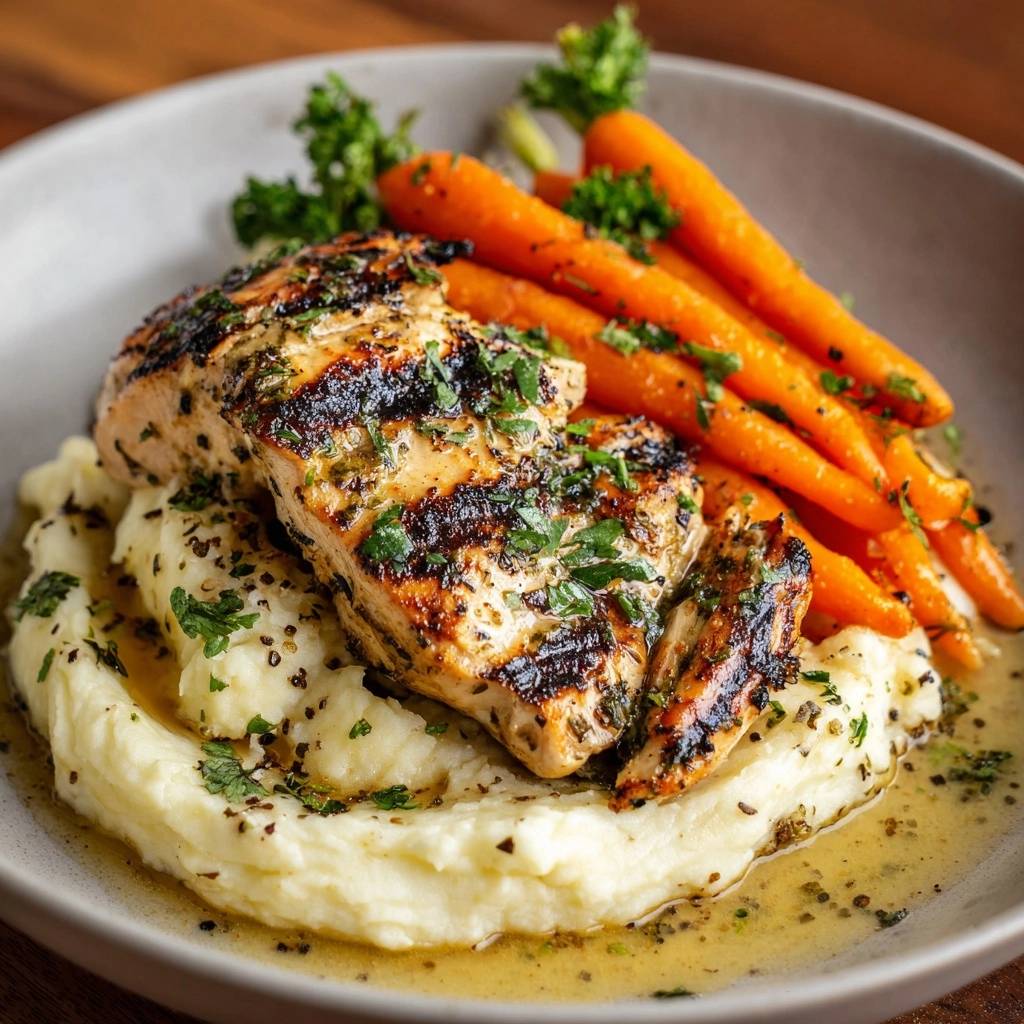
Once your Yukon Golds are fork-tender, drain them immediately. But don’t start mashing yet! Put the drained potatoes back into the hot pot for about two minutes. This “steam-dry” method allows any remaining surface moisture to evaporate. If you skip this, that extra water will prevent the cream and butter from fully soaking into the potato. Once they look dry and floury, add your butter and warm cream. Use a masher or a ricer for the smoothest results, folding in the raw minced garlic at the very end so its heat gently cooks it without losing its punch.
Phase 2: Searing and Basting the Chicken
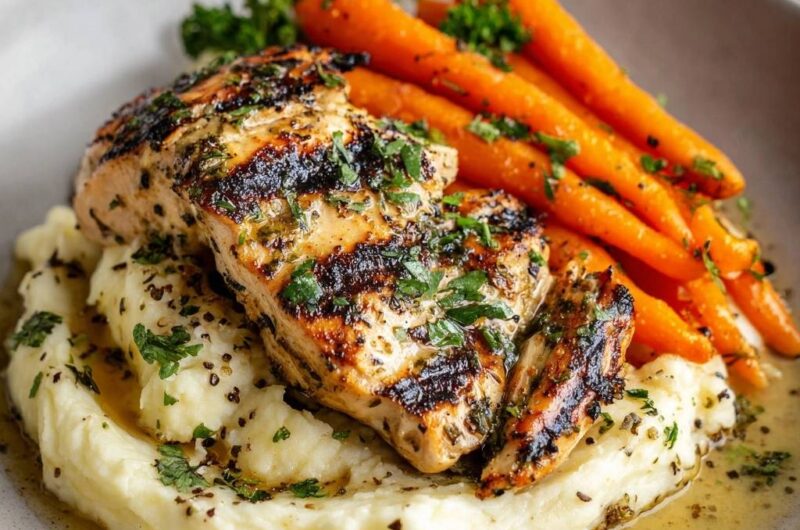
Pat your chicken dry with paper towels before seasoning; moisture is the enemy of a good sear. Get your grill pan smoking hot and lay the chicken down. Now, here is the hardest part: don’t touch it. You need at least five or six minutes of undisturbed contact to develop those deep char marks. If you try to flip it too early, the meat will stick to the ribs of the pan. Once flipped, you’ll start the “Arrosé” technique. Drop a knob of butter and garlic into the pan, tilt it slightly, and use a spoon to continuously pour that bubbling, fragrant fat over the chicken. This basting adds incredible flavor and keeps the exterior from drying out.
Phase 3: Glazing the Carrots and Pan Sauce
While the chicken rests, use a separate skillet for the carrots. Simmering them in chicken broth and butter allows them to cook through while absorbing savory notes. Once the liquid reduces, it will naturally thicken into a glossy glaze that coats the carrots. Adding a squeeze of lemon juice at the very end provides a hit of acidity that balances the sugar in the carrots and the fat in the butter. This reduction becomes your “sauce pool” on the plate, tying the chicken and mash together.
Avoiding Common Pitfalls with Grilled Poultry
The most common mistake is the chicken sticking to the pan. This usually happens because the pan wasn’t hot enough or you tried to move the meat before the sear was set. If it’s sticking, give it another minute; the meat will naturally “release” once the crust has formed. Another pitfall is gummy mashed potatoes. This happens when you over-process them, especially in a blender or food processor, which breaks the starch cells. Always mash by hand or use a ricer for that perfect velvety consistency.
Flavor Variations and Herb Substitutions
This recipe is a fantastic canvas for different flavors. If you want a Mediterranean twist, swap the oregano for fresh rosemary and thyme. For those who like a bit of heat, adding a teaspoon of smoked paprika or a pinch of cayenne to the chicken rub works wonders. You can also use this same method for bone-in, skin-on chicken thighs. Just keep in mind that thighs will take about 5-7 minutes longer to cook through, but they are even more forgiving than breasts when it comes to staying juicy.
What Else to Try
Round out your meal with these complementary dishes to go with your herb grilled chicken.
- For a satisfying vegetable addition, consider this cheesy roasted broccoli and cauliflower bake, offering a similar comforting feel.
- Pair your chicken with some fresh-baked golden skillet cornbread, perfect for soaking up any juices.
Optimal Pairings for Herb Grilled Chicken and Garlic Mash
To complement the rich, garlicky flavors of this dish, I recommend a beverage with a bit of brightness. A sparkling apple cider or a botanical tonic with a twist of lime provides a refreshing contrast to the heavy cream in the mash. If you want to add more greens to the plate, a simple arugula salad with a light vinaigrette is perfect. The peppery bite of the arugula cuts right through the buttery sauce, making the whole meal feel balanced and light despite the comfort-food elements.
Expert Troubleshooting and Preparation Tips
Can I use a standard frying pan if I don’t have a grill pan?
Absolutely. You won’t get the specific “ribbed” char marks, but a heavy stainless steel or cast-iron skillet will actually give you more surface area for browning. This results in an even more flavorful crust across the entire breast. Just follow the same timing and basting instructions.
How do I prevent the garlic from burning during the basting phase?
Garlic burns quickly and becomes bitter. The trick is to add the garlic and butter during the last two minutes of cooking. By this point, the pan has cooled slightly from the chicken, and the butter provides a buffer. If the butter starts to turn dark brown too quickly, pull the pan off the heat and continue basting with the residual heat.
What is the best way to reheat the mash without it losing its texture?
Microwaving often makes potatoes oily or dry. Instead, put the mash in a small saucepan over low heat. Add a splash of warm milk or a tablespoon of butter and stir gently until heated through. This re-emulsifies the fats and restores that velvety texture.
Can I substitute heavy cream with a lighter alternative?
You can use whole milk or half-and-half, but the mash won’t be quite as “velvety.” If you need to go dairy-free, a high-quality chicken broth mixed with olive oil can create a savory, smashed potato texture, though it will be less creamy than the original version.
How long can the chicken rest before it loses its heat?
If you tent the chicken loosely with aluminum foil, it will stay perfectly warm for about 10 to 12 minutes. This is the ideal window to finish your carrots and plate the mash. Avoid wrapping it tightly in foil, as the trapped steam can make the crispy crust turn soggy.
Make-Ahead Strategies and Storage
If you are meal prepping, store the chicken and mash in separate airtight containers. The chicken will stay fresh in the fridge for up to three days. When reheating, I recommend slicing the chicken first and warming it in a pan with a tablespoon of water or broth to keep it from drying out. The garlic mash can be stored for the same amount of time; just remember to add a little liquid when reheating to bring back its creamy consistency. I do not recommend freezing the potatoes, as the texture can become grainy and watery once thawed.
Herb Grilled Chicken
Course: Main CourseCuisine: AmericanDifficulty: easy2
servings15
minutes25
minutes580
kcal40
MinutesA succulent chicken breast recipe featuring high-heat charring and a garlic butter finish, served alongside creamy Yukon Gold mashed potatoes and lemon-glazed baby carrots.
Ingredients
2 large boneless skinless chicken breasts
1 pound Yukon Gold potatoes, peeled and cubed
6-8 whole baby carrots, peeled (tops left on for presentation)
4 tablespoons butter (divided)
1/4 cup heavy cream
3 tablespoons olive oil
4 cloves garlic, minced
3 tablespoons fresh parsley, finely chopped
1 teaspoon dried oregano
1 teaspoon salt
1/2 teaspoon cracked black pepper
1/2 cup chicken broth
1/2 lemon, juiced
Directions
- Start the potatoes in a pot of cold salted water. Bring to a boil and cook until fork-tender. A cold water start ensures even cooking and prevents a gummy texture.
- While potatoes cook, pat the chicken completely dry. Season generously with salt, pepper, oregano, and 1 tablespoon of olive oil.
- Heat a cast-iron grill pan over medium-high heat until smoking slightly. Place the chicken on the grill ribs. To achieve the visual char and lock in juices, sear for 5-6 minutes without moving the meat. Flip and cook for another 4-5 minutes.
- During the last 2 minutes of cooking, add 1 tablespoon of butter and half the minced garlic to the pan. Spoon the sizzling garlic butter over the chicken. Remove chicken when it hits 160°F and let it rest on a plate, tented with foil, for 8 minutes.
- In a separate skillet, add the carrots, chicken broth, and 1 tablespoon of butter. Cover and simmer for 6-8 minutes until tender. Remove the lid and increase heat for 2 minutes to reduce the broth into a glossy glaze. Stir in the lemon juice and half the parsley.
- Drain potatoes and let them steam dry in the hot pot for 2 minutes. Mash with the remaining 2 tablespoons of butter, heavy cream, and the rest of the minced garlic until velvety smooth.
- To plate: Create a wide bed of garlic mash. Place the rested chicken breast on top. Arrange the glazed carrots alongside. Pour the remaining lemon-butter glaze from the carrot skillet over the entire dish to create the sauce pool seen in the image. Garnish heavily with fresh parsley and extra cracked pepper.
Notes
- Starting potatoes in cold water prevents a gummy texture. Always let the chicken rest for at least 8 minutes to allow juices to redistribute.


