
Southern black eyed peas are more than just a side dish; they’re a cornerstone of comfort that carries generations of tradition in every spoonful. However, many home cooks struggle with the execution, often ending up with a bowl of gray, mushy beans floating in a watery, bland broth. It’s a common frustration that usually stems from rushing the process or skipping the foundational flavor steps.
The secret to a truly gourmet experience lies in what I call the “Two-Stage Sear” philosophy. By treating your ingredients with a bit of heat-driven respect, you transform a humble legume into a rich, savory masterpiece. We aren’t just boiling beans here; we’re building layers of caramelization and managing textures to ensure every bite is distinct and deeply seasoned.
For a similar rich flavor, check out this slow-braised beef and apricot stew.
I’ve found that the real magic happens when you focus on the “fond”—those little browned bits stuck to the bottom of your pot. Most people wash those away or ignore them, but that’s where the soul of the dish lives. If you master the sear and the simmer, you’ll never settle for a lackluster bowl of peas again.
The Anatomy of Non-Mushy Black Eyed Peas
Understanding the science of the bean is the first step toward perfection. Black eyed peas have a relatively thin seed coat compared to kidney beans or chickpeas, which makes them prone to bursting if they’re agitated too much. When you subject them to a violent, rolling boil, the outer skin expands and splits before the creamy interior has a chance to soften evenly.
To achieve that “creamy yet intact” texture, you have to control the heat. A gentle, low simmer allows the heat to penetrate the center of the pea slowly. This preserves the structural integrity of the bean while the starches inside transform into a buttery consistency. It’s a delicate balance that requires a watchful eye and a bit of patience.
Liquid ratios also play a massive role in the final mouthfeel. If you drown the peas in too much broth, you’ll end up with a thin soup rather than a cohesive stew. We use just enough liquid to submerge the ingredients, allowing the natural starches to concentrate as the broth reduces, creating a liquid that actually clings to your rice.
Essential Components for Southern Black Eyed Peas
Quality ingredients are the backbone of this recipe. While black eyed peas are the star, the supporting cast does the heavy lifting in terms of flavor. I always recommend using dried peas over canned because you have total control over the texture and the salt content. Dried beans absorb the seasoned broth as they cook, flavoring them from the inside out.
The choice of protein is equally vital. We’re using smoked beef sausage here because it offers a robust, savory depth without the need for pork. The smoking process infuses the meat with a woodsy aroma that permeates the entire pot. When that beef fat renders out, it carries the spices and aromatics into every corner of the dish.
Finally, don’t skimp on the “Holy Trinity” variation of onion, green pepper, and red pepper. While traditional French cooking uses carrots, Southern cooking relies on the bright, slightly bitter snap of bell peppers. The red pepper adds a touch of sweetness that balances the earthy notes of the peas and the heat from the cayenne.
Selecting and Prepping Dried Black Eyed Peas
When you’re at the store, look for dried peas that are uniform in color and free of wrinkles or cracks. Older beans take much longer to cook and often stay tough regardless of how long you simmer them. Freshness matters even with dried goods, so check those expiration dates on the bag.
I’m a firm believer in the overnight soak. Not only does it significantly reduce the cooking time, but it also helps break down the complex sugars that lead to digestive discomfort. If you’re in a pinch, a quick-soak—boiling for two minutes and letting them sit for an hour—works, but the overnight method yields the most consistent, even texture.
The Role of Smoked Beef Sausage
Beef sausage provides a much deeper, meatier profile than poultry alternatives. It stands up to the long simmering process without becoming rubbery or losing its punch. The spices used in smoked beef sausage, like garlic and black pepper, naturally complement the seasonings we add later.
I recommend slicing your sausage into 1/2-inch rounds. If you cut them too thin, they tend to break apart and disappear into the beans. A thicker slice ensures that you get a hearty, meaty bite in every spoonful, providing a satisfying textural contrast to the soft, tender peas.
Building the Flavor Base: The Two-Stage Sear
This is where we separate the amateurs from the experts. The Maillard reaction is a chemical reaction between amino acids and reducing sugars that gives browned food its distinctive flavor. By searing the sausage first, you’re creating a complex flavor profile that simply cannot be achieved through boiling alone.
To get similarly deep flavor from browned bits, consider this slow-simmered savory beef stew recipe.
As the sausage browns, it leaves behind a layer of caramelized protein on the bottom of the Dutch oven. This is the “fond.” It might look like the pot is burning, but that dark brown coating is pure gold. It acts as the primary seasoning agent, providing a smoky, savory foundation that makes the broth taste like it’s been simmering for twelve hours instead of forty-five minutes.
Sautéing Aromatics to Release Essential Oils
Once the sausage is out, the vegetables go in. The moisture from the onions and peppers will naturally start to loosen the fond. Use a wooden spoon to scrape the bottom of the pot as they cook. This process, known as deglazing, incorporates all those toasted flavors directly into the aromatic base.
Be careful with the garlic! It has a high sugar content and burns very easily. I always wait until the onions and peppers are soft and translucent before adding the minced garlic. You only need about 60 seconds of heat to release its essential oils. If it turns dark brown or black, it will become bitter and ruin the entire pot.
Step-by-Step: Southern Black Eyed Peas and Sausage
Start by heating your heavy-bottomed pot over medium-high heat. Lay the sausage slices in a single layer and let them sit undisturbed for a few minutes. You want a deep, dark crust on both sides. Once they’re beautifully browned, pull them out with a slotted spoon, leaving that flavorful fat behind.
Next, toss in your diced onions and peppers. You’ll hear a satisfying sizzle as they hit the pan. Sauté them until the edges start to caramelize. This is the “Aromatic Build” phase. Once the garlic is fragrant, stir in your soaked peas and spices. Coating the dry peas in the seasoned oil before adding the liquid helps seal the surface and prevents them from getting waterlogged.
Now, pour in the beef broth and add the bay leaf. Bring it to a boil just to get the temperature up, then immediately drop it to a low simmer. This is the “Infusion” phase. Cover the pot and let the flavors meld. The final “Marriage of Flavors” happens when you stir the sausage back in at the end, allowing the meat to reheat and its juices to finish seasoning the gravy.
Managing the Simmer for Perfect Texture
A rolling boil is the enemy of a clear, beautiful broth. It tosses the beans around, causing them to collide and break. Keep the heat low enough that you only see a few gentle bubbles breaking the surface. This “low and slow” approach ensures the peas cook through without turning into a mash.
Start checking your peas for tenderness around the 30-minute mark. Every batch of beans is different depending on their age. You’re looking for a pea that yields easily when pressed against the roof of your mouth but still holds its shape perfectly in the bowl. If they’re still crunchy, give them another five to ten minutes.
Reducing the Broth into a Silken Gravy
The final ten minutes of cooking should be done with the lid off. This is a crucial step for achieving that “velvety” mouthfeel. As the liquid evaporates, the starches that have leached out of the peas begin to concentrate. This naturally thickens the beef broth into a rich gravy.
You don’t need flour or cornstarch for this recipe. The peas do all the work for you. By the time you’re ready to serve, the liquid should coat the back of a spoon. It should feel substantial and luxurious, not thin or watery. If it’s still too thin, you can gently mash a small spoonful of beans against the side of the pot and stir them back in.
Avoiding Common Mistakes in Bean Cookery
One of the most common issues is beans that stay hard no matter how long you cook them. This usually happens if the beans are very old or if you’ve added acidic ingredients like tomatoes too early. Acid toughens the cell walls of the legumes. If you want to add a splash of vinegar or lemon juice, always wait until the very end once the peas are already tender.
Another mistake is over-salting at the beginning. As the broth reduces, the salt concentration increases. I always wait until the final five minutes to do my final seasoning. Taste the broth, then add salt and pepper gradually. Remember, the smoked sausage already brings a fair amount of salt to the party, so be conservative at first.
Flavor Variations and Ingredient Swaps
If you want a leaner profile, you can easily swap the beef sausage for a high-quality smoked turkey sausage. It still provides that essential smoky flavor but with less rendered fat. If you go this route, you’ll definitely need that tablespoon of vegetable oil to sauté your aromatics since turkey won’t release as much fat as beef.
For those who like a bit more kick, feel free to swap the green bell pepper for a diced jalapeño or add a few dashes of your favorite hot sauce at the end. You can also experiment with different herbs. While thyme is traditional, a bit of chopped parsley or even a pinch of dried oregano can add a fresh, herbaceous lift to the earthy beans.
What to Serve with Southern Black Eyed Peas
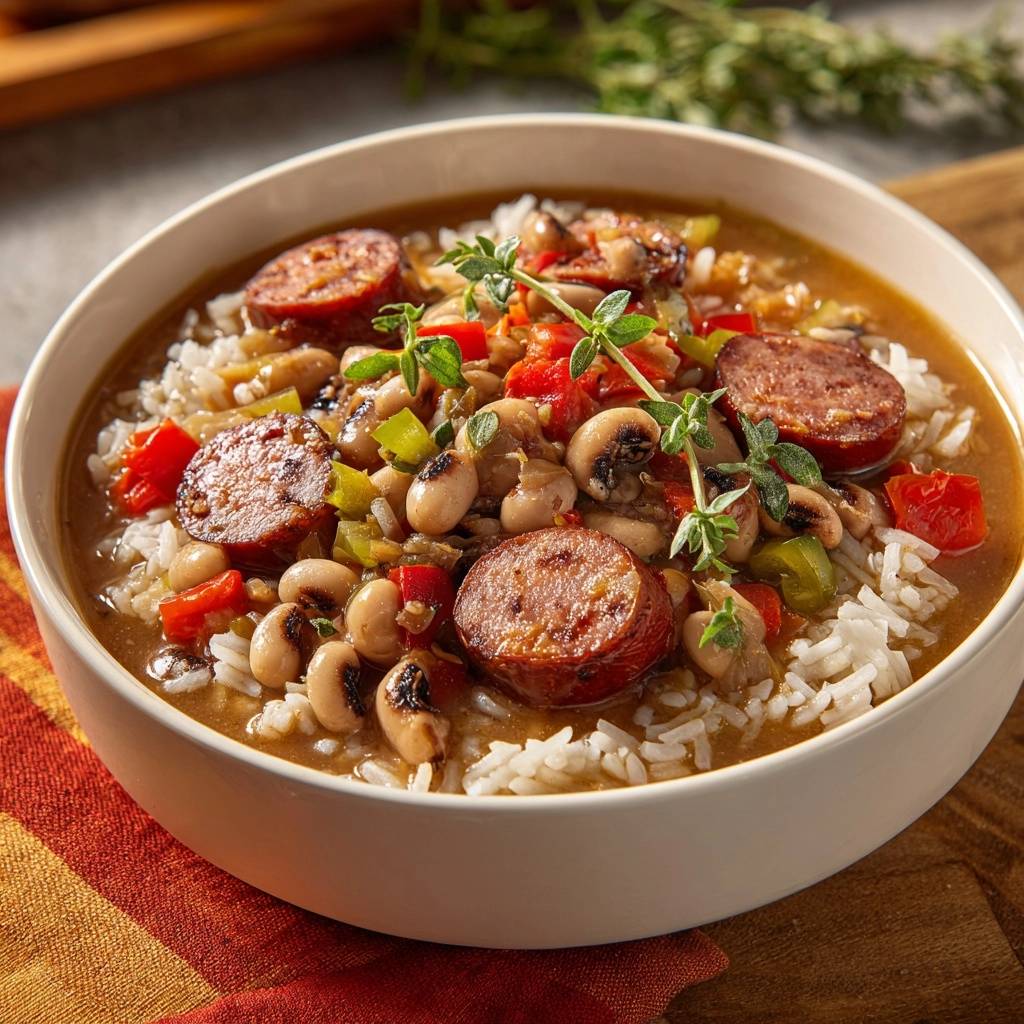
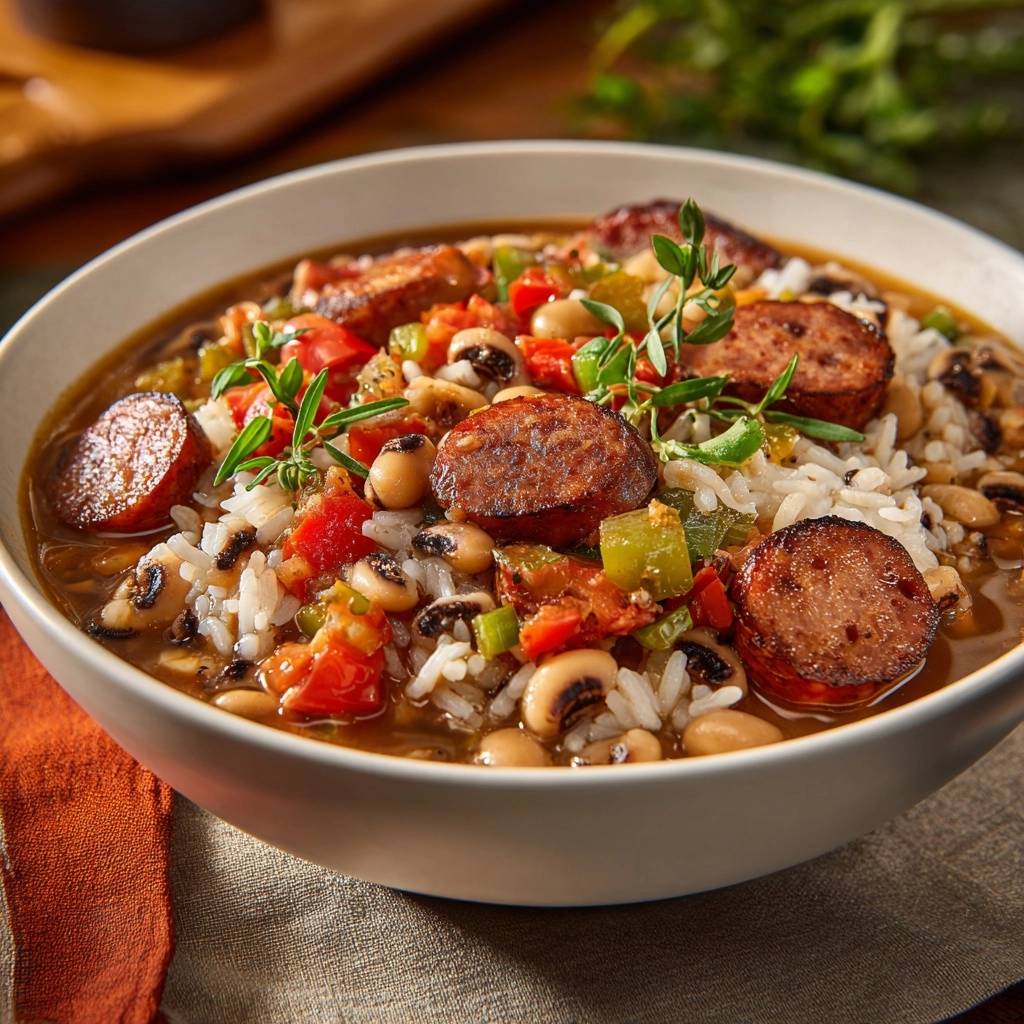
The classic pairing is long-grain white rice. The neutral flavor and fluffy texture of the rice act as a sponge, soaking up that incredible pot liquor. I like to serve the peas directly over the rice so every grain gets coated in that silken gravy. It’s a simple combination that feels incredibly complete.
To Round Out Your Meal
Consider these complementary dishes to serve alongside your black eyed peas and sausage.
- For a touch of sweetness and tang, try these balsamic glazed pearl onions, which pair well with hearty sausage dishes.
- Enjoy the crispiness of bacon-wrapped asparagus bundles for a fresh contrast to the rich flavors of black eyed peas.
To round out the meal, consider something with a bit of crunch or acidity. A vinegar-based coleslaw provides a sharp contrast to the rich, savory sausage. And of course, a piece of warm, buttery cornbread is never a bad idea. It’s perfect for mopping up every last drop of broth from the bottom of the bowl.
Make-Ahead Strategies and Storage Guide
Like most stews and braises, these black eyed peas actually taste better the next day. As the dish sits in the fridge, the flavors continue to marry and the starches further stabilize. If you’re planning a big dinner, feel free to make this a day in advance. Just reheat it gently on the stove, adding a splash of broth if it has thickened too much overnight.
To store leftovers, let the pot cool down slightly before transferring the mixture to airtight containers. It will stay fresh in the refrigerator for up to four days. If you want to freeze it, these peas freeze beautifully! Just leave a little headspace in the container for expansion. They’ll keep their quality for about three months. Thaw them in the fridge overnight before reheating.
Expert Tips for Professional Results
Invest in a heavy-bottomed Dutch oven if you don’t have one. The thick walls distribute heat more evenly than thin stainless steel, which prevents hot spots that can scorch your beans. It also retains heat better, allowing for a much more stable simmer.
Always garnish with fresh herbs right before serving. A few sprigs of fresh thyme or a sprinkle of chopped green onions add a pop of color and a bright, fresh aroma that cuts through the richness of the dish. It’s a small touch that makes the meal feel like it came from a high-end kitchen rather than a home stove.
Frequently Asked Questions
Can I use a slow cooker for this recipe?
Yes, you can use a slow cooker, but you must still sear the sausage and sauté the aromatics in a pan first to develop the flavor. Once that’s done, transfer everything to the slow cooker. Reduce the beef broth by about half a cup, as the slow cooker doesn’t allow for much evaporation. Cook on low for 6 to 8 hours or until the peas are tender.
Do I really need to soak the peas overnight?
While you can technically cook them without soaking, I don’t recommend it. Unsoaked peas cook unevenly, meaning some will be mushy while others are still hard in the middle. Soaking ensures a uniform texture and makes the beans much easier to digest. If you’re short on time, use the quick-soak method: boil for 2 minutes, then soak for 1 hour.
How do I thicken the broth if it’s too watery?
If your broth is too thin after the peas are cooked, simply take a wooden spoon and mash about a quarter cup of the peas against the side of the pot. Stir them back into the liquid and simmer uncovered for another 5 to 10 minutes. The released starches will act as a natural thickener, creating a creamy consistency without changing the flavor.
Can I substitute beef broth with vegetable broth?
You certainly can, though the flavor will be lighter and less “meaty.” If you use vegetable broth, I recommend adding a teaspoon of Worcestershire sauce or a bit more smoked paprika to help mimic the depth that beef broth provides. Make sure to use a high-quality, low-sodium vegetable broth so you can still control the final salt levels.
Why did my peas turn gray?
Black eyed peas naturally release some pigment as they cook, but an overly gray color usually comes from overcooking or using a pot that reacts with the beans (like unlined cast iron). To keep the colors vibrant, stick to the recommended cooking times and use a stainless steel or enameled cast iron pot. The addition of colorful bell peppers also helps keep the dish looking appetizing.

Black Eyed Peas and Sausage
Course: Main CourseCuisine: AmericanDifficulty: medium6
servings15
minutes45
minutes410
kcal60
MinutesThis elevated Southern classic avoids the common pitfalls of watery broth and mushy textures. By searing the sausage and aromatics to create a deep fond and controlling the simmer time, you achieve perfectly tender peas in a savory gravy served over fluffy white rice.
Ingredients
1 pound dried black eyed peas, soaked overnight and drained
1 pound smoked beef sausage, sliced into 1/2-inch rounds
1 tablespoon vegetable oil (if needed)
1 large yellow onion, diced
1 green bell pepper, diced
1 red bell pepper, diced
3 cloves garlic, minced
4 cups beef broth
1 teaspoon dried thyme
1/2 teaspoon smoked paprika
1/4 teaspoon cayenne pepper
1 bay leaf
Salt and black pepper to taste
3 cups cooked long-grain white rice
Fresh thyme sprigs for garnish
Directions
- Heat a large heavy-bottomed pot or Dutch oven over medium-high heat. Add the sliced sausage in a single layer. Sear for 3 to 4 minutes per side until deeply browned and the fat has rendered. This step is crucial as the browned bits (fond) provide the base flavor that prevents a bland result. Remove sausage with a slotted spoon and set aside.
- In the same pot with the sausage drippings (add a tablespoon of oil if the pot is too dry), add the onion, green pepper, and red pepper. Sauté for 5 to 7 minutes until the vegetables are softened and the edges are slightly caramelized. Use a wooden spoon to scrape the bottom of the pot to release all the flavor. Add the garlic and cook for just 60 seconds until fragrant.
- Stir in the soaked and drained black eyed peas, smoked paprika, cayenne, and dried thyme. Toss to coat the peas thoroughly in the seasoned oil and aromatics.
- Pour in the beef broth and add the bay leaf. Bring the mixture to a rolling boil, then immediately reduce the heat to low. Cover and simmer gently. To solve the mushy bean problem, start checking for tenderness at the 30-minute mark. You want them creamy on the inside but with the skins still perfectly intact and distinct.
- Once the peas are tender, stir the browned sausage back into the pot. Simmer uncovered for another 5 to 10 minutes. This allows the flavors to marry and the broth to reduce slightly into a rich, silken gravy that coats the back of a spoon.
- Remove the bay leaf. Taste and adjust salt and pepper. To match the visual presentation, place a generous scoop of fluffy white rice into deep bowls and ladle the pea and sausage mixture directly over the center, ensuring the vibrant red and green peppers are visible. Garnish with fresh thyme sprigs.
Notes
- The secret to avoiding mushy beans is to start checking for tenderness at 30 minutes. Ensure you scrape the bottom of the pot while sautéing vegetables to incorporate the flavorful browned bits from the sausage.


