

Most layered desserts suffer from a tragic flaw: the “soggy bottom” syndrome. You’ve likely seen it before at potlucks where a beautiful graham cracker crust turns into a mushy, unidentifiable paste after sitting for just an hour. It’s frustrating to put in the effort only to have the textures bleed together into a singular, soft mess.
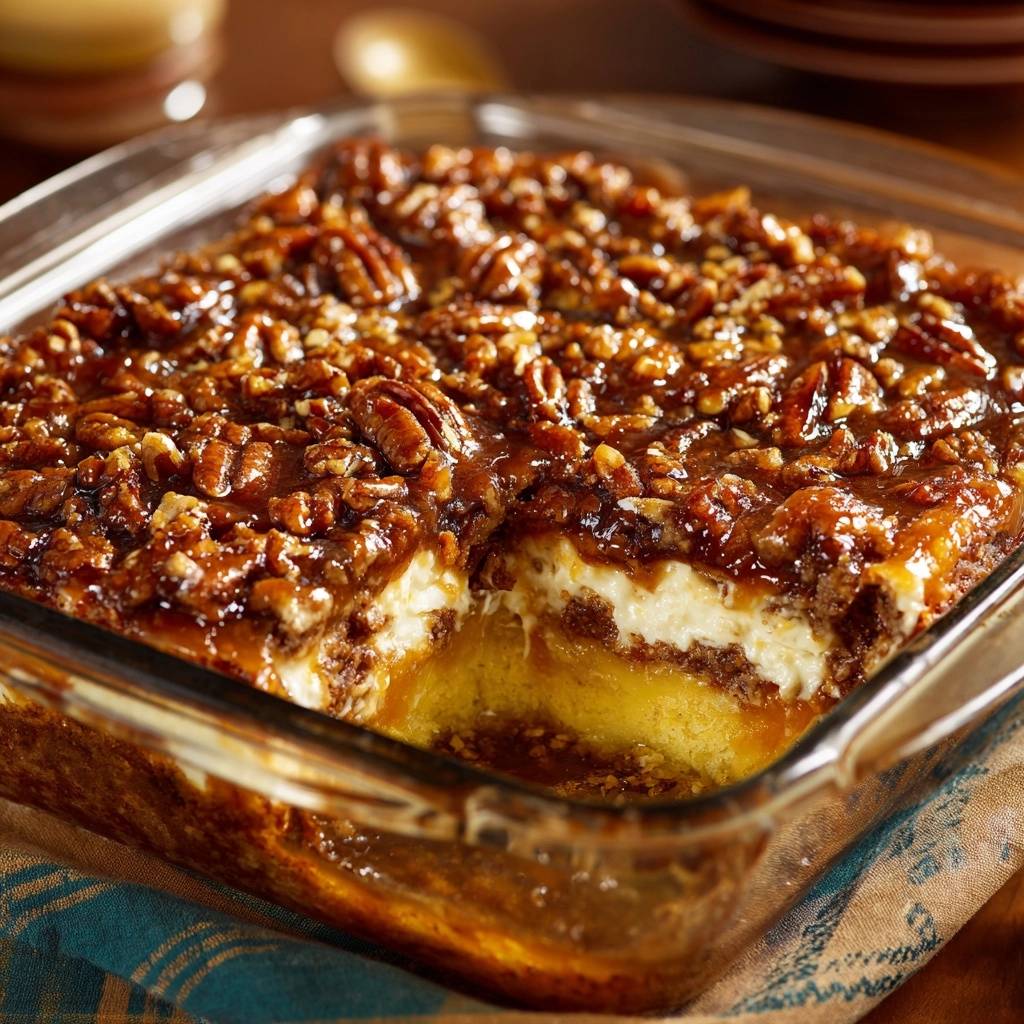
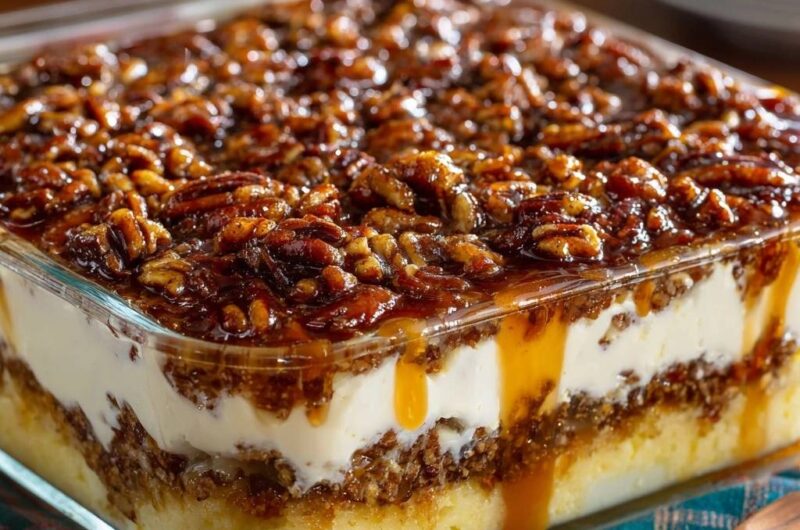
This Caramel Pecan Cheesecake Lush solves that architectural nightmare with a dense, buttery shortbread cake foundation. Instead of a crumbly base that drinks up moisture, we use a sturdy yellow cake mix base that stands its ground. When you bite into a chilled square, you get a distinct snap from the crust followed by the velvet-smooth cheesecake layer.
The real secret to this recipe’s success is the “praline-seal” technique. By baking a layer of caramel-coated pecans directly onto the hot crust, we create a literal sugar barrier. This hydrophobic shield prevents the cream cheese filling from migrating into the base, ensuring your dessert stays crisp and professional for days. It’s a total game-changer for anyone who values texture as much as flavor.
The Structural Secret: Why This Recipe Works
In the world of pastry physics, moisture always moves from the wettest layer to the driest. In a standard lush, the cream cheese layer slowly leaks water into the crust. However, our double-bake method uses the science of caramelization to stop this process in its tracks. When you return the caramel-tossed pecans to the oven on top of the base, the sugars melt and fuse into a solid, candy-like coating.
This praline layer acts as a structural waterproof membrane. It provides a crunchy transition between the soft cheesecake and the dense cake base. Because the caramel sets firmly, it holds the pecans in place, creating a rugged landscape that the cheesecake filling can grip onto. You aren’t just layering flavors; you’re building a reinforced dessert that won’t collapse under its own weight.
Essential Components for the Perfect Layered Lush
Quality ingredients are the difference between a “good” dessert and one people talk about for weeks. We use a standard yellow cake mix, but we aren’t making a cake. By omitting the water and increasing the fat with melted butter, we transform the mix into a rich, shortbread-style dough. This provides the necessary density to support the heavy toppings.
Using unsalted butter is a non-negotiable step here. Since we finish the dish with a generous sprinkle of sea salt and use a rich caramel sauce, you need to control the sodium levels yourself. If you use salted butter in the base, the final result can lean toward being unpleasantly salty rather than perfectly balanced.
Selecting the Right Caramel Consistency
Not all caramels are created equal, and the one you choose will dictate the success of your layers. Avoid the thin, runny syrups often found in plastic squeeze bottles meant for ice cream. These are too high in water content and will bleed into your cream cheese layer, making it look messy.
Look for a high-quality, artisan-style jarred caramel that is thick enough to hold its shape on a spoon. If the caramel is stiff at room temperature, that’s a great sign. It means it will set up beautifully in the fridge, providing those gorgeous, distinct ribbons of gold when you slice into the lush.
The Importance of Toasting Pecans
Raw pecans are fine, but toasted pecans are transformative. Toasting triggers the Maillard reaction, which develops deep, smoky, and woody flavors that raw nuts simply don’t have. It also draws out the natural oils, making the pecans crunchier and more resistant to softening once they are buried in the cream layer.
To toast them, simply toss them in a dry pan over medium heat for about 3 to 5 minutes. You’ll know they’re ready when the kitchen starts smelling like a candy shop. This small five-minute step adds a professional depth of flavor that cuts through the sweetness of the powdered sugar and caramel.
Step-by-Step: Building the Shortbread Foundation
Start by combining your dry cake mix, the melted butter, and one large egg. You aren’t looking for a pourable batter; you want a thick, heavy dough that feels almost like play-dough. If it feels a bit oily, don’t worry—that’s the butter that will give the crust its melt-in-your-mouth shortbread texture.
When you press the dough into your 9×9 dish, use the bottom of a flat measuring cup to get it perfectly even. You want to press firmly to eliminate any air pockets. If the base is uneven, the caramel will pool in the low spots, which can lead to some slices being too sweet and others being too dry.
The Double-Bake: Creating the Moisture Barrier
Bake the base until the edges are just barely turning a light golden brown. While it’s in the oven, toss your first batch of pecans with a bit of caramel. The moment the dish comes out of the oven, spread those pecans over the hot surface. The residual heat starts melting the caramel immediately, allowing it to seep into the top millimeter of the crust.
Pop it back into the oven for exactly five minutes. This second bake is where the magic happens. The caramel bubbles and “sets” into the crust, creating that praline seal we talked about. When you pull it out the second time, the surface should look glossy and slightly tacky. You must let this cool completely before moving on, or you’ll melt your cheesecake layer instantly.
Whisking the Aerated Cheesecake Filling
The most common mistake in cheesecake fillings is using cold cream cheese. If your cream cheese is even slightly chilled, you will end up with tiny white lumps that no amount of whisking can fix. Leave your blocks on the counter for at least two hours until they are completely soft to the touch.
Once you’ve beaten the cheese and sugar into a silky cloud, gently fold in your whipped topping. Use a wide rubber spatula and a “cut and fold” motion. If you stir too vigorously, you’ll deflate the air bubbles, and your lush will be heavy and dense instead of light and airy. You want a texture that feels like a firm mousse.
Assembly: Layering for Visual and Structural Impact
When spreading the cheesecake mixture, work from the center out to the edges. Use an offset spatula to push the cream all the way to the glass sides of the dish. This creates a clean white line that looks stunning from the outside. Once the cream is level, it’s time for the final caramel crowning.
Toss the remaining pecans with caramel and sea salt. Pour the rest of your caramel sauce over the cream first, letting it naturally drift toward the edges. Then, pile the salted pecans on top. The sea salt is crucial here; it provides a sharp contrast that wakes up your taste buds and prevents the dessert from feeling “one-note” sweet.
The Science of the Chill: Why Patience Matters
It is incredibly tempting to dive in right away, but this dessert needs at least four hours in the fridge. During this time, the fats in the cream cheese and the butter in the base firm up. This “setting” period allows the flavors to marry and the textures to stabilize.
If you can wait 24 hours, the dessert actually improves. The cake base matures, absorbing just a tiny hint of moisture from the layers above, which softens it from a hard biscuit to a tender, fudge-like shortbread. It stays structurally sound but becomes much easier to bite through.
Troubleshooting Common Lush Obstacles
If you find your caramel is running all over the plate when you serve, your sauce was likely too thin. You can fix this next time by simmering your caramel sauce on the stove for a few minutes to reduce the water content before using it. If it’s already made, just keep the dessert extra cold until the very second you serve it.
A cracked base usually happens if the dough was overbaked or pressed too thinly in the center. If your base cracks, don’t panic. The caramel-pecan layer will act as a “glue” to hold it together. Once the cheesecake layer is spread on top, no one will ever know the base wasn’t perfect.
To get those clean, Instagram-worthy slices, you need to manage the stickiness of the caramel. The pecans can be tricky to cut through, so use a very sharp chef’s knife. If you find the cream cheese sticking to the blade, it’s time to use the professional’s secret: the hot water dip.
Managing Temperature Fluctuations
Temperature is your biggest enemy when building layers. If the base is even slightly warm when you add the cream cheese, the bottom of the cream layer will melt. This creates a slippery interface that causes the layers to slide apart when you try to plate a slice. Always perform the “touch test” on the bottom of the glass dish; if it feels warm at all, wait another twenty minutes.
Achieving Clean, Professional Slices
For perfect squares, dip a long, thin knife into a tall glass of hot water. Wipe the blade completely dry with a clean towel, then make one long, decisive cut. The heat from the blade will glide through the caramel and cream cheese like butter. You must clean and re-dip the knife between every single cut to prevent the layers from smearing into each other.
Flavor Variations and Ingredient Swaps
While the caramel pecan combo is a classic, you can easily adapt this framework. For a “Turtle” style lush, drizzle melted dark chocolate over the final pecan layer. The bitterness of the dark chocolate balances the sweet caramel beautifully. Just ensure the chocolate is slightly cooled so it doesn’t melt the cream layer below.
For a similar layered approach that avoids excess liquid, check out this cabbage lasagna bake.
If you aren’t a fan of pecans, toasted walnuts make an excellent substitute. They have a slightly more earthy, bitter profile that works well with the sweet cake base. You could even use a spice cake mix instead of yellow cake mix for the base to give the whole dessert a warm, autumnal vibe without changing the structural integrity of the recipe.
Make-Ahead Strategies and Storage Logistics
This is the ultimate make-ahead dessert because it actually tastes better on day two. You can fully assemble the lush up to 48 hours before your event. Just make sure to cover the dish tightly with plastic wrap or a lid. Cream cheese is notorious for absorbing “fridge smells,” so a tight seal is mandatory to keep it tasting fresh.
Leftovers will stay good in the refrigerator for up to four days. After that, the pecans may start to lose their crunch, though the base will remain remarkably firm thanks to our praline seal. If you are transporting this to a party, keep it in a cooler with ice packs until serving to maintain that perfect, sliceable consistency.
Expert Tips for Success
Always use a glass baking dish if possible. Glass conducts heat more evenly than metal for this type of thick base, and it allows you to see those beautiful layers from the side. It makes for a much more impressive presentation on the table.
If you want to be truly precise, weigh your cake mix and butter. Baking is a science, and even a few extra tablespoons of butter can make the base too greasy. Finally, don’t skimp on the sea salt. Use a flaky variety like Maldon if you can find it; those large crystals provide a delightful crunch and a burst of salt that makes the caramel sing.
Frequently Asked Questions
Can I use a different cake mix flavor for the base?
Yes, you absolutely can. A chocolate cake mix works wonderfully for a “Chocolate Turtle” version, and a spice cake mix adds a lovely warmth that pairs perfectly with pecans. The key is to keep the ratios the same: one box of mix, one egg, and a half-cup of melted butter. This ensures the base remains a sturdy shortbread rather than a fluffy cake.
How do I make my own stabilized whipped cream if I don’t want store-bought topping?
To make a stabilized whipped cream that won’t weep, whip 1 cup of heavy cream with 1/4 cup of powdered sugar and 1/2 teaspoon of cream of tartar. The powdered sugar contains cornstarch, and the cream of tartar provides structural support. Beat it until very stiff peaks form. This will hold up much better in the layers than regular whipped cream.
Can this recipe be frozen for long-term storage?
You can freeze this lush, but you must be careful with the thawing process. Wrap the dish in several layers of plastic wrap and foil. It will stay fresh for up to a month. When you’re ready to eat, thaw it slowly in the refrigerator for 24 hours. Do not thaw it on the counter, as condensation will form and ruin the crunch of the pecans and the texture of the base.
Why did my caramel sink into the cake base?
This usually happens if the caramel is added while the base is too “under-baked” or if the caramel sauce is too thin. If the base hasn’t developed a top crust yet, the heavy caramel will simply fall through the dough. Ensure the edges of your base are golden and the center feels set to the touch before adding the caramel-pecan mixture for the second bake.
What is the best way to toast pecans without burning them?
The safest method is the oven method. Spread the pecan halves in a single layer on a baking sheet and bake at 350°F for 5 to 7 minutes. Shake the pan halfway through. Because pecans have a high oil content, they go from “perfect” to “burnt” in about thirty seconds, so stay in the kitchen and use your nose—once they smell fragrant, pull them out immediately.
Cheesecake Lush
Course: DessertCuisine: AmericanDifficulty: medium12
servings25
minutes35
minutes480
kcal60
MinutesThis innovative layered dessert solves the common problem of mushy crusts by using a dense yellow cake base and a double-baked pecan praline layer. Topped with a fluffy cream cheese filling and salted caramel pecans, it stays crisp and delicious even after refrigeration.
Ingredients
For the Base:
1 box (15.25 oz) yellow cake mix
1/2 cup unsalted butter, melted
1 large egg
For the Layers:
16 oz cream cheese, softened
1 cup powdered sugar
1 tsp vanilla extract
2 cups whipped topping (or stabilized whipped cream)
1 1/2 cups high-quality caramel sauce (thick consistency)
3 cups pecan halves, toasted
1/2 tsp sea salt
Directions
- Preheat your oven to 350°F (175°C). Grease a 9×9 inch glass baking dish.
- In a large bowl, combine the dry cake mix, melted butter, and egg. Mix until a thick, dough-like consistency forms. Press this firmly and evenly into the bottom of the prepared dish.
- Bake the base for 15-18 minutes until the edges are just starting to turn golden.
- While the base bakes, toss 1 1/2 cups of the pecans with 1/4 cup of the caramel sauce.
- Remove the dish from the oven. Immediately spread the caramel-coated pecans over the hot base, pressing them down slightly. Return to the oven for 5 minutes. This “double-bake” sets the sugars into a moisture-proof praline barrier. Let the dish cool completely.
- In a medium bowl, beat the softened cream cheese, powdered sugar, and vanilla until smooth and fluffy. Gently fold in the whipped topping.
- Spread the cream cheese mixture in an even layer over the cooled pecan-crust base.
- In a small bowl, toss the remaining 1 1/2 cups of pecans with 1/2 cup of caramel sauce and the sea salt.
- Pour the remaining caramel sauce over the cream layer, allowing some to drizzle down the sides of the glass dish as seen in the image. Top with the salted caramel pecan mixture, spreading it to the very edges.
- Chill for at least 4 hours (preferably overnight). The dense cake base and the baked-in pecan layer will remain perfectly intact against the silky cheesecake filling.
Notes
- The praline-seal technique involves baking caramel-coated pecans directly onto the hot base to create a moisture-proof barrier. For best results, chill for at least 4 hours or overnight to allow the layers to set perfectly.


