
Most wild rice dishes fall into one of two traps: they either turn into a soggy, mushy mess or end up as a thin, watery soup that lacks soul. This Creamy Chicken and Wild Rice Skillet is the antidote to those kitchen fails. By using a specific searing technique and a controlled simmer, you get a dish where every grain of rice remains distinct yet perfectly tender, all held together by a sauce so velvety it feels like a warm hug.
The secret to this success lies in the balance between the rugged texture of the wild rice and the silky cream base. We aren’t just throwing ingredients into a pan and hoping for the best. Instead, we are layering flavors from the bottom up, starting with a golden sear on the chicken and finishing with a gentle reduction that ensures the sauce clings to the rice rather than pooling at the bottom of your bowl.
If you want to avoid the dreaded “watery skillet,” the most important tip is to respect the roux. Cooking the flour with the butter for a full two minutes before adding your liquid creates a stable thickening base. This prevents the heavy cream from breaking and ensures your sauce stays thick and luscious even after a long simmer. Let’s dive into how to make this comfort classic perfectly every single time.
The Anatomy of a Perfect Wild Rice Blend
True wild rice isn’t actually rice at all; it’s the seed of an aquatic grass native to North America. It has a thick, smoky outer husk that requires a significant amount of heat and moisture to “pop” or bloom. If you use 100% wild rice, the dish can feel a bit too chewy and intense. That’s why a wild rice blend is the superior choice for a one-pan meal.
A high-quality blend usually mixes wild rice with long-grain brown or red rice. This combination is essential because the different grains release starches at different rates. While the wild rice provides that signature nutty “snap,” the long-grain rice softens more fully, helping to thicken the surrounding sauce. This creates a complex textural profile that keeps your palate engaged with every bite.
When shopping, look for a blend that lists “long-grain wild rice” as a primary ingredient. Avoid “quick-cook” or parboiled versions for this specific recipe. Those processed grains will disintegrate during the 45-minute simmer, leaving you with a texture closer to porridge than a refined skillet meal. You want grains that can stand up to the heat and maintain their integrity.
Why Texture Matters in One-Pan Meals
The magic of a skillet meal is the contrast between the components. You want the chicken to be tender and juicy, the vegetables to be soft but not pulverized, and the rice to offer a slight resistance when you bite down. If everything has the same soft texture, the dish feels heavy and one-dimensional.
By using wild rice, you introduce a structural element that survives the creamy sauce. It provides a sophisticated “bite” that cuts through the richness of the heavy cream and butter. This sensory experience is what elevates a simple weeknight dinner into something that feels like it came from a high-end bistro.
Essential Components for the Creamy Chicken and Wild Rice Skillet
Quality ingredients are the foundation of this dish. Since we are using a relatively short list of items, each one needs to pull its weight. Start with a low-sodium chicken broth. This is non-negotiable because as the liquid reduces during the long simmer, the salt concentrates. Using a full-sodium broth often results in a dish that is far too salty by the time the rice is tender.
The aromatic base, known as a mirepoix, consists of carrots, celery, and onion. These aren’t just filler; they provide the underlying sweetness and earthy depth that balances the savory chicken. For the dairy, always reach for heavy cream. Milk or half-and-half lacks the fat content necessary to withstand the final simmer without curdling or becoming too thin.
Selecting and Prepping the Chicken Breast
For the best results, use boneless, skinless chicken breasts and cut them into uniform 1-inch pieces. Uniformity is key here because we are only par-cooking the chicken at the start. If the pieces vary in size, the smaller ones will dry out while the larger ones remain undercooked. Aim for bite-sized cubes that will fit perfectly on a spoon with a bit of rice and veg.
Before you start cooking, take the chicken out of the fridge for about 15 minutes to take the chill off. Cold meat hits a hot pan and immediately drops the temperature, which leads to steaming rather than searing. Bringing it closer to room temperature helps you achieve a better Maillard reaction, creating those flavorful brown crusts that define a great skillet dish.
Fresh vs. Dried Herbs: The Thyme Debate
In this recipe, dried thyme is actually your best friend. Dried woody herbs are much more durable than fresh ones and can withstand the long, 45-minute simmering process without losing their flavor profile. Fresh thyme would likely dissipate and become bitter over that length of time.
However, we don’t skip the fresh element entirely. Fresh parsley is reserved for the very end. Adding it as a garnish right before serving provides a necessary hit of brightness and a pop of color. It cuts through the heavy, savory notes of the cream and thyme, refreshing the palate with every mouthful.
The Science of the Roux: Preventing Watery Rice
The most common complaint with rice skillets is a thin, watery consistency. We solve this by creating a “blonde roux.” After sautéing your vegetables, you sprinkle two tablespoons of flour over the butter and aromatics. This flour coats the vegetables and mixes with the fat to create a paste that acts as a powerful thickening agent.
You must cook this flour mixture for exactly two minutes while stirring constantly. This short window is crucial. It’s long enough to cook out the “raw flour” taste but short enough that the flour doesn’t turn dark. A blonde roux has the highest thickening power, ensuring that even after the rice absorbs the broth, the remaining liquid stays creamy and rich.
Phase One: Searing for Maximum Flavor Extraction
The first step is all about building the “fond.” Fond is the French term for those little brown bits that stick to the bottom of the skillet after searing meat. When you melt your first tablespoon of butter and sear the chicken, don’t worry about cooking it through. You just want a deep, golden-brown crust on the outside.
Be careful not to overcrowd the pan. If you put too much chicken in at once, the moisture will release and the meat will boil in its own juices rather than browning. Work in batches if you need to. Those brown bits on the bottom of the cast iron are concentrated flavor bombs that will eventually dissolve into the broth, giving the rice a deep, savory color and taste.
Phase Two: Building the Aromatic Base
Once the chicken is out, the vegetables go in. The onions, carrots, and celery will pick up the leftover fat and fond from the chicken. You are looking for the onions to become translucent and the carrots to soften slightly. This usually takes about 6 to 8 minutes over medium heat.
Timing is everything when it comes to the garlic. Garlic has a high sugar content and burns very easily. If you add it too early, it will turn black and bitter, ruining the entire base of the dish. Add the minced garlic and thyme only in the last minute of sautéing. As soon as you can smell that incredible aroma, it’s time to move on to the flour and broth.
Phase Three: The Low-and-Slow Simmering Technique
This is the most critical phase of the recipe: the “No-Peeking” rule. Once you’ve added the broth and the wild rice blend, bring it to a boil, then drop the heat to low and cover it tightly. A cast-iron skillet with a heavy lid is perfect here because it creates a pressurized environment that forces moisture into the tough wild rice husks.
Every time you lift the lid to check on the rice, you release the steam and drop the internal temperature. This can add 10 to 15 minutes to your cook time and often results in unevenly cooked grains. Trust the process and leave it alone for at least 40 minutes. The rice needs that consistent, gentle heat to fully hydrate and bloom.
Phase Four: Achieving the Velvety Skillet Finish
After the simmer, you’ll notice the rice has absorbed most of the liquid. Now it’s time to transform it into a masterpiece. Stir in the heavy cream and the par-cooked chicken. The chicken will finish cooking in the residual heat, ensuring it stays incredibly moist and tender rather than becoming rubbery.
For a similar, quick one-pan creamy chicken skillet, consider this simple variation.
Simmer the mixture uncovered for the final 5 to 8 minutes. This allows the sauce to reduce slightly and reach what chefs call the “nappe” stage. This means the sauce is thick enough to coat the back of a spoon without immediately running off. This final reduction is what gives the dish its luxurious, professional finish.
Troubleshooting Common Wild Rice Obstacles
If your rice is still crunchy after 45 minutes, don’t panic. This usually happens if the lid wasn’t tight enough or the heat was too low. Simply add a splash more broth, cover it back up, and give it another 5 to 10 minutes. The residual heat in a cast-iron pan is usually enough to finish the job.
On the flip side, if the sauce feels too thick or “gloppy,” you can easily thin it out with a tablespoon or two of warm broth. If the flavor feels a bit flat, it likely needs a touch more salt or a tiny squeeze of lemon juice. Acid is a great way to “wake up” heavy cream-based dishes without changing the actual texture.
Optimal Equipment: The Power of Cast Iron
While you can make this in a standard stainless steel pan, a large cast-iron skillet is the gold standard. Cast iron is famous for its heat retention. Once it gets hot, it stays hot, providing a very even temperature across the entire bottom of the pan. This prevents “hot spots” where the rice might scorch while the edges stay raw.
Furthermore, the wide surface area of a skillet allows for better evaporation during the final reduction phase. It also makes for a beautiful presentation. There is something incredibly rustic and appetizing about serving a bubbling, creamy rice dish directly from a seasoned black skillet in the center of the table.
Flavor Variations and Dairy-Free Adaptations
If you want to add more depth, try adding 8 ounces of sliced cremini mushrooms during the vegetable sauté phase. The earthy flavor of mushrooms is a natural partner for wild rice. You could also swap the chicken for turkey leftovers after a holiday meal for a quick and easy twist.
For those avoiding dairy, you can still enjoy this dish. Substitute the butter with a high-quality olive oil and use full-fat coconut milk or a cashew-based cream instead of heavy cream. While the flavor profile will shift slightly, the starch from the wild rice blend will still help create a satisfyingly thick sauce that mimics the original version.
Strategic Pairings for a Balanced Table
Because this skillet is quite rich and savory, you want side dishes that offer a bit of contrast. A simple arugula salad with a sharp lemon vinaigrette is a perfect choice. The peppery greens and acidic dressing cut right through the creaminess of the rice, refreshing your palate between bites.
Roasted vegetables also work beautifully. Try some balsamic-glazed Brussels sprouts or steamed green beans with a sprinkle of toasted almond slivers. You want something with a bit of crunch or a hit of vinegar to balance the soft, comforting nature of the main course. Avoid heavy, starchy sides like potatoes, as the rice already provides plenty of hearty carbohydrates.
Storage, Reheating, and Meal Prep Standards
This dish makes for excellent leftovers, but you have to be smart about reheating. Wild rice is notorious for continuing to absorb liquid as it sits in the fridge. By the next day, your creamy skillet might look like a solid block. This is completely normal and easily fixed.
When you’re ready to eat, place a portion in a small saucepan or a microwave-safe bowl. Add a tablespoon or two of chicken broth or water before heating. As it warms up, stir gently to incorporate the extra liquid. This will loosen the sauce and restore that velvety, “just-cooked” consistency without drying out the chicken.
Freezing Guidelines for Cream-Based Sauces
You can freeze this dish, but do so with caution. Cream-based sauces have a tendency to “break” or separate when frozen and thawed, which can result in a grainy texture. To minimize this, let the dish cool completely in the refrigerator before moving it to an airtight, freezer-safe container.
When you are ready to use it, thaw it slowly in the refrigerator overnight. Do not try to defrost it quickly in the microwave. Reheat it slowly on the stovetop over low heat, stirring frequently. If the sauce looks a bit separated, whisking in a tiny splash of fresh cream or broth as it warms can usually help emulsify the sauce back together.
Expert Tips for Professional Results
Before you even start cooking, give your wild rice blend a quick rinse in a fine-mesh strainer. This removes any excess dust or debris and can help the grains cook more cleanly. Also, make sure you are using a high-quality sea salt or Kosher salt. The larger grains allow for better control over the seasoning than fine table salt.
Finally, let the skillet rest for about 5 minutes after you turn off the heat. This “resting period” allows the starches in the sauce to settle and thicken slightly more. It also brings the temperature down to a perfect eating level, ensuring you can actually taste the complex layers of thyme, garlic, and toasted rice instead of just heat.
Frequently Asked Questions
How do I store leftovers and does this freeze well?
Store leftovers in an airtight container in the refrigerator for up to 3 to 4 days. While you can freeze this dish for up to 2 months, be aware that the cream sauce may separate slightly upon thawing. To fix this, reheat slowly on the stovetop and stir in a splash of fresh broth or cream to bring the emulsion back together. Do not freeze if the rice was already very soft, as it may become mushy after thawing.
Why is my wild rice still crunchy after the recommended cook time?
Crunchy rice usually happens if the steam escaped during the simmering process. This occurs if the lid isn’t tight-fitting or if you lifted the lid to check on it. To fix it, add 1/4 cup of chicken broth, cover tightly, and simmer for an additional 10 minutes. The heavy husks of wild rice require consistent, trapped steam to fully soften and “bloom.”
Can I use white rice instead of a wild rice blend?
You can, but you will need to significantly adjust the cook time and liquid. White rice only takes about 15 to 20 minutes to cook and absorbs less liquid. If you use white rice with this specific 45-minute method, it will turn into a paste. For the best results and the intended texture of this dish, stick with a wild rice blend that includes long-grain rice.
What can I use if I don’t have heavy cream?
If you don’t have heavy cream, the best substitute is a “cheat” half-and-half made by mixing milk with a little melted butter. However, avoid using plain skim or 1% milk, as the sauce will be very thin and prone to curdling. For a dairy-free option, full-fat canned coconut milk is the best substitute due to its high fat content and creamy thickness.
My sauce is too thin; how can I thicken it at the end?
If the sauce is still too thin after the final simmer, you can let it cook uncovered for a few extra minutes to allow more moisture to evaporate. Alternatively, mix 1 teaspoon of cornstarch with 1 tablespoon of cold water to create a slurry. Stir this into the bubbling skillet and cook for 1 minute; it will thicken the sauce instantly without changing the flavor.
Is it necessary to use a cast-iron skillet?
While not strictly mandatory, a cast-iron skillet is highly recommended because of its superior heat retention. It provides a very even heat that prevents the rice at the bottom from burning while the rice on top stays undercooked. If you use a thin stainless steel or aluminum pan, you must keep the heat very low and ensure your lid fits as tightly as possible to prevent moisture loss.

Chicken and Wild Rice
Course: Main CourseCuisine: AmericanDifficulty: medium6
servings15
minutes55
minutes410
kcal70
MinutesThis comfort meal features seared chicken breasts and a hearty wild rice blend cooked in a savory vegetable base. By using a roux and heavy cream, the dish achieves a rich consistency where every grain of rice is perfectly tender and coated in a flavorful sauce.
Ingredients
1.5 lbs boneless skinless chicken breasts, cut into 1-inch bite-sized pieces
1 cup uncooked wild rice blend (ensure it contains long-grain wild rice)
1 cup carrots, diced
1 cup celery, diced
1 medium yellow onion, finely chopped
3 cloves garlic, minced
3 tablespoons butter, divided
2 tablespoons all-purpose flour
3 ½ cups low sodium chicken broth
1 cup heavy cream
1 teaspoon dried thyme
1 teaspoon salt
1/2 teaspoon black pepper
Fresh parsley for garnish
Directions
- Melt 1 tablespoon of butter in a large cast-iron skillet over medium-high heat. Add the chicken pieces, seasoned with a pinch of salt and pepper. Sear until golden brown on all sides (about 5-6 minutes). The chicken does not need to be cooked through yet. Remove chicken from the skillet and set aside.
- In the same skillet, melt the remaining 2 tablespoons of butter. Add the onions, carrots, and celery. Sauté for 6 to 8 minutes until the vegetables are softened and the onions are translucent.
- Stir in the garlic and dried thyme, cooking for 1 minute until fragrant.
- Sprinkle the flour over the vegetables and stir constantly for 2 minutes. This creates a roux base that prevents the final dish from being watery.
- Slowly pour in the chicken broth while whisking or stirring constantly to incorporate the flour without lumps.
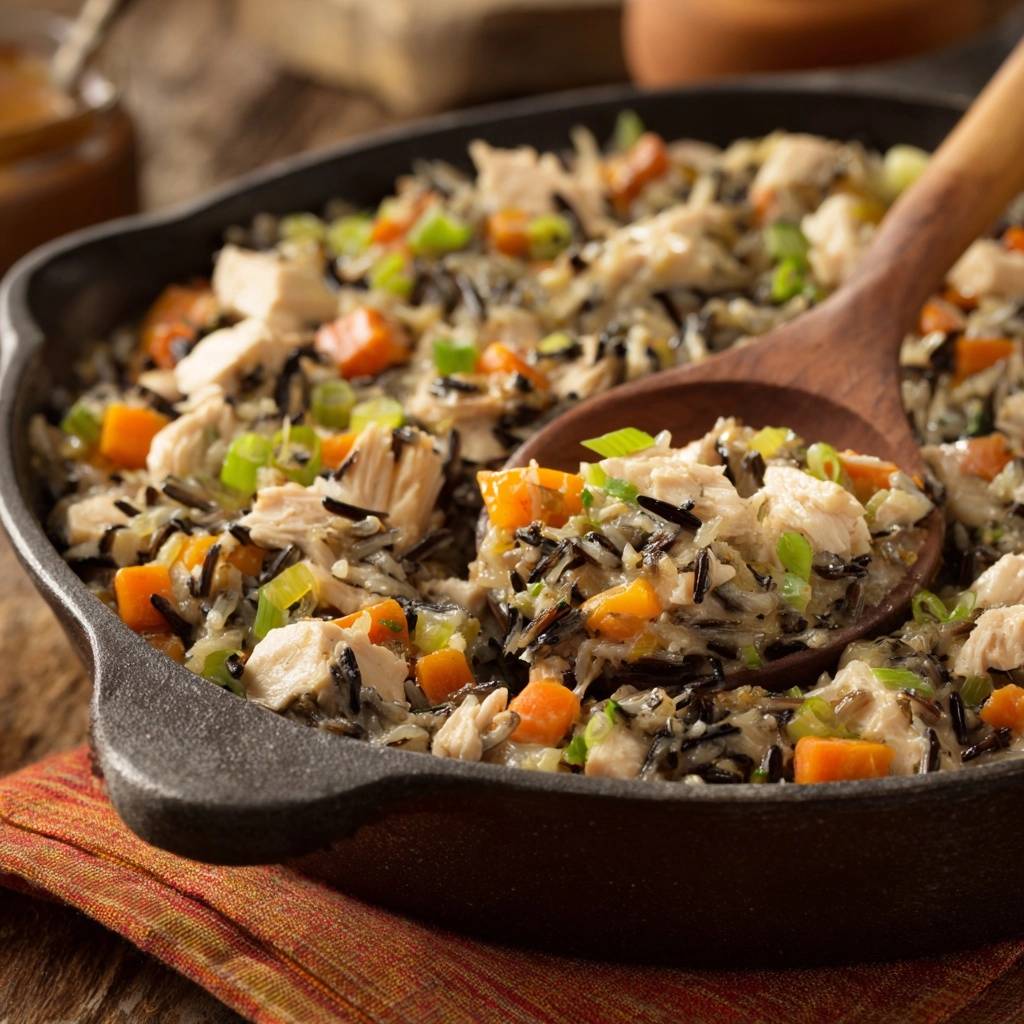
- Add the uncooked wild rice blend to the skillet. Bring the mixture to a boil, then immediately reduce the heat to low. Cover tightly with a lid or heavy foil.
- Simmer for 40-45 minutes. Do not lift the lid; the steam is essential to hydrate the tough outer husks of the wild rice.
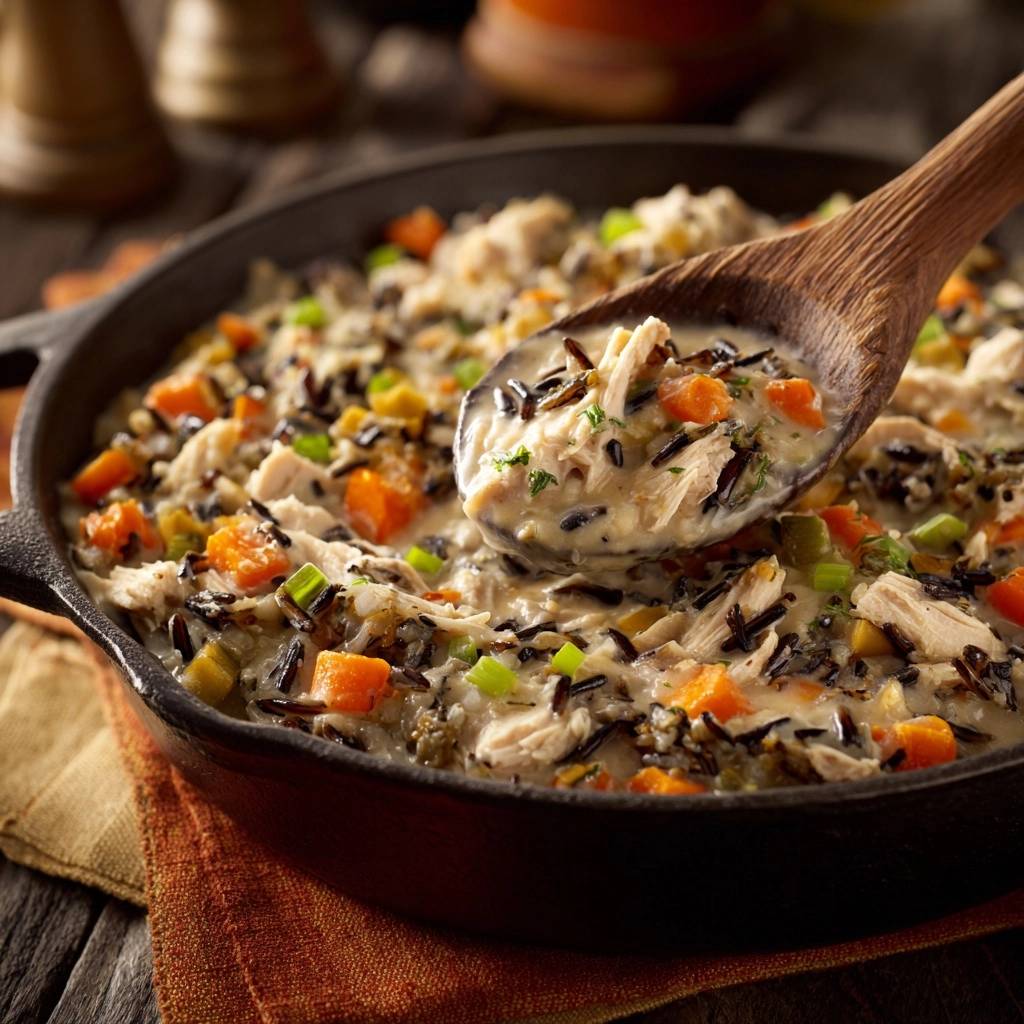
- Remove the lid. Most of the liquid should be absorbed, but a thick base should remain. Stir in the seared chicken and the heavy cream.
- Simmer uncovered for an additional 5-8 minutes. This allows the chicken to finish cooking through and the sauce to reduce into a thick, velvety consistency that coats the spoon.
- Season with additional salt and pepper to taste. Garnish generously with fresh parsley and serve directly from the skillet.
Notes
- Ensure you use a true wild rice blend for the best texture. Do not lift the lid during the initial 40 to 45 minute simmer to ensure the rice hydrates properly.


