
Few things in the culinary world offer the same soul-warming embrace as a Golden Lattice Chicken Pot Pie. It’s the ultimate comfort food, promising a blend of creamy filling and buttery pastry that should shatter with every forkful. However, many home cooks struggle with the dreaded “soggy bottom,” where the base of the pie turns into a gummy, unappetizing mess under the weight of the gravy.
This recipe tackles that structural integrity issue head-on with a specialized technique designed to keep your crust crisp. By focusing on moisture control and thermal management, we ensure the pastry remains flakey from the center to the crimped edges. You’ll finally achieve that bakery-standard finish without needing a professional kitchen or years of pastry school experience.
For a foolproof base that holds up beautifully, check out this chicken pot pie crust.
The secret to this success lies in the temperature-searing method for the bottom crust. Most recipes ask you to pour hot filling into a cold pan and hope for the best, but we’re going to use a preheated baking sheet to shock the dough into submission. This immediate blast of heat sets the pastry before the filling has any chance to soak in, creating a permanent barrier against sogginess.
The Physics of a Crisp Bottom Crust
Achieving a crisp bottom crust isn’t about luck; it’s about understanding heat transfer. When you place a room-temperature pie plate into a standard oven, the glass or ceramic takes several minutes to heat up. During those crucial first minutes, the raw dough sits in contact with the wet filling, absorbing moisture like a sponge.
To fix this, you must place a heavy-duty baking sheet on the lowest oven rack while the oven preheats to 425 degrees F. This creates a massive heat reservoir. When you slide your pie plate directly onto that scorching metal, the thermal shock causes the fats in the bottom crust to expand and the proteins to set instantly. This creates a waterproof seal that protects the integrity of the pastry.
Furthermore, using the lowest rack position ensures the heating element is as close to the bottom of the pie as possible. This concentrated heat source drives off any residual moisture in the dough. Therefore, the bottom of your pie will be just as golden and structural as the beautiful lattice on top.
Essential Components for the Filling and Pastry
The quality of your Golden Lattice Chicken Pot Pie depends heavily on the viscosity of your sauce. We use a combination of high-quality chicken broth and heavy cream to create a rich, velvety base. While milk might seem like a lighter choice, the 36% fat content in heavy cream is vital because it creates a thicker emulsion that resists thinning out in the oven.
Texture is just as important as flavor, which is why we parboil the carrots for five minutes before they ever touch the pie. Carrots take much longer to soften than peas or corn. If you skip this step, you’ll likely end up with crunchy orange bits in an otherwise tender pie, which disrupts the sensory experience of the dish.
For the pastry, refrigerated pie crusts are a fantastic time-saver, but they need to be handled correctly. Keep them in the fridge until the very moment you are ready to assemble. Cold fat is the key to a flakey crust; if the dough gets too warm before it hits the oven, the layers will merge and become tough rather than light and airy.
Selecting the Right Poultry and Produce
When it comes to the chicken, you have options, but consistency is key. Shredded cooked chicken breast provides a clean, lean protein that absorbs the flavors of the thyme and cream. You can use a store-bought rotisserie chicken to save time, but ensure you remove the skin to keep the filling from becoming overly greasy.
Frozen peas and corn are actually superior to fresh in this specific application. They are flash-frozen at peak ripeness and hold their shape beautifully during the 45-minute bake. Do not thaw them before adding them to the roux; adding them frozen helps cool the filling down faster, which is a crucial step in protecting your bottom crust.
The Role of Fats: Butter and Cream
We use unsalted butter for the roux because it allows you to control the sodium levels of the dish precisely. Different brands of salted butter vary wildly in salt content, which can make your gravy unpredictable. By starting with unsalted butter, the half-teaspoon of salt in the recipe provides the perfect, balanced seasoning.
The heavy cream acts as more than just a flavor enhancer; it is a structural component. The fats in the cream bind with the flour in the roux to create a high-viscosity sauce. This thickness is your “Anti-Soggy” insurance policy, as a thicker sauce is less likely to migrate into the pores of the bottom pastry during the baking process.
Building a High-Viscosity Roux and Sauce
The foundation of a great pot pie is the roux. Start by melting your butter over medium heat and whisking in the flour. You need to cook this mixture for at least 2 to 3 minutes. You’re looking for a bubbling consistency and a slightly nutty aroma, often called a blond roux or Beurre Noisette stage.
Cooking the flour for this duration is vital because it neutralizes the raw starch taste. If you rush this, your filling will have a pasty, floury mouthfeel. Once the roux is ready, begin adding your chicken broth very slowly. Start with just a splash, whisking until a thick paste forms, then gradually add the rest of the liquid.
This gradual whisking technique prevents lumps from forming and ensures a perfectly smooth sauce. Once the broth and cream are in, simmer the mixture until it is thick enough to coat the back of a spoon heavily. Remember, the filling will loosen slightly in the oven as the vegetables release their juices, so starting with a thick sauce is essential.
The Moisture Barrier: Prepping the Bottom Crust
Even with a thick sauce and a hot baking sheet, we want an extra layer of protection. This is where the “Egg White Shield” comes into play. Before adding your filling, lightly brush the bottom and sides of the raw crust with a thin layer of beaten egg white. The proteins in the egg white coagulate quickly in the heat, forming a waterproof film.
Another common mistake is pouring a boiling-hot filling directly into a raw crust. This immediate heat melts the fats in the dough before it can bake, leading to a greasy, collapsed base. Therefore, you must let your filling cool for at least 10 minutes after mixing in the chicken and vegetables.
By the time the filling hits the crust, it should be warm, not steaming. This patience pays off when you slice into the pie later. You’ll notice the bottom crust has maintained its shape and texture, providing a sturdy foundation for the creamy interior. It’s a small step that makes a massive difference in the final result.
Engineering the Perfect Golden Lattice Top
A lattice top isn’t just for aesthetics; it’s a functional design choice. By weaving 1.5-inch wide strips of dough, you create natural vents that allow steam to escape freely. In a solid-top pie, steam often gets trapped, which can thin out your sauce and make the underside of the top crust gummy.
For a different take on chicken and vegetables, explore hearty chicken vegetable soup.
To weave the lattice, lay half of your strips vertically across the pie. Fold back every other strip and lay a horizontal strip across, then unfold the vertical ones. Repeat this “over-under” pattern until the pie is covered. It looks impressive, but it’s actually quite simple once you get into a rhythm.
For an even more perfect flaky pastry, explore this golden crust chicken pot pie recipe.
Make sure to crimp the edges of the lattice firmly to the bottom crust. This creates a tight seal that prevents the filling from bubbling over the sides and burning on your baking sheet. The wide gaps in the lattice also give you a window into the pie, so you can see exactly when the filling has reached that perfect, bubbling consistency.
The Baking Process: Heat Management and Timing
With your oven set to 425 degrees F, the baking process is relatively fast. Place the pie plate directly onto the preheated baking sheet. You should hear a slight sizzle when they touch; that’s the sound of your bottom crust starting to crisp. This high-heat environment is necessary to puff the pastry layers quickly.
Keep a close eye on the pie after the 25-minute mark. You are looking for a deep, mahogany golden brown on the lattice. If the edges start to darken too quickly while the center is still pale, you can loosely tent the edges with a ring of aluminum foil to protect them from the direct heat.
The egg wash—a simple mix of egg and water—is what provides that professional, glossy sheen. Without it, the crust will look dull and matte. When the filling is vigorously bubbling through the gaps in the lattice and the crust is deeply browned, your Golden Lattice Chicken Pot Pie is ready to come out.
Troubleshooting Common Pot Pie Failures
If your filling ends up too runny, it usually means the sauce wasn’t reduced enough in the saucepan or the vegetables weren’t drained well. Next time, ensure the sauce is velvety and thick before adding the chicken. If the crust is pale, check your oven temperature with a thermometer; many home ovens run 25 degrees cooler than the dial suggests.
Filling overflow is another common headache. This usually happens if the lattice strips are woven too tightly or if the edges weren’t crimped securely. Leave about a half-inch of space between your strips to give the steam plenty of room to vent. This keeps the pressure inside the pie stable and prevents “blowouts” at the seams.
Finally, if your vegetables are crunchy, it’s almost always the carrots. Because they are a dense root vegetable, they simply cannot cook through in the time it takes to bake the pastry. Always give them that five-minute head start in boiling water. This ensures every bite of the pie is tender and uniform in texture.
Make-Ahead Strategies and Storage Logistics
You can easily prep this pie up to 24 hours in advance. Assemble the filling and store it in an airtight container in the fridge. However, do not assemble the full pie until you are ready to bake. If the raw dough sits in contact with the filling overnight, even our “Egg White Shield” will eventually fail, and the crust will soften.
Freezing a fully assembled raw pie is possible, but for the best results, I recommend freezing the filling separately. If you must freeze the whole pie, bake it from frozen and add about 15 to 20 minutes to the cooking time. Note that the texture of the peas and corn may change slightly after freezing, becoming a bit softer.
To reheat leftovers, avoid the microwave if you want to keep the crust crisp. Instead, place a slice in a 350-degree F oven for about 10 to 15 minutes. This recrisps the pastry and warms the center evenly. If you use a microwave, the crust will inevitably become soft, though the flavor will still be delicious.
Side Dishes to Balance the Richness
Since this pot pie is incredibly rich with butter and heavy cream, you want to pair it with something bright and acidic. A simple arugula salad with a lemon vinaigrette is the perfect companion. The peppery bite of the greens and the sharp citrus of the dressing cut right through the heaviness of the gravy.
What to Try Next?
Round out your meal with these complementary dishes.
- For a refreshing contrast to your chicken pot pie, try this Grilled Chicken Pasta Salad which uses similar fresh ingredients.
- Pair your pot pie with the satisfying texture of this Golden Skillet Cornbread, a classic accompaniment.
Roasted balsamic Brussels sprouts are another excellent choice. The slight bitterness of the sprouts and the sweet acidity of the balsamic glaze provide a sophisticated contrast to the savory chicken. Avoid serving heavy starches like mashed potatoes or bread, as the pie already provides plenty of hearty carbohydrates through the crust and filling.
The Importance of the 15-Minute Rest
The hardest part of this recipe is waiting to eat once the pie comes out of the oven. However, the 15-minute rest is non-negotiable. During this time, “carryover cooking” continues to happen. More importantly, the starch molecules in the thickened sauce finish hydrating as the temperature drops slightly.
If you cut into the pie immediately, the filling will be too fluid and will run all over the plate, leaving the crust behind. By waiting, the sauce sets into a creamy, cohesive consistency that stays put. This ensures that every slice comes out clean and beautiful, with the bottom crust perfectly intact and supporting the weight of the delicious filling.
How do I store leftovers?
Store any leftover pie in an airtight container in the refrigerator for up to 3 days. To maintain the best texture, avoid stacking slices on top of each other, which can crush the lattice. When you’re ready to eat, reheating in the oven is the best way to revive the flakey crust.
Why is my pot pie filling so runny?
A runny filling usually happens if the roux wasn’t cooked long enough or if too much liquid was added. Ensure your sauce is very thick—almost like a heavy pudding—before you add the chicken and vegetables. Also, remember that the 15-minute resting period after baking is essential for the sauce to thicken up as it cools.
Can I use a different type of meat?
Absolutely! While chicken is the classic choice, you can easily substitute it with leftover roast turkey or even hearty chunks of pot roast. If you use beef, consider swapping the chicken broth for beef broth and adding a teaspoon of Worcestershire sauce to the filling to match the deeper flavor of the meat.
What if I don’t have heavy cream?
If you don’t have heavy cream, you can use whole milk, but you will need to increase the flour in your roux by about one tablespoon to compensate for the lower fat content. The filling won’t be quite as rich or “glossy,” but it will still be delicious. Avoid using skim or 1% milk, as the sauce may break or become watery.
How do I prevent the edges of the crust from burning?
Because this pie bakes at a high temperature of 425 degrees F, the thin edges can sometimes brown faster than the center. If you notice the edges getting too dark after 20 minutes, simply wrap a strip of aluminum foil around the perimeter of the pie. This shields the edges while allowing the lattice top to continue browning.
Can I make this recipe gluten-free?
Yes, you can make a gluten-free version by using a 1-to-1 gluten-free flour blend for the roux and a gluten-free refrigerated or homemade pie crust. Since gluten-free pastry can be more fragile, you might find it easier to do a solid top with several large steam vents instead of a complex lattice weave.
Chicken Pot Pie
Course: Main CourseCuisine: AmericanDifficulty: medium6
servings25
minutes45
minutes510
kcal70
MinutesThis recipe solves the common problem of soggy pot pie bottoms by using a preheated baking sheet and a moisture barrier. It features a rich, velvety filling of chicken and vegetables encased in a perfectly browned, crispy pastry.
Ingredients
2 refrigerated pie crusts (top and bottom)
3 cups shredded cooked chicken breast
1 cup diced carrots (parboiled for 5 minutes)
1 cup frozen peas
1 cup sweet corn kernels
1/3 cup unsalted butter
1/3 cup all-purpose flour
1/2 teaspoon salt
1/4 teaspoon black pepper
1/4 teaspoon dried thyme
1 1/2 cups heavy chicken broth
1/2 cup heavy cream (for visual richness and thickness)
1 egg + 1 tablespoon water (for egg wash)
Directions
- Preheat your oven to 425 degrees F. Place a heavy baking sheet inside the oven on the lowest rack while it heats. This preheated sheet provides immediate bottom-up heat to set the crust.
- In a large saucepan, melt the butter over medium heat. Whisk in the flour, salt, pepper, and thyme. Cook for 2-3 minutes until the roux is bubbling and smells slightly nutty.
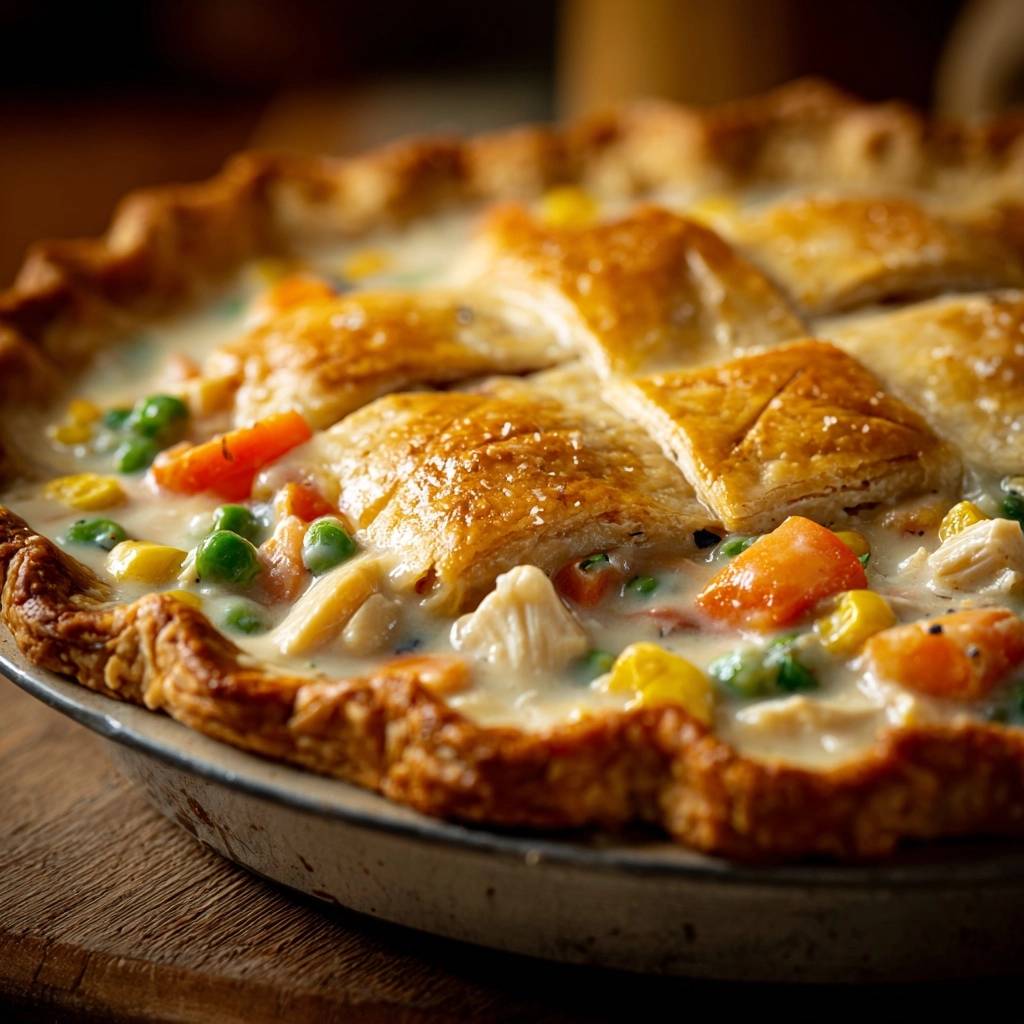
- Gradually whisk in the chicken broth and heavy cream. Simmer, stirring constantly, until the sauce is very thick and velvety. This high viscosity prevents excess moisture from seeping into the crust.
- Stir in the shredded chicken, parboiled carrots, frozen peas, and corn. Remove from heat and let the filling cool for 10 minutes (pouring boiling filling into a raw crust is the primary cause of sogginess).
- Place the bottom crust into a 9-inch pie plate. To further prevent sogginess, lightly brush the bottom and sides of the raw crust with a thin layer of beaten egg white to create a moisture barrier.
- Pour the slightly cooled, thickened filling into the crust.
- Cut the second crust into 1.5-inch wide strips. Weave a wide lattice pattern over the top, leaving space for steam to escape. Crimp the edges firmly to the bottom crust to seal.
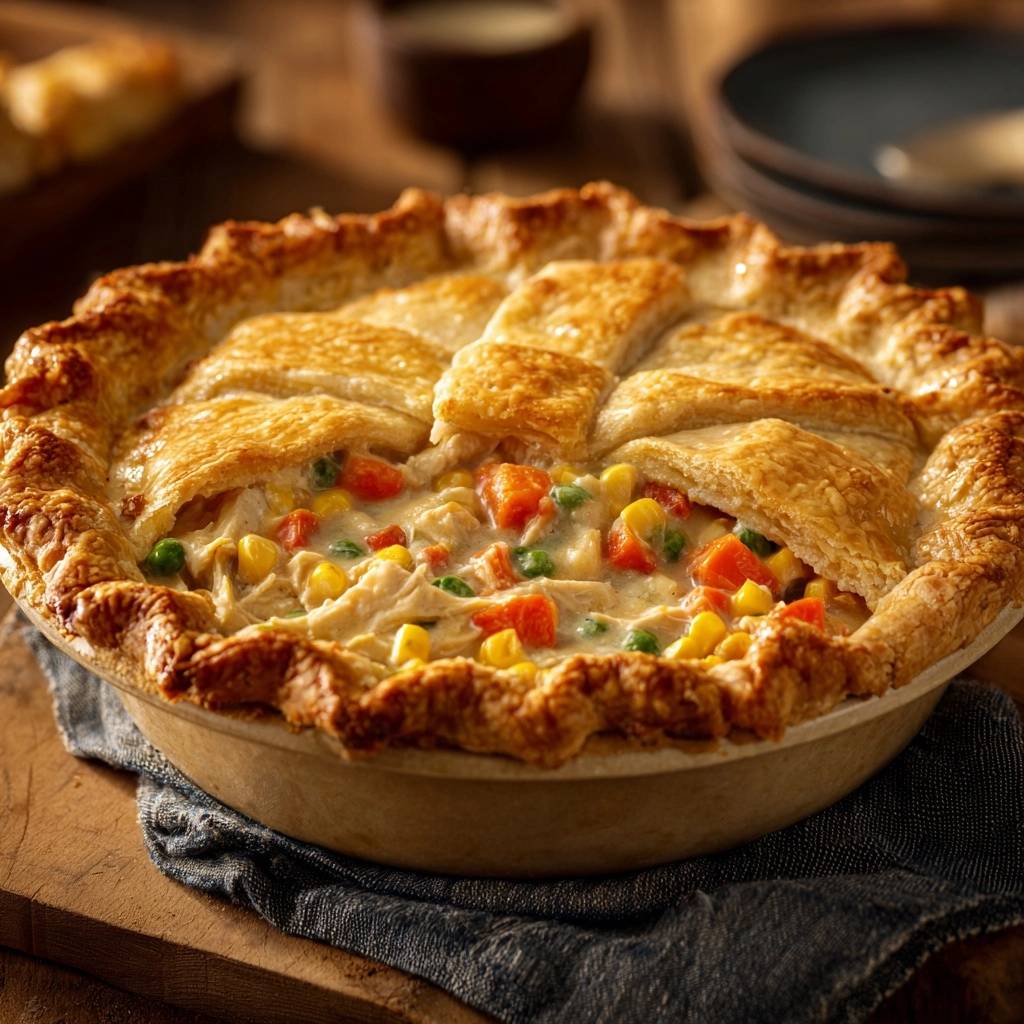
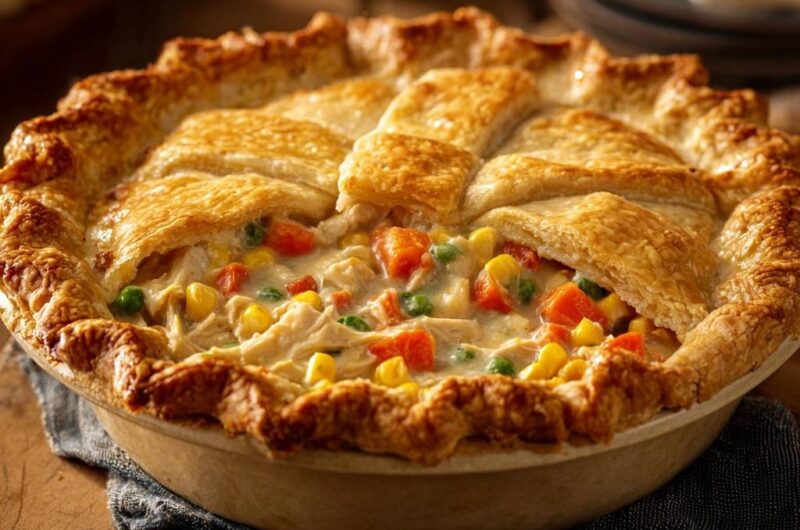
- Brush the lattice and the crimped edges generously with the egg wash. This ensures the deep golden, glossy finish seen in the image.
- Carefully place the pie plate directly onto the preheated baking sheet in the oven.
- Bake for 30 to 35 minutes until the crust is deep golden brown and the filling is bubbling through the lattice gaps.
- Let the pie rest for at least 15 minutes before slicing. This allows the sauce to set into the creamy consistency shown, keeping the bottom crust perfectly intact.
Notes
- To ensure the best results, do not skip the 10-minute cooling period for the filling or the egg white moisture barrier on the bottom crust. Resting the pie for 15 minutes after baking is essential for the sauce to set.


