
Most homemade whipped dips start out looking beautiful but quickly turn into a runny, weeping mess after sitting on the table for an hour. You’ve likely seen it happen: the vegetables release their juices, the cheese loses its structure, and suddenly your elegant appetizer looks like a watery soup. This recipe solves that frustration by focusing on a professional moisture-control technique that ensures your dip stays thick, velvety, and perfectly scoopable from the first bite to the last.
The secret lies in the contrast between the cold, aerated cheese base and the warm, charred peppers piled on top. By treating the vegetables as a separate, dehydrated component rather than just tossing them in raw, you preserve the integrity of the emulsion. This creates a restaurant-quality texture that feels incredibly indulgent and sophisticated.
I’ve found that the real trick to a dip that doesn’t separate is the “triple-press” method with the peppers. Even if you think they’re dry, pressing them firmly between paper towels removes the hidden moisture that usually breaks the cheese emulsion. Once you master this one simple step, you’ll never go back to basic, thin dips again.
The Science of Emulsifying Feta and Cream Cheese
Creating a dip that feels like a cloud requires more than just mixing; it requires aeration. When you process high-protein Greek yogurt with the dense fats of cream cheese, you’re essentially building a structural matrix. The food processor incorporates tiny air bubbles into the mixture, transforming it from a heavy paste into a light, mousse-like consistency.
Using full-fat ingredients is absolutely non-negotiable for this structural integrity. The fat molecules coat the air bubbles, preventing them from collapsing under the weight of the feta. If you use low-fat or fat-free versions, the dip will lack the necessary “grip” to hold its shape, resulting in a flat, lackluster texture that slides right off your chip.
Why Temperature Matters for Aeration
For the smoothest possible base, you need to play with temperatures. Your cream cheese must be completely softened to room temperature so it can whip into a silky volume without leaving lumps. However, keeping the feta cold is a clever trick that helps it break down into microscopic, salty beads rather than melting into a liquid state during the friction of the blades.

This temperature differential ensures that the feta provides a subtle “bite” and tang throughout the dip. If both cheeses are too warm, the mixture can become overly greasy. By starting with cold feta, you maintain that signature briny flavor while achieving a professional, aerated finish.
Essential Components for Roasted Pepper Whipped Feta Dip
Quality is everything when the ingredient list is this focused. I highly recommend seeking out a high-quality sheep’s milk feta stored in brine. It offers a much creamier, tangier profile than the dry, crumbly cow’s milk versions found in plastic tubs. The sheep’s milk fat melts on the tongue, providing a luxurious mouthfeel that defines a great whipped dip.
Smoked paprika serves as the essential flavor bridge in this dish. It connects the charred, earthy notes of the sautéed peppers with the sharp, salty profile of the cheese. Without it, the dip tastes good; with it, the dip tastes complex and deeply savory.
Selecting the Right Greek Yogurt
When you’re at the grocery store, reach for the 5% or 10% fat Greek yogurt. The higher fat content isn’t just about flavor; it provides the thickness needed to support the heavy peppers. Additionally, the natural acidity in Greek yogurt acts as a brightener, cutting through the richness of the cream cheese and resetting your palate after every bite.
Fresh vs. Jarred Peppers: The Moisture Debate
While jarred roasted red peppers are convenient, they are often the primary culprit behind a watery dip. They sit in brine for months, soaking up liquid like a sponge. Even if you pat them dry, the salt in the feta will eventually draw that internal moisture out through osmosis, thinning your dip over time. Using fresh peppers that you sauté yourself gives you total control over the water content.
Step-by-Step: Achieving the Perfect Dip Consistency
Achieving the perfect consistency is a three-phase process that focuses on texture and stability. You’ll start by transforming the raw peppers into concentrated flavor bombs. When you toss them into the pan with olive oil, you’re looking for them to soften and develop dark, charred edges. This charring adds a smoky depth that raw peppers simply can’t provide.
Once the peppers are cooked, the most important technical step begins. You must press them. Even after sautéing, peppers hold onto steam and oil. By firmly pressing them between layers of paper towels, you ensure that only the flavor and the flesh of the pepper make it into the bowl, not the liquid. This keeps the cheese base thick and stable for hours on a party platter.
When it comes to the cheese base, patience is your friend. Let the food processor run for a full 2 to 3 minutes. You’ll see the mixture change from a chunky, curd-like state to a glossy, smooth ribbon. This is the sign that the fats have fully emulsified and the air has been properly incorporated. Only then should you add your inclusions like the green chiles and cilantro.
If you appreciate the smooth texture here, you’ll also enjoy the silky smooth hummus.
Phase 1: Sautéing for Flavor and Dehydration
Sautéing the diced red and orange peppers over medium-high heat is actually a reduction technique. As the peppers sizzle, their natural sugars caramelize, and their water content evaporates. You want to see those little blackened spots on the skin; that’s where the “roasted” flavor comes from. Be careful not to crowd the pan, or the peppers will steam rather than sear.
Phase 2: The Triple-Press Moisture Removal
After the peppers come out of the pan, lay them out on a thick stack of paper towels. Don’t just let them sit there; use another towel to press down firmly. You might be surprised at how much moisture comes out. Repeat this until the towels come away mostly dry. This step is the difference between a dip that stays thick and one that separates by the time your guests arrive.
Phase 3: High-Speed Processing and Folding
Once your base is aerated and smooth, switch to the “pulse” setting for the green chiles. If you over-process the chiles, their juice will turn the entire dip a muddy, unappealing grey-green color. You want distinct green flecks visible in the white cheese. This creates a beautiful visual contrast and ensures every bite has a different burst of flavor.
Troubleshooting Common Whipped Feta Issues
If your dip feels grainy, it’s usually because the feta was too dry or you didn’t process it long enough. You can often fix this by adding a single teaspoon of warm olive oil while the processor is running; the warmth helps the fats bind together. If the dip looks like it’s breaking or “curdling,” it might be a temperature shock. Let it sit for five minutes at room temperature, then give it a quick whisk by hand to bring it back together.
Flavor Variations and Regional Swaps
Once you’ve mastered the base, you can experiment with different flavor profiles. For a Mediterranean twist, swap the green chiles for chopped sun-dried tomatoes and fresh oregano. If you love heat, replace the mild chiles with a roasted habanero or jalapeño. Just remember the golden rule: whatever you add must be thoroughly dried or sautéed first to maintain that low-moisture environment.
For a different flavor profile, consider trying this creamy dill pickle dip.
Optimal Pairings for Roasted Pepper Whipped Feta Dip
Because this dip is exceptionally thick and rich, you need a “dipper” with some structural integrity. A flimsy potato chip will snap instantly. Instead, opt for thick-cut, kettle-style tortilla chips or toasted sourdough points. The crunch of a sturdy chip provides a necessary textural contrast to the silky, whipped cheese.
For a fresher approach, chilled Persian cucumbers or thick slices of bell pepper work beautifully. The cool, crisp water content of the raw vegetables balances the salty richness of the feta. Warm, fluffy pita bread is also a classic choice, especially if you use it to scoop up the warm peppers from the center of the bowl.
The Role of Acid: Serving with Salsa
Serving this dip alongside a chunky, acidic salsa isn’t just a suggestion; it’s a flavor strategy. The vinegar and lime juice in the salsa act as a palate cleanser. After a few bites of the fatty, creamy cheese, the bright acidity of the salsa resets your taste buds, making the next bite of feta taste just as vibrant as the first.
Round Out Your Meal
Looking for something to complement your roasted pepper dip? Consider these options.
- For a hearty and flavorful meal, try this Loaded Taco Salad Bowl, featuring well-seasoned beef that pairs wonderfully with the bright flavors of the dip.
- If you’re in the mood for something warm and comforting, this Easy One-Pot Chicken Tortilla Soup offers a savory depth that balances the creamy feta.
Make-Ahead Strategies and Storage Logistics
You can easily prep this dip 24 hours in advance, but I recommend storing the whipped cheese base and the sautéed peppers in separate airtight containers. This prevents the peppers from bleeding color into the white cheese overnight. When you’re ready to serve, just give the cheese a quick stir to loosen it up, then assemble the toppings fresh.
Whatever you do, do not freeze this dip. The freezing process causes the water in the cheese and yogurt to form ice crystals, which rupture the cell walls of the dairy. When it thaws, the dip will be grainy, watery, and completely lose its aerated “fluff.” It’s best enjoyed fresh or kept in the fridge for up to three days.
Expert Tips for Professional Presentation
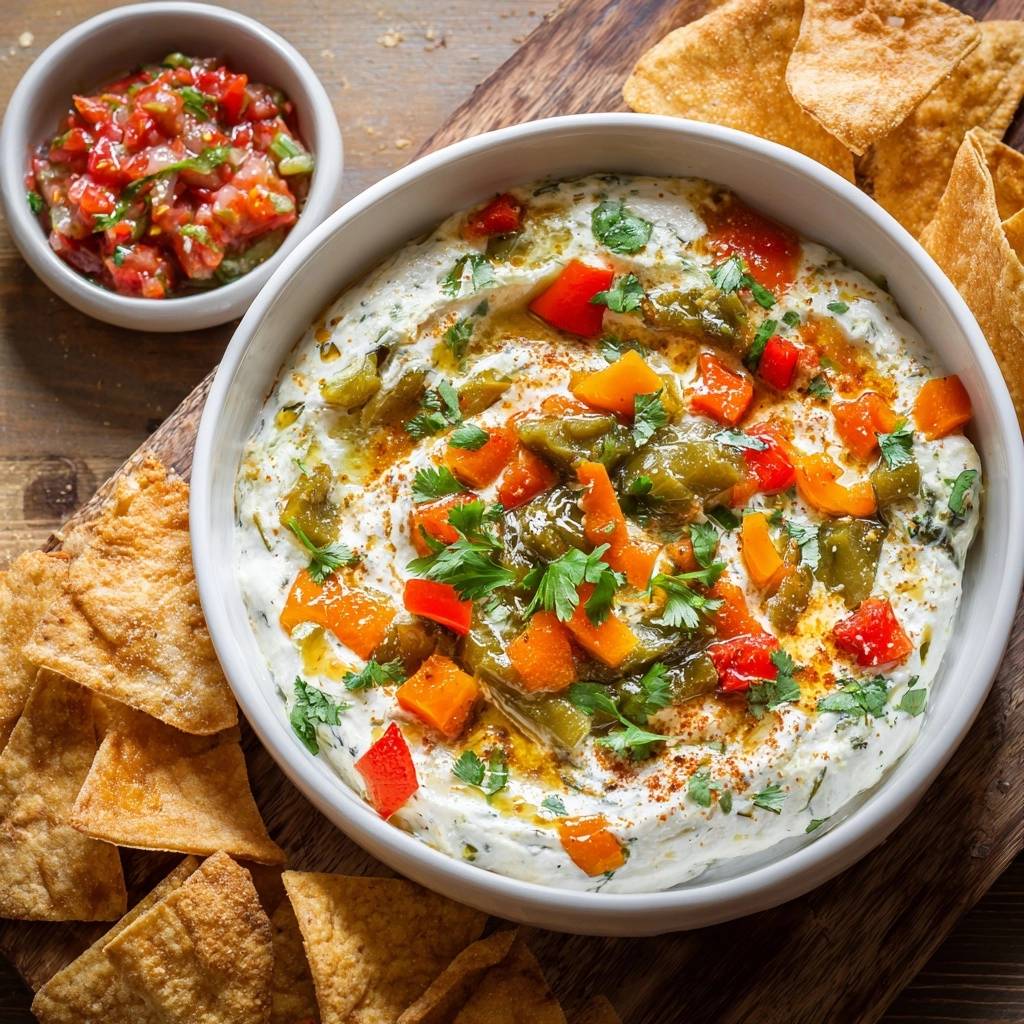
To get that high-end restaurant look, use the back of a large spoon to create a deep “swoosh” or well in the center of the whipped cheese. Don’t just spread it flat! Piling the colorful peppers into that well creates a stunning visual centerpiece. Finally, the drizzle of olive oil on top isn’t just for show; it acts as a light sealant that prevents the surface of the cheese from drying out while it sits on the table.
Frequently Asked Questions
How long can this dip sit out at a party?
Because of the high fat content and the moisture-control steps, this dip can safely sit out for about two hours. If your home is particularly warm, you might want to set the serving bowl inside a larger bowl filled with ice to keep the dairy base chilled and firm.
Why is my whipped feta grainy instead of smooth?
Graininess usually happens if the feta is very dry or if the cream cheese wasn’t soft enough before blending. To fix it, keep the food processor running for an extra minute or two. If it’s still grainy, add a tiny splash of Greek yogurt or a teaspoon of olive oil to help the solids emulsify into the liquid fats.
Can I use a blender instead of a food processor?
You can use a high-powered blender, but you’ll need to stop and scrape the sides down frequently. A food processor is generally better for this recipe because the wide blades are more efficient at aerating thick mixtures without needing extra liquid to keep things moving.
What is the best substitute for Greek yogurt?
If you don’t have Greek yogurt, full-fat sour cream is the best substitute. It has a similar tang and fat content. Avoid regular yogurt, as it is much thinner and will likely cause the dip to become runny, defeating the purpose of the moisture-control techniques.
Can I use jarred roasted peppers if I’m in a rush?
Yes, but you must be extremely diligent. Rinse the jarred peppers to remove the brine, then pat them dry. Sauté them in a dry pan for 2-3 minutes to cook off the internal moisture, then use the paper towel pressing method. This extra effort will prevent the jarred peppers from ruining the dip’s texture.

Roasted Pepper Whipped Feta
Course: AppetizerCuisine: Mediterranean FusionDifficulty: easy6
servings15
minutes10
minutes210
kcal25
MinutesA restaurant-quality whipped feta dip featuring sautéed bell peppers and mild green chiles. This recipe uses a specific moisture-control technique to ensure a velvety, thick texture that stays perfect for hours.
Ingredients
8 ounces high-quality feta cheese, crumbled
1/2 cup Greek yogurt, full fat
1 block (8 ounces) cream cheese, softened
1 red bell pepper, diced
1 orange bell pepper, diced
1 cup canned mild green chiles, drained and roughly chopped
2 tablespoons olive oil
1 teaspoon smoked paprika
1/4 cup fresh cilantro, chopped
1/2 teaspoon garlic powder
Tortilla chips and fresh salsa for serving
Directions
- The most critical step to prevent a watery dip is preparing the peppers. Sauté the diced red and orange peppers in a pan with one tablespoon of olive oil over medium-high heat for 5 to 7 minutes until softened and slightly charred.
- Place the cooked peppers and the drained green chiles on a layer of paper towels. Press firmly with another paper towel to remove every drop of excess moisture. This prevents the vegetable juices from thinning out your cheese base.
- In a food processor, combine the crumbled feta, softened cream cheese, Greek yogurt, and garlic powder. Process for 2 to 3 minutes until the mixture is completely smooth and aerated.
- Add half of the chopped cilantro and half of the green chiles to the food processor. Pulse 3 to 4 times just to incorporate them into the base without fully pureeing, creating the green-flecked texture seen in the dip.
- Transfer the whipped cheese to a wide serving bowl. Use a spoon to create a shallow well in the center.
- Pile the sautéed red and orange peppers and the remaining green chiles into the center. Drizzle with the remaining tablespoon of olive oil and sprinkle with smoked paprika and the rest of the fresh cilantro.
- Serve immediately with crispy tortilla chips and a side of chunky salsa. The thick consistency will hold up perfectly for hours.
Notes
- The secret to preventing a thin dip is thoroughly drying the sautéed peppers and canned chiles with paper towels before adding them to the cheese base.


